0x80073cfa Removal Failed
Normally, uninstalling an app is not difficult. However, you might see an error 0x80073cfa when you are trying to uninstall an app downloaded from Microsoft Store. The error message is like this:
We couldn’t uninstall <app-name>
The operation did not completed successfully. Try again in a bit.
The error code is 0x80073cfa, in case you need it.
Or,
INFO- 0x80073C
FAERROR_REMOVE_FAILED
Package removal failed.
You may get this error for failures that occur during the package uninstall.
Instead of giving up uninstalling the app after receiving this error, you can troubleshoot it with the fixes mentioned below. Please read this guide carefully till the end.
How to Fix Windows Uninstallation Error 0x80073cfa on PC?
Fix 1: Uninstall the Problematic Application via PowerShell
When you cannot uninstall the app downloaded from Microsoft Store, the alternative way is to uninstall it via Windows PowerShell.
Step 1. Press Win + X at the same time to choose Windows PowerShell (Admin).
If you cannot find Windows PowerShell (Admin) on your computer, you can also right-click on Windows PowerShell to highlight Run as administrator instead.
Step 2. When the new window opens, copy & paste the following command and press Enter.
Get-Appxpackage -Allusers
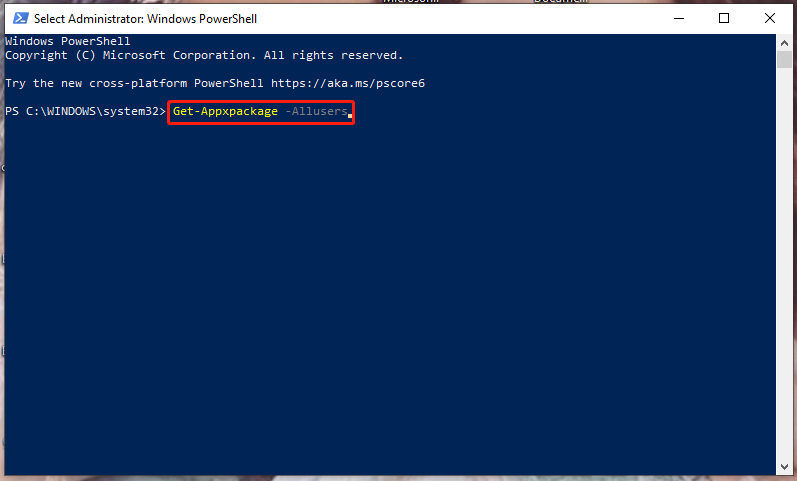
Step 3. Now, you can see a list of apps that are installed on your PC, scroll down to find the app that you cannot uninstall. Copy the content of its PackageFullName. (Select the content by pressing & holding your left mouse button and then press Ctrl + C.)
Step 4. Type the following command and then hit Enter.
Remove-AppxPackage -Package PackageFullName
Don’t forget to replace PackageFullName with the content you copied just now.
If you still cannot uninstall the app, please try the next method.
Fix 2: Uninstall the App After Performing a Clean Boot
Due to the interferences of some third-party apps, you may fail to uninstall the app. Performing a clean boot will help you to exclude all the interferences of third-party apps and services from the startup. To do so:
Step 1. Press Win + S to evoke the search bar and type msconfig to locate System Configuration.
Step 2. In the Services tab, tick Hide all Microsoft Services and hit Disable all.
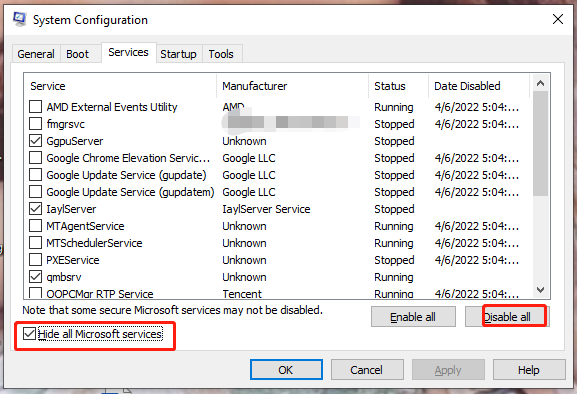
Step 3. Go to the Startup tab and hit Open Task Manager.
Step 4. In the Startup tab of Task Manager, right-click on the enabled programs to set them to Disable one by one.
Step 5. Go back to the Startup tab of System Configuration and hit Apply & OK to save the changes.
Step 6. After you restart your device, try to open the problematic app to uninstall it again.
Fix 3: Run Windows Store Troubleshooter
For any error related to Windows Store like error code 0x80073cfa, the simplest way to solve it is using Windows inbuilt troubleshooter. This tool will help you to look out for the specific reasons triggering 0x80073cfa and address it.
Step 1. Press Win + I at the same time to open Windows Settings.
Step 2. In the settings menu, find Update & Security and hit it.
Step 3. In Troubleshoot, go to Additional troubleshooters.
Step 4. Find Windows Store Apps and hit Run the troubleshooter.
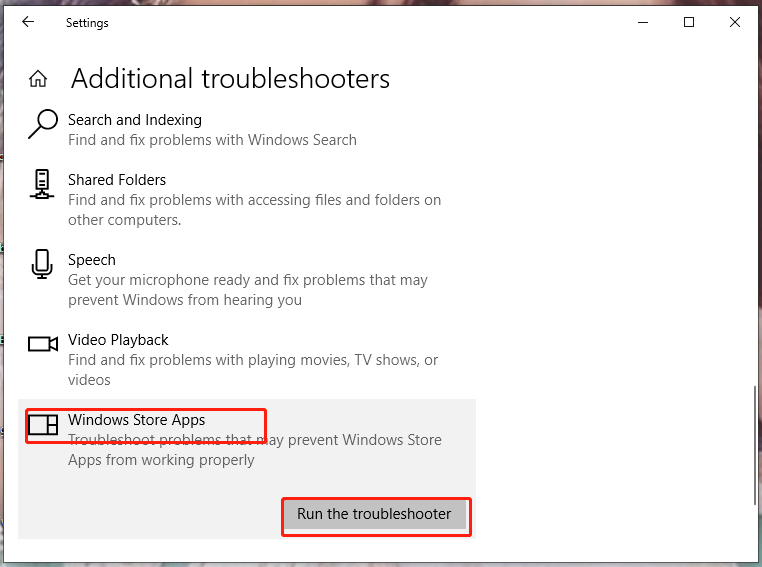
Step 5. After following the instructions provided to complete the troubleshooting process, uninstall the app again to see if 0x80073cfa is still there.
If you want to know more information about Windows troubleshooter, please go to - How to Run Windows 11/10 Troubleshooters to Fix PC Problems.
Fix 4: Reset the Problematic App
Chances are that the app that you would like to uninstall has some problems, so you cannot uninstall it successfully. In this case, you can try to reset it before uninstalling it.
Step 1. Type apps & features in the search bar and hit Enter.
Step 2. In the app list, look for the app you want to uninstall, hit it and tap on Advanced options.
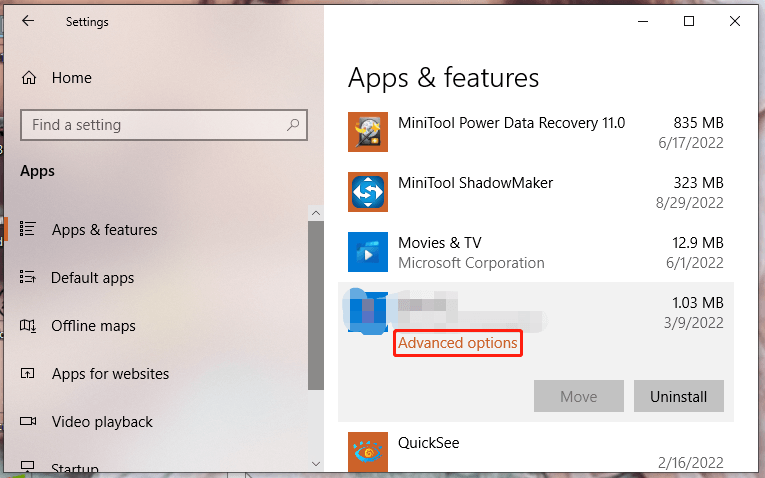
Step 3. Scroll down a bit and press Reset.
Step 4. When the confirmation message appears, hit Reset again to confirm this action. After the process is complete, uninstall the app again.
Fix 5: Reset Windows Store Cache
Any corrupted cache in Microsoft Store can also result in error code 0x80073cfa. Resetting the cache in it enables you to clear the corrupted data and get rid of 0x80073cfa.
Step 1. Press Win + R at the same time to evoke the Run box.
Step 2. Type cmd and press Ctrl + Shift + Enter to run Command Prompt as administrator.
Step 3. Type wsreset.exe and hit Enter to reset Microsoft Store cache.
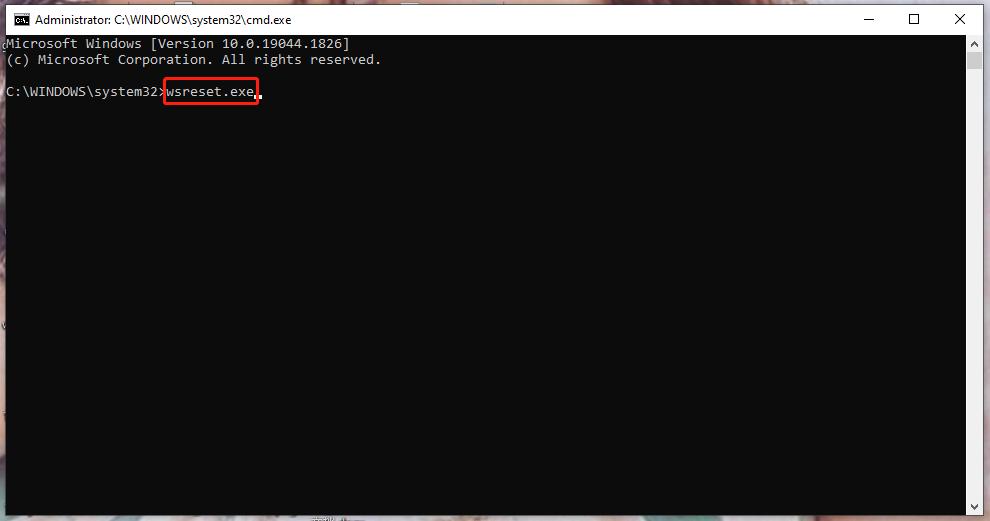
Step 4. Reboot your computer and try to uninstall the app again after the resetting process is done.
Fix 6: Reinstall Microsoft Store
Reinstalling Microsoft Store is also proven fruitful to error code 0x80073cfa. Since Microsoft Store is an inbuilt app in Windows, you cannot uninstall it via Settings directly.
Step 1. Run Windows PowerShell with administrative rights.
Step 2. Run the following command:
Get-AppXPackage -AllUsers | Foreach {Add-AppxPackage -DisableDevelopmentMode -Register “$($_.InstallLocation)AppXManifest.xml”}
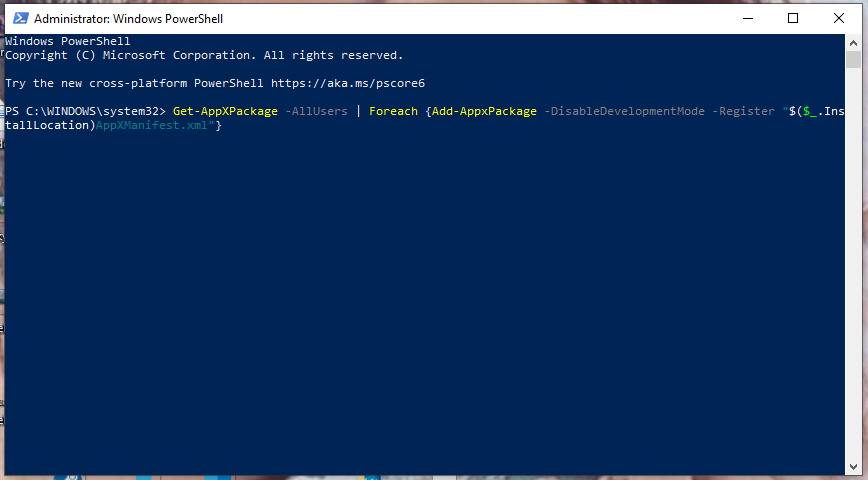
If the command above returns an error, you can add -Verbose to the end of this command and run this new command. The new command should look like this:
Get-AppXPackage -AllUsers | Foreach {Add-AppxPackage -DisableDevelopmentMode -Register “$($_.InstallLocation)\AppXManifest.xml” -Verbose}
Step 3. Restart your device.
Fix 7: Use an Administrative Account
When your user account doesn’t have enough administrative permissions, it will also cause uninstallation issues. When you are using a standard Windows user account, you need to change it into an admin one via Control Panel to solve 0x80073cfa.
Step 1. Press Win + R to open the Run box, type control panel, and hit Enter.
Step 2. Scroll down to locate the User Account and hit it.
Step 3. In the left pane, press Change your account type.
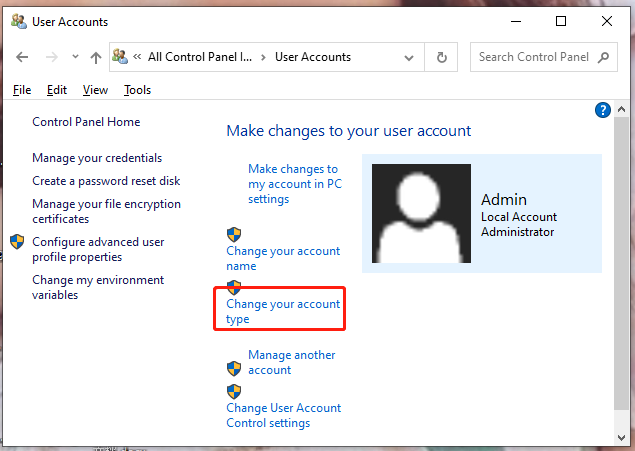
Step 4. Tick Administrator under Select your new account type and hit Change account type.
Step 5. Reboot your device and uninstall the app in your admin account.
You can also create a new admin account, transfer user data from your old account from the previous account into the new one and uninstall the app in it. See this guide - How to Add or Remove a User/Microsoft Account on Windows 11.
Fix 8: Perform SFC & DISM Scan
If some important system components related to Microsoft Store are missing or corrupted, error code 0x80073cfa can also appear. System File Checker and Deployment Image Servicing Management can help to scan, repair and restore system files to fix Windows issues.
Although the two tools seem to have the same functions, it will be more efficient if they work together. Follow the steps below:
Step 1. Type cmd in the search bar to locate Command Prompt. Right-click on it to select Run as administrator.
Step 2. If there is a message prompting to ask for administrative rights, hit Yes. In the command window, type sfc /scannow and hit Enter. It will take about 10 to 15 minutes for the tool to find and replace the corrupted or missing system files.
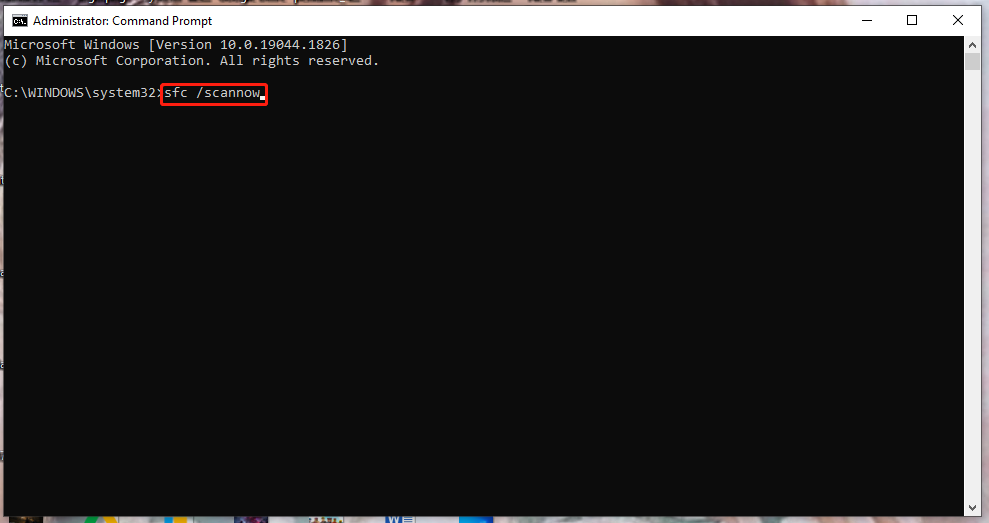
Step 3. After the process is done, run the following command:
DISM /Online /Cleanup-Image /RestoreHealth
Wait for a while and this command will repair any issue with the system image. The time will depend on the number of files available on your computer.
Step 4. Reboot your computer and uninstall the app again.
For more details about DISM, see the post - How To Use The DISM Restore Health Command To Repair Windows.
Fix 9: Check Windows Update
As it turns out, when your OS is missing an important component of the Windows Update architecture, you cannot uninstall the app downloaded from Microsoft Store as well. You can open Windows Update to see if any updates are available and install them if there is an option for you.
Step 1. Click on the gear icon to open Settings.
Step 2. Scroll down to find Update & Security.
Step 3. In Windows Update, tap on Check for updates. If there is any update available, hit Download.
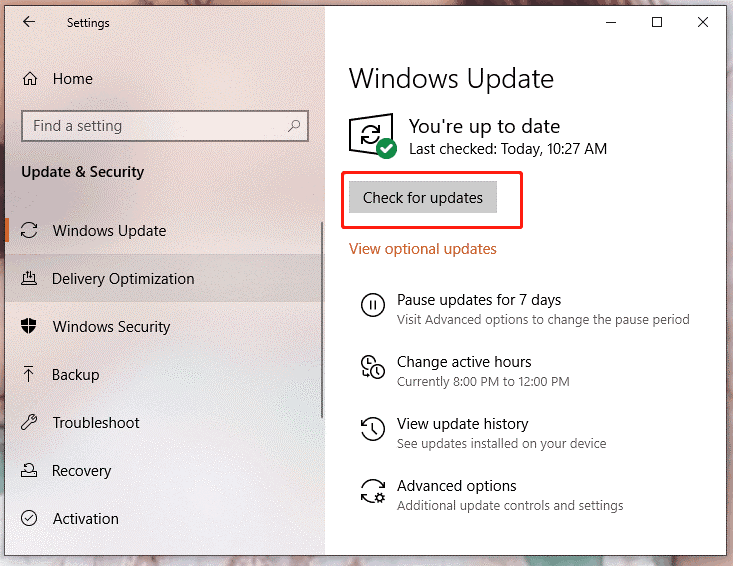
Step 4. As soon as the downloading and installing process is finished, reboot your computer.
What if Windows Update cannot currently check for updates for you? Follow the fixes in this guide - [SOLVED] Windows Update Cannot Currently Check for Updates.
Fix 10: Factory Reset Your PC
Any big change like incorrect registry changes, installing a low-trusted software from an unofficial website, and so on will also cause the appearance of 0x80073cfa. Luckily, you can set Windows to the default state to undo all the changes thus fixing this issue.
This operation will remove all installed applications & files and reset your system so you had better back up your important data with a professional backup tool before performing it.
Move 1: Back up Your Important Files
Here, it is highly recommended to back up your vital files with a free and reliable backup software, MiniTool ShadowMaker. It allows you to back up your files, folders, systems, partitions and disks. What’s more, if you want to manage your disk space occupied by backup files, you can go to Backup Scheme. At the same time, automatic backup is supported, too.
Step 1. Download & install MiniTool ShadowMaker Trial and launch it.
MiniTool ShadowMaker TrialClick to Download100%Clean & Safe
Step 2. Tap on Keep Trial and then you can enjoy its functions & services for free.
Step 3. Go to the Backup functional page and hit Source > Folders and Files to select desired files.
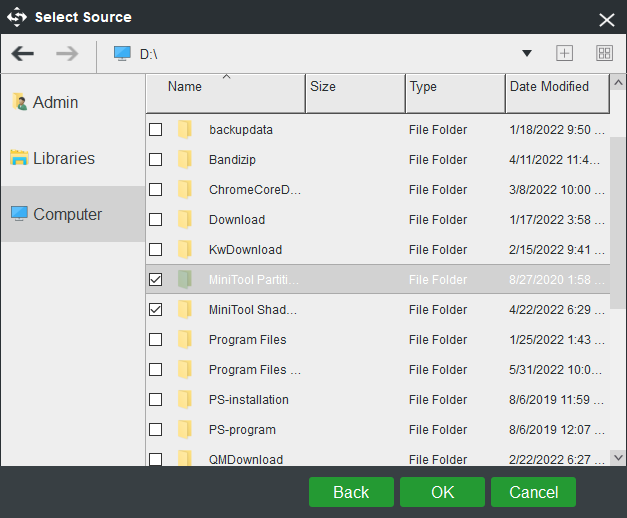
Step 4. Hit OK and you will go back to the Backup functional page. You can choose a destination path by hitting Destination. Select Back up Now at the lower right corner of the screen to start the backup task at once.
Move 2: Reset this PC
Step 1. Go to Start > Settings > Update & Security.
Step 2. In the Recovery tab, press Get started under Reset this PC from the right-hand panel.
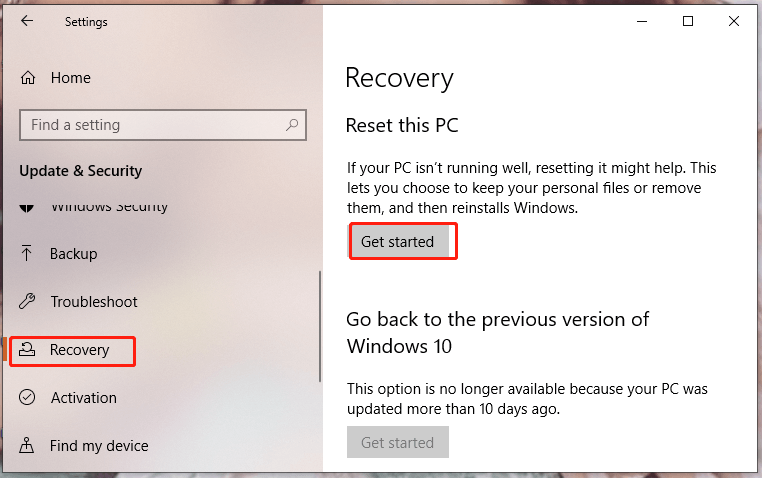
Step 3. Choose either Keep my files or Remove everything. Here, we choose the latter one as an example.
Step 4. Choose from Just remove my files and Remove files and clean the drive.
Step 5. Hit Next in the warning window.
Step 6. Hit Reset under Ready to reset this PC.
Step 7. Hit Continue under Choose an option and wait for the process to complete.
Final Words
Are you still wondering how to get rid of the Windows uninstallation error code 0x80073cfa from your PC? Do you uninstall the problematic app successfully? I believe that your issue is fixed now. If you resolve this issue with other methods which are more efficient than ours, welcome to inform us in the comment area below or via [email protected].

![CHKDSK vs ScanDisk vs SFC vs DISM Windows 10 [Differences]](https://mt-test.minitool.com/images/uploads/2020/03/chkdsk-vs-scandisk-vs-sfc-vs-dism-thumbnail.jpg)
![How to Factory Reset Windows 11 Without Password? [4 Ways]](https://mt-test.minitool.com/images/uploads/2022/07/how-to-factory-reset-windows-11-without-password-thumbnail.png)