What does the “A required device isn’t connected or can’t be accessed” error mean? Do you know to fix this problem when you encounter it? This post from MiniTool will give you top 7 solutions. What’s more, a useful PC protection suggestion is shown to you.
Error: a Required Device Isn’t Connected or Can’t Be Accessed
When trying to boot the computer, you may encounter the Blue Screen of Death (BSOD) error with the following error message: “Recovery Your PC/Device needs to be repaired. A required device isn’t connected or can’t be accessed”.
This error disables users to access the system and it is most likely due to the invalid boot configuration data, system file corruption or data cable damage, damaged OS disk or a wrong active partition, etc.
Solutions to Required Device Isn’t Connected or Can’t Be Accessed
Don’t be frustrated when running into this blue screen of death error. In order to fix it, you can refer to the following solutions.
Remove and Check External Devices
Before trying the following methods, you can try to disconnect all the peripheral devices from your computer. Next reboot the computer after connecting the devices one by one to find whether the “Your PC/device needs to be repaired a required device isn’t connected” problem is caused by a certain peripheral device. If you are pretty sure all your devices are not the causes of the problem, try the solutions below.
Check BIOS Settings
It is possible that the incorrect BIOS settings may lead to the “a required device is not connected” issue. In this situation, you can try to check BIOS settings. Here is the tutorial.
Step 1: Power off your computer and restart to enter BIOS settings by pressing a particular key.
Step 2: Then check the following settings:
- Make sure the hard drive is in the first boot order.
- Disable secure boot.
- In the SATA settings, look for SATA model. If it is set to AHCI or RAID, change it to IDE. If the SATA Mode is set to IDE then change it to AHCI.
Once all steps are complete, save the changes and exit BIOS Settings. Then reboot your computer to check if the problem disappears.
Perform Automatic Startup Repair
In order to fix the “A required device isn’t connected or can’t be accessed” error, you can choose to perform automatic Startup Repair which is able to fix some system errors. Now, here is the tutorial.
As your computer is not able to boot into the operating system, so the Windows installation media is required. If you do not have one, please prepare it first. Read the post: A Complete Guide to Use Windows 10 Media Creation Tool to learn how to create Windows 10 installation media.
Step 1: Power off the computer and insert the Windows installation media. It could be a USB flash drive or a CD/DVD drive.
Step 2: Reboot the computer from the media and click Repair your computer to enter the WinRE (Windows Recovery Environment).
Step 3: Click on Troubleshoot > Advanced options > Startup Repair to continue.
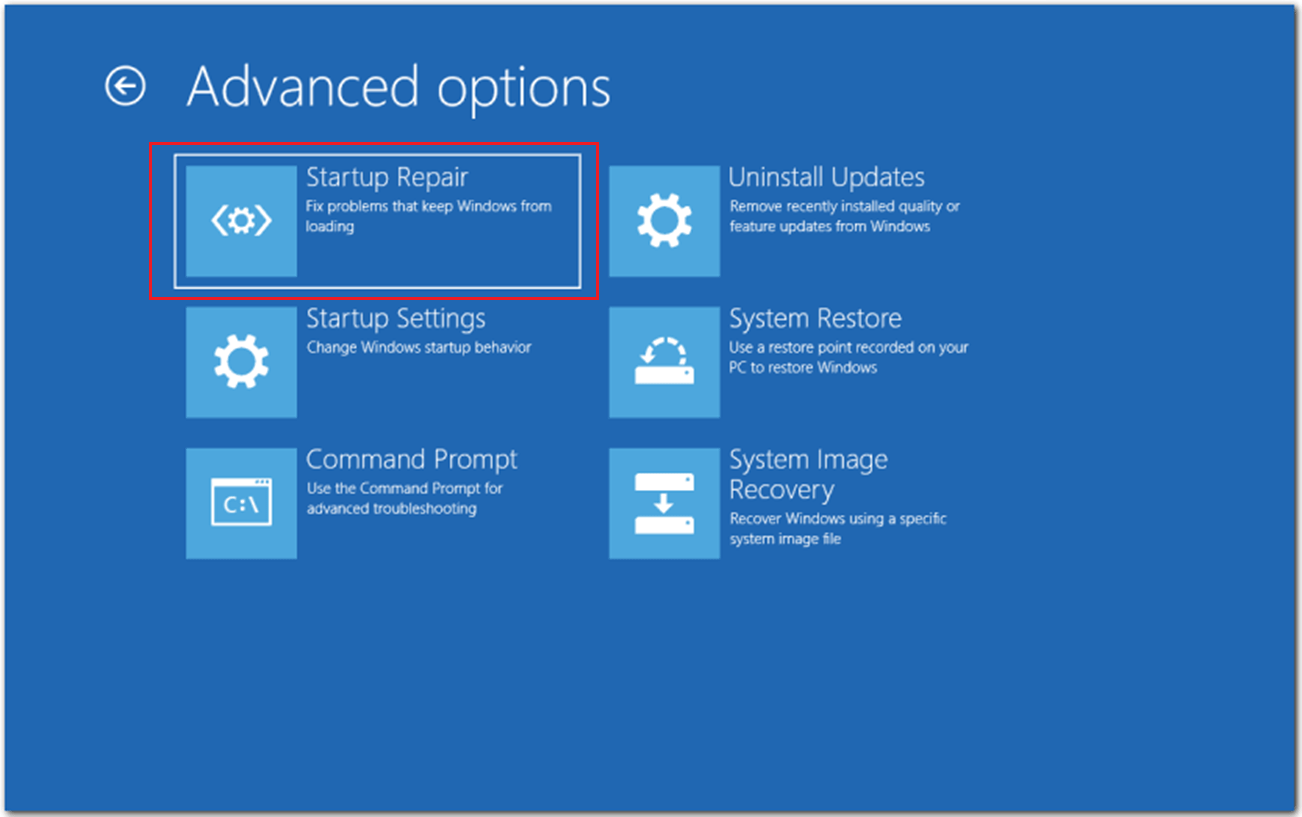
After that, it will start to scan the computer and fix some Windows loading problems. Once the Startup Repair process is finished, reboot the computer and check whether the “A required device isn’t connected or can’t be accessed” issue is fixed. If this solution is not effective, try another one.
Perform System Restore
There is an available method for you to fix the “A required device isn’t connected or can’t be accessed” error. If you have created a system restore point before, you can choose to perform a system restore. To do that, you can revert your computer to an earlier normal state and do not affect your personal files.
Step 1: Boot the computer from the installation media.
Step 2: Click Repair your computer.
Step 3: Select Troubleshoot > Advanced options > System Restore and wait for the preparing to complete.
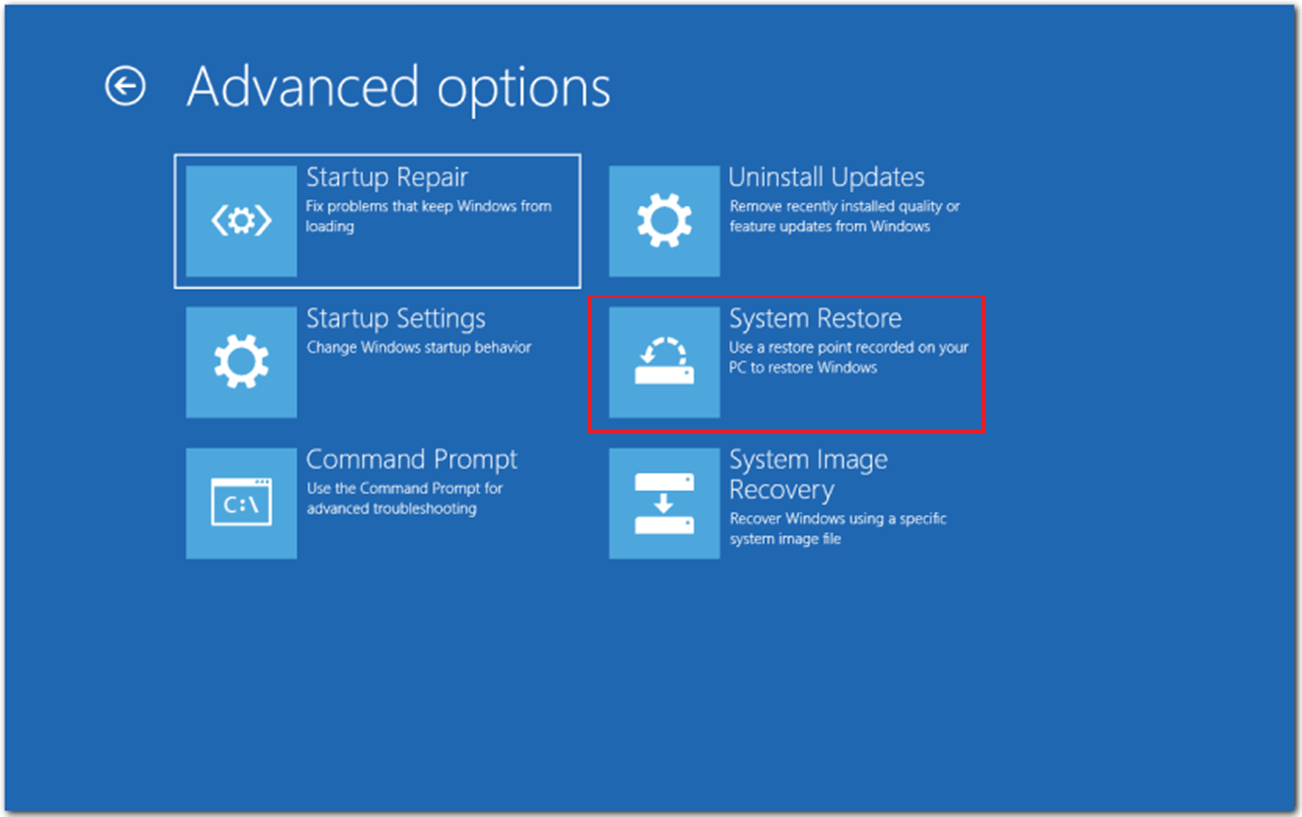
Step 4: Log in your account if required. In the popup window, click Next.
Step 5: Select a restore point from the list based on the creating time and click Next.
Step 6: Click on Finish to start restoring.
After that, restart your computer to check if the “Recovery Your PC/device needs to be repaired a required device isn’t connected” issue persists.
Run a Disk Check and System File Check
If there are corrupted system files on your computer, you may come across the “A required device isn’t connected or can’t be accessed” error. In order to fix this error, try running a disk check and system file checker. To do this, follow the steps:
Step 1: Boot your computer from Windows installation media.
Step 2: Click Repair your computer > Troubleshoot > Advanced options > Command Prompt.
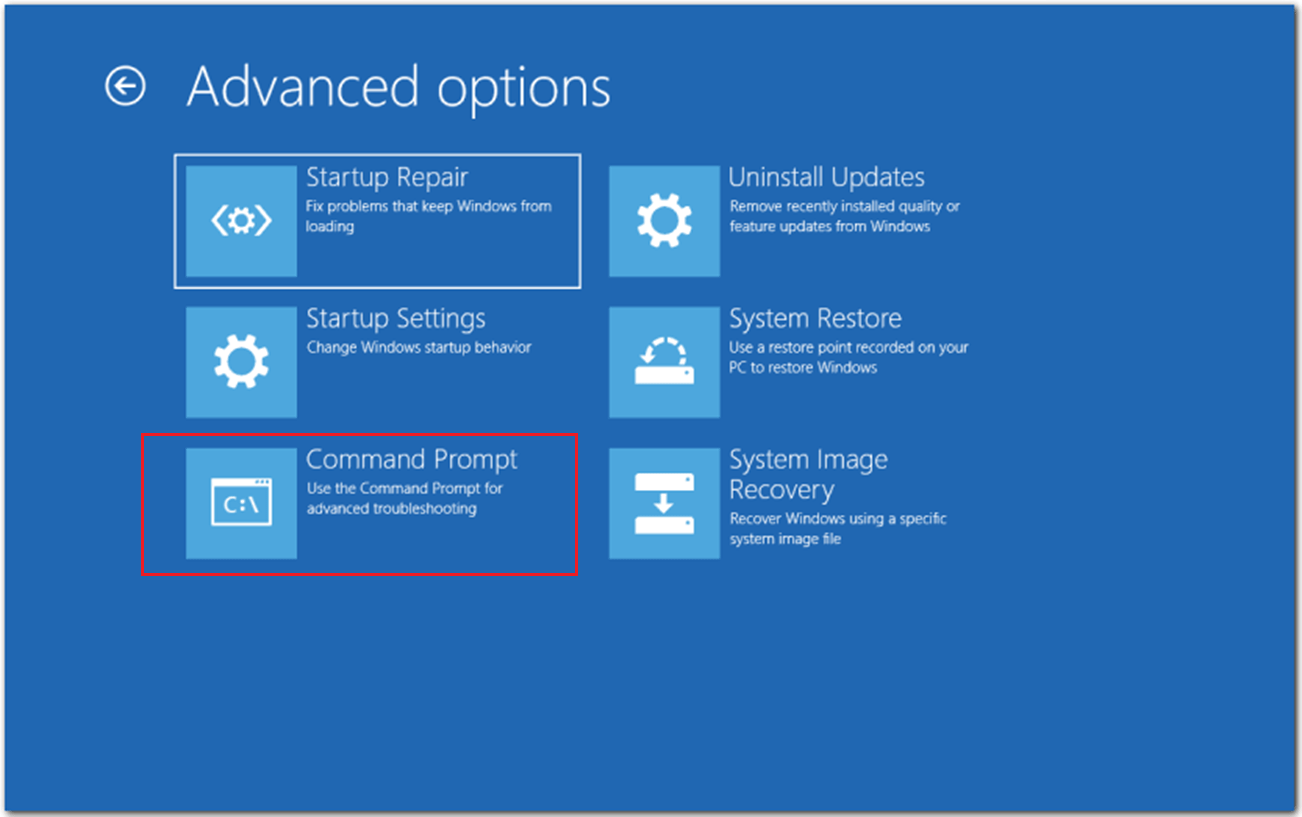
Step 3: In the command window, type sfc /scannow and hit Enter to continue.
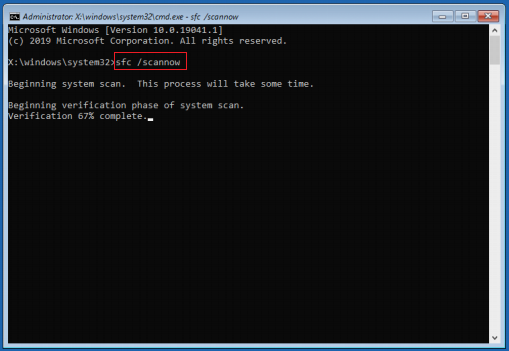
Step 4: Wait for the process to end until you see the message Verification 100% complete.
Step 5: Type chkdsk c: /f /r and press Enter key to execute it.
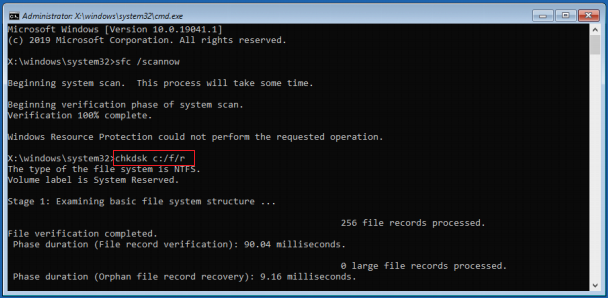
Step 6: Once the process is finished, restart your computer and check if the error is gone.
Related article:
- Quickly Fix – SFC Scannow Not Working (Focus on 2 Cases)
- Here You Are: Solutions to CHKDSK Not Working in Different Cases
Rebuild BCD with Command Prompt
As mentioned in the above part, faulty boot configuration data is able to give rise to the “Your PC/device needs to be repaired” error. If the above methods are not able to fix it, you may try to rebuild BCD to see if it works.
Step 1: Boot your computer from Windows installation media and click Repair your computer.
Step 2: After entering WinRE, click Troubleshoot > Advanced options > Command Prompt.
Step 3: In the command window, type the following commands and hit Enter after each command.
bootrec /fixmbr
bootrec /fixboot
bootrec /scanos
bootrec /rebuildbcd
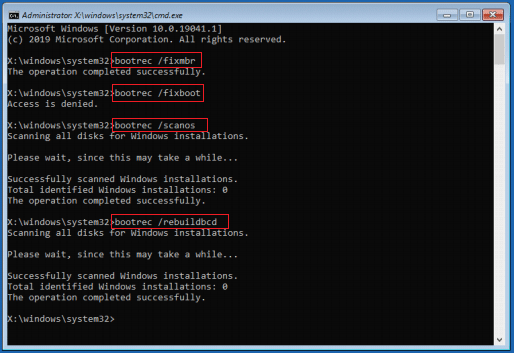
Step 4: Enter A to add the installation to the boot list, then press Enter.
Step 5: Quit Command Prompt and click Continue to launch Windows 10.
After executing bootrec /scanos, if you receive this prompt “Total identified Windows installations”, please enter following commands to rebuild BCD:
bcdedit /export C:\bcdbackup
c:
cd boot
attrib bcd -s -h -r
ren c:\boot\bcd bcd.old
bootrec /rebuildbcd
After all steps are completed, exit the command window and restart your computer and check whether the problem is solved.
Set Correct Partition as Active
If the incorrect partition is set as active by accident, you may fail to boot and encounter the “Your PC/device needs to be repaired” error. Thus, in order to fix this boot problem, you can try setting the correct partition as active. Here are detailed steps you can follow.
Step 1: Boot your computer from Windows installation media.
Step 2: Click Repair your computer > Troubleshoot > Advanced options > Command Prompt.
Step 3: Type the following command lines one by one. Remember to press Enter after each.
list disk
select disk n (n represents the disk number of your system disk)
list partition
select partition x (x represents the number of system partition. You can recognize the system partition through the partition size.)
active
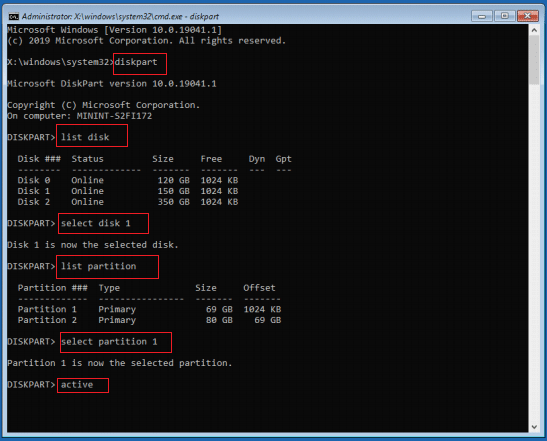
Step 4: Quit the command window and restart your computer.
Related post: An Easy Way to Set Partition as Active or Inactive with MiniTool.
Useful Suggestion: Back up the Operating System
When the blue screen of death error such as “A required device isn’t connected or can’t be accessed” occurs, you need to try several methods to let your computer work. However, it would be troublesome because you don’t know the particular reason for the error. Therefore, to make things easier, there is a suggestion for you – create a system image when the computer is normal. When system crashes, you can restore the computer to the normal state with the created system image.
To create system image, a powerful backup software is recommended – MiniTool ShadowMaker. It is designed to backup files, folders, disks, partitions and even the operating system. Besides, it is a piece of syncing and cloning tool which supports cloning SSD to larger SSD in case that your SSD is running out of space.
Now, we will show you how to use MiniTool ShadowMaker to back up Windows 10/11.
Step 1: Click the button below to get MiniTool ShadowMaker, install and launch it.
MiniTool ShadowMaker TrialClick to Download100%Clean & Safe
Step 2: Click Keep Trial to enter its main interface, and then click the Backup tab.
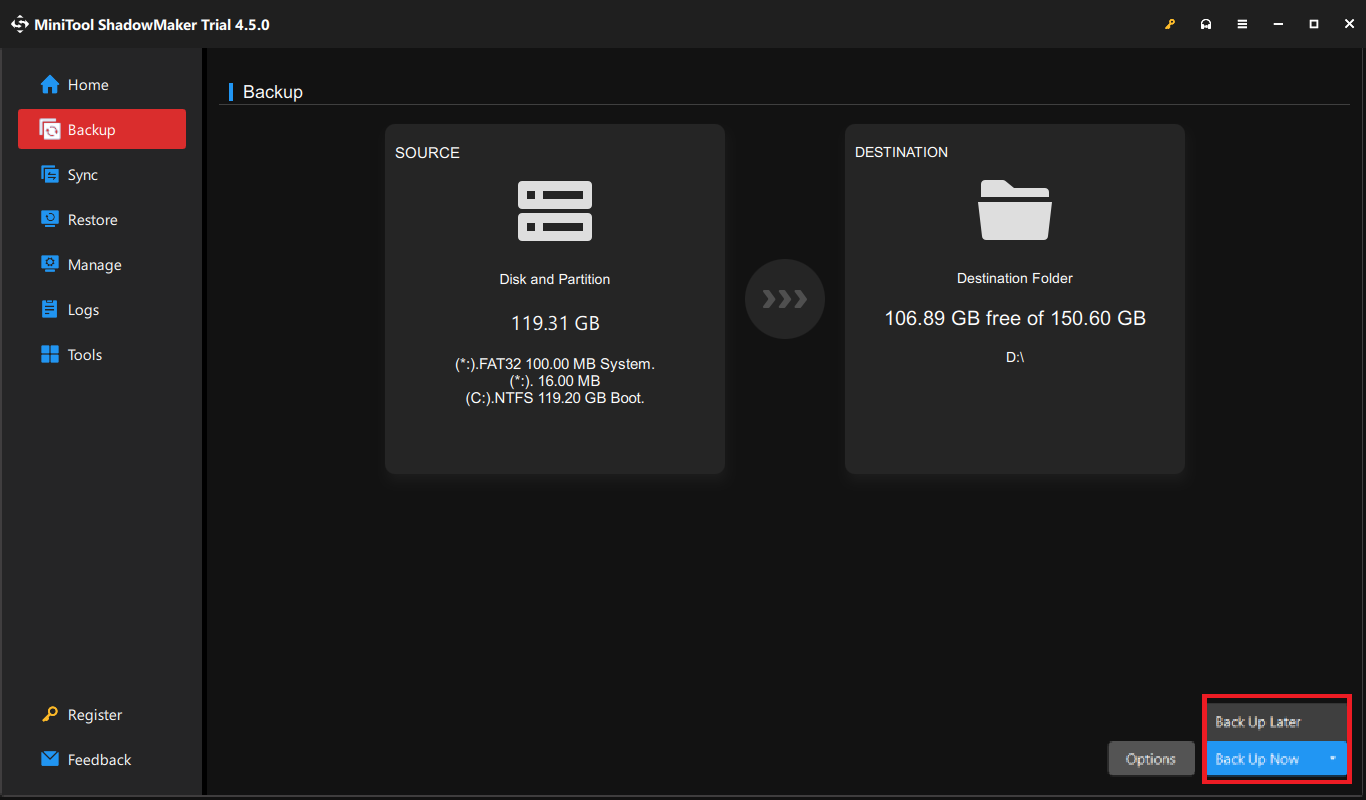
Step 3: In the SOURCE section, the operating system is selected by default. Then just click on DESTINATION to choose a path to save the system image and click OK. A USB flash drive is recommended.
Step5: Select Back Up Now or Back Up Later according to your need.
Bottom Line
To be concluded, this article provides you seven solutions to fix the “A required device isn’t connected or can’t be accessed” issue. If you come across the same problem, read this post and try these methods.
If you have any problem in using MiniTool ShadowMaker, please feel free to contact us via [email protected] and we will reply you as soon as possible.
A Required Device Isn’t Connected or Can’t Be Accessed FAQ
2. Check BIOS Settings
3. Perform Automatic Startup Repair
4. Perform System Restore
5. Run Disk Check and System File Check
6. Rebuild BCD with Command Prompt
7. Set Correct Partition as Active