To achieve maximum security, you are only allowed to install signed drivers on Windows 10. What if you want to install unsigned drivers? Then you need to disable driver signature enforcement. To do this job, right now you need to read this post from MiniTool. It will show you some workable methods.
Windows Driver Signature Enforcement Explained
What Is Windows Driver Signature Enforcement
In order to improve security, Microsoft introduced driver signature enforcement in Windows OS including Windows Vista/XP/7/8/8.1/10/11.
The working driver on your computer must be a signed driver that contains a digital signature. The digital signature is an electronic security token that indicates the publisher of the driver and all relevant information. If someone changes the original contents of the driver package, you will find out the differences by comparing the original relevant information.
All of your drivers and system files on the computer must be digitally verified by Microsoft, or Windows won’t run those unsigned drivers on 32-bit or 64-bit systems.
Why Do You Need to Disable Driver Signature Enforcement
However, sometimes you need to disable driver signature enforcement on Windows 11/10/8/7. Why?
Many programs that use driver files don’t have digital signature authentication. In order to obtain a verified certificate, the manufacturer or developer must pay Microsoft. If they don’t pay, their drivers will be inaccessible in Windows.
Thus, if you want to install unsigned drivers and make sure they can work properly, you need to disable driver signature enforcement. Keep reading and this post will show you how to disable it temporarily or permanently in multiple ways.
How to Disable Driver Signature Enforcement Temporarily
If you want to disable driver signature enforcement temporarily, follow the instructions below right now.
Method 1: Change the Startup Settings
This is the easiest way to disable driver signature enforcement on Windows 11/10/8/7, but you need to keep in mind that this method only temporarily disables driver signature. After you restart your computer, the driver signature enforcement feature will automatically be enabled.
Here is a quick guide on how to disable driver signature enforcement by changing the Startup Settings.
Step 1: Click Restart from the Start menu and hold down the Shift key on your keyboard at the same time.
Step 2: Once the computer has rebooted, choose the Troubleshoot option when a new window pops up and then choose Advanced options > Startup Settings.
Step 3: Click the Restart button to restart your computer one last time to modify boot time configuration settings.
Step 4: A list of options will show up. Press F7 on your keyboard to choose Disable driver signature enforcement.
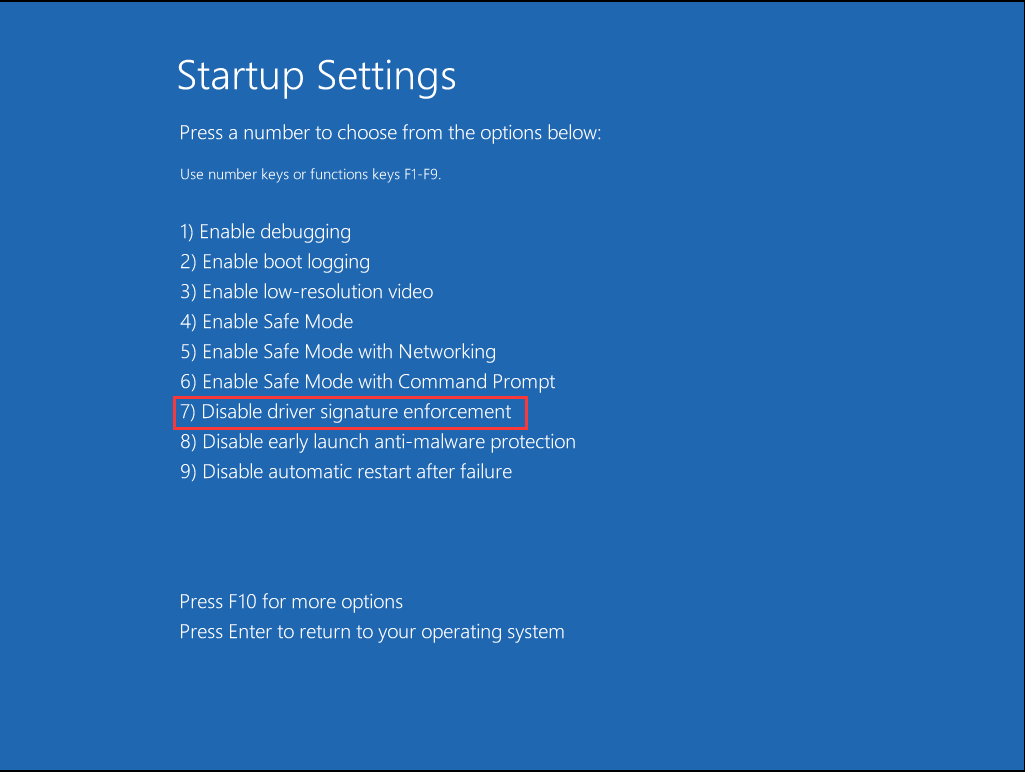
After finishing all the steps above, your PC will restart and you should disable driver signature enforcement successfully. Now you are able to install unsigned drivers without error messages.
Since this method only disables driver signature enforcement temporarily, so you need to install all the unsigned drivers as soon as you can.
Method 2: Disable Driver Signing Code with Local Group Policy Editor
Another method you can try to disable driver signature enforcement temporarily is to use Local Group Policy Editor. Here are the steps on how to disable the driver signing code with Local Group Policy Editor.
Step 1: Press the Windows key + R key at the same time to open the Run dialog box. Next, type gpedit.msc in the Run box and press Enter to open Local Group Policy Editor.
Step 2: Once in the Local Group Policy Editor window, navigate to User Configuration > Administrative Templates > System > Driver Installation from the left panel.
Step 3: Right-click the Code signing for device drivers entry and then select Edit.
Step 4: Now check Enabled and then choose Ignore from the drop-down list under Options.
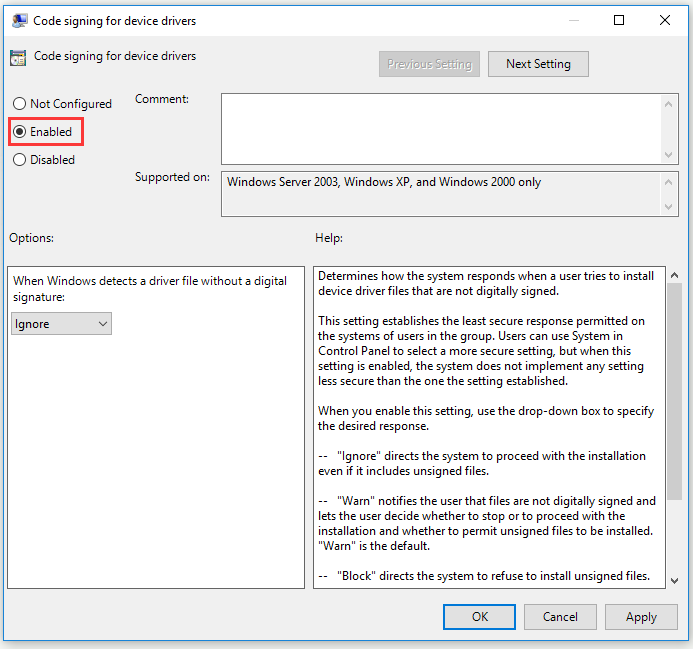
Step 5: Click OK and then click Apply to perform all the changes.
Step 6: Restart your Windows 10 system in the end.
Now you should disable driver signature enforcement successfully and you can install the unsigned drivers.
Method 3: Enable Windows 11/10/8/7 Test Signing Mode
If you don’t want to disable driver signing permanently, you can try to put Windows in test mode and install any drivers you want. In test mode, you will not meet any problems when installing unsigned drivers.
Here is a quick guide on how to enable Windows 10 test signing mode with Command Prompt.
Step 1: Type cmd in the Search bar, right-click Command Prompt and then choose Run as administrator to open it with administrator privileges.
Step 2: Type the command: bcdedit /set testsigning on and then press Enter to run the command.
Step 3: Close the Command Prompt window and restart your computer.
After you finish all the steps mentioned above, you can install any unsigned drivers without encountering problems.
How to Disable Driver Signature Enforcement Permanently
If you want to permanently disable driver signature enforcement, now you can follow the instructions below to do this job with ease.
Disable Driver Signature Enforcement Permanently with Command Prompt
Step 1: Type cmd in the Search bar, right-click Command Prompt and then choose Run as administrator to open it with administrator privileges.
Step 2: Type the command: bcdedit.exe /set nointegritychecks on and then press Enter to run the command.
bcdedit.exe -set loadoptions DISABLE_INTEGRITY_CHECKS
bcdedit.exe -set TESTSIGNING ON
Step 3: Close the Command Prompt window and restart your computer.
After you finish all the steps above, now you should disable driver signature enforcement permanently and then you can install unsigned drivers what you want.
How to Enable Driver Signature Enforcement If Needed
You can also enable driver signature enforcement back again whenever you need. Here is a quick guide on how to do this job.
Step 1: Open Command Prompt as administrator again by following the instructions mentioned above.
Step 2: Once the Command Prompt window is opened, enter cdedit.exe /set nointegritychecks off and then press Enter to execute this command.
bcdedit -set loadoptions ENABLE_INTEGRITY_CHECKS
bcdedit -set TESTSIGNING OFF
Step 3: Now reboot your computer.
After you finish running the command(s) above, you should re-enable driver signature enforcement.
Top Recommendation to Keep Your PC Safe
For maximum security, Windows 10/11/8/7 requires digitally signed drivers. If you’re concerned about the safety of your Windows, it is a good feature for you. However, if you need to disable driver signature enforcement permanently, your PC may become somewhat vulnerable.
Thus, in order to keep your PC safe, it is recommended to create a system image to protect your important data and your PC. Here is a great piece of free backup software – MiniTool ShadowMaker you can try. With it, you can not only create a system image, but also get recovery solutions when accidents happen to your PC.
It provides you with various backup services with its multiple powerful features. These features contain system backup, files and folder backup, disk backup, partition backup.
MiniTool ShadowMaker offers you more other functions to protect your PC. You can try to synchronize your important files or folders and you are also allowed to clone disk. It is a useful data protection and disaster recovery solution for PCs.
You can also find more great functions after you try it. If you have a need, you are welcome to get MiniTool ShadowMaker Trial which can be used for free within 30 days for all the backup features.
Right now, free get it by clicking the following button or purchase its Pro Edition by clicking this link if you want to use MiniTool ShadowMaker permanently.
MiniTool ShadowMaker TrialClick to Download100%Clean & Safe
The following part will show you how to back up data with the Backup function of MiniTool ShadowMaker step by step.
Step 1: Choose a Backup Mode
1.After installation, run MiniTool ShadowMaker.
2.Click Keep Trail to use the Trial Edition.
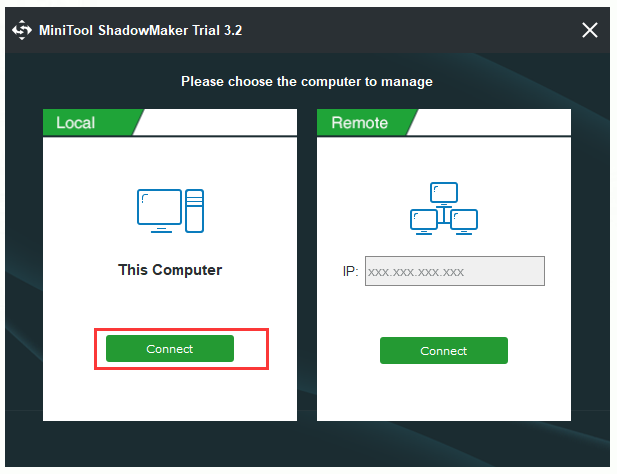
3.Then click Connect in the Local section to manage the local computer.
Step 2: Choose Backup Source
1.Click the Backup option to enter its interface.
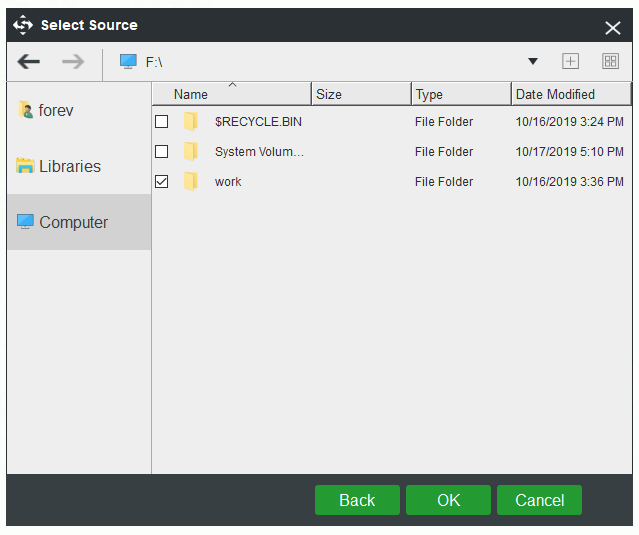
2.Click the Source tab, then choose the Folder and Files option when a new window pops up and choose all of the files that you want to back up.
3.Finally, click the OK button to back to the Backup page.
Optional: If you want to back up your disks or partitions, you are also allowed to choose the other option: Disk and Partitions.
Step 3: Select a Destination Path to Save Your Backup Data
1.When you return to the Backup page, click the Destination tab.
2.There are four available destination paths for you to choose. Select one to save your files and then click OK to back to the main interface.
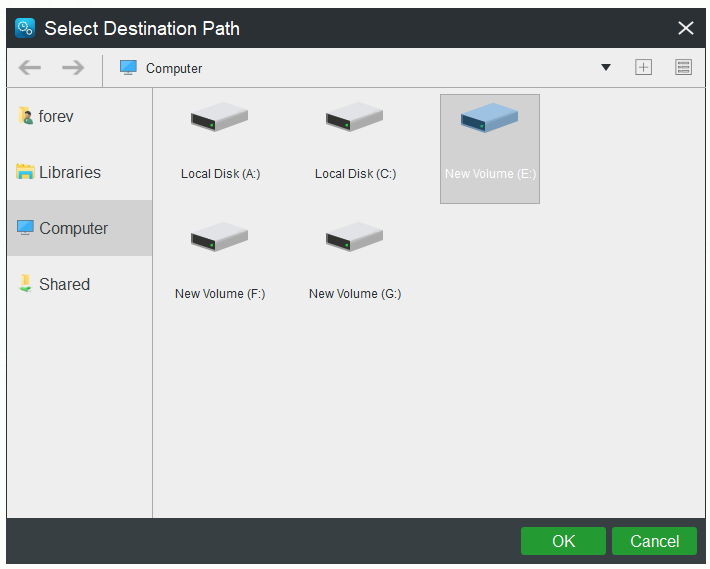
1.It is recommended to choose an external hard drive as the destination path.
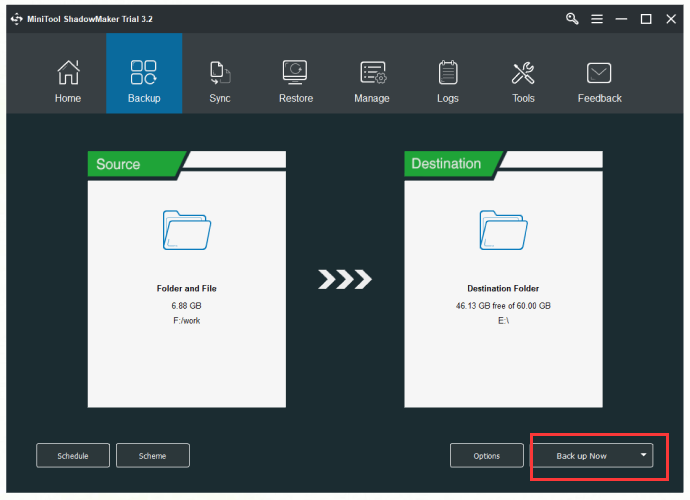
2.Before you start a backup task, you can make some advanced settings through Schedule, Scheme or Options on the Backup page.
Step 4: Start to Back up
1.Click Back up Now to start this backup task immediately.
Optional: You can also choose Back up Later to delay the process, and then you need to click Back up Now on the Manage page to perform the pending operation.
2.A confirmation message window will pop up. If you confirm to perform the backup operation right now, just click the Yes button to continue. At the same time, you are also allowed to choose whether to check the option: Shut down the computer when all the running backup tasks are finished.
When you finish all the steps mentioned above completely, you should now back up your data with MiniTool ShadowMaker successfully.
Conclusion
After reading this post, now you should clearly know about what the Windows driver signature enforcement feature is and you should learn how to disable driver signature enforcement when you want to install unsigned drivers on your PC.
In addition, this post also provides you with a top recommendation to keep your PC safe: make a backup of your PC with a useful backup tool – MiniTool ShadowMaker.
MiniTool ShadowMaker TrialClick to Download100%Clean & Safe
MiniTool ShadowMaker is a great useful tool that you can use to back up your data in advance in case you lose data. However, if you encounter any problems when you are using MiniTool ShadowMaker, please let us know by sending an email to [email protected].
![[SOLVED] How to Revive Windows 10 With Recovery Drive | Easy Fix](https://mt-test.minitool.com/images/uploads/2019/05/windows-10-repair-recovery-disk-thumbnail.png)
