What Is Shadow Copy
Shadow Copy is known as VSS or Volume Snapshot Service. It creates backup copies or snapshots of computer files and volumes, even if they are in use. It is available in Windows XP, Vista, 7, 8, 10, 11, and Windows Server 2003, 2008 (R2), 2012, 2016, 2019, and 2022.
Your shadow copies are usually located on the C:/ partition and stored in the System Volume Information folder.
Why Should You Delete Shadow Copies
Why should delete shadow copies? There are two main reasons:
- Take up a lot of storage space: Excessive volume shadow copies can take up a lot of storage space, which can lead to low disk space, slow computer performance, and even system instability.
- Possess security risks: Volume shadow copies may bring some security risks. For example, attackers may find SAM files in volume shadow copies and read user password hashes, and even use them to log in to remote servers.
How to Delete Shadow Copies on Windows 11/10/Server?
Way 1: Via System Properties
To delete shadow copies on Windows 10/11/Windows Server, you can use System Properties. Here are the steps:
For Windows 11/10
Step 1: Press the Windows + R keys together to open the Run dialogue box.
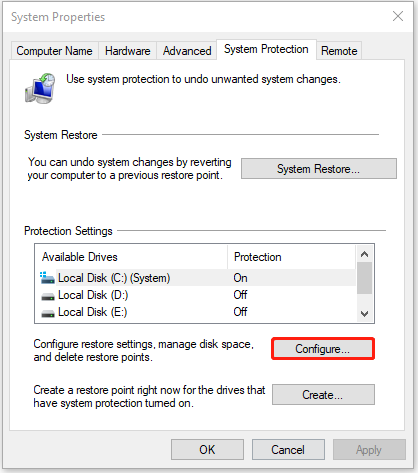
Step 2: Type SystemPropertiesProtection in the box and press Enter to open the System Properties window.
Step 3: Now, you are under the System Protection tab. Click the Configure… button.
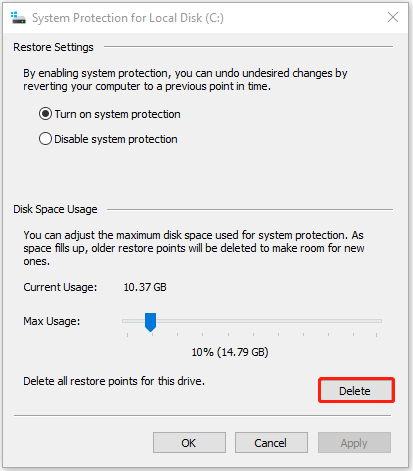
Step 4: Click the Delete button. When you see a warning message, please click the Continue button to delete all shadow copies.
For Windows Server
Step 1: Open File Explorer by pressing the Windows + E keys together.
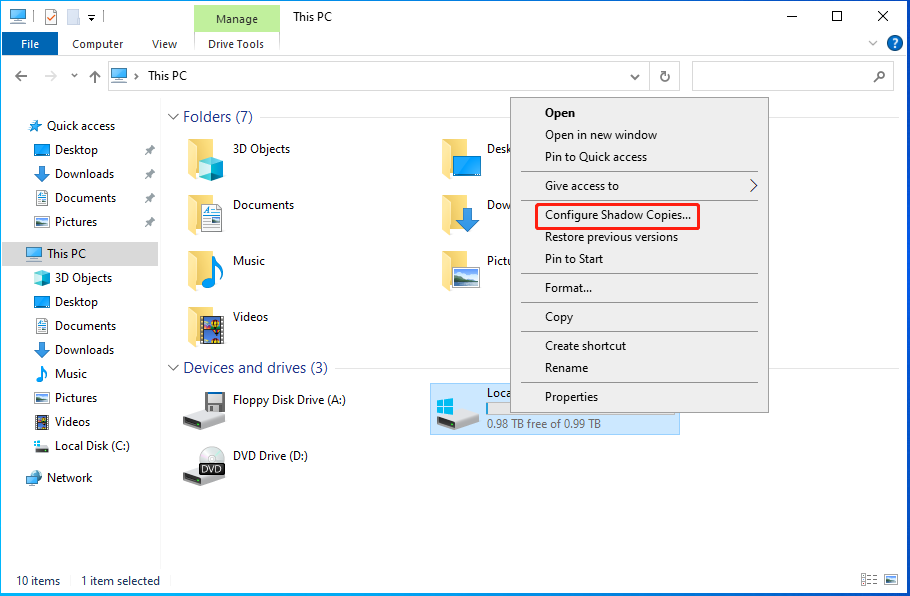
Step 2: Click This PC and right-click your C drive to choose Configure Shadow Copies….
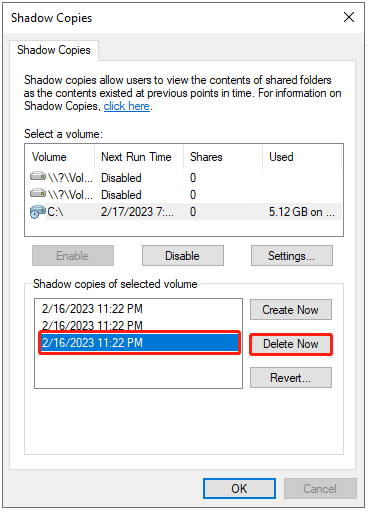
Step 3: Select the shadow copy you want to delete and click the Delete Now button to continue. When you receive a warning message, click Yes to allow it to make changes.
Alt-delete shadow copies on Windows Server
Way 2: Via Disk Cleanup
The method can be applied to Windows 11/10 and Windows Server, that is, delete shadow copies via Disk Cleanup.
Step 1: Type Disk Cleanup in the Search box and click the best-matched result to open it.
Step 2: Choose the drive or partition that you want to delete shadow copies and click OK.
Step 3: Go to the More Options tab. Under the System Restore and Shadow Copies part, click the Clean up… button.
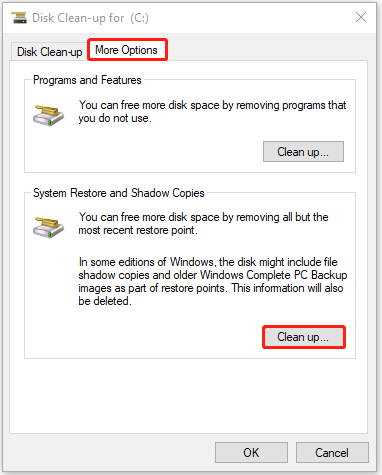
Step 4: When you receive the message, click the Delete button to continue.
Way 3: Via Command Prompt
The vssadmin command can delete all shadow copies or specific shadow copies from a volume. The following provides information about the parameters and meanings of vssadmin.
- /for=: Specifies the volume for which the shadow copy is to be deleted.
- /oldest: Deletes only the oldest shadow copy.
- /all: Deletes all of the shadow copies for the specified volume.
- /shadow=: Deletes the shadow copy specified by ShadowID. To get the shadow copy ID, use the vssadmin list shadows command.
- /quiet: Specifies that the command will not display messages while it is running.
Then, you can remove shadow commands using vssadmin in Command Prompt.
Step 1: Type cmd in the Search box and choose Run as administrator in the right panel.
Step 2: Enter the following command based on your needs.
1. To delete all shadow copies on a specific volume, type the below command and press Enter.
vssadmin delete shadows /for=c: /all
2. To delete a specific shadow copyfrom any volume, type the below command and press Enter.
vssadmin delete shadows /shadow=[Shadow ID].
3. To delete the oldest shadow copy on a specific volume, type the below command and press Enter.
vssadmin delete shadows /for=c: /oldest
Step 3: Type exit and press Enter to exit Command Prompt.
Resize Shadow Storage to Delete
You can also resize shadow storage to delete shadow copies via vssadmin command. This operation will delete all your shadow copies on the specified volume.
Here is the Syntax:
vssadmin resize shadowstorage /for= /on= [/maxsize=]
- ForVolumeSpec: Specifies the volume for which to adjust the maximum amount of storage space.
- OnVolumeSpec: Specifies the volume storage.
- Maxsize: Should be 1MB or larger and accept the following suffixes: KB, MB, GB, TB, PB, and FB. Or you can use percentages with “%” to define. If no suffix is provided, in bytes.
There is how to run this command:
- Type cmd in the Search box and choose Run as administrator in the right panel.
- Then input the command for example:
vssadmin Resize ShadowStorage /For=C: /On=C: /Maxsize=600MB
Way 4: Delete Shadow Copies using PowerShell
How to delete shadow copies on Windows Server/Windows 11? The last method for you is via PowerShell.
Step 1: Type PowerShell in the Search box and choose Run as administrator.
Step 2: To delete shadow copies using PowerShell, type the command: shadowcopy delete /nointeractive.
Use MiniTool ShadowMaker to Back Up/Restore Your Data
As the alternative to Windows’ built-in backup utility using Volume Shadow Copy, MiniTool ShadowMaker is worth recommending.
The backup software is an all-in-one data protection and disaster recovery solution for PCs. It is compatible with Windows 7/8/8.1/10/11 and Windows Servers. It allows you to back up your systems, important files, folders, partitions, and even the whole disk. Once a disaster occurs, you can restore data with a copy of the backup.
MiniTool ShadowMaker also lets you create bootable media to restore your system to a normal state when your computer fails to boot. It’s easy to use MiniTool Media Builder and MiniTool PXE Boot Tool to maintain hard drives. You can download MiniTool ShadowMaker Trial to back up the system.
MiniTool ShadowMaker TrialClick to Download100%Clean & Safe
Back up System
Step 1: Launch the software and select Keep Trial on the lower right.
Step 2: On its main interface, switch to the Backup tab.
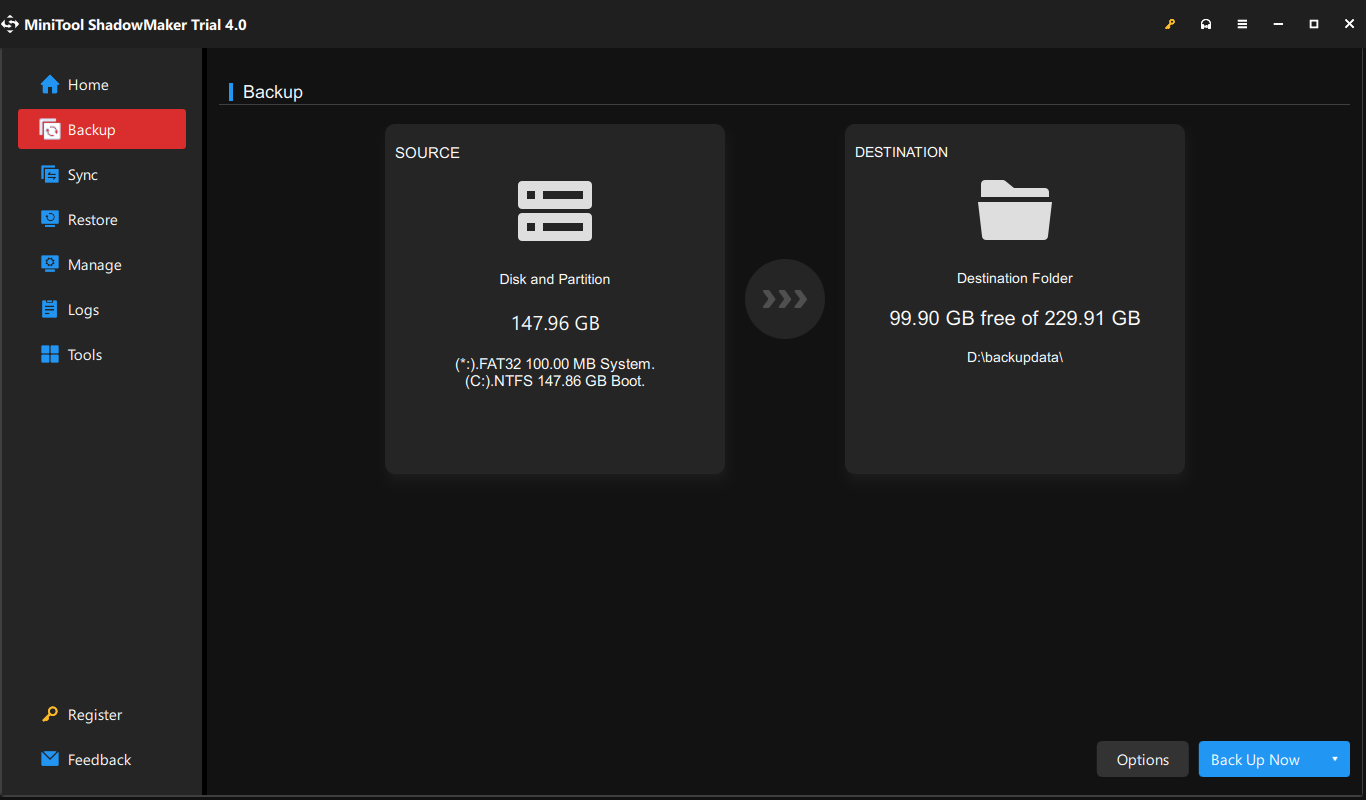
Step 3: Go to the SOURCE part on the left. Here, your system is selected by default, and you don’t need to choose it.
Step 4: Click the DESTINATION rectangle on the right and select the address where you plan to save the image file in the pop-up window. It’s recommended to choose the external hard drive as the backup destination.
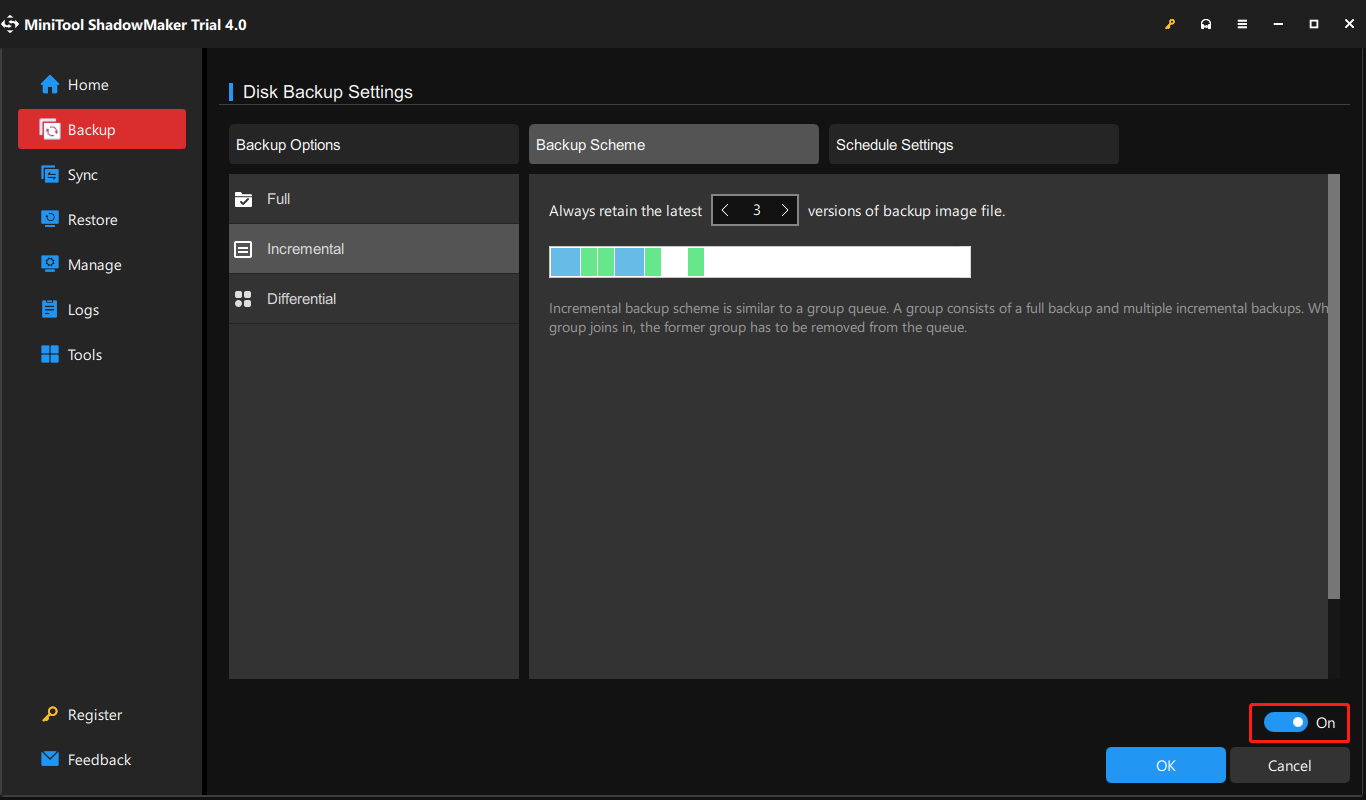
Step 5: Then, on the lower right, click Options > Backup Scheme. It is turned off by default. So, you need to turn it on in the bottom right corner first and then set up your backup type there. You can decide how many backup image versions to keep on your backup destination.
Step 6: When all settings are done, just click Back Up Now in the lower right and it will redirect you to the Manage tab. There, you can view the status of your backup. Just wait until it finishes.
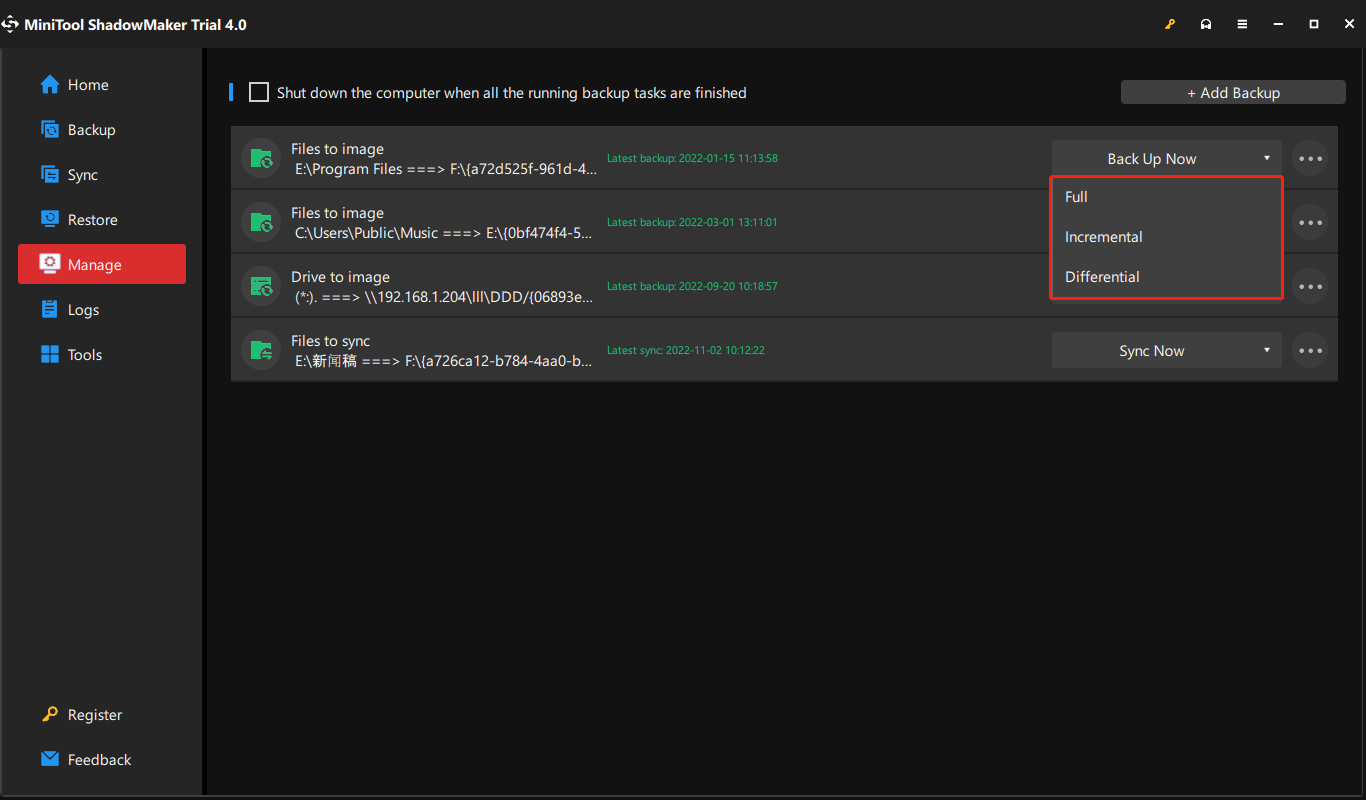
If you already created a full backup, you can set further full, incremental, or differential backup based on it from the Manage section.
Way 1. Click the inverted triangle beside Back Up Now and choose the backup type you prefer.
Way 2. Click on the three slashes on the right end of the backup task graphic bar and select Edit Scheme. Then, follow above Step 5 to finish the settings.
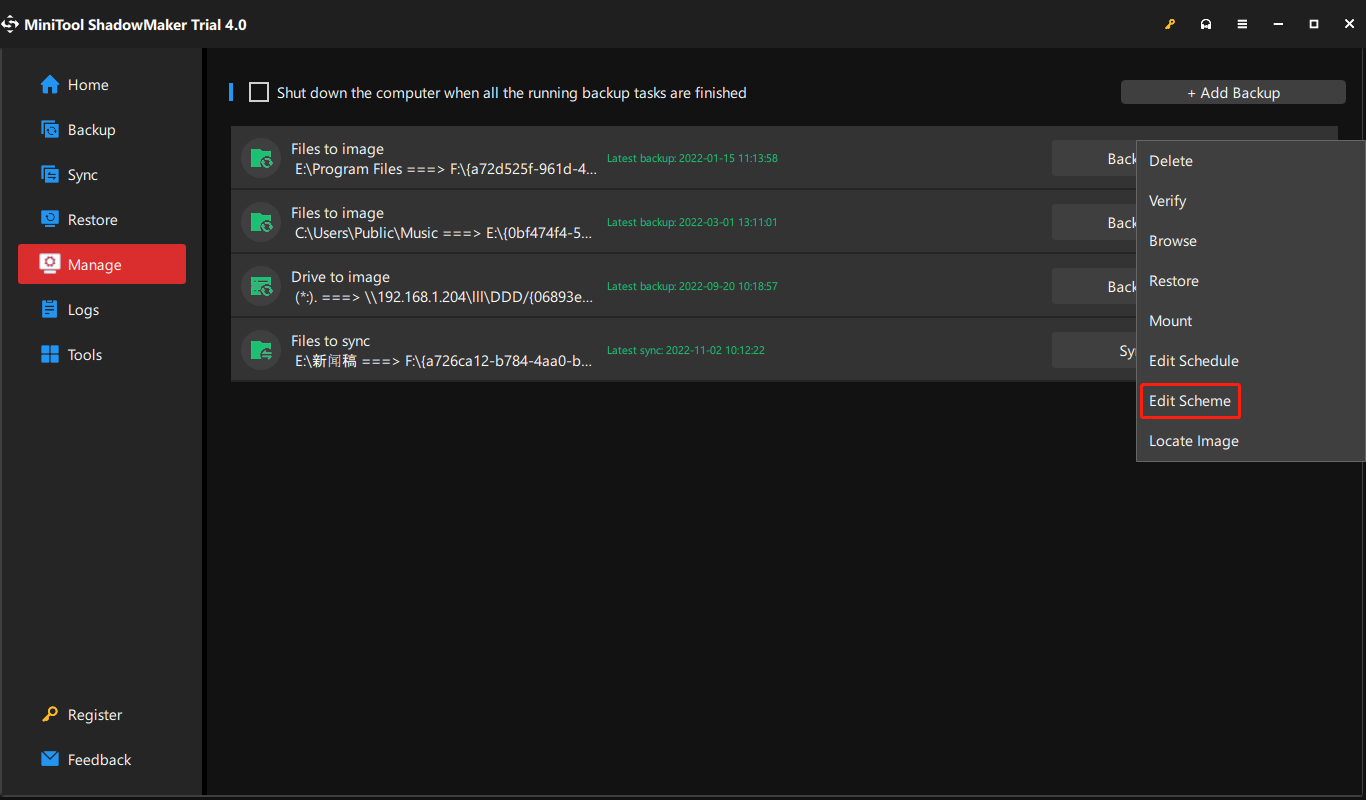
Besides different backup types based on how the backup performs, MiniTool ShadowMaker also supports most backup types classified by data types or data carriages listed at the start of this article. Moreover, MiniTool ShadowMaker enables you to set a schedule to automatically back up your important data daily, weekly, monthly, or even on the event (when you log on or log off the computer).
Restore the System from an External Hard Drive
MiniTool ShadowMaker is helpful to restore your computer in case of unexpected disasters. How to do this job?
Tip: First of all, please use the Media Builder feature of MiniTool ShadowMaker to create a bootable disc to boot your computer. Then, you can start a system recovery in WinPE.
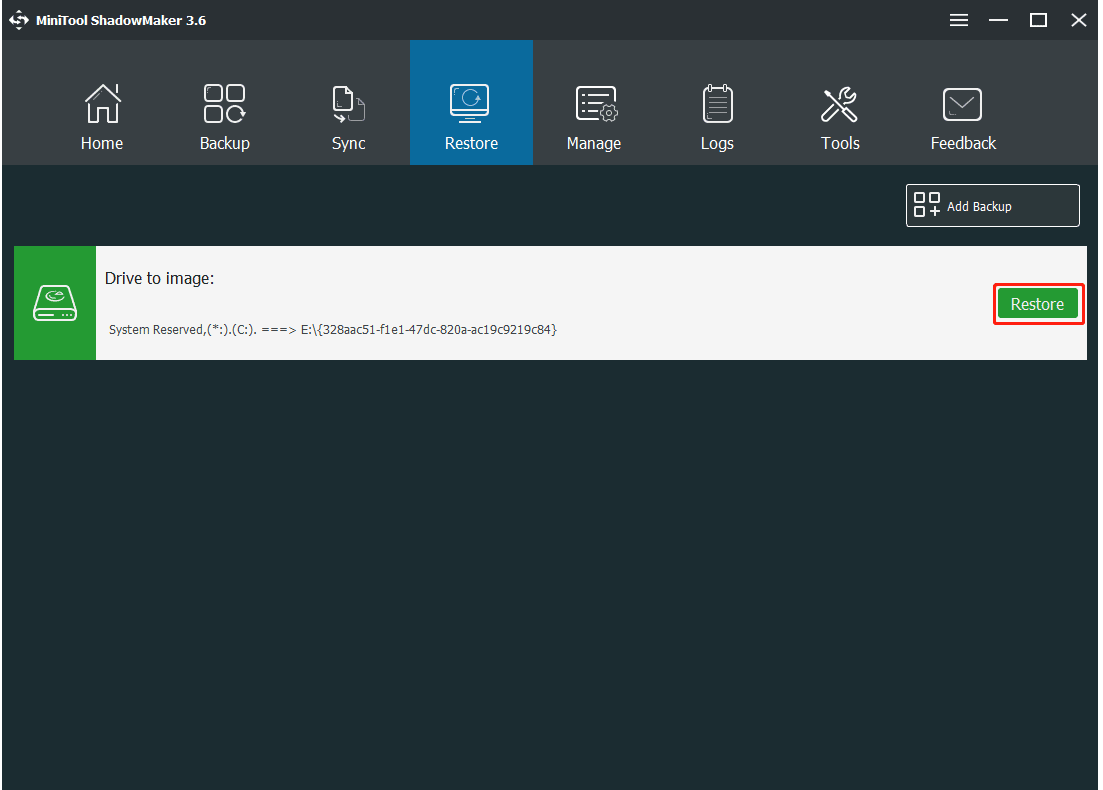
Step 1: In the Restore page, find the system image or system disk image you have created and click the Restore button.
Step 2: The backup time will be shown, choose the backup version and click Next to continue.
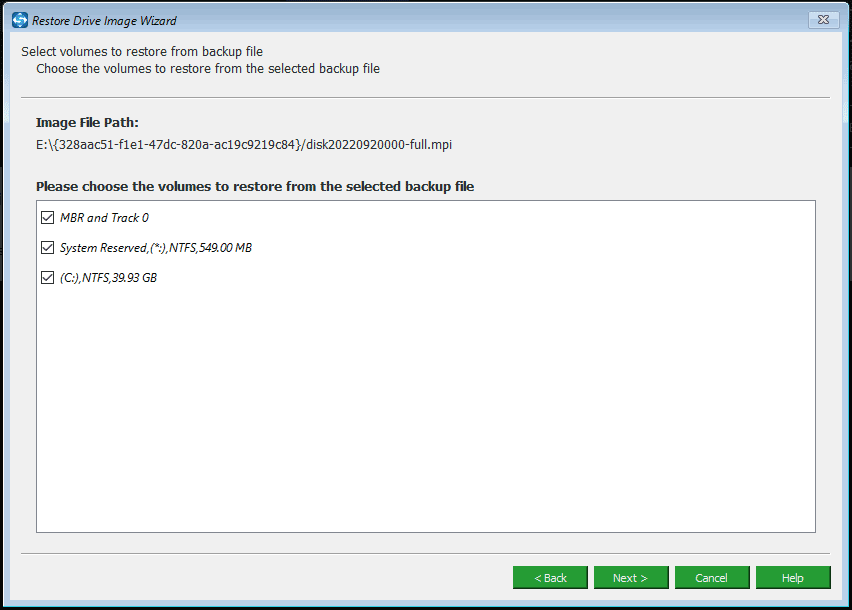
Step 3: Next, choose all system partitions as well as MBR and Track 0 to restore. The MBR and Track 0 option is essential for the restore, otherwise, the system will fail to boot after restoration. Therefore, please be sure to check it.
Step 4: Choose the disk you want to restore the image file to and this freeware will tell you the drives that will be overwritten during restoration. Click OK to the next step.
Step 5: Now the software is performing the system image recovery process. After the operation, restart your computer and it can run properly.
Bottom Line
To sum up, this article has shown you how to delete shadow copies to free up space in your Windows 11/10/Server. It also told you how to perform a backup to keep your system and data safe with MiniTool ShadowMaker.If you encounter any question or have any suggestion, feel free to contact us via [email protected].
How to Delete Shadow Copies FAQ
Windows uses the Volume Shadow Copy service to make a copy of the hard drive for restoration from System Restore. Sometimes this takes up too much space, especially with small hard drives, so you may want to reduce the disk space used by shadow copy storage.
A shadow copy is a snapshot of a volume that replicates all data held on that volume at a well-defined moment in time. VSS identifies each shadow copy by a persistent GUID. A shadow copy set is a collection of shadow copies of various volumes taken simultaneously.
Any data not transferred to the disk will be lost when the snapshot is taken. However, when you use a restore point, you're not making a new copy of the disc in question; instead, you're instructing Windows to start recording changes to it and backing up the original so you can go back to it if something goes wrong.
![[7+ Ways] Fix VSS was Denied Access to the Root of Volume](https://mt-test.minitool.com/images/uploads/2022/02/vss-was-denied-access-to-volume-root-thumbnail.png)