If you get into trouble with a reminder that no battery is detected, you really need to read this post. It will show you some possible reasons and some feasible solutions. Meanwhile, it also introduces you a powerful tool to back up your data before you perform one of these methods which are technical. Get these useful solutions from the MiniTool website.
Compared with PC users around the world, most Windows users typically own a laptop. With laptops, you can use Windows wirelessly and at any time. However, like all portable devices, there are many problems that can arise over time. One is that no battery is detected.
This error message appears when you click the battery icon on your laptop. That means either your hardware is causing trouble, for example, your battery is broken or it’s too old to use, or your software is causing the issue.
This post will show you why this problem appears and show you possible workarounds to fix this issue.
Reasons for No Battery Is Detected
- Battery is not connected properly
- Battery is disabled
- The system is in error state
- Outdated BIOS
- Power adapter
- Battery is worn out
- Bad battery drivers
- Battery contacts accumulating dust
Some Possible Reasons for No Battery Is Detected
There are some reasons for no battery is detected in Windows 10.
1.Battery is not connected properly
This is believed to be the primary cause of this error message. If the battery is not properly connected to the laptop, you are sure to get this error message.
2.Battery is disabled
You can disable the battery manually with the device manager. If you disable your battery, your computer will not be able to detect the battery in any way.
3.The system is in error state
Windows is known to occasionally enter an error state because of conflicting configurations of different modules.
4.Outdated BIOS
Although it is rare, there are instances where BIOS is out of date or not working properly.
5.Power adapter
In many cases, the power adapter used to charge your computer may fail or not work properly.
6.Battery is worn out
If the battery you are using is worn out and depleted, you will not be able to reuse it.
7.Bad battery drivers
If the drivers for your battery are out of date or damaged, your computer can’t detect your battery. That’s because the drivers are the main connecting components.
8.Battery contacts accumulating dust
Battery contacting on your laptop can accumulate dust or cause blockages in connectors.
Fixes for No Battery Is Detected
- Power Cycle Your Computer
- Enable Battery Drivers in Device Manager
- Check Power Adapter
- Update Battery Drivers in Device Manager
- Clean Battery Connecting Points
- Check Health of Your Battery
- Update/Reset BIOS to Default Settings
Solution 1: Power Cycle Your Computer
How to fix the no battery is detected error in Windows 10? You should try to power cycle your computer before you start using any other solutions. Power cycling will shut down your computer completely, disconnect all peripherals and drain the computer power.
Draining the power of your computer can help you reset all the temporary configurations of the computer and solve any small hardware problems.
The following part will show you how to turn off the computer power.
Step 1: Turn the computer off completely by shutting it down and disconnect the power cable.
Step 2: Take out the battery of your laptop. You need to slide the levers or press them depending on the model of your laptop.
Step 3: Press the power button for about 5-8 seconds. This process will drain all the power from your computer. Let your laptop sit for about 4-5 minutes.
Step 4: Plug everything back in your computer and restart it.
After you finish all the steps, check if the battery is detected.
Solution 2: Enable Battery Drivers in Device Manager
Step 1: Press the Win key and R key together, type devmgmt.msc in the dialogue box and click OK to open Device Manager.
Step 2: In the Device Manager window, locate to Batteries and expand it.
Step 3: Right-click on the driver under the Batteries section and select Enable device if it is disabled.
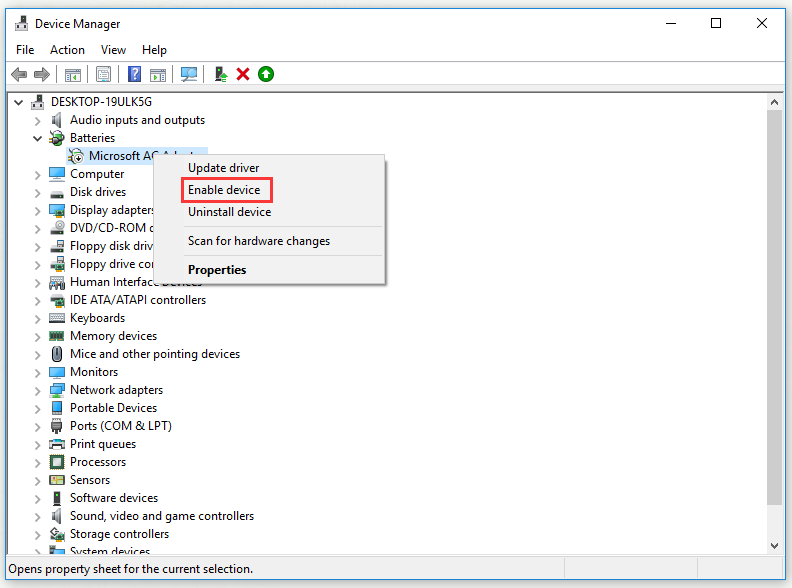
Step 4: Restart the computer completely.
Now you can check if the battery is detected properly.
1.After performing these steps, you can also execute Solution 1.
2.With Device Manager, you can also try to update drivers in Windows 10 to fix the hardware errors.
Solution 3: Check Power Adapter
In this solution, you need to make sure that you are actually using the right adapter your computer needs. It is important to note that the adapter has the same pin as the adapter that comes with the laptop, but this does not necessarily mean that the two adapters are the same.
Each power adapter comes with a different power rating that is designed for specific laptops. If your computer is connecting a third-party power adapter, you need to change it and check to see if the battery is detected.
Solution 4: Update Battery Drivers in Device Manager
Step 1: Press the Win key and R key together, type appwiz.cpl in the dialogue box and click OK to open Device Manager.
Step 2: In the Device Manager window, locate to Batteries and expand it.
Step 3: Right-click on the driver under the Batteries section and select Uninstall device. Right now, Windows will uninstall the driver automatically.
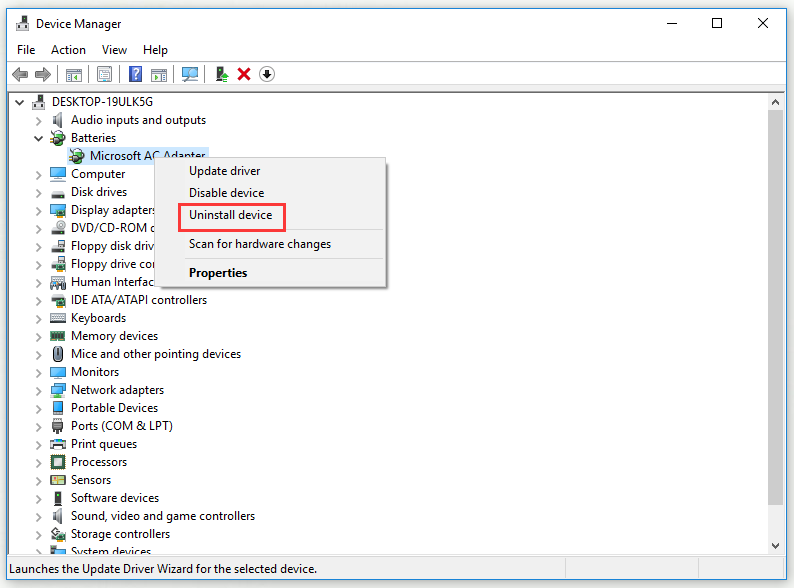
Step 4: Right-click on an empty place and click Scan for hardware changes. Right now, OS will install the latest drivers for your computer automatically.
Execute solution 1 and check the battery status again. If you are still prompted that no battery is detected, please follow these steps to update the drivers.
Step 1: Locate to the battery entry in Device Manager as before.
Step 2: Right-click the driver and select Update driver.
Step 3: You will now have two choices: either to update the selected driver automatically or manually.
To update the selected driver automatically, select the Search automatically for update driver software option. Perform Solution 1 after it’s done.
To install the driver manually, you can select the Browse my computer for driver software option or download the driver from the manufacturer’s website and install it by executing the executable file.
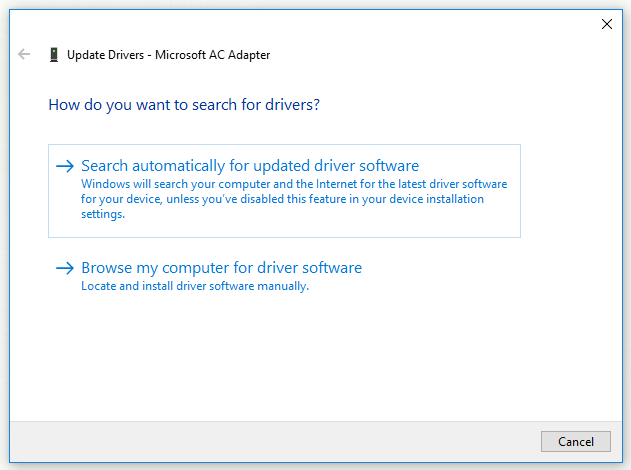
After you finish updating the drivers, you can check to see if the battery is recognized.
Solution 5: Clean Battery Connecting Points
If none of the above solutions work, you can try cleaning battery connecting points.
Step 1: Power off your computer, take out the power cable and then remove the battery.
Step 2: Now you can see the connecting points present. Take a little alcohol and apply it to your earbuds. Meanwhile, apply alcohol to the connectors and make sure no dust accumulates.
Step 3: Put everything back in and power on the computer.
You can check to see if the problem is fixed.
Solution 6: Check Health of Your Battery
If the battery on the computer has been used for a long time, it is recommended that you check its health condition to see if it can work properly. Normally, the original battery that comes with a laptop should work about two to three years.
After that time, it will slowly begin to depreciate, and the battery life will decrease every day until the life is completely used up.
Therefore, if you have been using the battery for a long time, you need to replace the battery and check if the problem is resolved. You can try plugging another working battery into your computer to see if it is detected.
If so, it will help you to troubleshoot whether the problem is really battery related. If not, this could mean your laptop has some problems.
Solution 7: Update/Reset BIOS to Default Settings
This approach is very technical, so it is recommended that you try this solution after all the solutions have been tried and failed.
Step 1: Enter your BIOS. The way you access your BIOS depends on your motherboard.
Step 2: When you are in BIOS, press F9 key to get the Load Optional Defaults prompt and then click Yes to restore the default settings.
Step 3: When you’re finished, press F10 to Save and Exit.
Back up Data with A Powerful Tool – MiniTool ShadowMaker
This part will introduce you to great backup software – MiniTool ShadowMaker. With it, you can back up your data to keep it safe efficiently.
Meanwhile, MiniTool ShadowMaker also allows you to back up OS and disks and even clone the whole hard disk. If you can’t reboot your computer properly, you can use the Media Builder feature of it to create bootable media firstly and then you can restore your system to a normal state with this bootable media.
MiniTool ShadowMaker is also a great piece of sync software that allows you to sync files and folders.
Right now, you can download MiniTool ShadowMaker Trial Edition to back up your data.
MiniTool ShadowMaker TrialClick to Download100%Clean & Safe
Follow the steps below, it will show you how to back up data with Backup function of MiniTool ShadowMaker.
Step 1: Choose Your Source File
1.Open MiniTool ShadowMaker.
2.Click Connect in the Local module.
3.Click the Backup tab to continue.
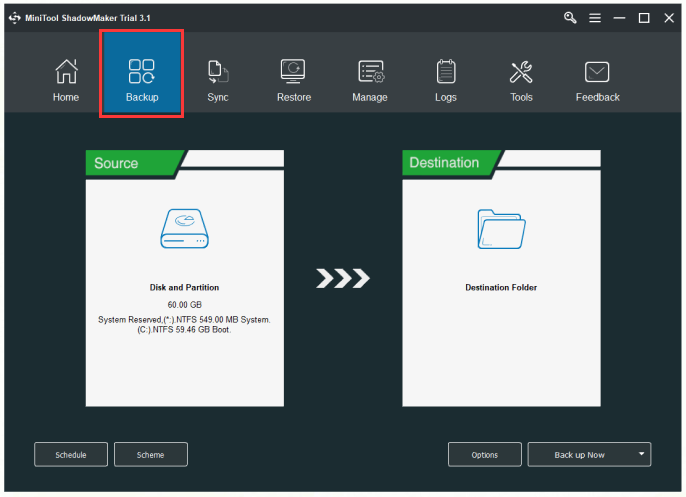
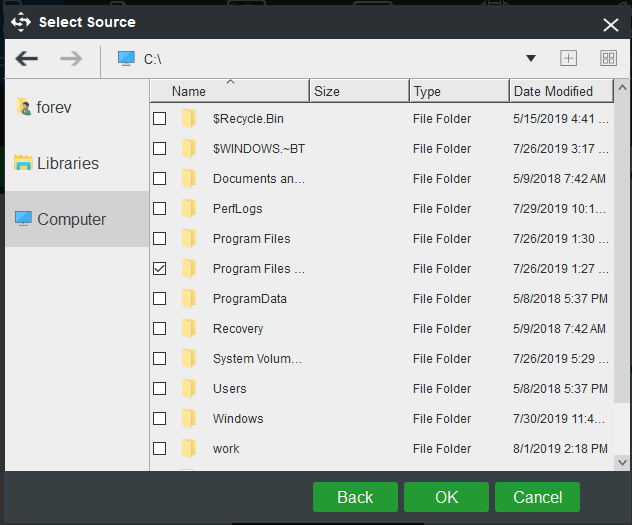
4.Click the Source module firstly and then select the source type you want to back up. Here, you need to choose files as backup source.
Step 2: Select a Destination Path to Save Your Backup Files
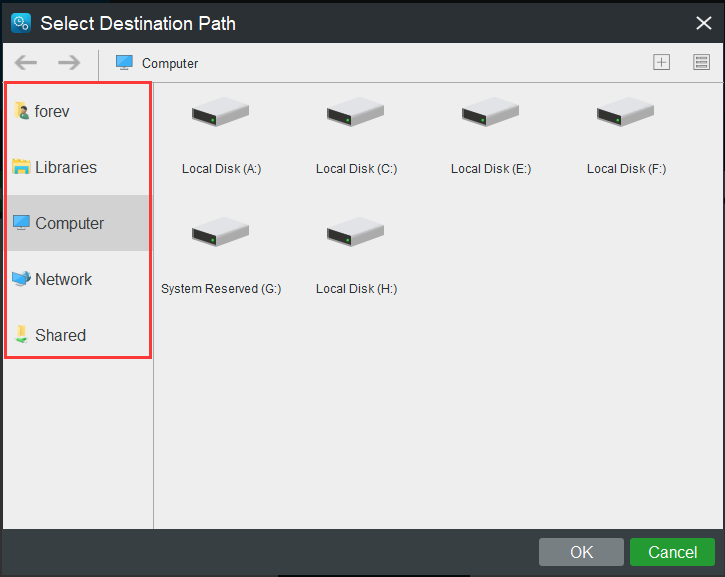
1.Click the Destination module.
2.Choose a destination to save your backup files. There are 5 types of destination paths for you to choose – Administrator, Libraries, Computer, Network and Shared. Click OK to continue
Step 3: Perform Backup Operation
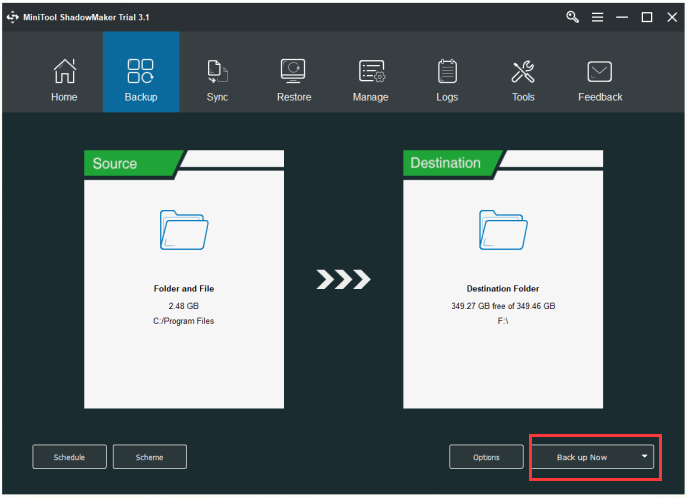
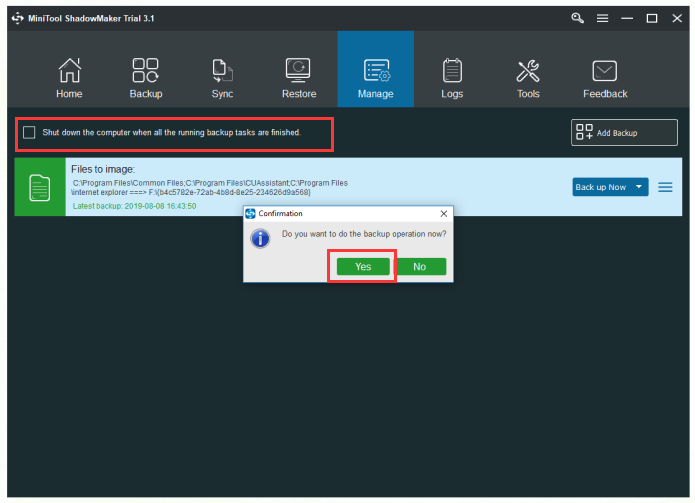
1.Click Backup now to execute the backup operation immediately. You can also choose Back up Later to carry out the operation later, and you need to click Back up Now in the Manage page to execute the pending operation.
2.Click Yes to confirm that you want to do the backup operation now. You can also check Shut down the computer when all the running backup tasks are finished.
In addition to the Backup function, the Sync function is also powerful to protect your data. With it, you can sync files and folders. Follow the steps below to learn how to sync your data with MiniTool ShadowMaker.
Step 1: Open MiniTool ShadowMaker.
Step 2: Select the sync source from the Source module.
Step 3: Select the sync destination from the Destination module.
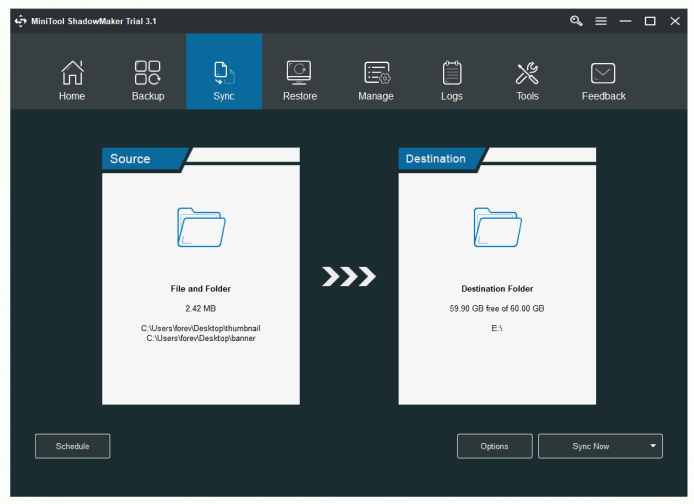
Step 4: Click Sync now to perform this operation immediately. You can also choose Sync Later to carry out the operation later, and then start the delayed sync task in the Manage page.
After completing all the steps above, you can successfully sync your data with MiniTool ShadowMaker.
Conclusion
In conclusion, this post has shown you some possible reasons for the no battery is detected error and also shown you several solutions to fix this issue. Besides, it also introduces you a useful tool – MiniTool ShadowMaker to back up your data before you start to update BIOS.
If you meet problems when you are using our program, please feel free to contact us via the email [email protected] and we will reply to you as soon as possible.