It is very distressing that your computer gets ntoskrnl.exe BSOD frequently, and usually you’re at a loss since you even don’t know the culprits. Don’t panic. This article from the Minitool website has explained several markable methods for you to figure out this issue “ntoskrnl.exe BSOD Windows 11”. Now let’s fix it step by step!
What Is Ntoskrnl.exe?
Ntoskrnl.exe is the filename of the Windows NT operating system kernel. It is an integral system file, which is responsible for several functions including memory management, hardware abstraction, and process, making it a fundamental component of the Windows PC.
Therefore, when this file gets corrupted or lost, it may cause a ntoskrnl.exe error. This error may occur due to various reasons, leading to severe data loss. Don’t worry, and you can try out the efficacious methods in this article to fix this error.
Common Causes for the Ntoskrnl.exe BSOD Error
Before you solve this problem, you need to know the behind causes of it to have a comprehensive understanding of this crisis. The main causes behind the ntoskrnl.exe failure are as follows:
- Problematic Windows update.
- Faulty RAM.
- Corrupted drivers.
- Missing or corrupt system files.
- Overclocked system.
Now, you have already known the culprits behind this issue. Many computer users once back to the desktop by rebooting their PC when experiencing ntoskrnl.exe BSOD, however, the fundamental error has not been resolved yet. Don’t worry. You can adopt the following measures to get further fixed, let’s move to the next part to fix the “ntoskrnl.exe BSOD windows 11” problem!
To boot into Safe Mode: enter WinRE, select Troubleshoot, and tap Advanced options. Then click Startup Settings and wait for a while. After that, press F5 key to choose Enable Safe Mode with Networking option, and finally boot into Safe Mode.
Fast Fixes for Ntoskrnl.exe BSOD on Windows 11
Option 1: Check Your Windows Update
Updating the Windows version is always a possible solution to system-related problems. It may be fortunately that Microsoft has already fixed the ntoskrnl.exe BSOD error and released an update. So, you can also try checking and updating your Windows when trying to fix the ntoskrnl.exe BSOD Windows 11 error. The following steps cover installing Windows updates for Windows 11.
Step 1: You should access the Start menu by clicking the Windows icon on your screen to get started and select Settings from the menu.
Step 2: In the left menu, select Windows Update and check for updates. Generally, it will automatically check for updates and install the updates.
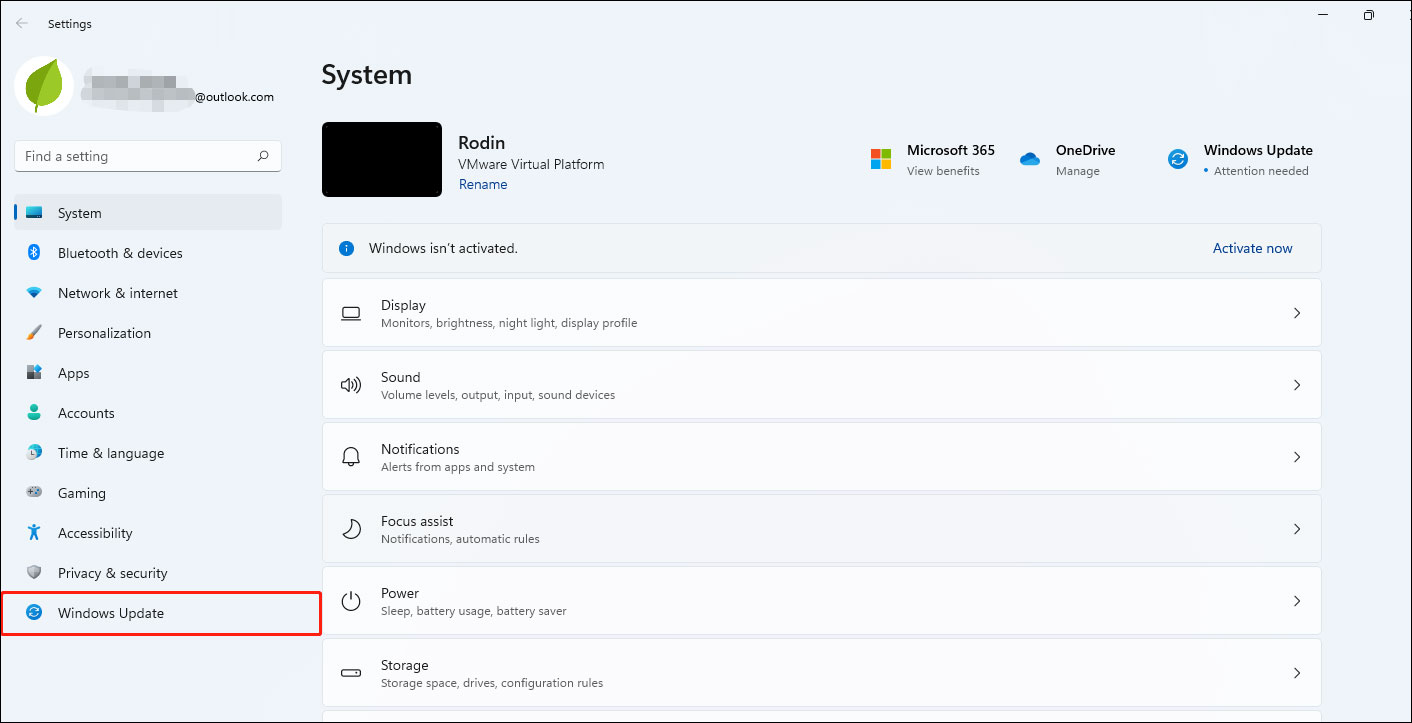
If the error occurred after installing a Windows update, you may uninstall the problematic Windows Update to fix this issue. To uninstall the update:
Step 1: Go to the Settings > Windows Update > Update history.
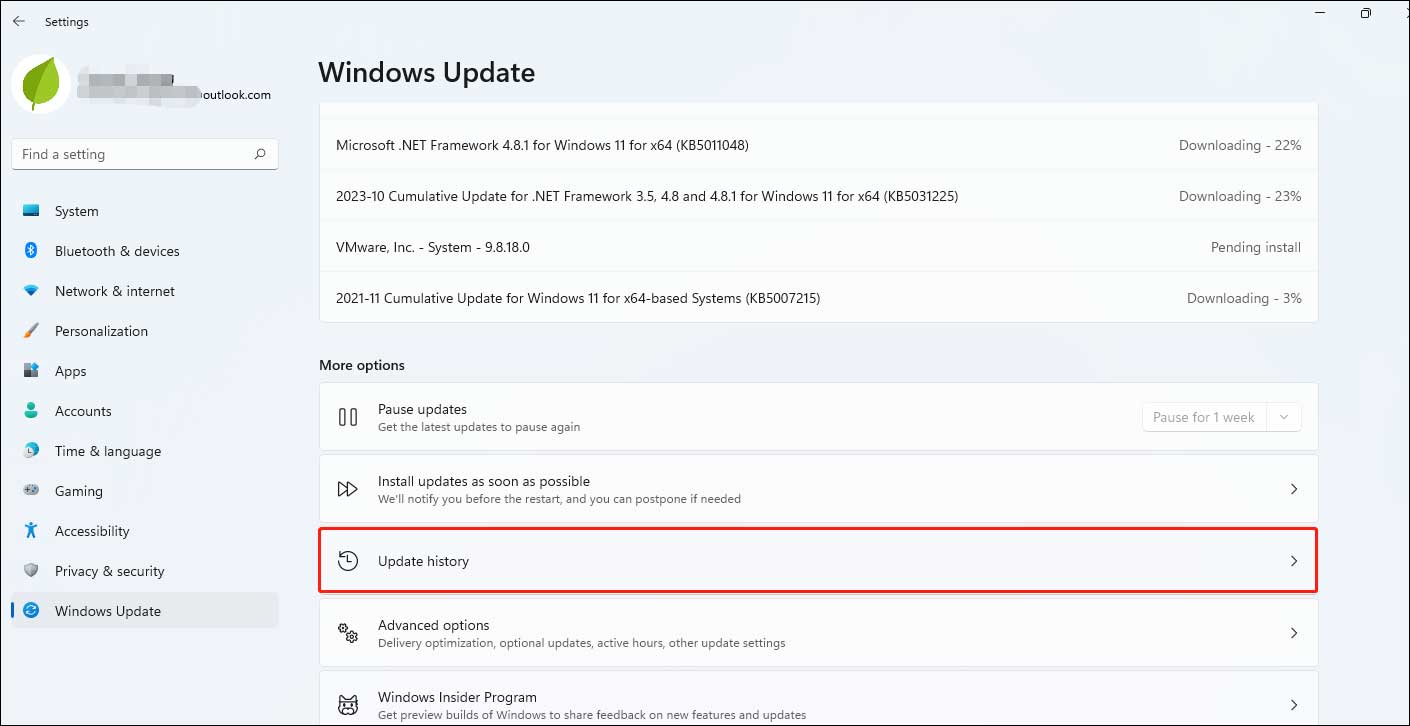
Step 2: On the Update history screen, find and tap Uninstall updates.
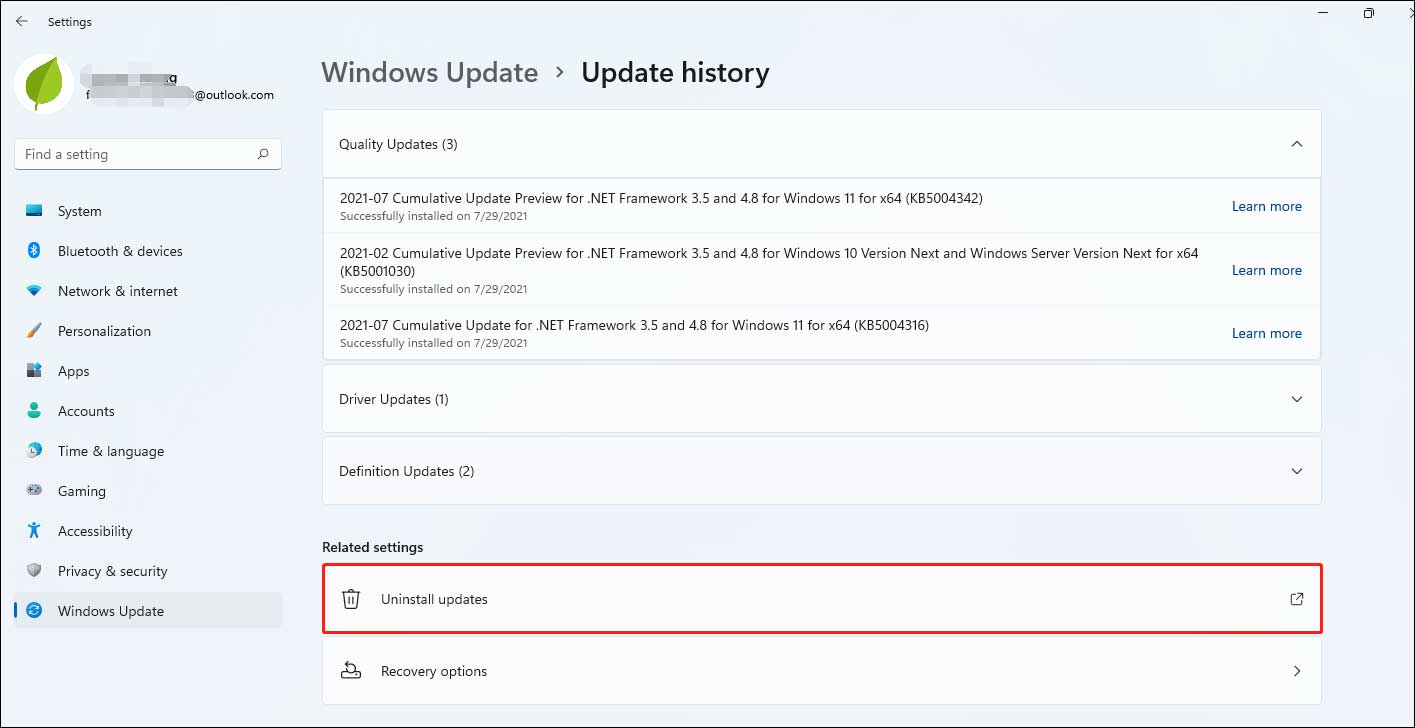
Step 3: In the pop-up menu, choose your recent system update or the suspected faulty update, right-click it, tap Uninstall, and then confirm this operation by clicking Yes in the pop-up screen.
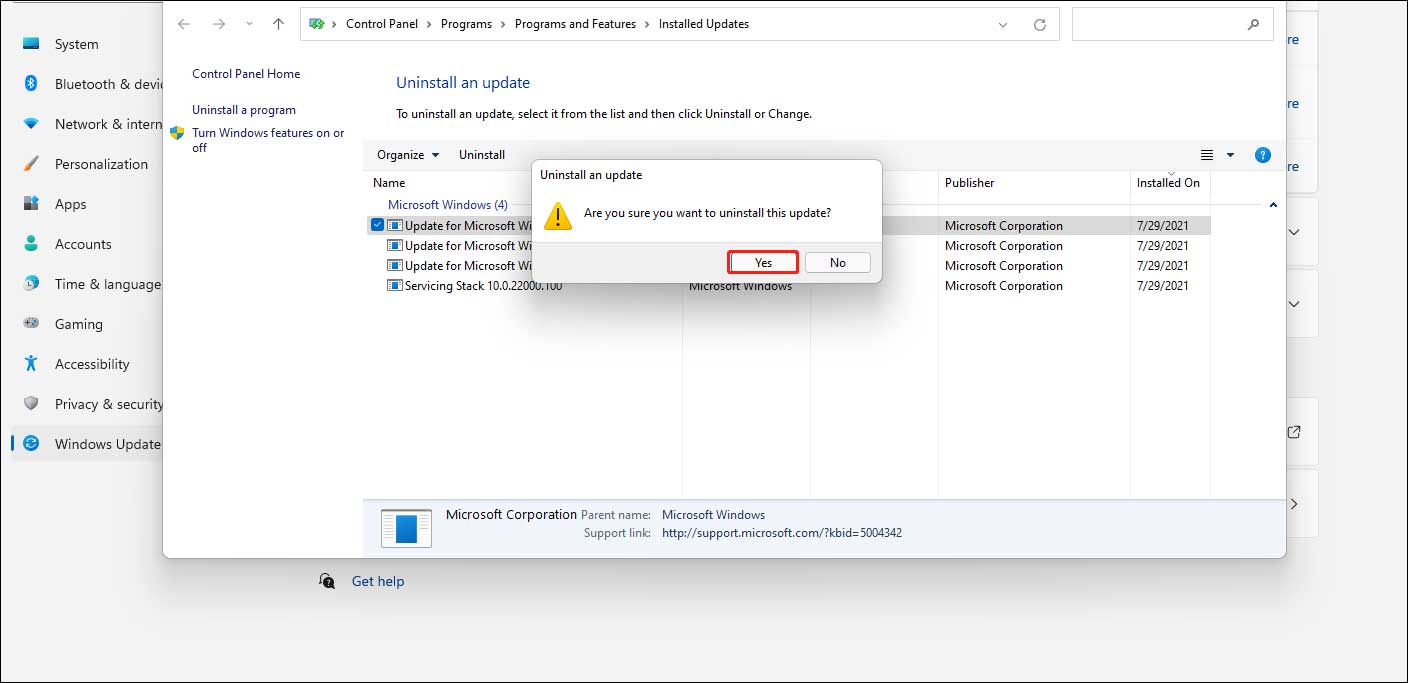
Step 4: Follow the on-screen instructions to complete the task.
Option 2: Update Device Drivers
Device drivers are the special program that enables the computer to communicate with the device. It is equivalent to the interface of the hardware. Only through these interfaces can the operating system control the work of the hardware device.
Updating the device drivers is a superfine technique to resolve many issues that arise in the computer, including BSOD ntoskrnl.exe. What’s more, it will improve your PC’s overall performance and eliminate the high CPU consumption in the process. You may try updating the drivers with the help of the following troubleshooting steps:
Step 1: You should access the Start menu and then search for Device Manager and select it when pops up.
Step 2: You should make sure that the items in the Device Manager menu are all up to date. You can expand directories and right-click drivers to select Update driver one by one.
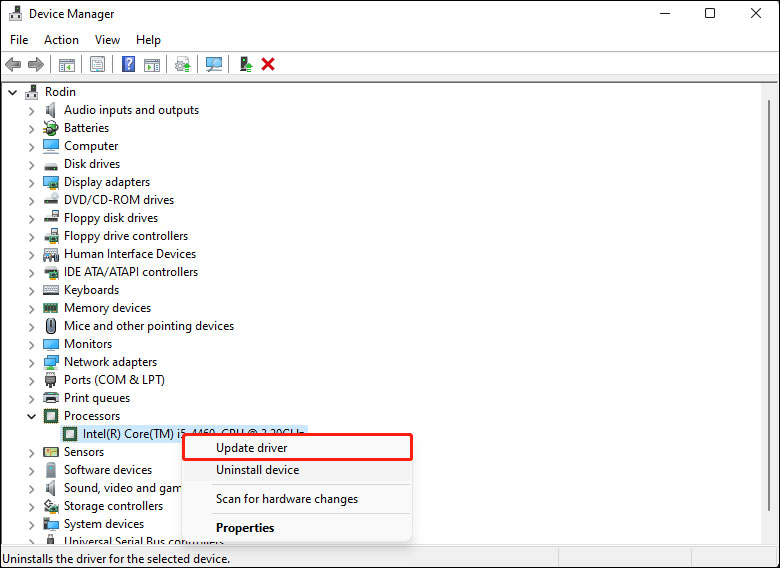
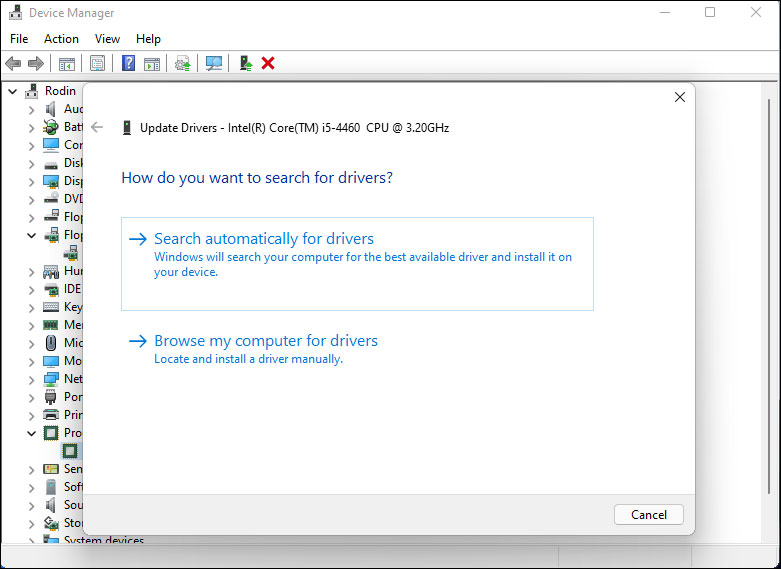
Step 3: Select Search automatically for drivers in the pop-up window.
Option 3: Run the Windows Memory Diagnostic Tool
The Windows Memory Diagnostic is a built-in Windows utility that is very useful when locating and fixing system memory problems. This tool effectively tests your RAM and notifies you if there are any issues that interfere with operation.
Follow the detailed instructions below to run the Windows Memory Diagnostic tool when trying to fix the “ntoskrnl.exe causing BSOD” issue.
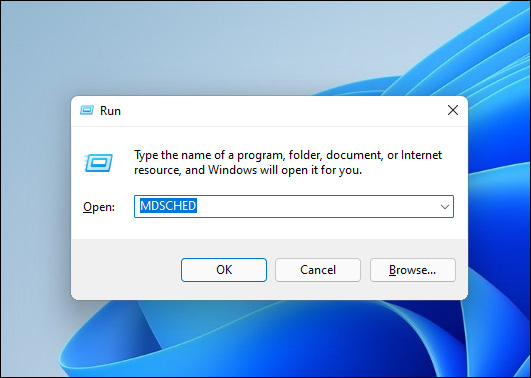
Step 1: Press the Windows and R keys at the same time to open the Run window.
Step 2: Type the following command: MDSCHED in the Run window and hit Enter to execute it.
Step 3: Tap Restart now and check for problems (recommended) to launch and test your PC for memory problems. Before doing this, you should ensure that you save all files on your PC and close open applications.
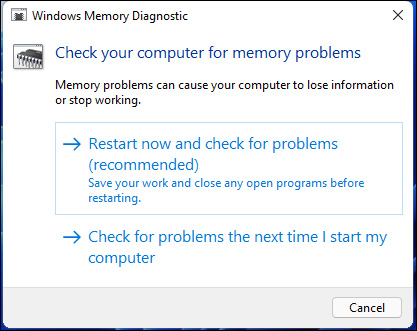
Step 4: The scanning process might take a few minutes, so wait patiently until it completes the process and displays the result.
Option 4: Run SFC
BSOD ntoskrnl.exe may be caused by various reasons. Corrupt, damaged, or missing system files can also be the culprits behind this error. You are supposed to fix them to eliminate the problem. SFC scan (System File Checker) is an effective way to do this work, which can detect and replace damaged system files you might have. Just follow the steps below:
Step 1: Tap the magnifying glass icon to open the search bar in the taskbar. Alternatively, you can also press the Windows button and S keyboard simultaneously to access the search tool.
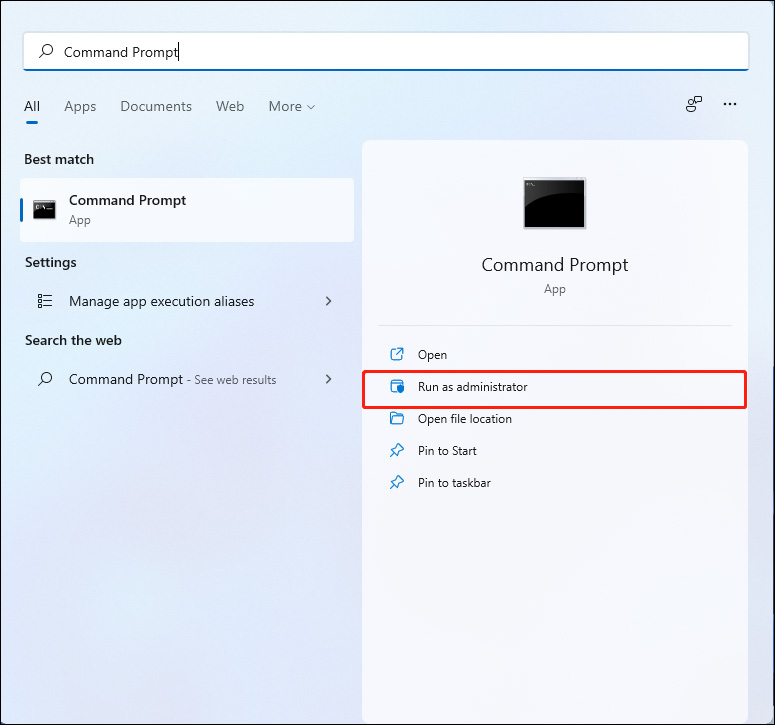
Step 2: Type Command Prompt in the Windows Search bar and click on it when pops up, and then choose Run as administrator to proceed.
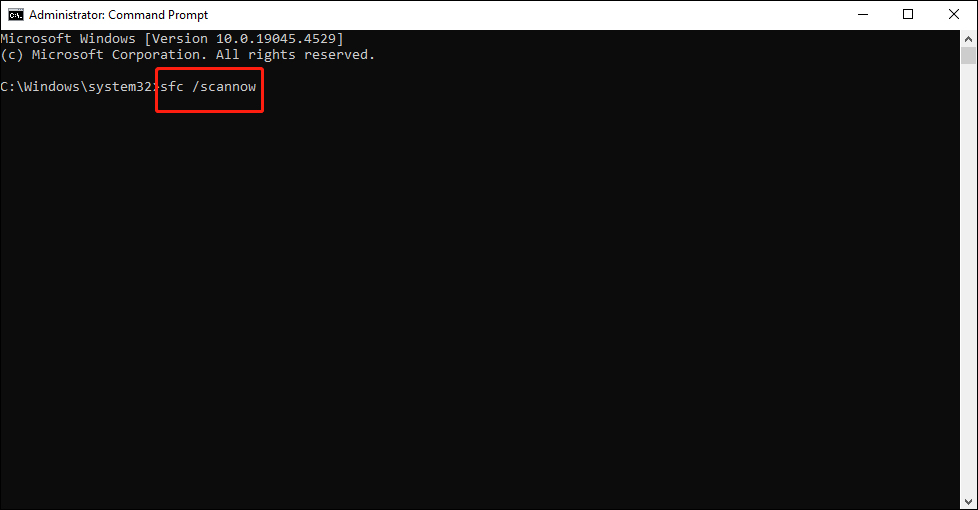
Step 3: When the command prompt launches, type in the command sfc /scannow and then press Enter to execute the command. It will begin scanning your computer immediately. If there are any problems, it will automatically restore system files and fix the related issues
Step 4: Wait for the scanning process to be done patiently, and then restart your system.
Option 5: Disable the Overclocking Settings
Sometimes the reason resulting in the ntoskrnl.exe error is an overclocked CPU or GPU. You have installed overclocking software on your computer to improve the hardware’s overall performance, but this may cause the stability of the accessory to decrease, hence resulting in ntoskrnl.exe crash. In terms of this, you are supposed to disable this feature or this overclocking software.
Option 6: Check Your Computer for Viruses and Malware
It is strongly recommended to check your computer for malware and viruses, which can interfere with your PC, causing the “ntoskrnl.exe BSOD Windows 11” issue. You are supposed to take a manual scan of your machine resorting to Windows Security or a third-party security tool you prefer. Follow the steps below to check for viruses using Windows Defender.
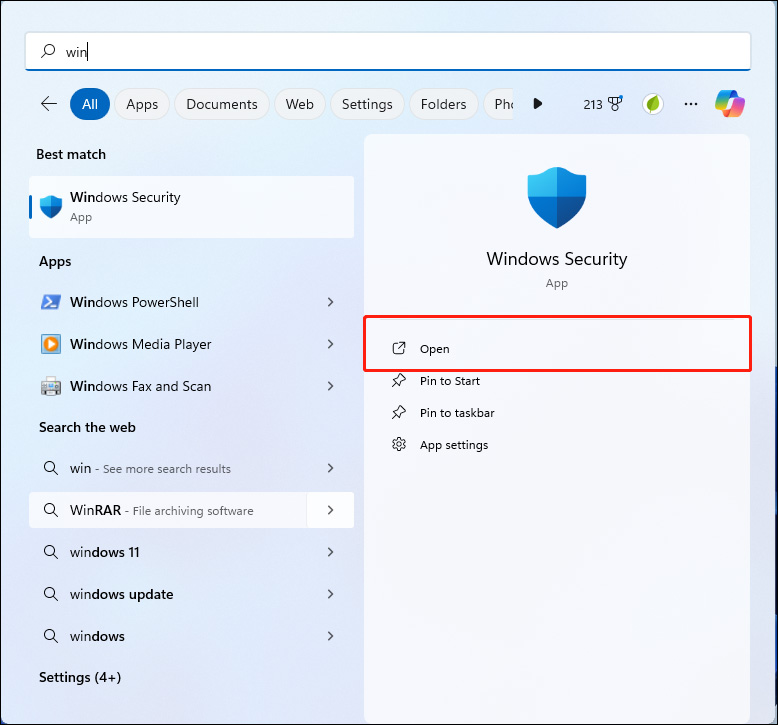
Step 1: Search for Windows Security in the Windows Search bar. Then click Open on the pop-up screen.
Step 2: Select the Virus & threat protection module in the right panel, and then click on the Quick scan button to carry out a general check for viruses.
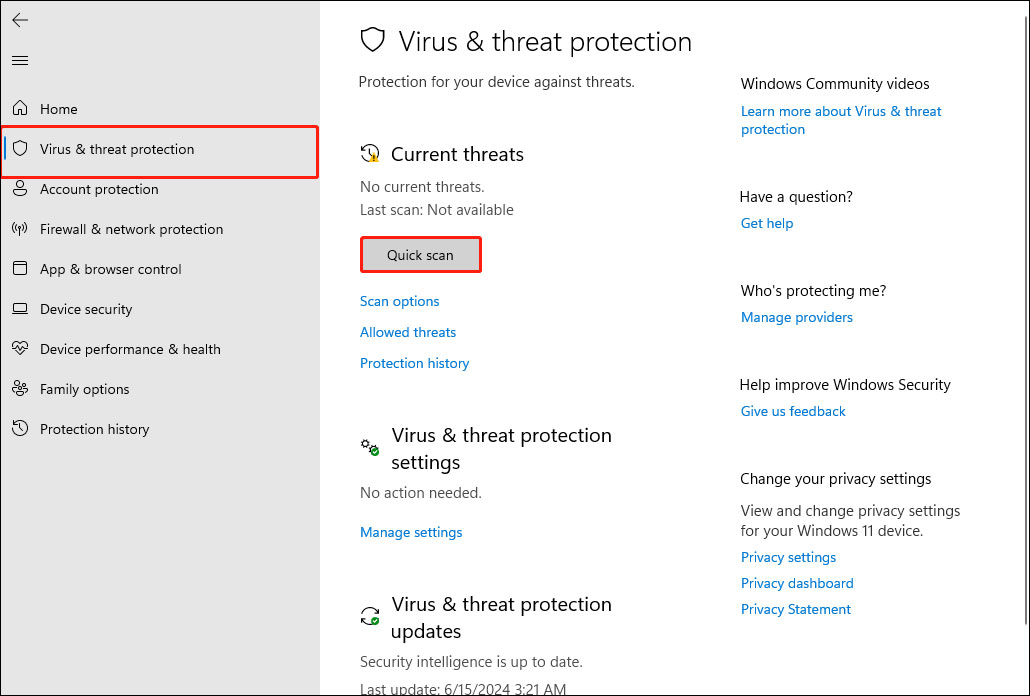
If the quick scan does not find any problem. You can further conduct a full scan by clicking Full scan in the Scan options section and then tapping Scan now to start this operation.
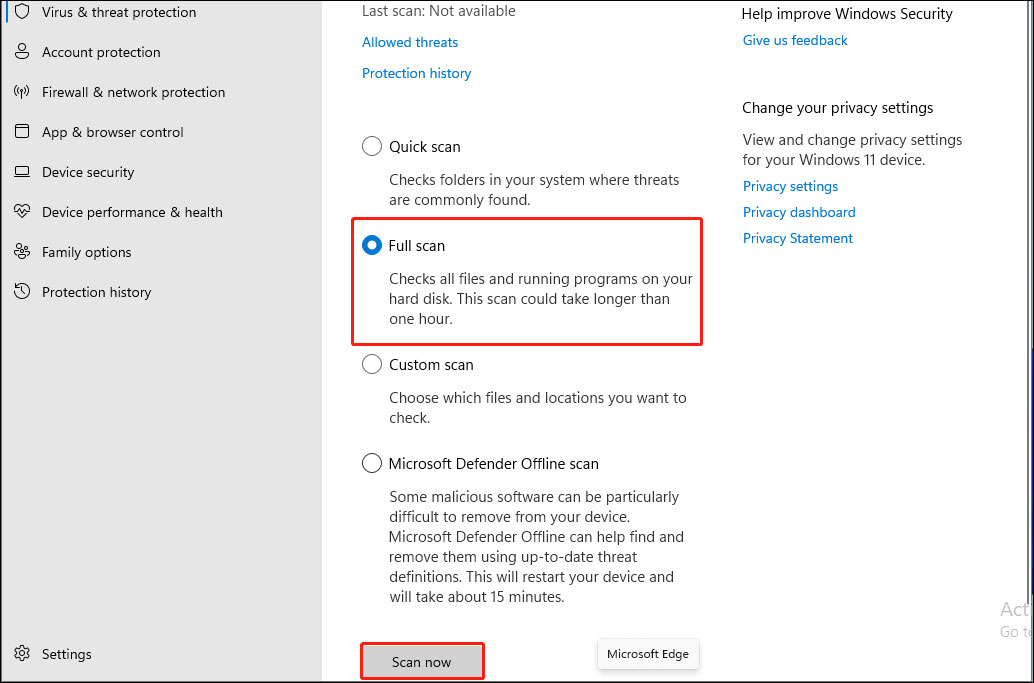
Step 3: The scanning process might take much longer time than a quick scan, so please wait patiently until it finishes.
Option 7: Perform System Restore
Performing a system restore is a great option for eliminating the ntoskrnl.exe blue screen error, which can restore your PC to a problem-free state. Note that you should create a system point before the BSOD ntoskrnl.exe error occurs.
Follow the steps to perform system restore:
Step 1: Search for Recovery in the Windows Search bar and open it.
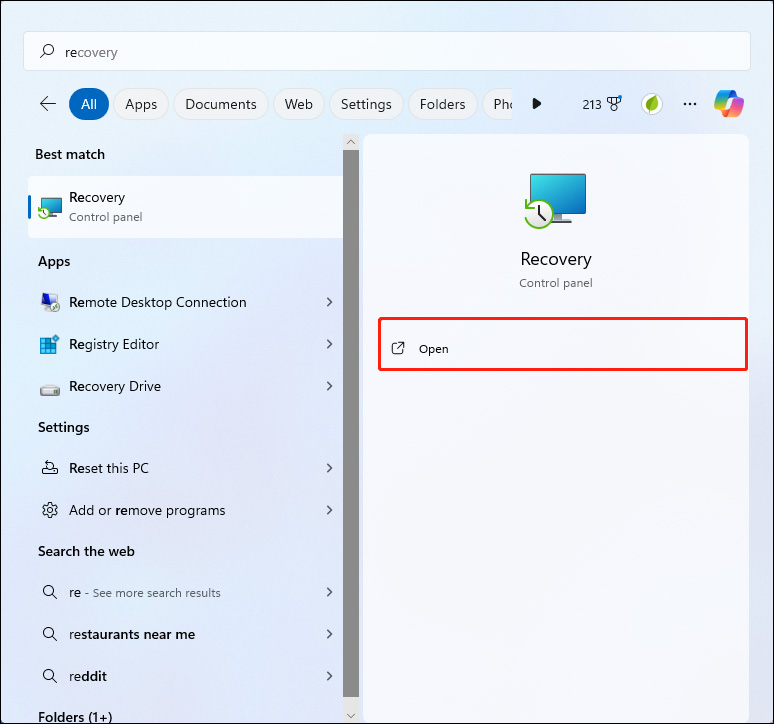
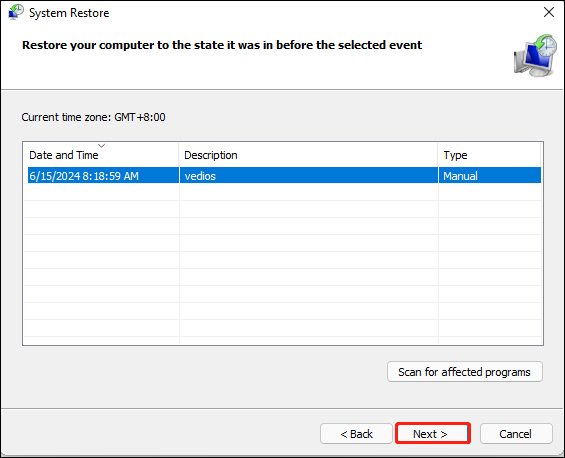
Step 2: Select Open System Restore and then click Next on the pop-up screen.
Step 3: Choose the restore point and click on Next.
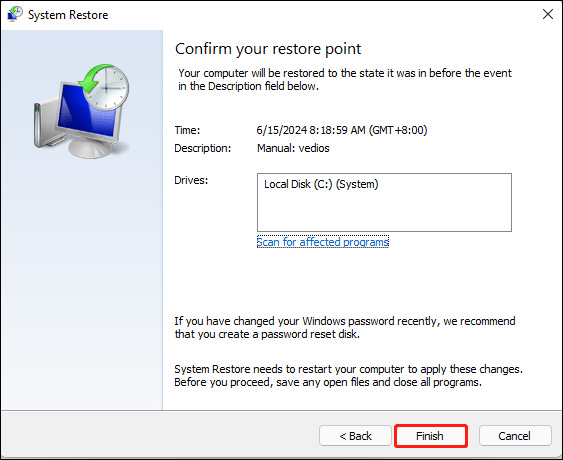
Step 4: Click Finish on the pop-up screen.
Recommended Data Backup Method
Sincerely hope that the solutions introduced above can help you deal with the ntoskrnl.exe blue screen problem successfully. However, the remarkable thing is that you are supposed to have the awareness of computer backup in advance for the sake of data security, as there is a possibility that you lose your significant data during the ntoskrnl.exe crash.
For the purpose of data backup, you may need the help of a professional and reliable data backup program. Here MiniTool ShadowMaker deserves to be strongly recommended, which can backup files/folders, partitions, system, and even the entire hard disk easily with just a few steps.
Just perform the following steps to back up your data with this useful assistant.
MiniTool ShadowMaker TrialClick to Download100%Clean & Safe
Step 1: Download, and install MiniTool ShadowMaker on your PC.
If you cannot boot up your current machine already, don’t worry, you can install this software on another working computer. Then use one of its powerful features – Media Builder. It’s a function that can make a bootable DVD/CD disc or USB flash drive. After connecting the bootable drive to the cash PC, you can boot your cash computer from the created bootable media to enter the MiniTool PE Loader interface where many options are for you to deal with some issues.
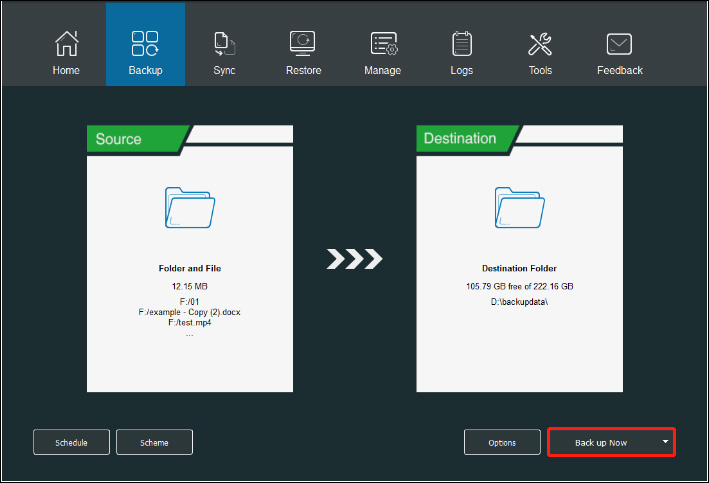
Step 2: Connect the external drive to your PC, and then launch this software. In the main interface of MiniTool ShadowMaker, tap Backup from the top menu.
Step 3: Click the Source section to select the files and folders you’d like to back up.
Step 4: Click the Destination section to choose a location to store the backup image. Here, external storage is recommenced.
Step 5: Click the Back up Now button to start the process, and then wait for the process to complete (the waiting time is proportional to the backup size).
Disconnect the USB that contains the backup image after the backup process. Furthermore, you can use the backup image to restore the lost files also resorting to MiniTool ShadowMaker Restore.
It is worth mentioning that if you are trying to restore a system to a computer with a dissimilar processor, motherboard, or chipset, the restored system is likely to fail to boot, causing incompatible issues. In this case, you can rely on the MiniTool ShadowMaker Universal Restore feature to solve some incompatible problems.
Wrap Things up
The “ntoskrnl.exe BSOD Windows 11” error may occur due to several reasons as mentioned above. You can perform the tested methods in this article to fix this issue. However, some of the methods may result in data loss, so you can use a data backup tool, just like the one introduced in this post to back up your precious data.
That’s all, and if you have any advice or problems regarding using MiniTool ShadowMaker, please don’t hesitate to contact us via [email protected] and you will be answered as soon as possible!