What Is Offline Files Windows 10
What is offline file? The Windows 10 offline files feature is a network feature of Sync Center that allows users to access files stored at another point on their network than their own computer, even if the network connection is not working.
All data made offline are saved in the offline files folder. If your system drive letter is the C drive, it is located in the C:\windows\CSC folder. You can view them at any time. If your computer is not connected to a network drive, the online-only network folder is empty with no files by default.
Offline files in Windows 10 are only available in Pro, Enterprise, and Education editions of Windows 10.
In addition to enabling offline files and always-on offline mode in Sync Center, your files may also be offline in the following situations.
- The connected server is unavailable.
- You have enabled work offline mode in File Explorer.
- The network connection speed is below a configurable threshold.
Why You Need Offline Files Windows 10
Why do you need offline files on your Windows? The first is that offline files can help you make exact copies of the web files you want to protect and use. The second is that you can access and view them at any time, especially when your computer is not connected to the network and server.
How to Enable/Disable Offline Files Windows 10
How to enable or disable offline files in Windows 10? There following are three ways available. Before enabling offline files Windows 10, please do the following preparations:
1. Create a shared folder to save all network files and folders to be synchronized.
- Create a folder. Right-click it to choose Properties. Then, click the Sharing tab and click Share.
- Click the arrow to choose Everyone to share with and click Add.
- Choose Read/Write under Permission Level and click Share.
- Go to the Sharing tab again. Click Advanced Sharing… and check the Share this folder In the same window, click the Permissions button and check the Allow box next to the Full Control option.
- After creation, go back to the Sharing tab and note down the network path.
2. Map the network drive to the local computer.
- Open This PC and select Map network drive under the Computer tab. Then, type the path of your shared folder and click Finish.
- Then, go to the mapped network drive. Right-click the files or folder you want to access to select the Always available offline option.
Way 1: Via Sync Center
How to enable offline files Windows 10? The first method is via Sync Center. Follow the guide below:
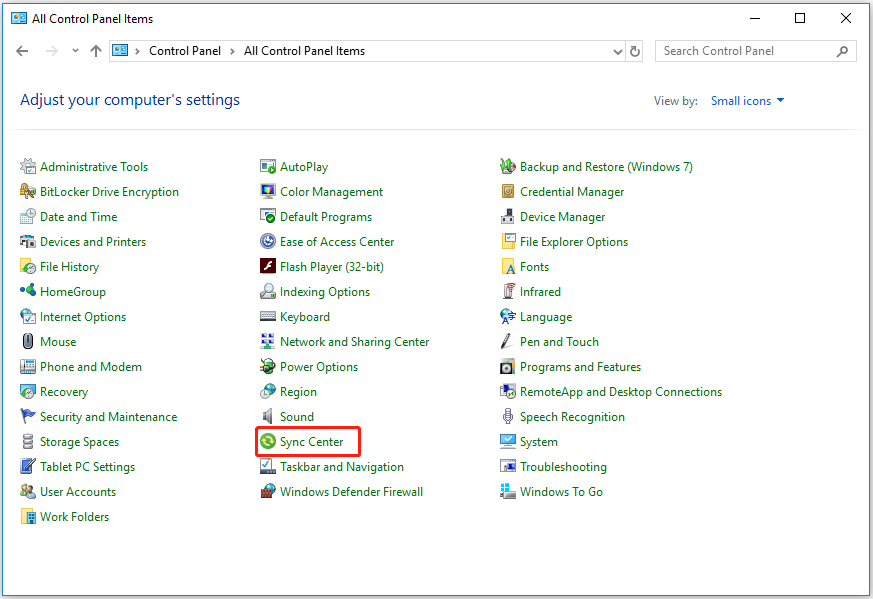
Step 1. Type Control Panel in the Search box to open it. Then, find Sync Center and click it to open.
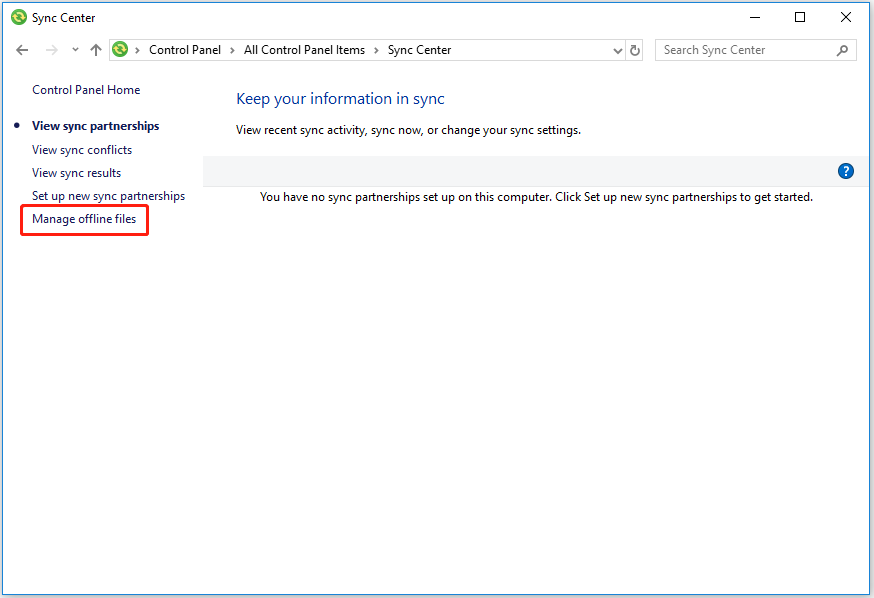
Step 2. Click Manage offline files in the left panel.
Step 3. Under the General tab, click Enable offline files and click Apply to enable it. After that, you will be asked to restart your computer. You just need to do that. Otherwise, you will encounter “Offline file is enabled but not yet active” in Windows 10 and your network files will not be synced to the local mapped drive.
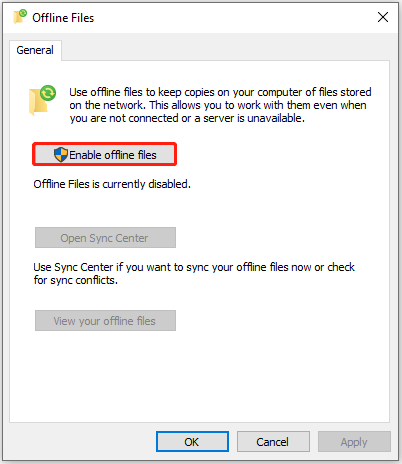
How to disable offline files Windows 10? You need to click Disable offline files in the Offline Files window. By default, the Enable offline files option will change to Disable offline files after you enable it.
Way 2: Via Registry Editor
The second method for you to enable offline files on Windows 10 is via Registry Editor. Here is how to do that:
Step 1. Type Registry Editor in the Search box to open it.
Step 2. Go to the CSC and CscService key in order with the following path.
HKEY_LOCAL_MACHINE\SYSTEM\CurrentControlSet\Services\CSC
HKEY_LOCAL_MACHINE\SYSTEM\CurrentControlSet\Services\CscService
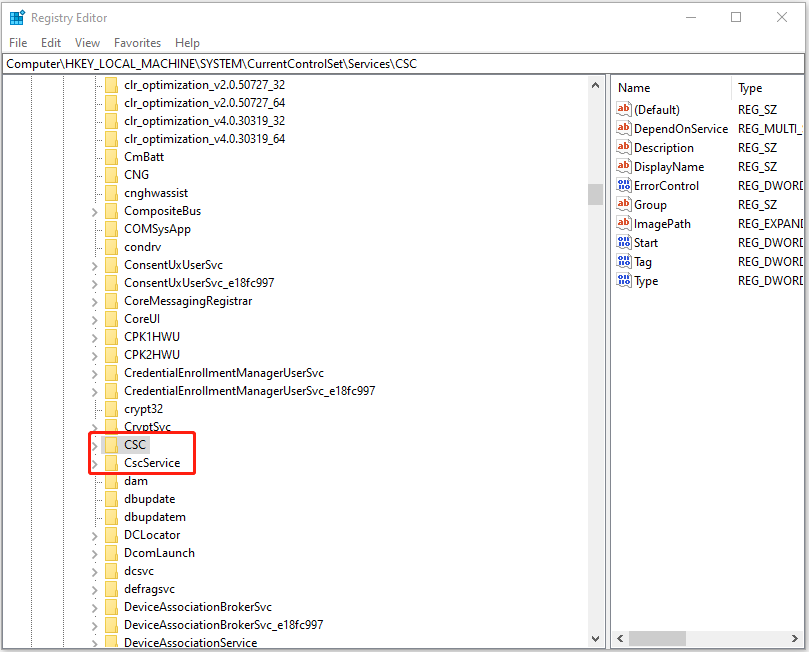
Step 3. Then, right-click the blank area in the right panel to select new and DWORD (32-bit) Value and set its name as Start.
Step 4. To enable offline files, set the start value of CSC and CscService to 1 and 2 in order.
Step 5. Restart your computer to save changes.
To disable offline files, you just need to set the start value of CSC and CscService to 4 and restart your computer to save changes.
Way 3: Via Local Group Policy Editor
How to enable offline files Windows 10? The third method for you is via Local Group Policy Editor.
Step 1. Type group policy in the Search box and then select Edit group policy from the start menu list.
Step 2. Go to Computer Configuration > Administrator templates > Network > Offline Files key.
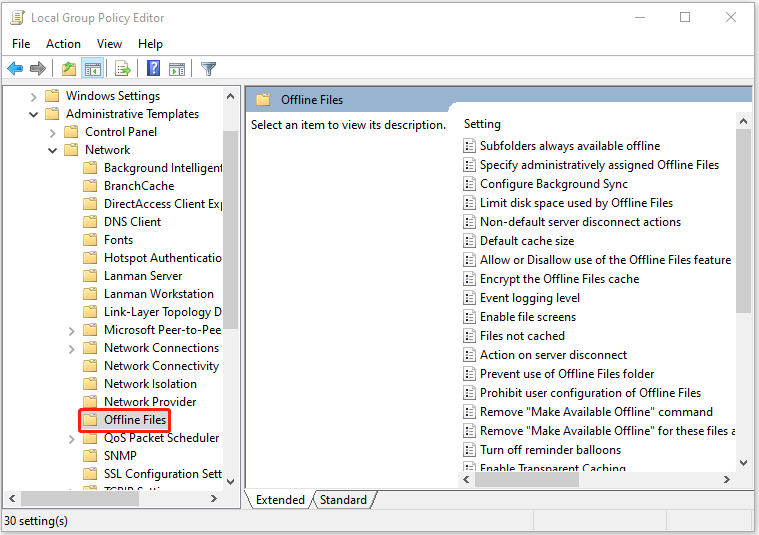
Step 3. Scroll down the Offline Files setting to find Allow or Disallow the use of Offline Files feature. Double-click it.
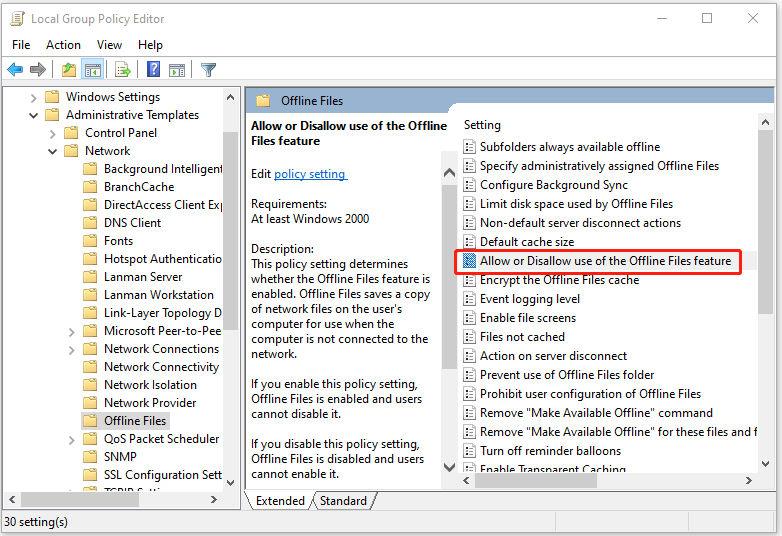
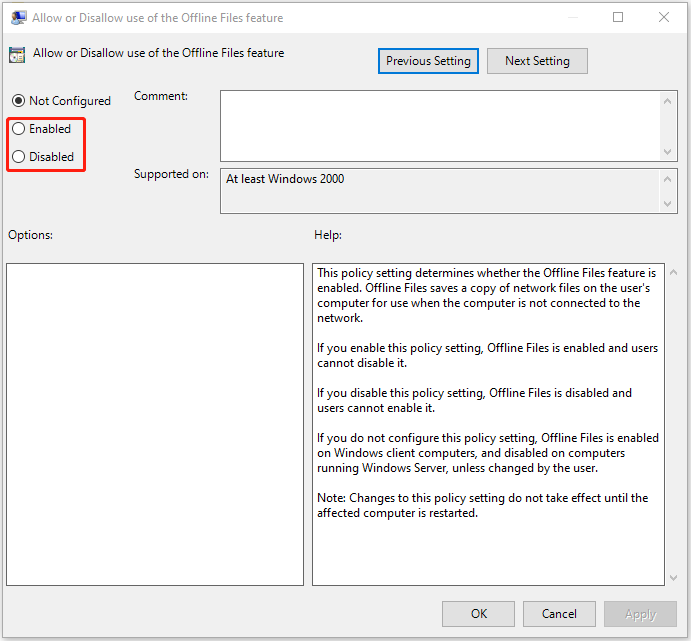
Step 4. Then you can enable or disable offline files based on your needs. To enable offline files, select Enabled in the next window. To disable offline files, select Disabled in the next window.
How to Configure Offline Files Windows 10
While the default settings are adequate for most users, Windows 10 offline files provide many settings that you can customize. For example, you can control the amount of local space used to store network files. You can enable encryption to add an extra layer of security. You can optimize offline files for slow network connections, and view and manage conflicts and results.
Next, we will introduce how to configure offline files Windows 10. Continue to read.
1. Check Offline Files disk usage
Follow the guide below:
- Type Control Panel in the Search box to open it. Then, find Sync Center and click it to open.
- Click Manage offline files in the left panel.
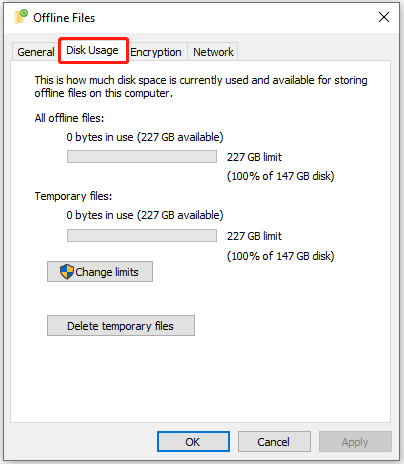
- Click the Disk Usage tab. Confirm the storage usage for the offline files.
- Click the Change limits button. Use the sliders to specify the maximum local space for offline and temporary files. Click the OK button.
- Click the Delete temporary files button and click the OK button.
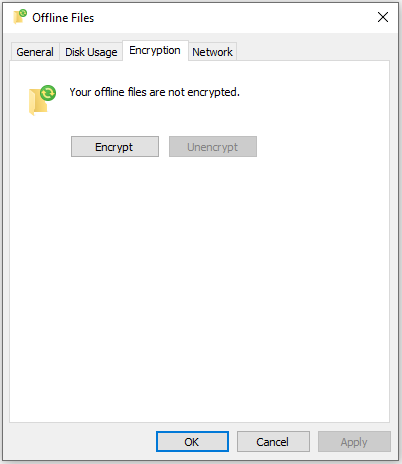
2. Encrypt or Unencrpt Offline Files
- Open Manage offline files again.
- Click the Encryption tab. Click the Encrypt button.
- Click the Unencrypt button to disable encryption and click the OK button.
- Once you complete the steps, the cached network files will remain encrypted.
3. Optimize sync for slow connection
- Open Manage offline files again.
- Click the Network tab. Confirm the time (minutes) to check for a slow connection to sync files.
- Click the Apply button and click the OK button.
After you complete the steps, when you are working offline because of a slow network connection, Windows 10 will check the connection speed using the time you specified. If the network is sluggish, you will continue to work offline, but it will switch the connection to online if it’s good again.
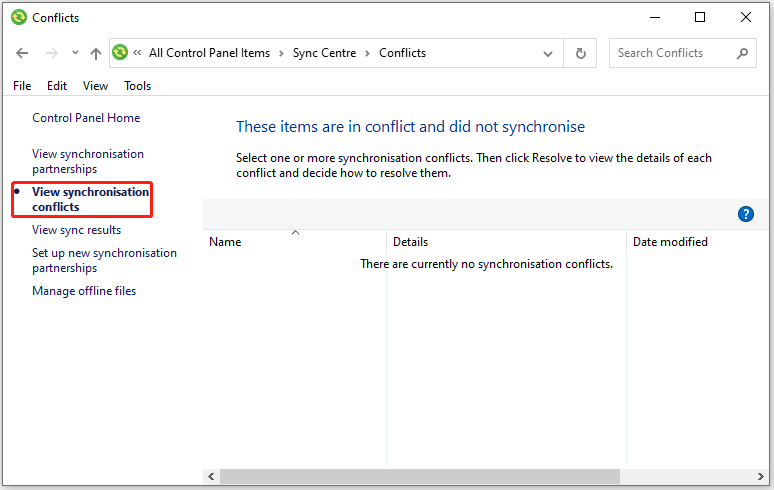
4. View Synchronisation Conflicts
- Click the View synchronisation conflicts button from the left pane.
- Then, you can see the name, details, and modified data of the conflicts.
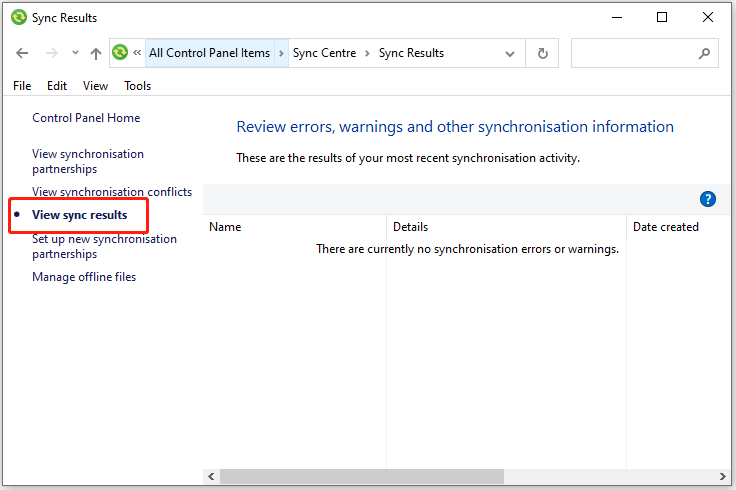
5. View sync results
- Click the View sync results button from the left pane.
- Then, you can see the name, details, and modified data of the results.
How to Sync Offline Files Windows 10
How to sync offline files on Windows 10? There are two ways for you.
Method 1: Sync Offline Files Manually
Step 1. Go to File Explorer > This PC > network locations, then select the mapped network drive created in advance.
Step 2. Right-click folders that contain offline files, then select Sync > Sync selected offline files.
Method 2: Sync Offline Files Automatically
Step 1. Open Sync Center again.
Step 2. Click the Offline Files folder, then you will see all the shared folders for offline files sync. Click Sync to sync the network files to the local computer immediately. You can click Schedule to make your files always in sync.
How to Sync Files to Network Drive
By now, you probably know how to sync network files locally using Offline Files in Windows 10. This is very useful for users who want to work with network files, allowing you to access and view them anytime you are offline from your computer.
But its steps are a bit complicated. Also, syncing is not always smooth and you may encounter various errors such as offline file conflicts, access denied, sync hangs, etc. There is an easier way to sync network files and keep them offline in Windows 10.
MiniTool ShadowMaker is a piece of professional Windows 10 backup software and it is designed to back up the files, folders, disks, partitions and the operating system. It also comes with the Sync feature, ensuring the files are in two or more locations and kept in pace. MiniTool ShadowMaker is one-way sync.
MiniTool ShadowMaker TrialClick to Download100%Clean & Safe
Detailed operating steps are listed as follows:
Step 1: Launch MiniTool ShadowMaker
- Please launch MiniTool ShadowMaker.
- Click Keep Trial.
Step 2: Specify Folders and Path to Sync
- Go to the Sync page and click it in the toolbar.
- Specify the source and destination for file sync.
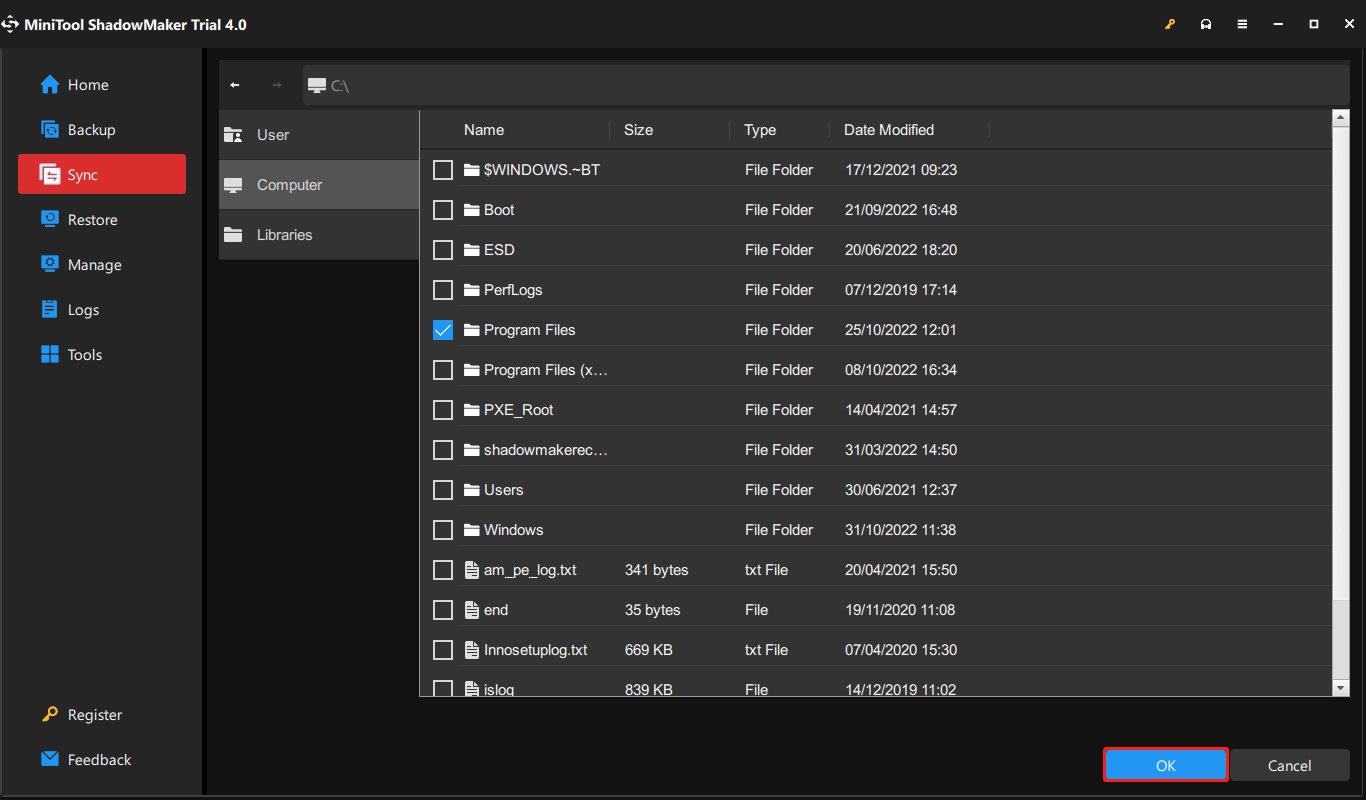
What to Sync
- Go to the SOURCE section.
- Under the SOURCE tab, three paths are available: User, Computer, and Libraries. You can choose a source to select files. Then click OK to continue.
Where to save synchronized folders
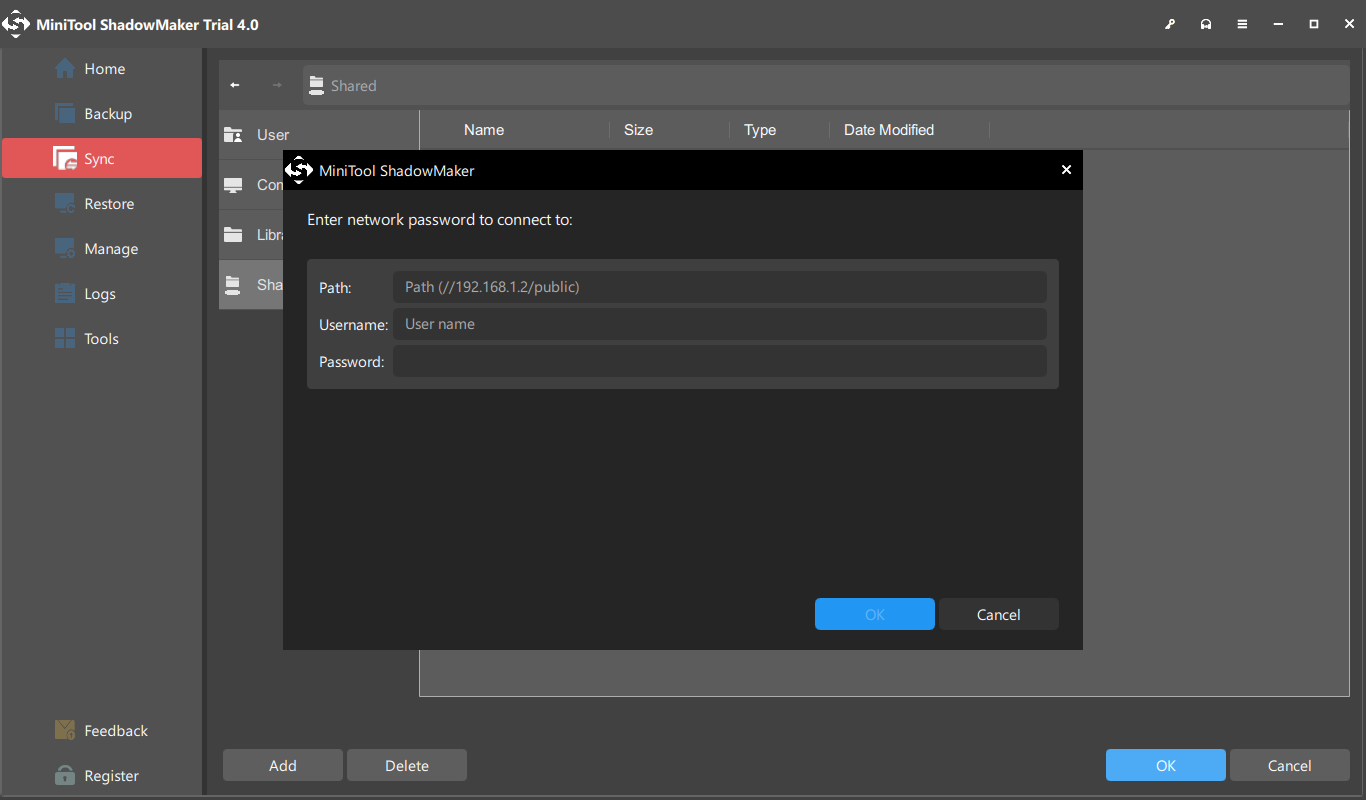
Under the DESTINATION tab, there are four paths available: Administrator, Libraries, Computer, and Shared. To sync files among multiple computers, choose Shared, type Path, User name, and Password in sequence and click OK to finish.
Step 3: Start to Sync Files to Another Computer
- Please go to Sync.
- You can click Sync Now to perform file sync or click Sync Later to postpone it. Besides, you can continue this sync task on the Manage page.
Bottom Lines
To sum up, this post shows what offline files Windows 10 is and how to enable and disable offline files Windows 10. If you have any problem with MiniTool ShadowMaker, please feel free to contact us via email at [email protected] and we will reply to you as soon as possible.
