It is really annoying to encounter PC stuck on ASRock screen when trying to boot your computer. How to fix it to boot your computer without errors again? Don’t fret! After reading this guide from MiniTool Solution, you will get around this tricky issue easily.
PC Stuck on ASRock Screen
It is common to suffer from PC stuck on boot screen with the motherboard manufacturer’s logo. In our previous articles, we have discussed how to fix PC stuck on gigabyte screen, PC stuck on MSI screen, PC stuck on ASUS screen, and more. Today, we will show you what you should do to address PC stuck on ASRock screen with detailed instructions.
According to other users in the forums, the factors below can attribute to PC stuck on ASRock boot screen:
- Conflicted peripherals.
- Incorrect boot sequence.
- Improper BIOS settings.
- Faulty RAM modules or slots.
How to Fix PC Stuck on ASRock Screen on Windows 10/11?
Fix 1: Restart Your PC Without Peripherals
Attached peripherals like a mouse, keyboard, external hard drive, printer, projector, speaker, headphone, webcam, USB flash drive and more might cause issues with power, driver conflicts and more, preventing your computer from booting properly. Here’s how to rule out the problematic peripherals:
Step 1. Press and hold the Power button until your computer shuts down.
Step 2. Disconnect all the peripherals from your Windows machine.
Step 3. Reboot your computer. If you can access the desktop this time, the culprit of PC stuck on ASRock screen might be certain external device. You can connect the peripherals one by one to exclude the conflicted device.
Fix 2: Clear the CMOS
CMOS is a small amount of memory on the motherboard that stores the Basic Input/Output System (BIOS) setting. The BIOS can be used for identifying and configuring hardware in your computer. When encountering boot issues like computer stuck on the ASRock logo, you can consider clearing the CMOS to restore the BIOS settings to the factory defaults. To do so:
Step 1. Shut down your computer and disconnect the system power cord from its AC power source.
Step 2. Open the case cover of your computer.
Step 3. Find the CMOS battery on the motherboard and pry it from the connector gently.
Step 4. After several minutes, reinsert the CMOS battery and then put the computer case cover back.
Step 5. Plug in the AC power cord to the power supply and press the Power button to see if PC stuck on motherboard screen is gone.
Fix 3: Check Boot Order
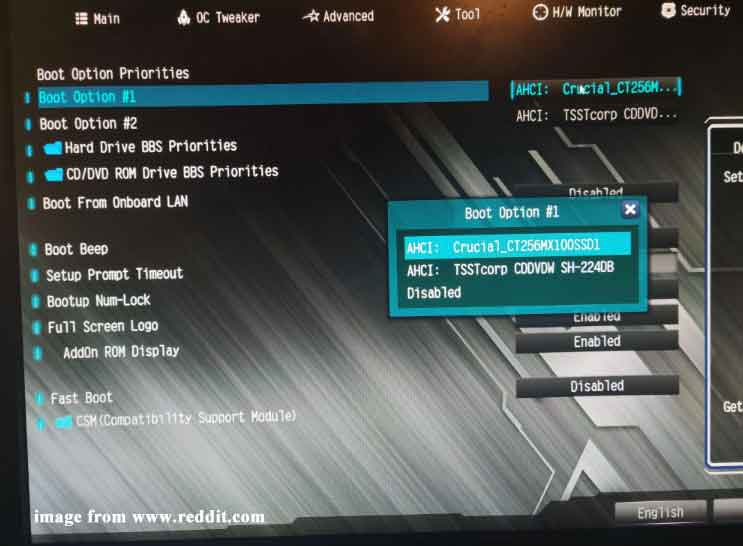
Incorrect boot sequence can also lead to some system or boot issues including PC stuck on ASRock screen. Therefore, you need to enter the BIOS menu to check if your default boot device is right. Here’s how to do it:
Step 1. Shut down your computer and then restart it.
Step 2. Press F2 or Del repeatedly when the system starts.
Step 3. Use the arrow keys to locate the Boot tab > set your system disk as the first boot device > hit Enter > press F10 to save the change.
Step 4. Restart your computer.
Fix 4: Check the RAM Modules & Slots
If your RAMs are not installed properly, PC won’t go past ASRock screen, either. Here’s how to check your RAMs:
Step 1. Power off your computer.
Step 2. Locate RAMs on the motherboard and remove them from the slots.
Step 3. Insert one RAM at one time while trying to boot each time. Also, you can place them in different slots to inspect if some slots are damaged. If any RAM modules or RAM slots are faulty, you need to replace them in time.
Fix 5: Perform Startup Repair
When your computer experiences consecutive boot issues like PC stuck on splash screen, you can turn to Startup Repair to diagnose and handle them. Here’s how to do it:
Step 1. Shut down your computer > reboot it > press the Power button to turn it off when the Windows logo appear on the screen.
Step 2. Repeat the process for 2 or more times until prompted by the Automatic Repair screen.
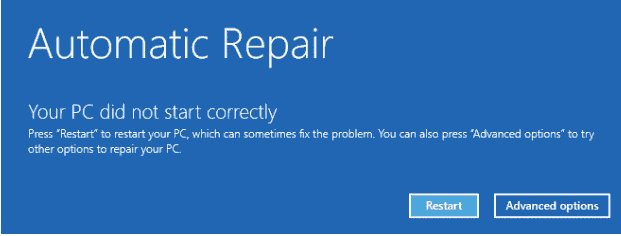
Step 3. Click on Advanced options to enter Windows Recovery Environment.
Step 4. Navigate to Troubleshoot > Advanced options > Startup Repair.
Fix 6: Reset This PC
If none of the solutions above work for you, the last surefire method is to reset your computer. Follow these steps:
MiniTool ShadowMaker TrialClick to Download100%Clean & Safe
Step 1. Boot your computer into Windows Recovery Environment.
Step 2. Tap on Troubleshoot and then hit Reset this PC.
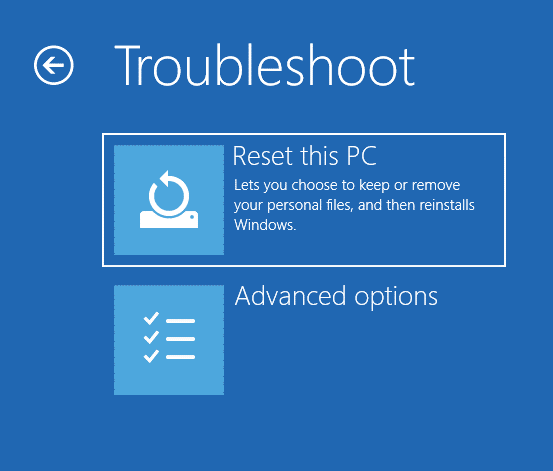
Step 3. Either select Keep my files or Remove everything.
Step 4. Choose Cloud download or Local reinstall.
Step 5. Follow the on-screen instructions to complete the rest process.
Suggestions: Create a System Image with MiniTool ShadowMaker
By now, you might manage to solve PC stuck on ASRock screen. Obviously, it will take much time to troubleshoot this problem because you don’t know the root cause. Is there a better way to deal with the similar boot or system issue?
The answer is definitely yes. You can back up your operating system in advance. With a system image in hand, you can restore your system to a working state when the OS goes wrong. To do so, MiniTool ShadowMaker is a good option.
This free PC backup software supports file backup, system backup, disk backup, partition backup, and disk backup. What’s more, it provides a one-click system backup solution that enables you to back up the system drive with just a few clicks.
Here’s how to perform one-click system backup with it:
Step 1. Launch MiniTool ShadowMaker and go to the Backup page.
MiniTool ShadowMaker TrialClick to Download100%Clean & Safe
Step 2. As you can see, the operating system is selected as the default backup source, so you only need to pick a storage path for the system image in DESTINATION.
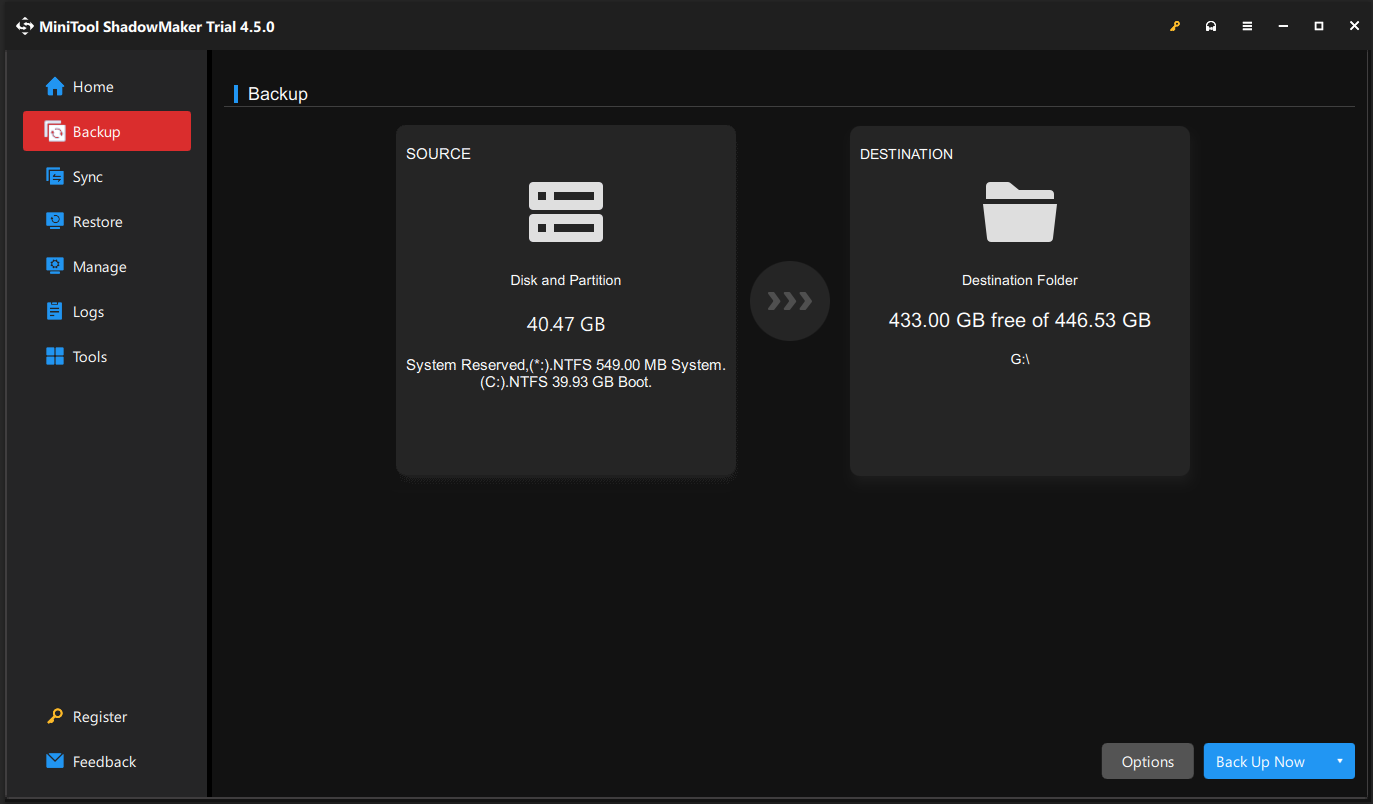
Step 3. Click on Back Up Now to start the process immediately.
After creating a system image, you can go to Media Builder in the Tools page to create a bootable USB drive. Once your computer fails to access the desktop, you can boot it from this drive and perform system recovery with it.
Final Words
This guide introduces why PC stuck on ASRock screen occurs and how to solve it in 6 ways. More importantly, it is highly advisable to create a system image and a bootable USB drive with MiniTool ShadowMaker so as to restore your system to a previous state when there is a need.
MiniTool ShadowMaker TrialClick to Download100%Clean & Safe
For more quires about our product, welcome to share them with us via [email protected]. We are looking forward to receiving your feedback!
