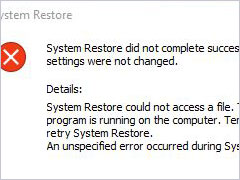
You may not be very familiar with what Windows restore point is, how to create a restore point, and how to restore system Windows 10/11. In this guide, MiniTool aims to give you some helpful knowledge about system restore point Windows 10/11. Get details now!
What Is a System Restore Point?
The System Restore feature can create a backup copy of important Windows operating system files and settings and save it as a restore point. When the system fails or is unstable, you can use a restore point to revert the device to an earlier state to fix the issue. A system restore point is designed to recover the system files, installed applications, Windows Registry as well as system settings.
If a severe problem occurs after installing an update, app, or driver, or after modifying the system settings incorrectly, you can use the system restore point to reverse the computer to an earlier point.
Instead, it will not help you to revert your personal important files such as documents, music, photos, videos, and the like. Therefore, you should know that the restore point – Windows 10/11 can only help you to reverse the changes in Windows.
Meanwhile, the Windows restore point is different from a system image backup. The system image is an exact copy of a drive, including Windows, system settings, programs, and personal files as well as the drive required by Windows to run. It can help perform a comprehensive restoration in the event of an operating system or hard drive malfunction.
You should now have a general understanding of the Windows system restore point. The following part will walk you through the steps on how to create restore point Windows 10/11.
How to Create Restore Point Windows 10/11?
This convenient recovery feature, by default, is disabled. So before you create a Windows 10 restore point manually or make an automatic creation in the system, remember to enable it.
Here’s a full guide to show you how to set a restore point Windows 10/11.
Step 1: Type Create a restore point in the search bar of Windows 10 or Windows 11 and choose it.
Step 2: Find and click the Configure… button from the System Properties window.
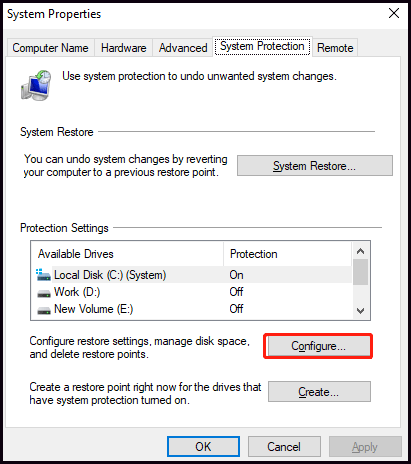
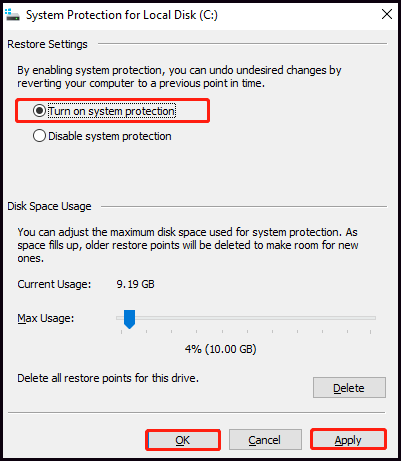
Step 3: Check the switch of Turn on system protection and then click Apply and OK to save the change.
Step 4: Choose the partition associated with the system from the Protection Settings table and click the Create… button.
Step 5: Input a description to the system restore point and click Create to continue. The description can help you distinguish different restore points when performing a system restore.
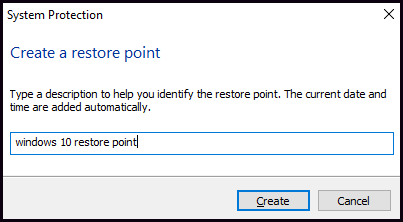
Step 6: Wait for the process to complete. After receiving a message that tells you the restore point was created successfully, click the Close button to exit the window.
How to create a system restore point? When all steps are done, then you can successfully create system restore point Windows 10/11 to reverse some changes. You should also know how to restore system in Windows 10 and Windows 11.
How to Restore System?
Try to take advantage of the recovery feature to apply a restore point to undo the changes if you encounter an unknown issue after updating or installing system settings.
If your computer can boot correctly when it confronts some errors, you can perform a system restore in the System Properties window. But if your computer no longer starts properly, you can complete this action from Windows Recovery Environment (WinRE). Here’s how to restore Windows 10/11 from boot with a step-by-step guide.
Step 1: Press the Power button to power on your PC. When the Windows logo appears, press Power again to stop its start. Then at the third time, the computer will enter Automatic Repair. Just click Advanced options to open WinRE.
You can also open Start and click Settings, then choose Update & Security and click Recovery, and finally, click the Restart now button under Advanced startup.
Step 2: Choose Troubleshoot > Advanced options and click the System Restore button to go on.
Step 3: In the next pop-up window, click the Next button.
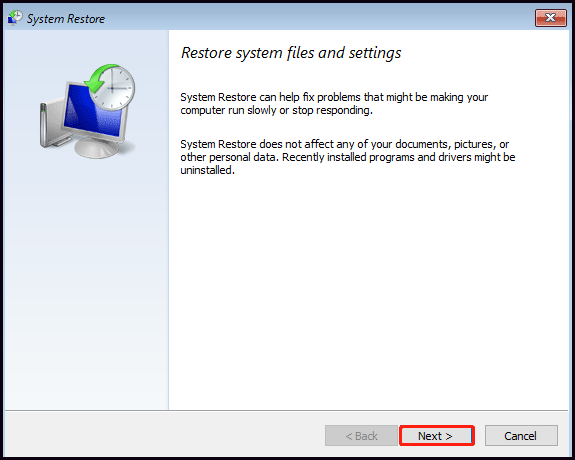
Step 4: Select a system restore point and click Next. If there are a couple of restore points, you can distinguish the needed one according to your description and the created time and date.
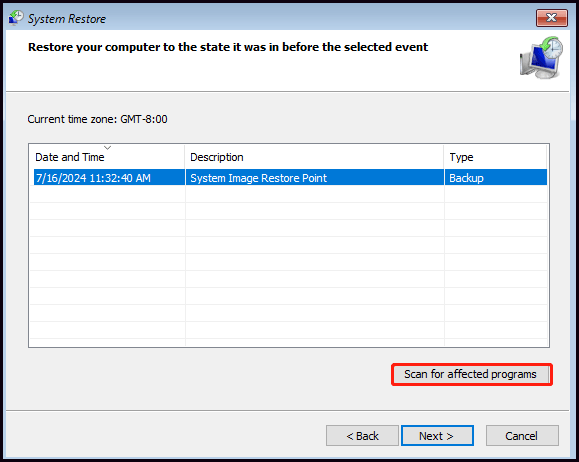
Step 5: Click the Scan for affected programs button to make sure which apps that were added after the restore point was created will be removed. Then click Close and Next in turn.
Step 6: Confirm the system restore point and click the Finish option.
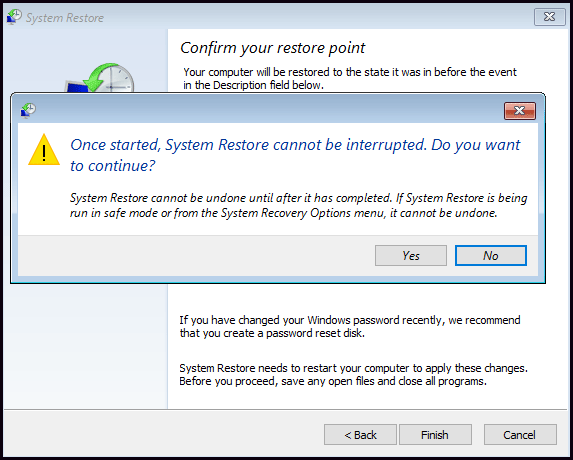
After completing the steps, the system restore will recover the computer to its previous working state. Then you can reinstall your affected apps after the process is finished.
Also read: Recover Files After System Restore in Windows 11/10/8/7 Easily
Common Problems That Can Happen with System Restore
Some users also complain that they face some difficulties when they create a system restore point Windows 10/11 or try to perform a system restore. Indeed, the System Restore feature is useful and can get you out of a very tight spot. Whereas, it will not work as expected. Here touches on a few common problems with system restore points you may encounter.
1. System Restore Point Cannot Be Created
System Restore point – Windows 10/11 can help you undo the changes or resolve the issue when a system error occurs. However, some people reflect that they cannot create a System Restore point because the specified subject is not found.
2. System Restore Point Is Missing
You may encounter a problem of System Restore point missing when you are trying to reverse your computer to an earlier point. There are a couple of likely reasons for this issue, for instance, Windows update, insufficient storage space for creating a restore point Windows 10/11, accidental restore point deletion, System Restore disabled or turned off, defragmented page file, and so on.
3. System Restore Did Not Complete Successfully
There is a considerable likelihood that System Restore didn’t complete successfully when restoring the system. Plenty of reasons could be the root cause such as System Restore failing to restore the directory from the restore point, System Restore could not access a file, System Restore failing to extract the file, or other factors.
4. System Restore Stuck
The problem System Restore stuck is another scenario including System Restore initializing and Windows System Restore stuck on restoring files, which could happen when you are trying to restore your computer to a previous date.
Of course, we have not listed all the problems you may encounter. However, you should know that many issues could appear when you create a system restore point Windows 10/11 or perform a system restoration.
Also read: What’s Windows 11/10 System Restore & How to Enable/Create/Use
A Useful Suggestion to Safeguard Your PC and Files
As you know, the system restore point only reverts your Windows updates or settings instead of personal files, media data, or others. Additionally, when you complete a system restoration, you may come across some irrational problems. Thus, in order to protect your Windows PC and files, it’s advisable to create a Windows backup.
The system image backup can help you restore your entire Windows including the Windows files, computer settings, especially the personal files and programs. It is recommended to use MiniTool ShadowMaker, the best and professional backup software to backup Windows 11/10.
MiniTool ShadowMaker supports backing up files, folders, partitions, disks, and the operating system. It is a piece of SSD cloning software.
MiniTool ShadowMaker TrialClick to Download100%Clean & Safe
Step 1: Launch the software and click the Keep Trial button.
Step 2: Go to Backup, the operating system is chosen by default. If you want to change, choose the SOURCE section to select Disk and Partitions and select the system disk you want to back up. Then click the OK button to continue.
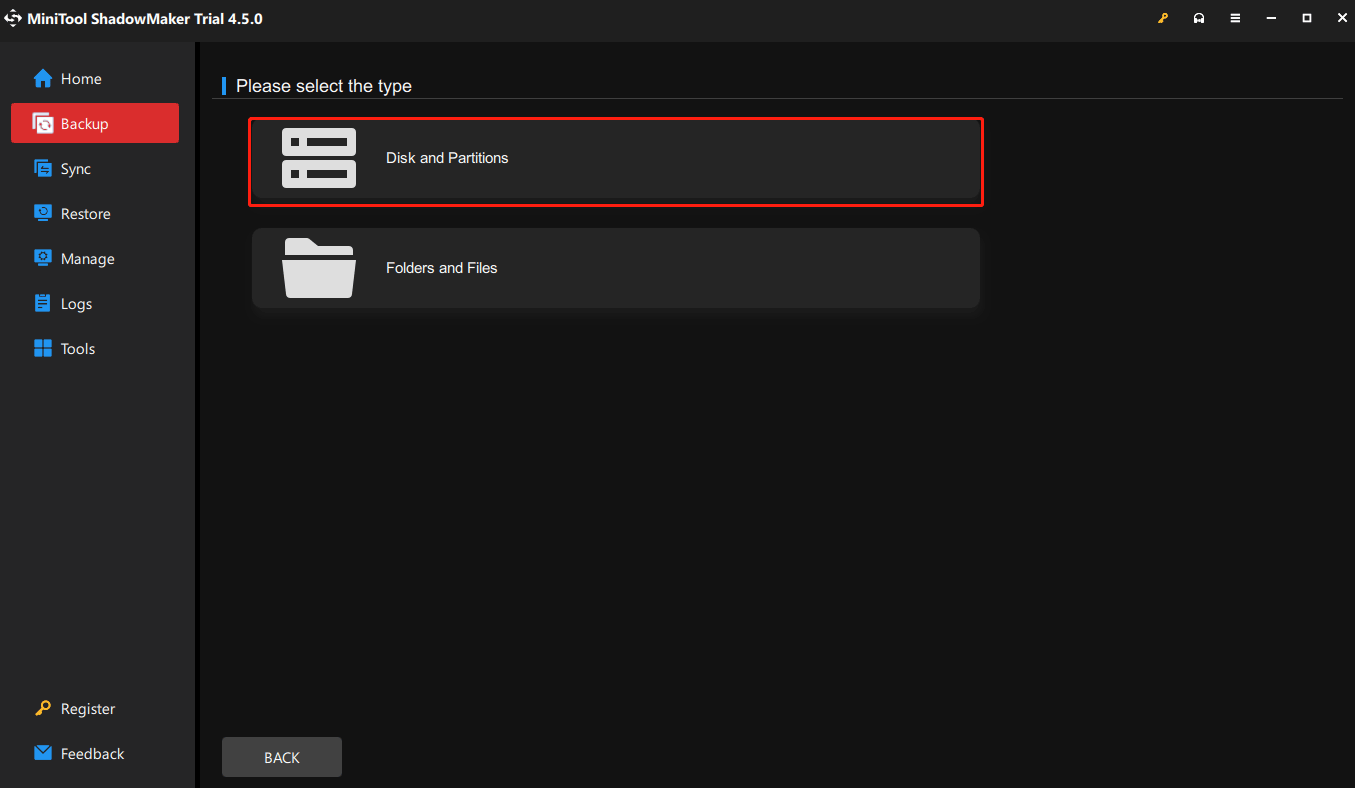
Step 3: Click the DESTINATION section to select a place to save your image backup based on your needs. An external hard drive would be a suitable choice. After that, click OK to go on.
Before performing the backup process, MiniTool ShadowMaker also enables you to set up some backup configurations. Click the Options button, tap on the Schedule Settings tab, and toggle on the switch turned off by default. You can schedule automatic backups, daily, weekly, monthly, or on event.
The best backup software also provides three different backup schemes for you. They are the full backup, incremental backup, and differential backup, respectively. The incremental backup is selected by default and you can change it in the Backup Scheme section.
There are also some other advanced backup settings such as the image file size, the backup compression level, image creation mode, and so on. Refer to Backup Settings to know more.
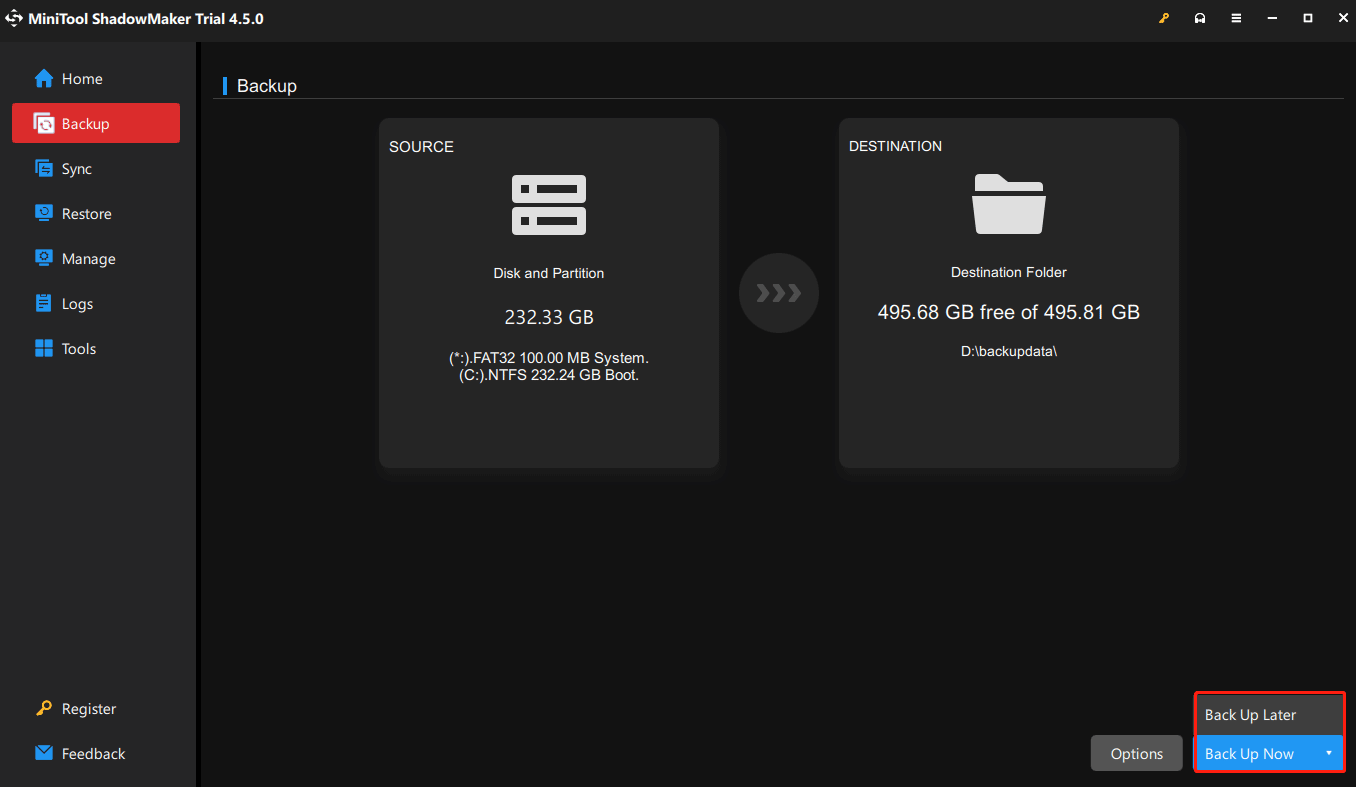
Step 5: Click Back Up Now to start Windows backup immediately. Or click Back Up Later to put off the Windows backup process and then you can click the Back Up Now button in the Manage page to restart it.
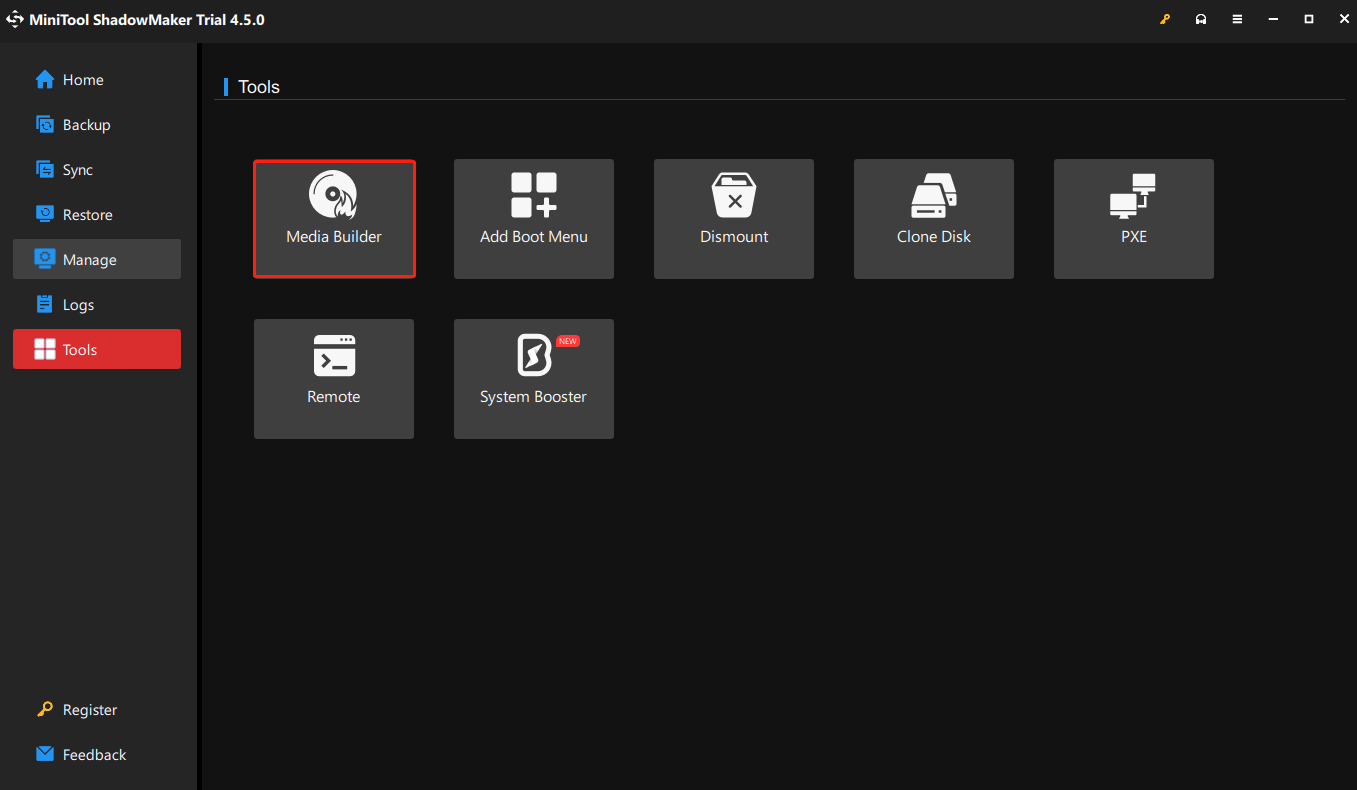
Step 6: In the Tools page, to respond to the situation that your computer cannot boot the operating system, you need to create bootable media by clicking the Media Builder option.
From the above introduction, you can see that MiniTool ShadowMaker is a piece of powerful backup software that helps you to keep the PC and files safe. And with the Windows backup image, you are able to restore your computer to an earlier point.
Bottom Line
The System Restore point Windows 10/11 is definitely a helpful and straightforward recovery option to use when you are having certain problems with your PC after updating or installing new system settings. This feature will only remove drivers, applications, and Windows updates installed after the restore point is made instead of your personal files.
What is a system restore point? And how to create Windows 10/11 restore point? This post has introduced you to the answers. Besides, it also shares a professional way to protect your Windows PC and files.
If you have any problem with MiniTool ShadowMaker, please send an email to [email protected] and we will reply to you as soon as possible.
System Restore Point Win10 FAQ
Go to Folder Options > View, and uncheck the Hide protected operating system files option, instead, check Show hidden files, folders and drives.
![[7 Ways] How to Restore Computer to Previous Date Windows 11?](https://mt-test.minitool.com/images/uploads/2021/11/restore-computer-to-previous-date-windows-11-thumbnail.jpg)

