About Windows 10 Update Assistant
The accessible and user-friendly tool designed by Microsoft – Windows 10 Upgrade Assistant, which allows you to download and install the latest version of Windows 10 on your computer by a few mouse clicks and the process won’t make your files lose.
Even though many other users out there have installed the Windows 10 update without incidents, I strongly advise that you had better take the time to do a system backup before I go further.
The latest updates can be downloaded and installed on your device by the Windows 10 Update Assistant. Feature updates such as, the Windows 10 May 2019 Update (version 1903) offer new functionality, which can help keep your systems secure. After you download Windows 10 Update Assistant, you’ll get these new updates automatically.
In addition, you can update Windows 10 yourself if you want to check for quality updates or if you don’t want to wait for an automatic update. And you can defer updates — go to Windows 10 servicing options if you’re an IT Professional.
How to Upgrade to the Latest Windows 10 Version by Windows 10 Update Assistant
Windows 10 version 1903 provides all the latest feature improvements and security enhancements for your Windows device.
The latest Windows 10 version on your Windows PC can be installed by several methods. Of course, the most common method is to use the built-in feature named Windows Update, which is available from the Settings menu.
But if you are one of the unfortunate people whose Windows device or computer is stubbornly refusing to get the official Windows Update from the Microsoft servers, then fret not, you can try the following solution – Windows 10 Update Assistant.
You can run the tool yourself by just visiting the Windows 10 software download website and following the instructions on the site for installing the latest version of Windows 10. Here is how to use Windows 10 Update Assistant to upgrade to the latest version of Windows 10.
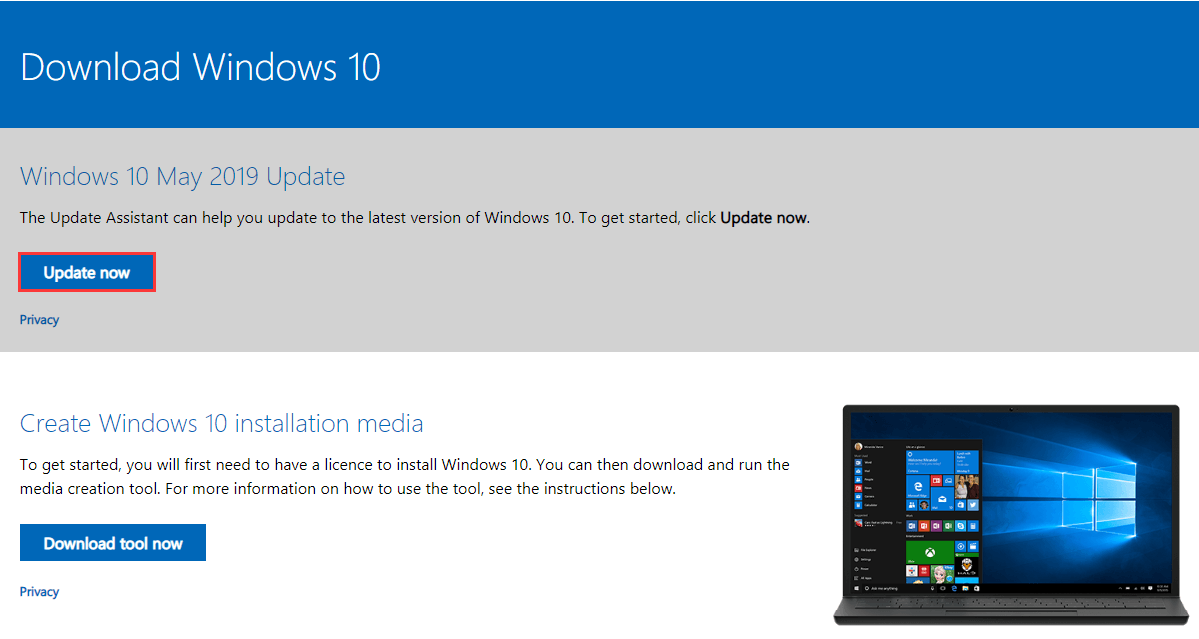
Step 1: You need to visit the official website and click the Update now button on the page. Then the 719-bytes exe file will be downloaded to your computer.
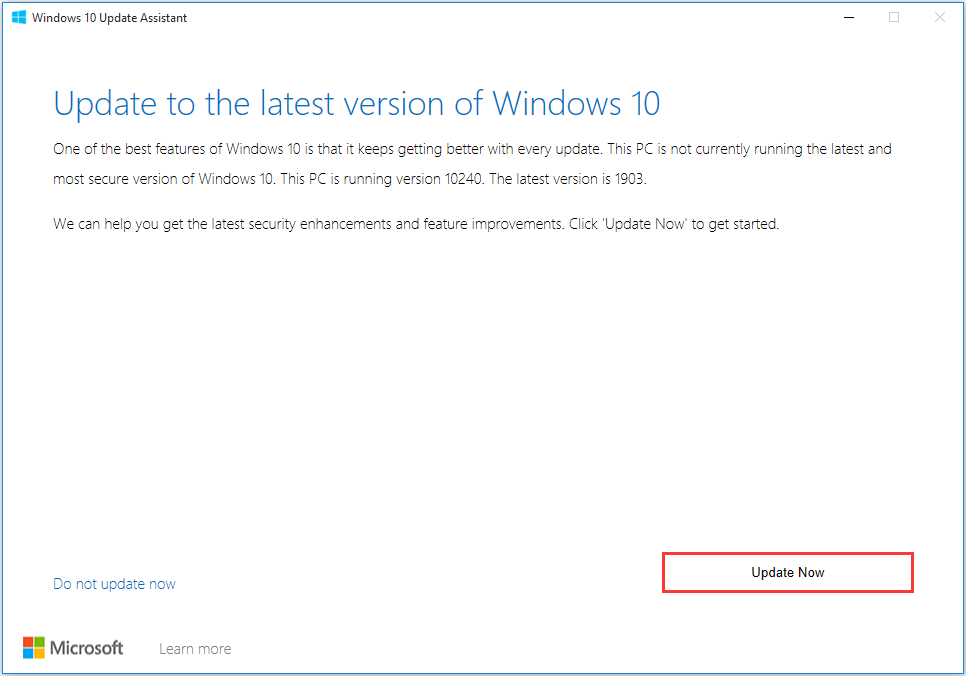
Step 2: When you run the tool, you will see the main screen of the tool. It will check for updates automatically and then you can click Update Now to start the process.
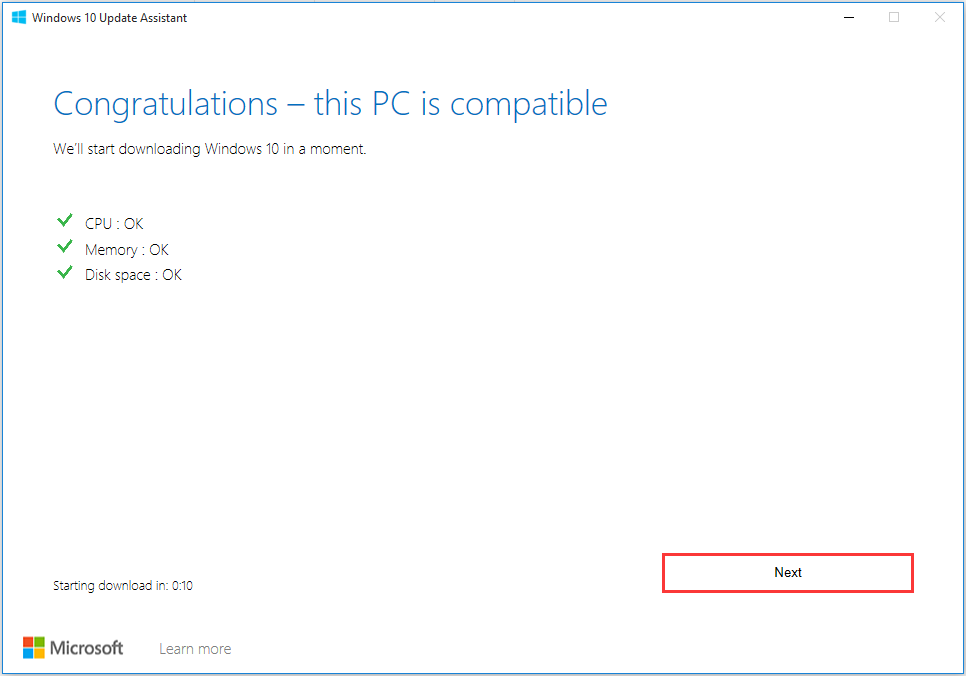
Step 3: Then there will be some requirements test for your device, which means it will check if the CPU and memory configuration is up to par and if there is enough available disk space. If all appears well, you can click Next to continue.
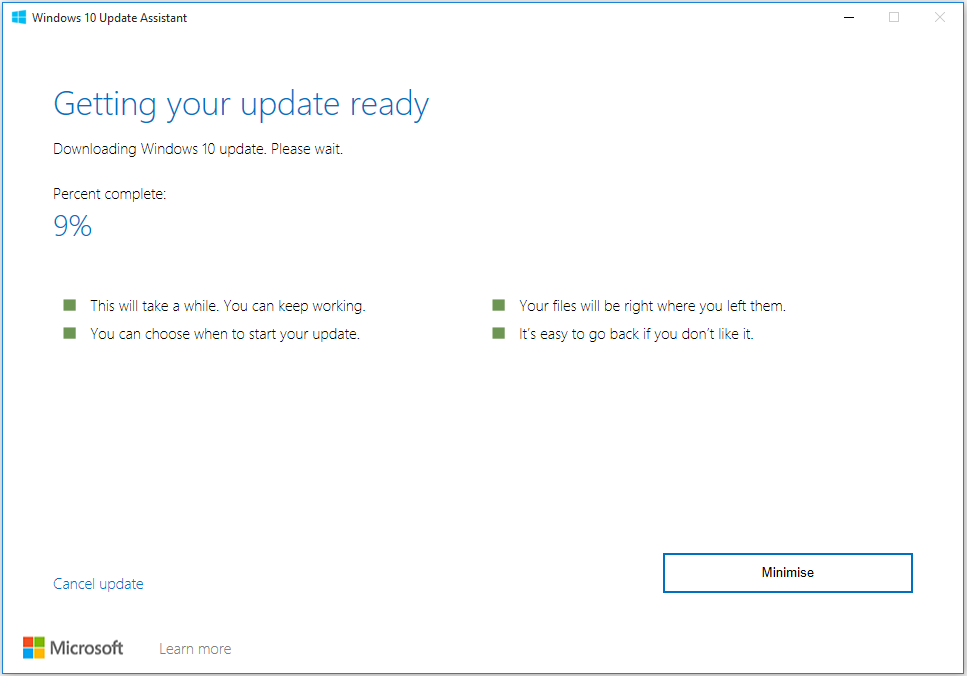
Step 4: Then Windows 10 Update Assistant will start to download files. Since this installation will take some time, you can click Minimise and continue to do your own work.
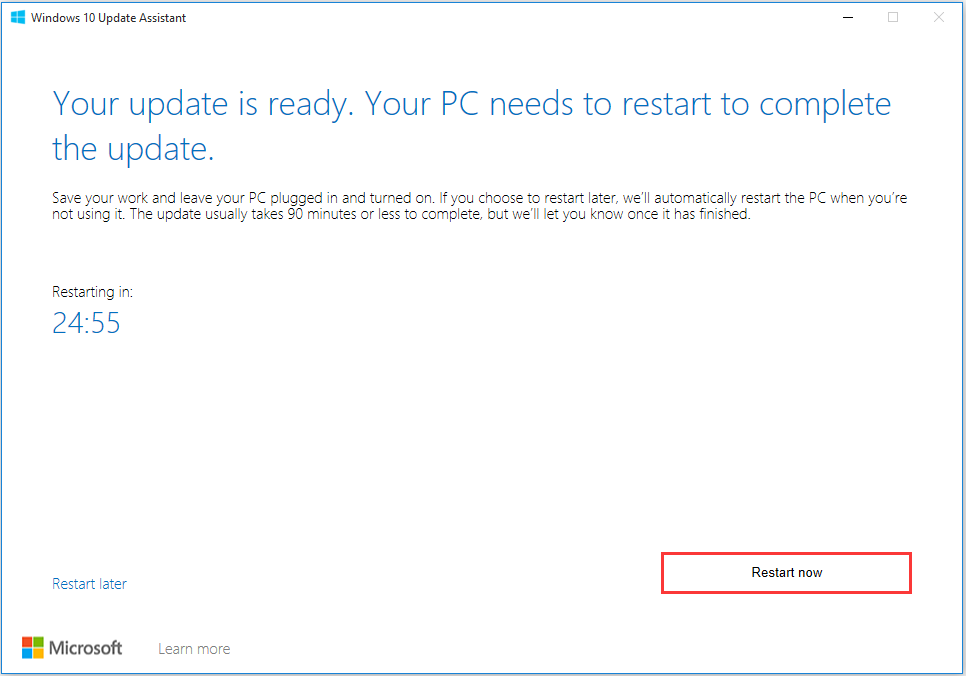
Step 5: When the update process is completed, you will be prompted to click Restart now to allow the changes to take effect. If everything goes well, your computer should be running the latest available Windows 10 version after the reboot.
Further Reading:
What’s new in this new version? What can you get in this version after you update it?
In addition to security and performance improvements, the update includes new features such as new lightweight themes, Windows Sandbox for application testing, and the ability to pause updates (including the Home version).
Here are some other features of Windows 10 version 1903:
- Speed improvements (thanks to better spectre fixes)
- Cortana and the Search Bar are separating
- The Start Menu support searching all Your PC’s files
- Windows 10 lets you uninstall more built-in applications
- 7 GB of your PC’s storage reserved for updates
- A less cluttered default Start Menu
Back up Files Before Updating by the Free Software – MiniTool ShadowMaker
Before upgrading to the latest version of Windows 10, you had better make sure that you have backed up important data and system. This operation will help you restore files and recover your system when the system crashed.
I will introduce the third-party free backup software: MiniTool ShadowMaker for you. The program has lots of advanced backup features which allows you to back up important data and system in simple steps.
Here are more details about MiniTool ShadowMaker. This free backup software is designed for Windows 10/8/7, which can provide data protection & disaster recovery solution for you.
This freeware is flexible, which enables you to back up files, Windows operating system, disk, and partition automatically to an external hard drive, flash drive, thumb drive, pen drive, NAS, etc. on a regular basis.
In addition, there are three types of backup on this software: full backup, incremental backup, and differential backup. You can choose one of the backup types based on your need. Simultaneously, disk management can be enabled. All in all, this software can meet any of your demands.
This Windows backup software offers a Trial Edition that allows 30-day free trial for all backup features. If you want to use it permanently, get its Pro Edition. Now you can download and try MiniTool ShadowMaker Trial Edition to back up your system.
Now, let’s see how to back up your Windows system after you upgrade to Windows 10 latest version.
Step 1: Launch MiniTool ShadowMaker
- Launch MiniTool ShadowMaker.
- Keep using the trial edition.
Step 2: Choose Backup Source
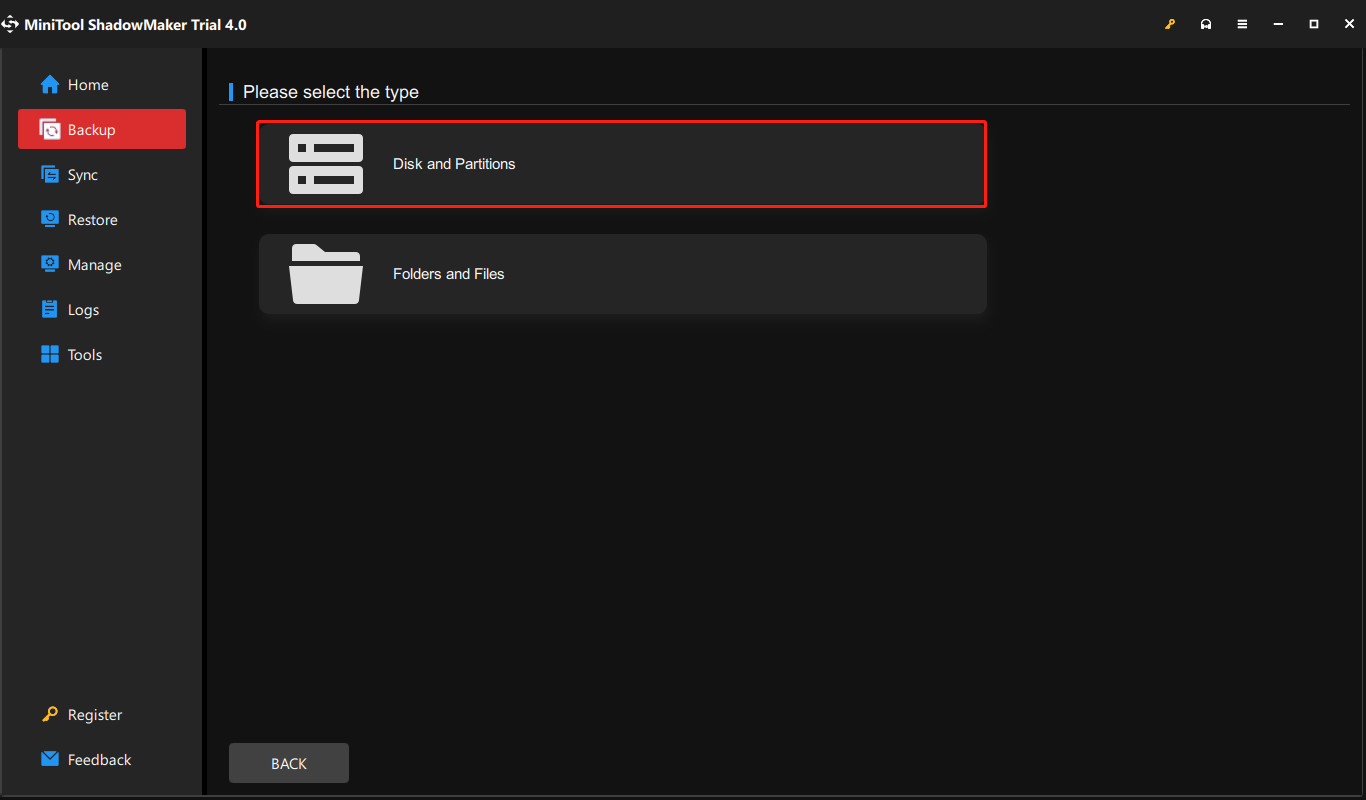
- Click SOURCE in the Backup page and then select the source type – Disk and Partitions.
- Select the system disk where Windows 10 is installed from the following combo box and check all the partitions, click OK.
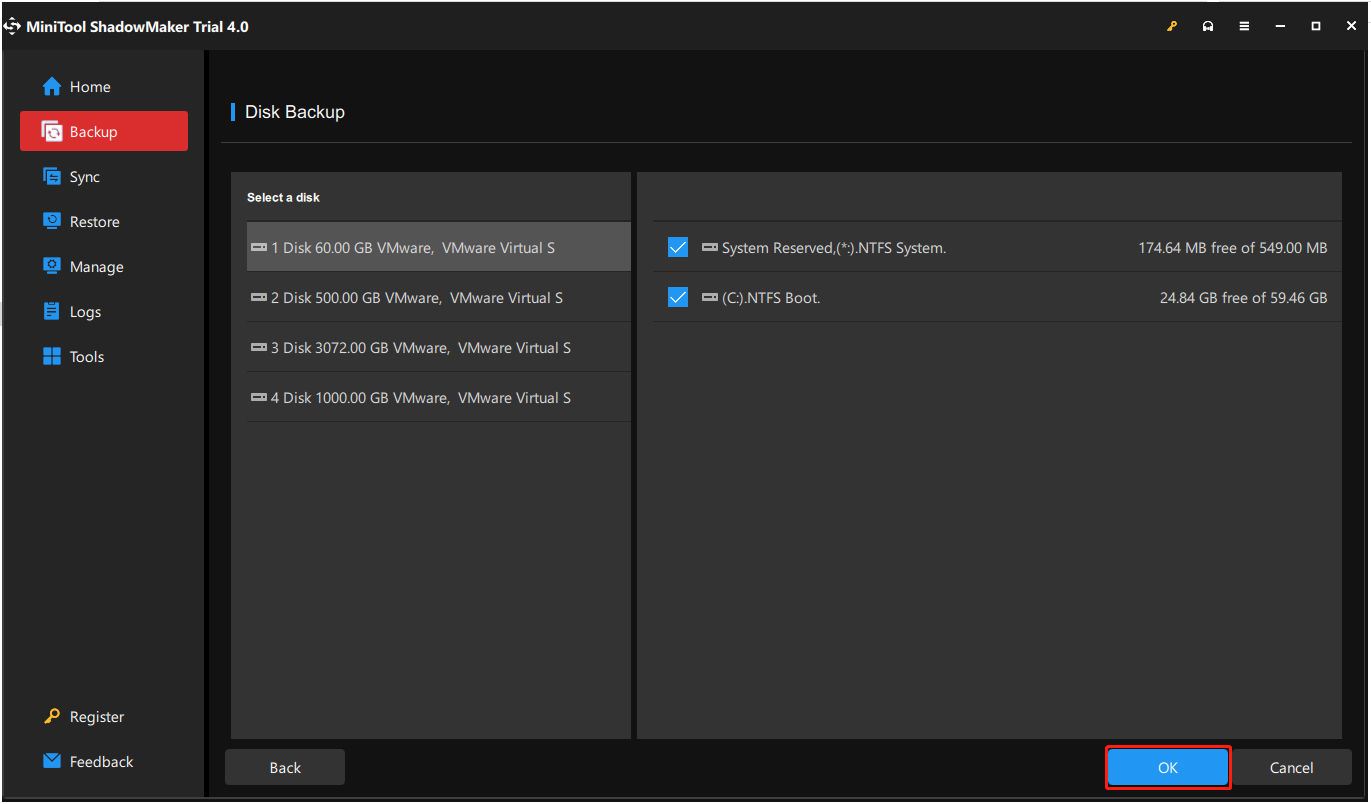
Step 3: Choose a Destination Path
- MiniTool ShadowMaker allows you to back up your system to an external hard drive, USB flash drive, NAS, and more.
- Choose one destination path to store your system based on your needs and click OK.
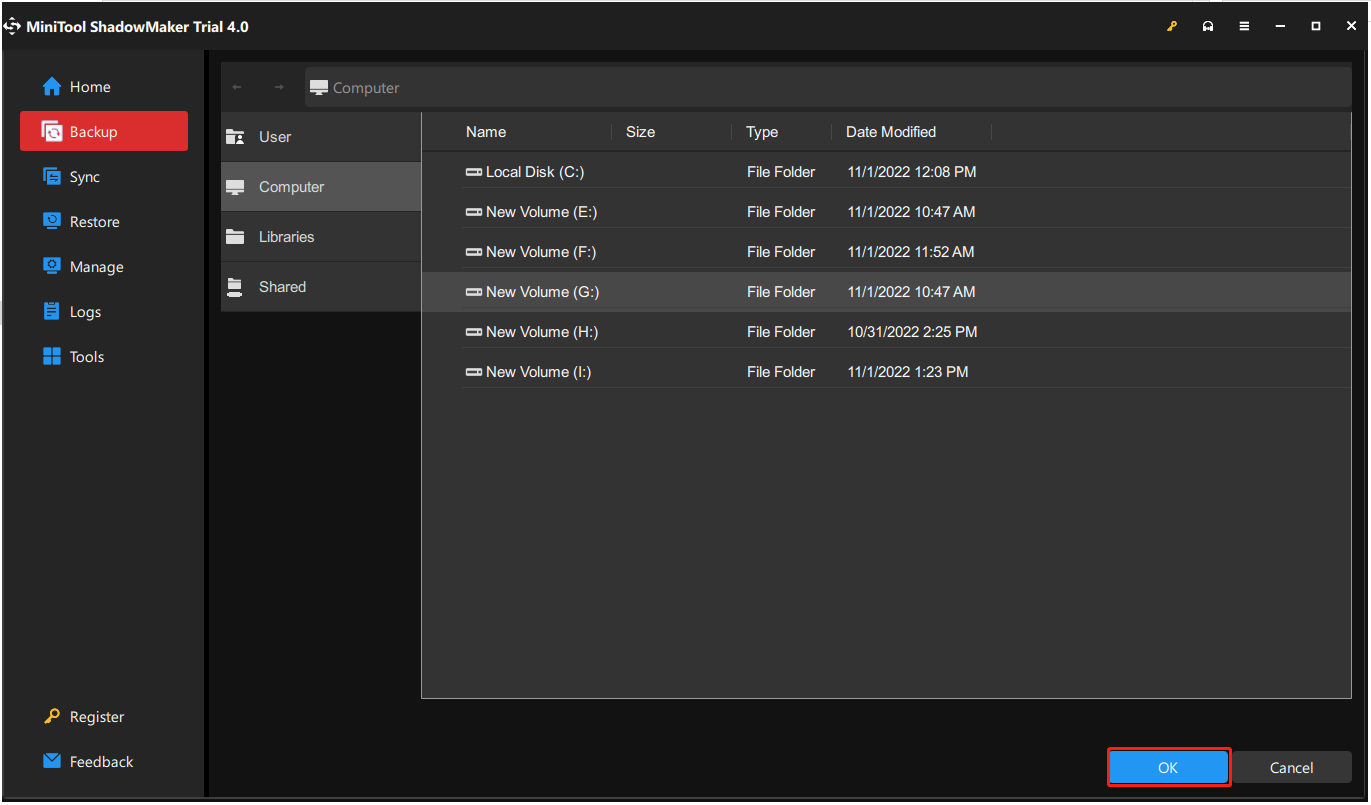
Step 4: Start to Back up
- Go back to the following interface.
- You have two options: start the backup process immediately by clicking Back Up Now or delay the backup by choosing Back Up Later.
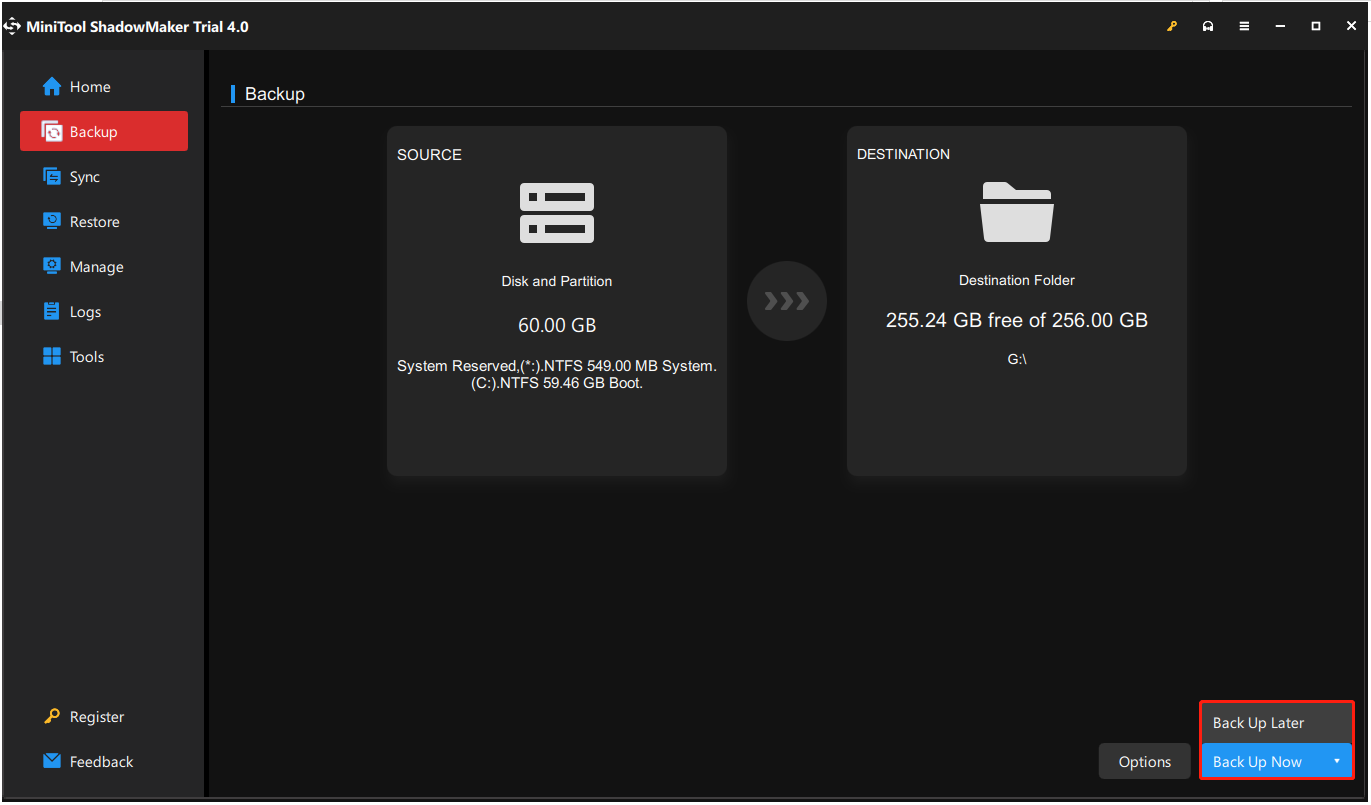
Here are all the steps of how to back up system by MiniTool ShadowMaker.
Further Reading
In addition to the method mentioned above, here is another method to back up disk data by using MiniTool ShadowMaker, which is to Clone Disk.
You can also use it to back up the entire computer to the flash drive via disk cloning. This feature allows you to transfer everything to another drive, such as Windows system, files, settings, applications, and data.
Here are the steps for cloning the disk. It’s also easy to operate you just need to click some steps.
Step 1: Connect the USB flash drive to your computer. Please click the Clone Disk feature on the Tools page to continue after launching MiniTool ShadowMaker.
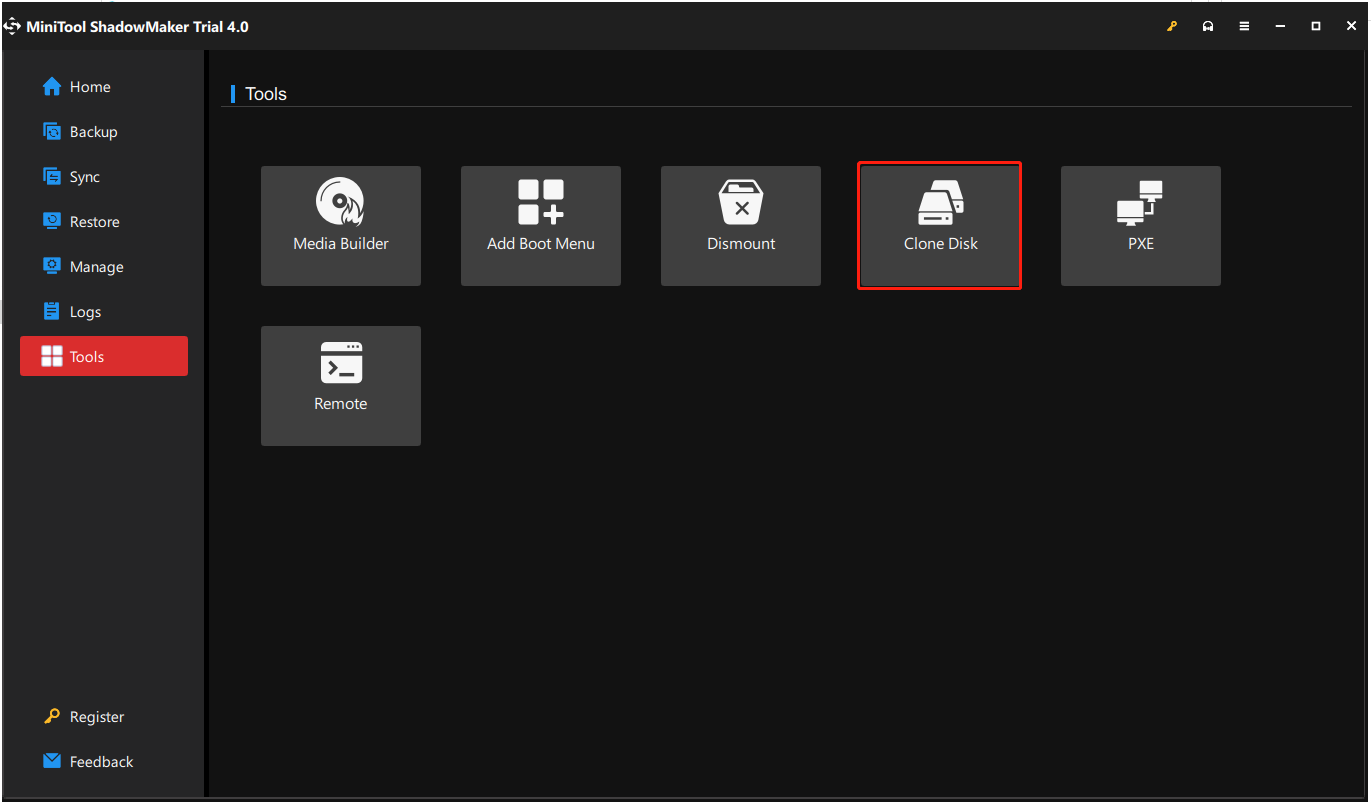
Step 2: You need to choose the system disk where Windows 10 is installed as the source disk and choose a USB drive as a target disk.
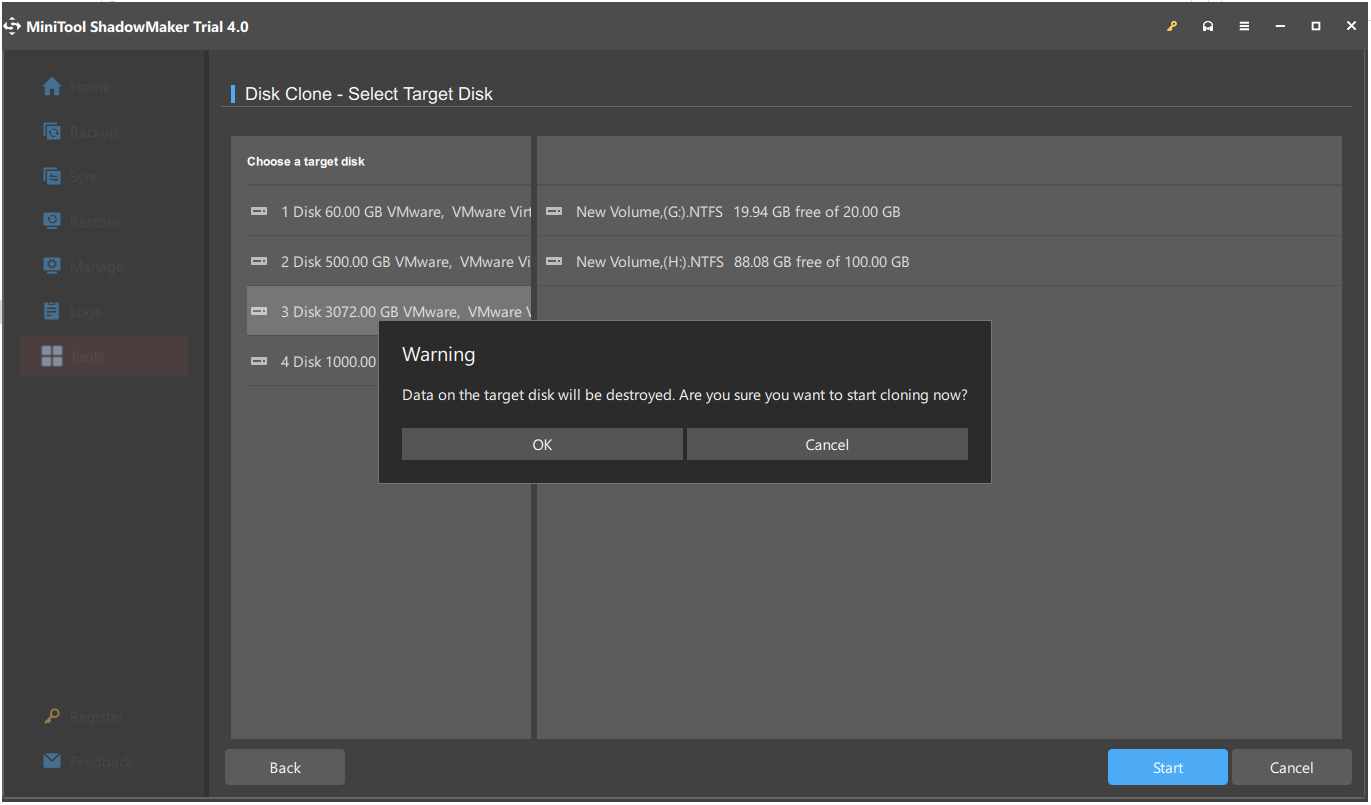
1. The process of cloning the disk will destroy data on the target disk, so please make sure that no important files are saved on it.
2. The USB flash drive should have enough space to save all the information and data on the cloned system disk.
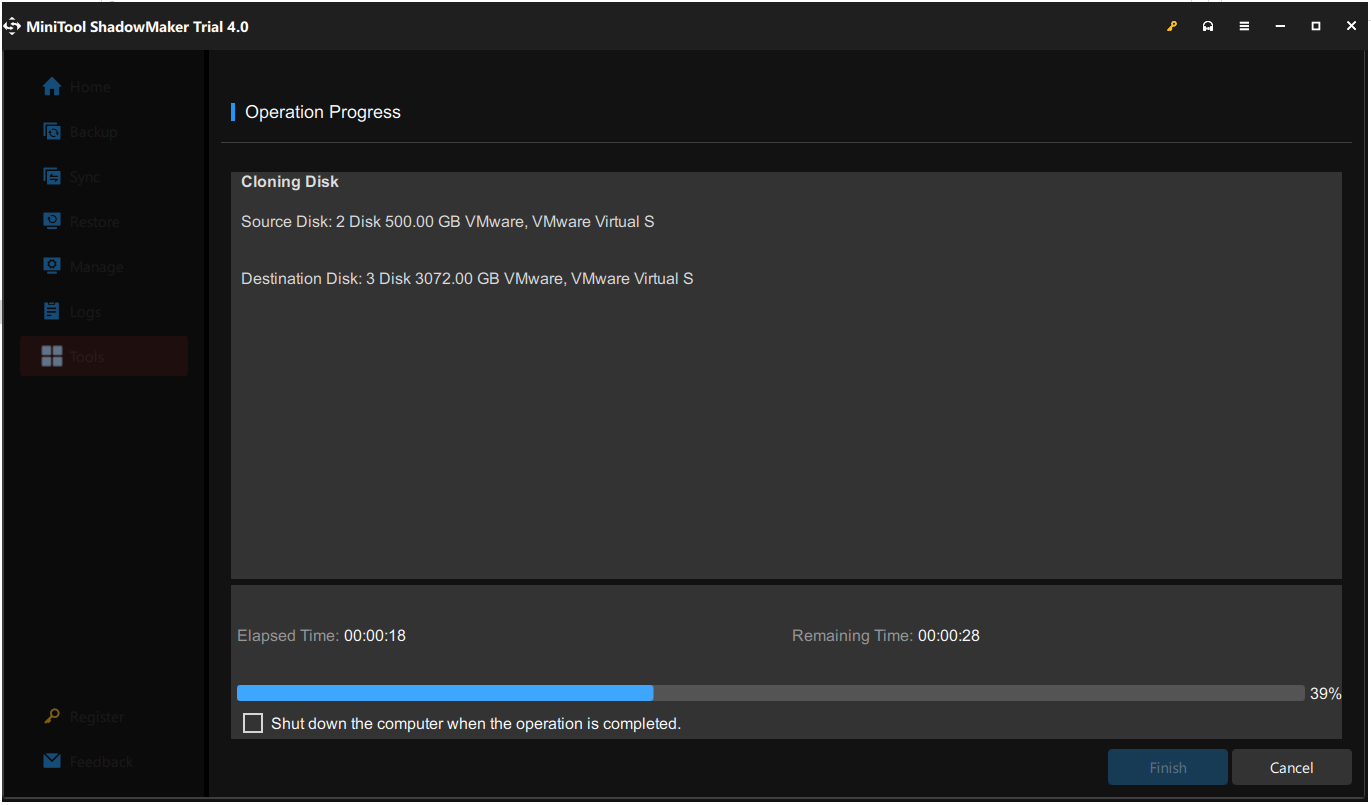
Step 3: Now this backup software is cloning Windows 10 system disk to the USB flash drive. You can plug the USB drive into the computer after the cloning process is completed. By this way, all the system disk data is backed up to the USB drive.
Bottom Line
To conclude, Windows 10 Upgrade Assistant is a very well-thought-out and very useful application that offers you one of the easiest ways to install the latest Windows update on your device.
And the free software MiniTool ShadowMaker is the best backup tool for you to back up your system before Windows 10 update in case something wrong happens. If you have any questions and suggestions, please contact us via [email protected] or leave a comment.
Windows 10 Upgrade Assistant Download FAQ
- Open the Settings application.
- Click the Update and Security section.
- Choose the Windows Update tab in the sidebar.
- Select Check for updates. If there is an available update, it will be downloaded automatically.

