Acer refers to Acer Inc., which is a Taiwan-based multinational hardware and electronics corporation. It’s professional in the field of electronics technology and Acer devices like Acer laptop is world famous. Today, I’m going to talk about Acer recovery which helps you fix problems on Acer computers.
MiniTool Solution offers many suggestions and methods for computer recovery.
Common Acer Recovery Tools and Methods
There are a lot of users talking about encountering problems on an Acer computer and they want to find a good solution to fix them. To provide help to these people, I’d like to focus on Acer recovery in the following content.
There are many tools and methods used for Acer laptop recovery:
- Factory reset
- System Restore
- Acer recovery USB
- Acer recovery disk
- Acer recovery keys
- Acer recovery partition
- Acer recovery management
- And so on
Factory Reset Acer Laptop on Startup
What does factory reset mean?
Actually, it refers to the action of restoring an electronic device to its original system state. This action is harmful to your data stored on the device. So you’d better make a backup before restoring the laptop to its original manufacturer settings.
How to reset Acer laptop to factory settings:
- Press the power button and hold it for a few seconds (about 5 seconds or more) until the system is powered off completely.
- Release the button and press it again to turn on the laptop.
- Look at the screen carefully so that you can press Alt + F10 buttons in time when Acer logo appears on the laptop screen.
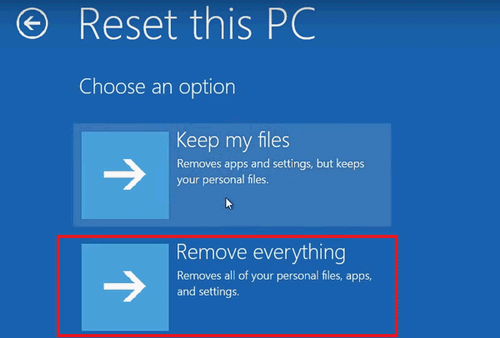
- If you do it right, you’ll see a blue screen which asks you to Choose an option.
- At this time, you should select Troubleshoot.
- After that, select Reset this PC from the menu. Then, you’ll be asked to choose to keep or remove your files.
- Select Remove everything (Removes all of your personal files, apps, and settings.).
- Click on the Restart button to confirm your selection and start the PC resetting process.
However, there are some users saying that pressing Alt + F10 (the Acer restore key) didn’t work for their case when they want to factory reset the Acer laptop. Let’s see an example:
Acer recovery won’t start from Alt + F10.
Hi, I want to completely restore my laptop to the factory settings, but it doesn’t seem to work. I have followed the guides from Acer; made sure my D2D Recovery is enabled, and tried pressing Alt + F10. When I do, it only starts a Black screen, where it says Edit Windows boot options for: Windows 7 and so on. If I press escape I get to Windows boot manager, but that shouldn’t be right according to the guides. What am I doing wrong?– said Amazingnr7 in Tom’s Guide Forums
You can also use the setup/repair disk or eRecovery Management to factory reset an Acer laptop.
Acer Recovery Disk Windows 10 Download
Acer recovery media is available for users to recover from a broken Acer computer easily. So, please start Acer recovery disk Windows 10 free download at once.
How to get an Acer Recovery Media (eRecovery Media/Acer eRecovery Management)?
- Pay a visit to the Acer Store.
- Look for the SNID text box and type in the serial number of your Acer laptop. (Please go to check the serial number and type it correctly.)
- Click on the SUBMIT button below to confirm.
- After that, you should follow the on-screen instructions to get the recovery media successfully.
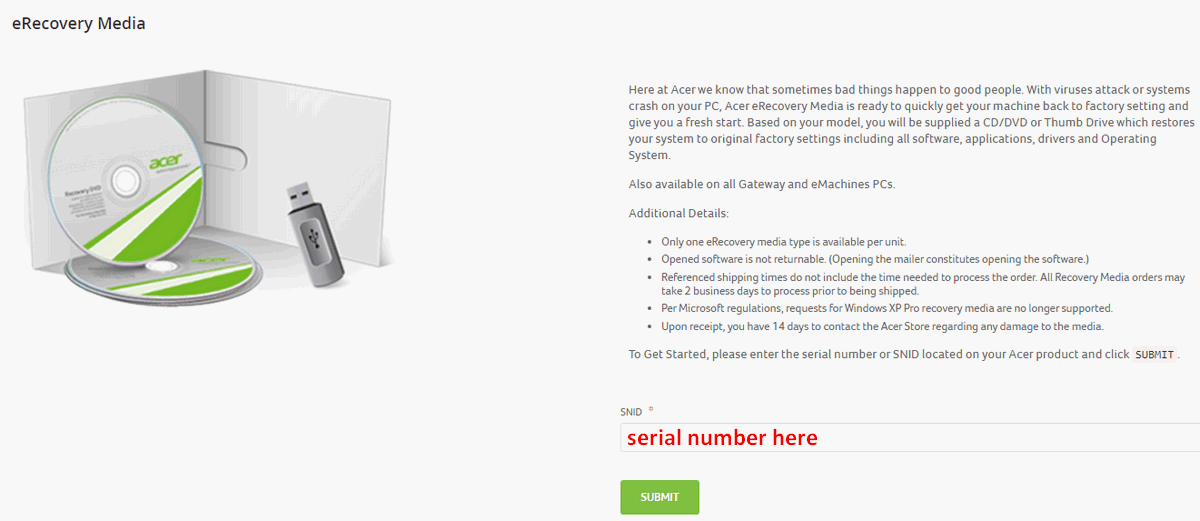
That’s how Acer recovery management Windows 10 download can be done.
Acer Recovery Management
The Acer recovery disk is also known as restore/repair disc or boot disc. So do you know how to make an Acer recovery USB or Acer recovery drive on CD/DVD? The steps for making Acer recovery disk Windows 10, Window 8 and Windows 7 are basically the same. Therefore, I’ll take Windows 8 system as an example.
How to make Acer recovery disk Windows 8?
- Press Win + S or Win + Q to open the Search box.
- Type acer recovery into the search box.
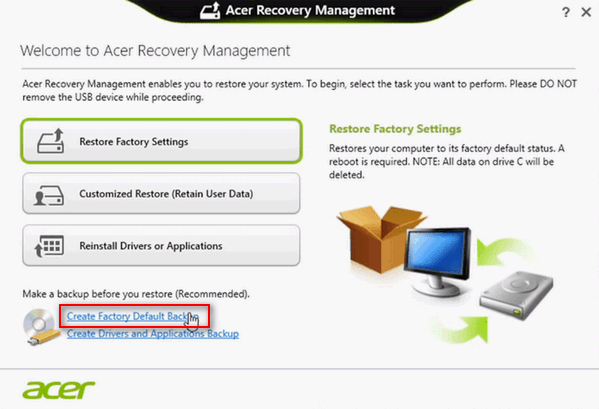
- Click Acer Recovery Management from the search result. (You can also access Recovery Management through Acer Care Center.)
- If a User Account Control (UAC) window pops up and asks you the question – Do you want to allow the following program to make changes to this computer, you should just click Yes.
- Click Create Factory Default Backup link.
- Click Next in the Create a recovery drive window.
- Keep the Copy the recovery partition from the PC to the recovery drive option checked.
- Look for your USB drive from the Available drive(s) list in the select the USB flash drive window. (You’d better connect the USB drive to computer before this step.) Then, select the USB drive and click Next.
- Make sure there is no useful data on the drive you’ve selected since all data saved on it will be destroyed if you continue with the next few steps.
- Click Create to confirm your choice.
- Then, wait for the process to complete. It may last for about 30 minutes when the Copy the recovery partition option is checked. Otherwise, the process should be finished a little bit quicker.
- Click on the Finish button when you see the message – The recovery drive is ready.
- Now, you can close the software and remove the USB drive from computer properly.
Please click here if you’d like to recover data from your USB drive FOR FREE!
How to perform Acer recovery with the Acer Recovery Management tool?
- Also, you need to open the Search box.
- Type recovery into the search box and select Acer Recovery Management from the result.
- Click Yes if you see a User Account Control (UAC) window.
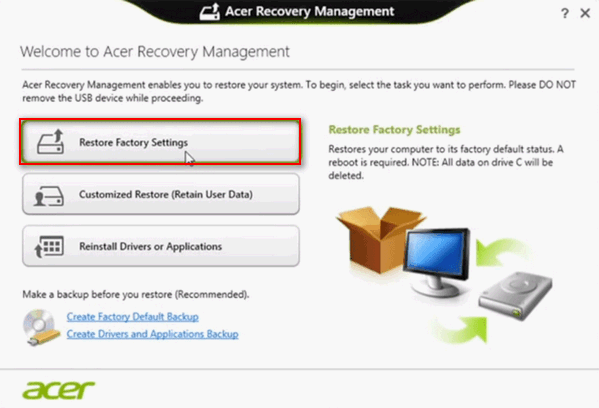
- Choose Restore Factory Settings from the menu.
- Click Next (you should note that this action will erase all your files).
- Choose from Fully clean the drive (this option is recommended) or Just remove my files.
- Think twice before you click Reset to start the restore process.
- Wait until the process is finished and follow the on-screen instructions to setup your computer.
Acer eRecovery Management issues troubleshoot.
There are 3 common problems of Acer eRecovery Management.
Problem one: Acer eRecovery Management gets stuck.
You may find your Acer eRecovery Management freeze during the Acer recovery disk creating process and the computer settings restoring process. Many users reported that their software is stuck at 0% or 99% or at loading files.
The possible reason responsible for such issues is a corrupted drive or files. How to fix the problem?
Method 1: remove all the peripherals that are not necessary for your computer, such as printers, scanners, external hard drive, USB flash drives, and so on.
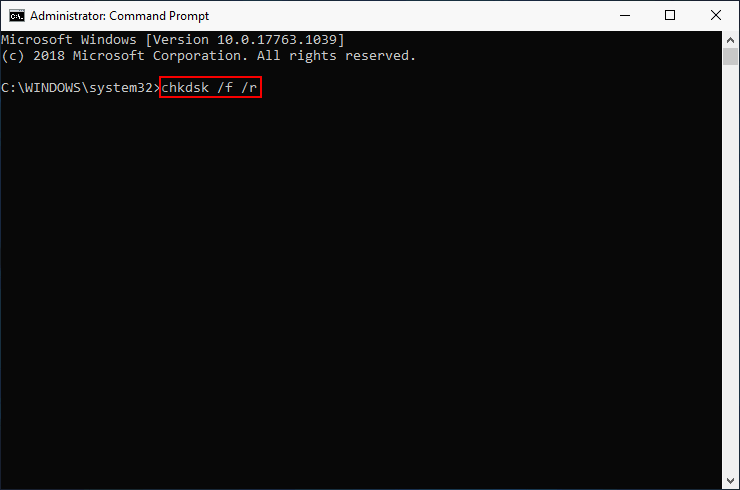
Method 2: check hard drive integrity by running CHKDSK command.
- Run Command Prompt as administrator on your computer.
- Type chkdsk /f /r or chkdsk * /f /r (* stands for the drive letter).
- Press Enter and wait for the process to accomplish.
- Restart your computer and try using Acer eRecovery Management again.
Problem two: Acer eRecovery Management stops working (not loading).
According to the users’ feedback, the Acer eRecovery Management may not work if the D2D recovery option is disabled in BIOS. So how to enable the Acer BIOS key?
- Restart your computer.
- Look at the screen instructions carefully so that you can press F2 in time to open BIOS.
- Navigate to the Main tab by using arrow keys and look for the D2D Recovery option (it’s usually the last one).
- Select the option and press Enter to open it.
- Choose Enabled, instead of Disabled from the menu.

Solved: PC Not Booting After BIOS Update – Recovery & Repair!
Problem three: forget the password.
If you haven’t changed the password for eRecovery Management software, you should try the default password: 000000 (6 zeros).
But in most cases, people need to change the password by rebooting the Acer computer.
- Reboot your computer.
- Click Windows and look for All Programs.
- Locate the Acer or Acer Empowering Technology folder (the options may be slightly different in different Acer computer models).
- Choose Password: Change eRecovery Password and click on the Next button.
- If you didn’t see this option, please go to Settings and find the corresponding option to change password.
Acer Recovery Partition
What is Acer Recovery Partition?
There is a special partition built in every Acer laptop; it’s called Recovery Partition and hidden by default. That is to say, people won’t see it while using the Acer computer. The main function of the Acer Recovery Partition is to help users restore the operating system to its default factory state. This Recovery Partition is the best Acer recovery mode after the system has been attacked by virus or the software-related problems have been detected.

Acer Recovery Partition Not Working
What disappoints us is that the Recovery Partition is not always working. If the Recovery Partition is deleted by mistake or damaged somehow, you can’t restore system with it.
What to do when partition deleted/not working? Of course, the answer is to recover deleted Acer Recovery Partition.
You can experience MiniTool Partition Wizard by getting a Free Edition. But in order to recover lost/deleted Recovery Partition, you must buy a license that supports Partition Recovery (the free edition cannot save the searched partitions).
MiniTool Partition Wizard FreeClick to Download100%Clean & Safe
How to recover Acer Recovery Partition?
- Install and launch MiniTool Partition Wizard properly.
- Select the disk that includes the deleted Recovery Partition.
- Choose Partition Recovery Wizard from the left sidebar or select Partition Recovery from the menu bar or disk right-click menu.
- Follow the instructions to set Scanning Range and Scanning Methods. Then, wait for the scan to finish.
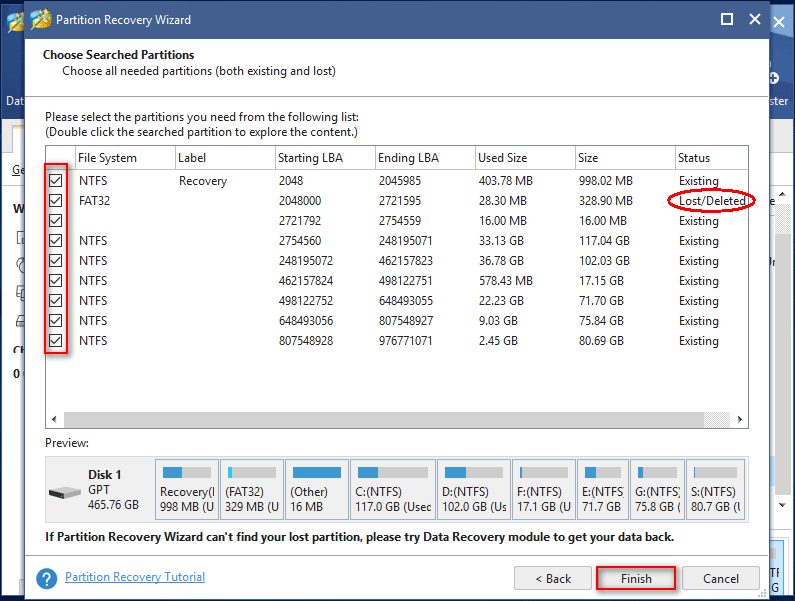
- Check all the found partitions, including the existing ones and the Lost/Deleted ones.
- Click on the Finish button to close Partition Recovery Wizard.
- Click on the Apply button in the lower left corner of software main interface.
- Select Yes in the pop-up Apply Changes window to confirm the action.
- Wait for a while and click OK in the Successful window.
How can you recover a lost partition (or use other functions of MiniTool Partition Wizard) when your system can’t boot? You need to make a bootable USB or CD/DVD drive (please connect the drive to computer immediately).
- Find another computer and get a license for MiniTool Partition Wizard that includes Boot Media Builder.
- Install, register and launch the software. Then, click Bootable Media from menu bar.
- Follow the on-screen instructions in MiniTool Media Builder to make a bootable USB disk or CD/DVD drive.
How to use the Acer recovery USB or CD/DVD?
- Remove the bootable disk from current computer properly.
- Connect it to your Acer laptop and restart it.
- Boot into BIOS to change boot order, making USB or CD/DVD drive the first boot device.
- Exit BIOS and save changes.
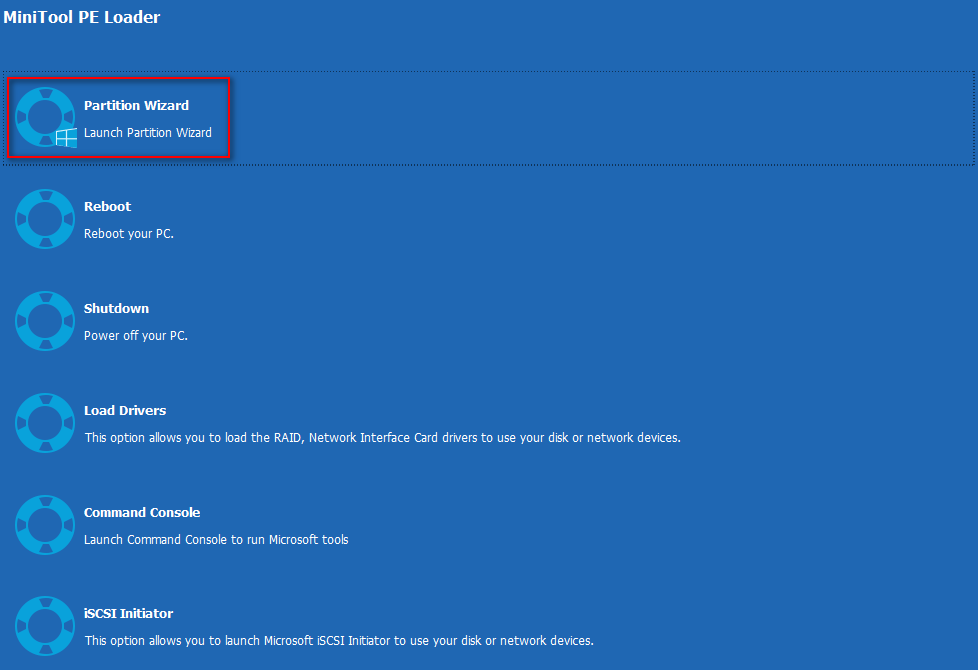
- Select Launch Partition Wizard and repeat the steps mentioned above to recover deleted Acer Recovery Partition.
[2020] Top Windows 10 Boot Repair Tools You Should Know!
Alternative to Acer Recovery Partition
You can use MiniTool Power Data Recovery to recover lost files from a deleted partition easily. (The Trial Edition is released for people who want to experience the software performance first.)
MiniTool Power Data Recovery TrialClick to Download100%Clean & Safe
How To Recover Deleted/Lost Files On PC Easily In Seconds (2020)?
If you want to recover any of the found files, you’ll need to register the software to an advanced edition by acquiring a license.
How to recover data from Acer laptop?
- Install Power Data Recovery properly and launch it.
- Select Hard Drive Recovery from the left sidebar.
- Specify the hard disk that contains the deleted partition. Then, click on the Scan button below.
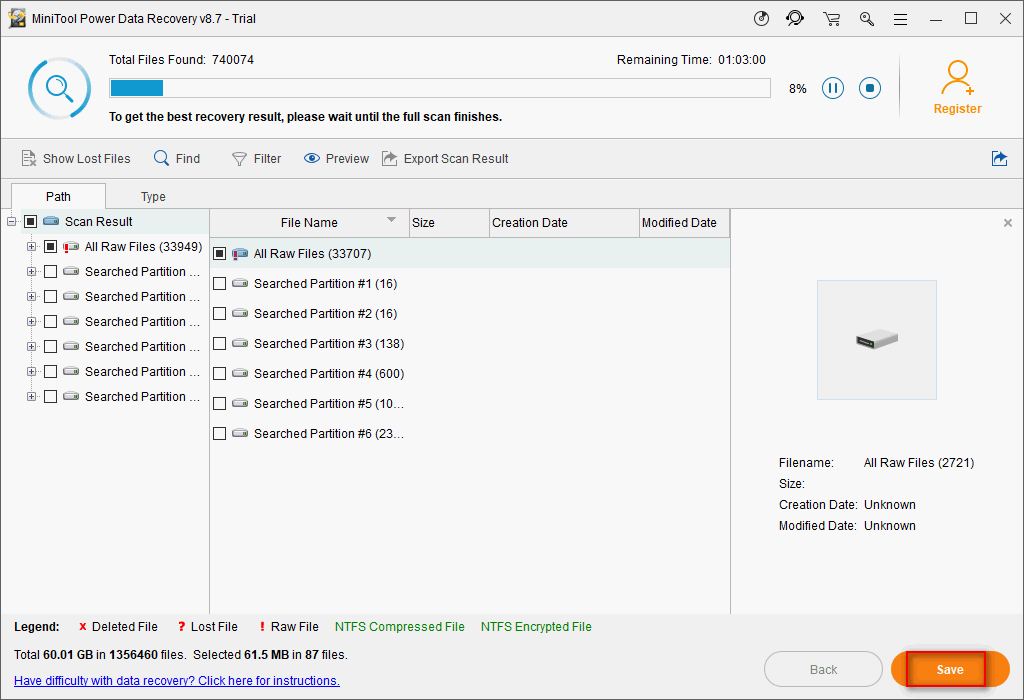
- Wait for the scan process and browse the found files carefully in order to pick out the ones you need.
- Check the files and folders you’d like to recover and click on the Save button.
- Choose another storage location for the files and folders and click OK.
- Wait for the file recovery process to complete on Acer laptop.
By using MiniTool Power Data Recovery, you can also recover files from hard disk without operating system.
- You should create Acer recovery USB or CD/DVD by clicking on the Bootable Media button (located at the bottom left corner).
- Then, change the boot sequence in BIOS.
- Finally, use the Acer recovery boot to recover files from an unbootable Acer laptop.
These tools are very useful for Acer laptop data recovery.
Please note: Acer recovery Windows 10, Acer recovery Windows 8, and Acer recovery Windows 7 are the same.
Final Words
Acer recovery is not so difficult, right? You need to finish Acer recovery disk download at first; then, make an Acer recovery drive when the Acer recovery download is completed; after that, you can use the drive to perform Acer recovery on your laptop.
In the above content, I provided several ways for you to achieve Acer recovery easily; you should choose one or more according to needs.