It’s not difficult to find that a lot of prompt windows and message are designed by Microsoft to minimize users’ unintentional wrong operations. This thoughtful design does work most of the time; however, there are still exceptions.
For instance, some people still click on “Yes” button to allow the deletion when seeing these prompt messages:
- “This file is too large for the Recycle Bin”
- “This folder is too large for the Recycle Bin”
After that, the selected item will be deleted permanently, without being put into Recycle Bin for temporary storage.
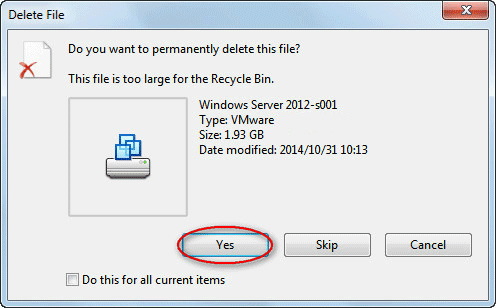
So the question is: whether it’s possible or not to recover files too big for Recycle Bin. If it’s possible, how can you finish the large file recovery?
In order to settle those doubts for users, I plan to carry out a more in-depth discussion of the file/folder too big for the Recycle Bin issue. Three aspects will be involved in the following content:
- True cases of files too big for the Recycle Bin
- How to restore files too large for Recycle Bin
- How to change Recycle Bin properties to solve this problem
Prompt Message: Files Too Big for Recycle Bin
As I’ve mentioned above, you’ll see the prompt (given by system) – the file is too big for the Recycle Bin – when deleting a large file in a Windows operating system.
What does this really mean? As a matter of fact, it can be paraphrased as: the file will be deleted from the computer directly, without going through the Recycle Bin. Its effect is equivalent to the situations in which you press “Shift” + “Delete” button on the keyboard at the same time or choose to “Empty Recycle Bin”
Thus, the topic: how to restore deleted files too big for Recycle Bin can be understood as how to recover permanently deleted files or how to recover files that have been recently deleted but are not in the Recycle Bin.
Let’s start with 2 true examples.
Case 1: Deleting a Folder from My Computer
I was moving folders around on/off my external hard drive and when I was deleting a folder from my computer after moving it I got a ‘file too big for recycling bin do you want to permanently delete’ and absent-mindedly hit ‘YES’ (thinking I was deleting a CD). 1 sec later I realized I deleting my ENTIRE music collection from my external. Please tell me this was not really permanent and that I can get it back. Please. P.S. I have a Sony Viao using Windows 7, my external is WD one terabyte.– asked by fanxtrois on CNET forums
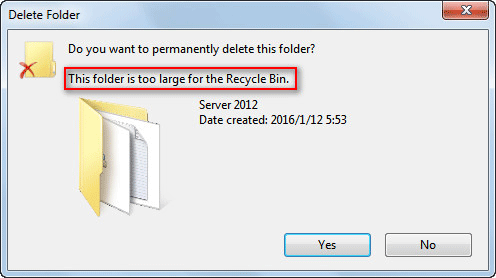
Case 2: Deleted Some Files Accidentally
I’ve made a very large mistake. I’ve deleted some files accidentally from my C:// It was a bunch of .CR2 wedding photos that I mistake for incorrectly exported JPEG’s. The files were too big to send to the recycling bin though. What can I do to recover the files? It was on an SSD, so I’m worried about that too. Any advice would be extremely appreciated. – a question on superuser.com
To tell the truth, once you insist on deleting the items when the message – file too big for Recycle Bin – appears, they will be moved out of computer directly. That is to say, there’s no chance to recover deleted files from Recycle Bin after deleting large files/folders, just like the “Shift + Delete” activity.
In this case, both the registry entry and the index value will also be cleared. Therefore, a great third-party recovery tool is needed to recover file too large for Recycle Bin, pretty much like recovering items deleted from Recycle Bin.
Restore the File/Folder with Deleted File Recovery Tool
The first thing you should do, of course, after deleting a file/folder that is too big for the Recycle Bin is to find a deleted file recovery tool that is powerful enough and that you can trust. To help people save time and avoid possible but unnecessary troubles, I have a recommendation – MiniTool Power Data Recovery.
MiniTool Power Data Recovery TrialClick to Download100%Clean & Safe
Why Choose MiniTool Power Data Recovery
Outstanding features of this tool:
- It’s small in size and easy to use.
- It has good compatibility, fast scanning speed, and high recovery rate.
- It provides a trial edition for people to experience without paying.
- With the trial edition, you’re allowed to scan the disk and preview the pictures/text files found by it.
Now, you may as well download it to your computer and finish the installation process quickly. After that, follow the tutorial given below to recover files too large for Recycle Bin.
Please note that I’ll take file too large for Recycle Bin recovery on Windows 10 as an example in the following recovery steps. The steps to finish deleted file recovery on Windows 7 are basically the same.
How to Recover Data
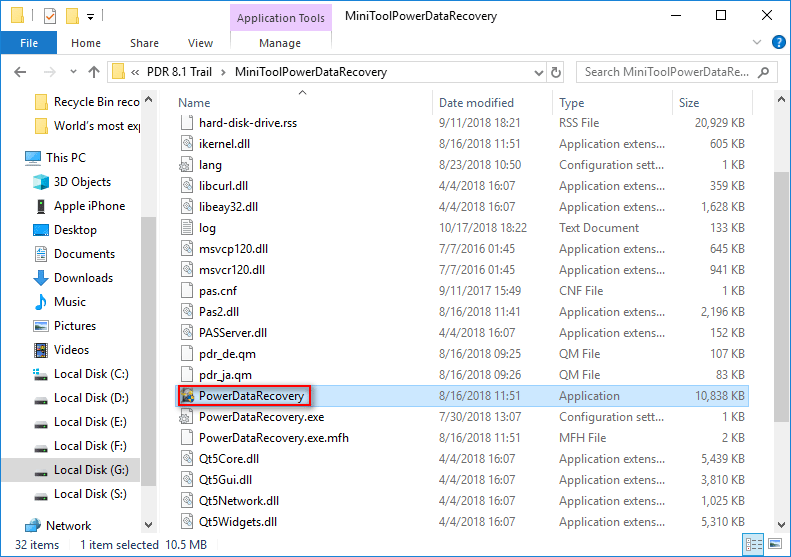
1. Double click on the software icon on your computer desktop or find “PowerDataRecovery” application from the installation folder and then double click on it. After that, this file recovery tool will be launched and its main interface will appear in front of you.
2. When you see this main window shown below, you should click on “This PC” option from the left side and then select the drive where the deleted file/folder was located from the right side.
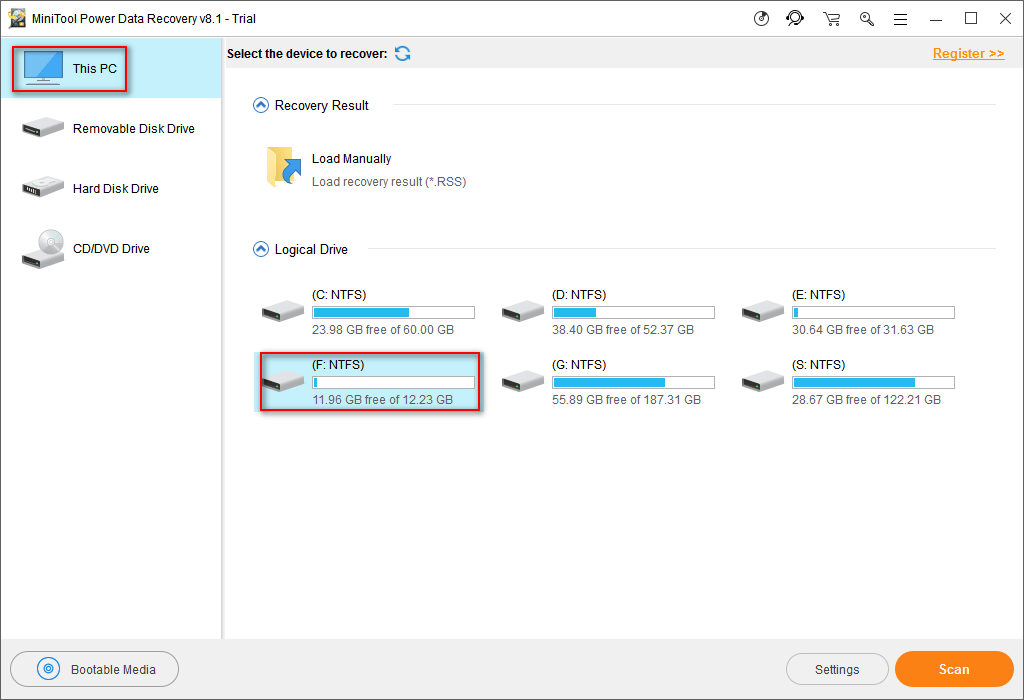
You can take a look at the drive letter, capacity, file system, and other information to confirm which drive is the one you need to scan.
3. After that, please click on the “Scan” button in the lower right corner to search for the deleted items in it.
- If you need to recover deleted files/folders from a removable disk (such as external hard drive and USB flash drive), you should connect it to this computer in step 1.
- If you fail to see your removable disk in the drive list shown in the picture above, please click to see how to fix external hard drive doesn’t appear error and recover data.
- If you still can’t find your disk, you may have a bad disk and need to buy a new one.
4. Upon clicking the “Scan” button, the scan will be initialized at once. When it is over, a software interface full of scan results will appear in front of you.
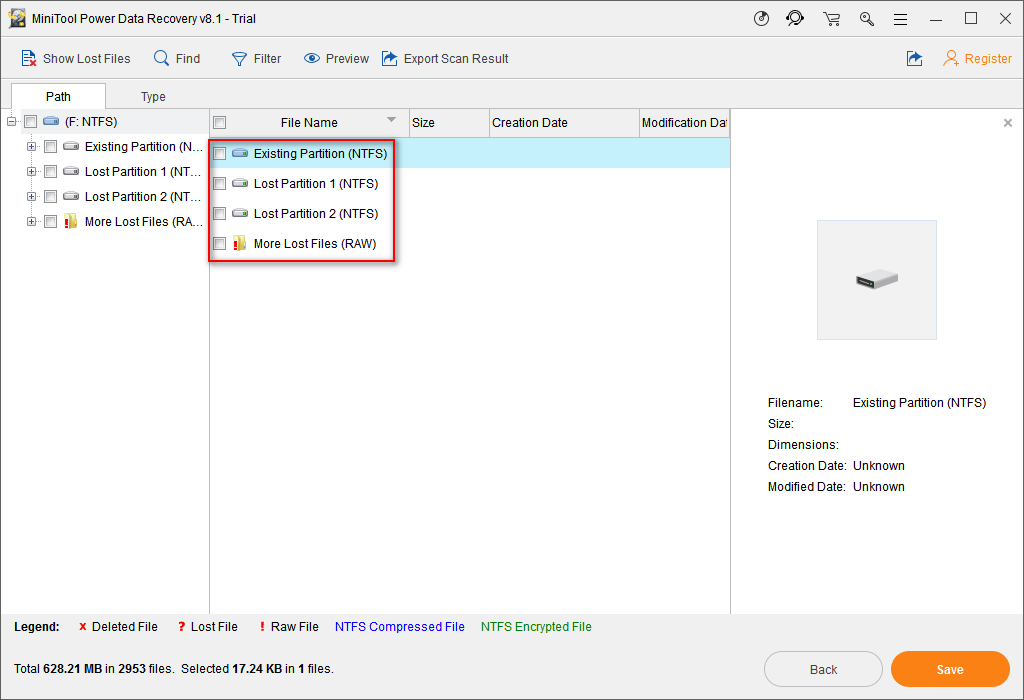
At this time, obviously, you need to browse all the scan results carefully, in order to find out what are the files & folders needing to restore and what are not. Please check the files & folders you need by adding a check mark to the small square text boxes in front of each item.
5. Afterward, move the cursor to the lower right corner of the software interface and click on the “Save” button. In the pop-up window, you should do the following things:
- Set a safe storage path for the files and folders you have checked to recover; please make sure that the target drive which you want to save recovered files to has enough free space.
- Click on the “OK” button in this window to confirm your selection and start recovering files.
Well, you’ll see the following window after clicking on the “Save” button; it informs you that you are now using the trial edition which only allows to scan and review files only. To save the recovered files and folders, you must upgrade to the full version.
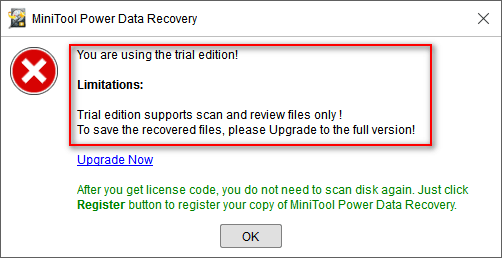
You are advised to get a personal license to finish the large file recovery task if you don’t have special needs.
Reading here, you must know well about how to recover items too big for Recycle Bin with the recommended deleted file recovery tool, right?
By the way, I also noticed that there are many people interested in how to recover files larger/bigger than 4GB (which are stored on an NTFS drive). What I want to say is that only a piece of powerful data recovery software that is compatible with NTFS partition is able to accomplish such a task. And luckily, MiniTool Power Data Recovery meets all the requirements. Have a try now!
Effective Workaround
As I explained in the above content, after you accidentally deleted the large folder or deleted files too large for Recycle Bin and found the deleted files are not showing in Recycle Bin now, you must seize the time to do the recovery.
Well, there are still many people prone to click on the “No” or “Cancel” button when seeing the file is too large to delete message. They want to put the target files/folders to Recycle Bin for temporary storage so that they get a chance to regret. Is this possible? Of course, it is! You are able to avoid the Windows file too large for Recycle Bin message by simply changing the properties of recycle bin.
How to Add or Remove “Properties” from Recycle Bin Context Menu in Windows?
How to Change Recycle Bin Properties
To solve the file too big to recycle problem, you may follow the guidance given below (also take Windows 10 as an example).
Step 1
Find the “Recycle Bin” icon on your desktop and then right click on it to see a pop-up menu.
Step 2
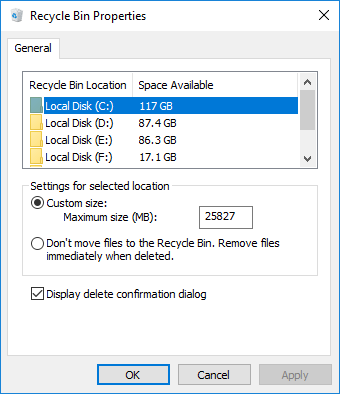
Select the “Properties” from the pop-up menu and then you’ll see the following interface.
Step 3
Now, please select the drive that includes the large file/folder. After that, you should move to the “Settings for selected location” area, which contains two options:
- Custom size, Maximum size (MB)
- “Don’t move files to the Recycle Bin. Remove files immediately when deleted.” option
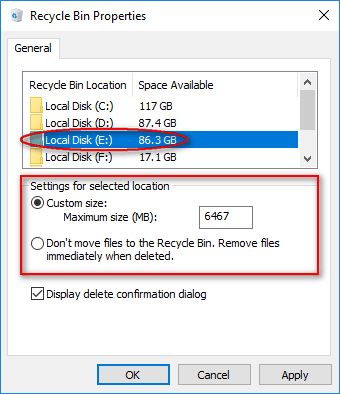
The latter one is easy to understand; it means that the deleted files will be moved out of computer immediately, without being sent to Recycle Bin, when you press “Delete”.
But, what does the custom size or maximum size mean? Actually, it is the size of the Recycle Bin for the currently selected drive. When the actual size of the file/folder you delete is larger than the current maximum size value for the certain partition, the file/folder is too big for the Recycle Bin prompt message will appear.
Step 4
Please change the maximum size (MB) value to make it larger than the size of the deleted file/folder and then click on the “OK” button to confirm.
This is the whole process of how to change the Recycle Bin properties to avoid seeing file/folder too large for the Recycle Bin prompt. After that, your deleted files and folders will be sent to the Recycle Bin firstly for temporary storage and you won’t see the prompt message when deleting.
Please pay attention!
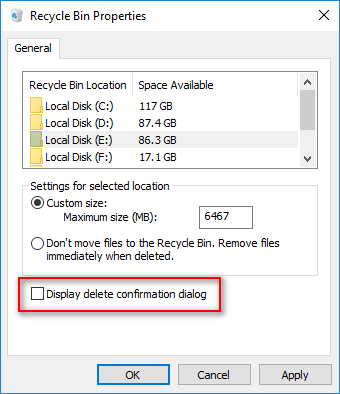
One: you can configure the Recycle Bin to not display delete confirmation dialog by just canceling the check mark in front of this option and pressing the “OK” button (see picture below).
Two: it is worth mentioning that people may see this prompt as well when deleting a folder – folder contains items whose name is too long for the Recycle Bin. Clearly, this indicates that the name of the certain file (included in the deleted folder) is so long that it can’t be sent to Recycle Bin. To solve this problem and make the deleted folder & files kept in the Recycle Bin temporarily, you should cancel the current deletion and then change the file name to be a shorter one.
Conclusion
You don’t need to be nervous when seeing “files too big for Recycle Bin” prompt message in a Windows system. You may as well do the following things at this time:
- Cancel the current deletion
- Go to change the properties of Recycle Bin
- Repeat the deletion task.
By doing so, you’ll not see such prompt.
Even if you have ignored the message and deleted the large files/folders, you still have a chance to get them back by following the steps mentioned in this essay. It isn’t a big problem, right?