Time Machine is the default backup software in macOS. People like to use it to backup operating systems on Mac devices. Time Machine allows users to create backups easily and conveniently. However, many errors may occur during the backup process and the Time Machine always stuck on preparing backup is one of them. How to troubleshoot Time Machine preparing backup?
How to Backup Mac with Time Machine
Let’s start with a brief introduction to Time Machine.
What Is Time Machine
As most of you know, Time Machine is the built-in backup software in macOS designed by Apple. It was firstly introduced in Mac OS X Leopard to help users back their operating systems conveniently and safely. Time Machine gives support to all common external storage devices, which you can connect over USB &Thunderbolt (for a wired connection) or a network (for a wireless connection).
Anyone running macOS, the desktop operating system developed by Apple Inc., can use Time Machine to backup systems and files. Though Time Machine works perfect most of the time for backing up, it still fails sometimes. Many users found their Time Machine preparing backup all the time; the backing up process seems to last forever. They don’t know what happened and how to solve the problem efficiently. The following parts will mainly introduce some useful ways to help Mac users fix the issue when Time Machine says preparing backup. But before that, let’s take a look at how Time Machine works.
MiniTool Power Data Recovery TrialClick to Download100%Clean & Safe
How to Set up Your Time Machine
What you can use to back up your Mac:
- An external drive (USB drive or Thunderbolt drive)
- The Mac shared using as a destination for Time Machine backup
- A NAS (Network-attached Storage) device giving support to Time Machine over SMB
- AirPort Time Capsule, AirPort Time capsule connected drive, or AirPort Extreme Base Station (802.11ac)
External Hard Drive Not Showing Up On Mac? Here’s How To Fix.
Getting started with your Time Machine (how to enable automatic Time Machine backup):
- Click on the Apple logo menu at the top left.
- Choose System Preferences from its drop-down menu.
- Select Time Machine from the list.
- Check Back Up Automatically from the left sidebar.
- Click on the Select Disk button in the right panel to choose a storage destination for the backup.
How to restore files from your Time Machine backup:
- Click on the Time Machine icon from the menu bar.
- Select Enter Time Machine.
- Navigate to the files or folders you need and select them.
- Click Restore and wait.
How to fix when there’s no Time Machine icon in the menu bar:
- Click on the Apple menu in the upper left corner.
- Select System Preferences from the submenu.
- Click Time Machine.
- Check Show Time Machine in menu bar at the bottom of the right panel.
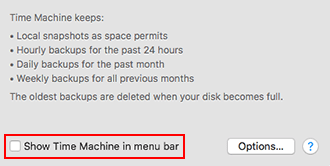
What if your Time Machine is stuck on preparing backup? Please move on.
Time Machine Stuck on Preparing Backup
How long does Time Machine backup take? This is a question hard to answer since the backup speed is infected by many factors.
- The number of files and their total size
- Priority settings for the backup process
- The speed of the primary disk on Mac
- The speed of the drive used to store backup
Causes of Preparing Backup Time Machine
Some people said they find the Time Machine preparing backup for hours (even over a day): Time Machine always says preparing backup. What happened? Many reasons should be blamed for it.
You should suspect the following things when a Time Machine backup takes longer than you expect:
- The size of the files waiting to backup is too large.
- The settings for the backup process are not proper.
- The backup drive is very old.
- Your Mac is running slow.
- The network connection is slow or unstable.
- Software updates installed recently cause the issue.
- Your Mac wasn’t shut down properly last time.
- The previous Time Machine backup was interrupted.
- You have not backed up Mac for a very long time.
- There’s a virus on your Mac or external drive used for backup.
- A disk was disconnected from your Mac before it is ejected.
- Etc.
What to do when Time Machine is always preparing backup?
Time Machine will back up only files and folders that have been changed since the last backup unless this is your initial backup. The system will display a “Preparing…” message on your Mac screen when it is comparing the current files and folders to those in the most recent backup. However, many people said their Time Machine was stuck on the preparing backup stage. Some even said their Time Machine won’t backup during the first backup.
A Ture example of Time Machine waiting to complete first backup found in Apple Community.
Step 1: Check Whether the Preparation Process Is Really Stuck
The Time Machine backup process could take longer than usual sometimes due to certain reasons. You should follow this guide to decide whether the Time Machine backup is really stuck or just running slow.
- Click on the Apple menu from the top menu bar.
- Select System Preferences from its submenu. You can also directly click on the System Preferences icon in the Dock.
- Click on the Time Machine icon in the pane.
- The system displays a Preparing backup, Preparing * items, or Scanning * items message, depending on the macOS you’re running.
- Wait and see whether the number of items listed in the message is increasing or not.
- If the number remains the same for a very long time (for example, more than half an hour or so), the Time Machine backup may be stuck.
- If the number increases slowly, it means the Time Machine is working properly. Please be patient with the backup process.
Step 2: Fix Time Machine Stuck in Preparing Backup
Please try the following methods when your Time Machine backup failed: Time Machine preparing backup all the time.
#1: Stop the Currently Failing Backup Attempt
Stage 1: stop the preparing backup process.
- Click on the Apple icon in the menu bar
- Select System Preferences.
- Choose Time Machine. You can also click on the Time Machine icon directly (if it appears in the menu bar) to access the Time Machine pane.
- Click on the X button on the right side of the progress bar above the Preparing backup… message.
- Wait until the backup process has been stopped completely.
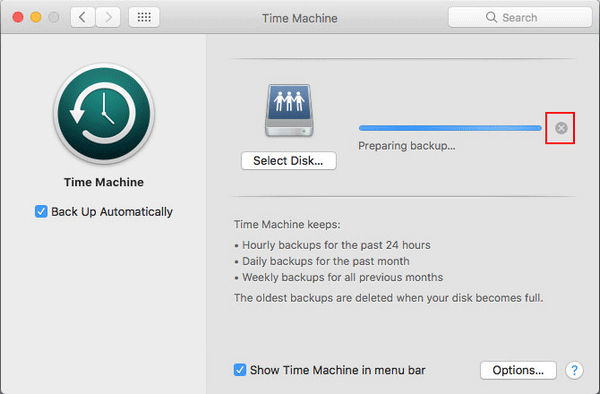
Stage 2: delete the.inProgress file.
- Open Finder.
- Open the Time Machine drive.
- Look for the backupd folder and open it.
- Open the folder with the name of your Mac.
- Look for a file with the .inProgress extension.
- Right-click this file to select Delete.
- Empty the Mac Trash.
How to recover deleted Mac files easily:
Stage 3: restart Mac.
Please keep the Time Machine drive connected to your Mac during the rebooting.
- Click on the Apple logo menu.
- Select Restart.
Stage 4: try Time Machine backup again.
- Click on the Time Machine icon in the menu bar.
- Select Back Up Now from the submenu.
#2: Stop Spotlight from Indexing the Time Machine Backup Drive
The Spotlight may interrupt a Time Machine preparing process if it’s indexing the drive used for Time Machine backup. So you need to stop the index manually.
- You need to select System Preferences from the drop-down menu of the Apple icon. Also, you can go to the System Preferences pane by clicking its Dock icon directly.
- Look for the Spotlight icon in this window and click on it.
- Shift to the Privacy tab in the opening Spotlight window.
- The list of apps and processes that have not been indexed by Spotlight currently will appear.
- Click on the + (Add) button at the bottom left.
- Look for the Time Machine backup folder and add it to the list. You can also drag and drop it directly to the list.
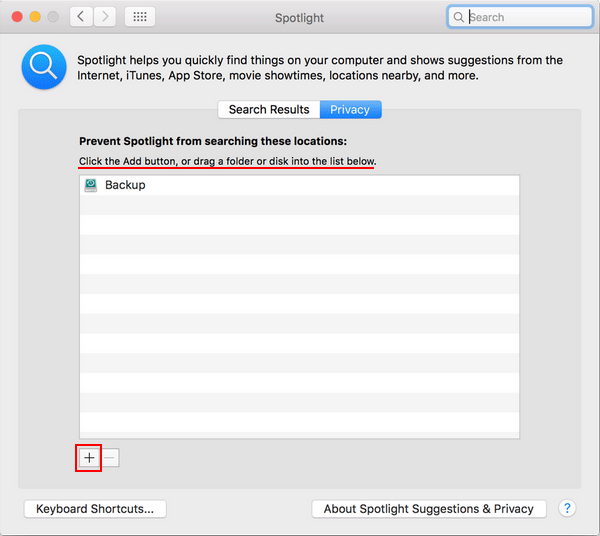
#3. Run First Aid on the Time Machine Backup Drive
You should follow this guide to check the backup disk for issues and repair it.
- Open Finder.
- Choose the Applications option (under Favorites) from the left pane.
- Look for the Utilities option in the right pane and click it.
- Locate and select Disk Utility.
- Choose the external drive that you used to back up Mac from the left sidebar.
- Click on the First Aid button at the top of the window.
- Click on the Run button in the pop-up window to confirm the action.
- The system will check the selected drive for errors.
- Follow the on-screen instructions to finish the process.

How to fix if your backup drive didn’t appear: click the View menu at the top of the Disk Utility window -> select Show All Devices.
Even if your Mac won’t start, you can open the Disk Utility from macOS Recovery mode.
#4. Exclude Large, Frequently Updated Files
The extremely large and frequently used files could slow down your backup impressively, so you should exclude them from the backup.
- Click on the Apple menu.
- Select System Preferences.
- Click Time Machine.
- Click on the Options button in the lower right corner.
- Click on the + (Add) button to add the large & frequently used files or folders.
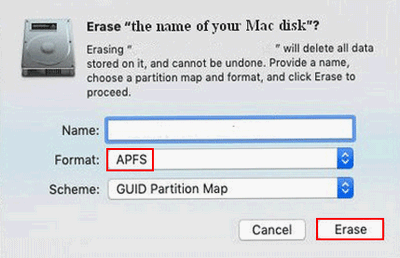
#5. Format the Backup Drive to APFS
- Open Finder -> choose Applications -> select Utilities -> click Disk Utility.
- Click on the Erase button at the top.
- Type a Name (optional) -> choose APFS for Format -> select a Scheme (optional).
- Click Erase again in the prompt window.
- Wait for the erasing process to complete and click Done.
Click here to know more about APFS vs Mac OS Extended.
#6. Update the macOS
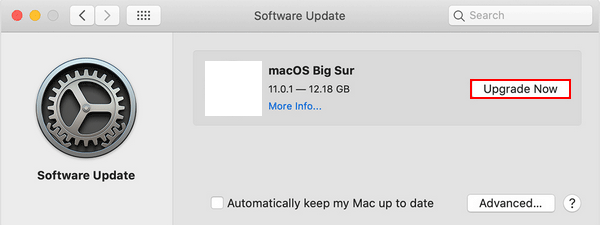
Apple advises you to upgrade to macOS Big Sur for getting the best Time Machine performance.
- Check whether macOS Big Sur is compatible with your Mac.
- Make sure your internet connection is reliable and stable.
- If you’re running macOS Mojave or later: please select Apple menu -> choose System Preferences -> click Software Update -> click on the Upgrade Now button -> follow the on-screen instructions.
- If you’re running a previous version of macOS: please get macOS Big Sur -> then click on the Get button or iCloud download icon.
Other suggestions from Apple when your Time Machine couldn’t complete the backup, stuck on preparing backup.
- Check the WiFi connection or the network performance on your Mac.
- Check for apps & programs that keep your backup disk busy by accessing it over and over again.
- Contact certain app developers to learn more about how to best use their app with Time Machine.
Step 3: Recover Data from Your Mac
Virus attack and disk failure are two other possible causes to lead to Time Machine preparing backup. Both could result in a serious data loss situation. So you should start to back or recover files (at least the important ones) from your Mac. We’ll discuss the latter case.
Stage 1: Get Mac Data Recovery Software
Though you can find lots of data recovery software that can be used to recover data from macOS, some of them are not professional/powerful enough. Some may even bring damage to your system, disk, or data. Because of this, you should give a shot to Stellar Data Recovery for Mac, which is jointly designed by Stellar and MiniTool (two companies with high reputation).
- It’s absolutely ads-free and malware-free.
- It supports all common file types and can recover files lost due to different reasons.
- It’s still available when your MacBook is crashed or dead.
How to download the software:
- Please visit this page and click on the green Free Trial button.
- Please click on the Free Download button below.
Data Recovery for MacClick to Download100%Clean & Safe
After that, you should install and use the software to recover files.
Stage 2: Recover Files from Mac
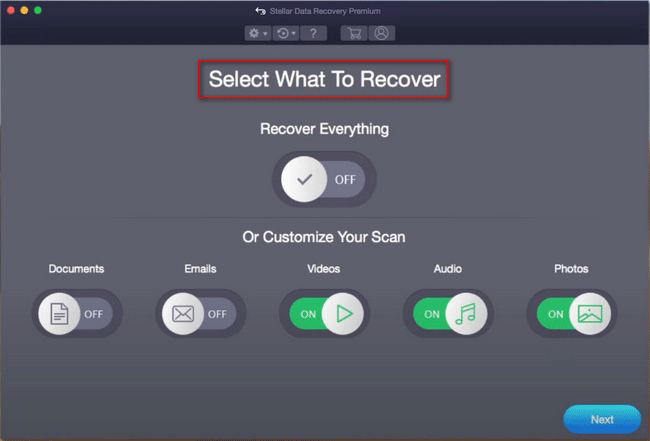
- Run Stellar Data Recovery for Mac.
- Specify the file types you need in the Select What To Recover page.
- Click on the Next button at the bottom right to continue.
- Select the drive that contains the files you need and click Scan. Keep Deep Scan enabled to get more scan results.
- Wait for the scan and then choose all the files you want to recover. Then, click Recover.
- Choose a storage location for these files and click Save. You’d better connect an external disk to keep the recovered data.
- Wait for the recovery to complete.
When the recovery is over, you can go to the target disk to check the files recovered by the software.
Please read this page if you want to know how to wipe a MacBook or how to factory reset MacBook.
Final Thoughts
It’s not difficult for anyone to back up Mac since there’s a built-in tool called Time Machine. Users only need to follow the on-screen instructions to finish the backup process step by step. However, problems like Time Machine preparing backup may occur during the process, preventing users from backing up successfully.
This page mainly shows you the causes of Time Machine stuck on preparing backup, the methods for fixing it, and the steps to recover data when Time Machine won’t backup. Hope this can help you solve your problem efficiently.

![[SOLVED] How To Recover Deleted Files On Mac | Complete Guide](https://mt-test.minitool.com/images/uploads/2018/09/mac-file-recovery-thumbnail.jpg)