Verbatim has always occupied a prominent position in the data storage device market. However, data loss and drive issues aren’t immune to the Verbatim drive. This post from MiniTool walks you through how to recover data from a Verbatim memory card and USB drive and solutions to Verbatim drive issues.
Part 1. Verbatim Memory Card/USB Data Recovery: Is It Possible?
Storing data on portable data storage devices like a Verbatim USB drive and Verbatim memory card makes data transfer convenient. Though Verbatim is an experienced developer of safe and reliable data storage devices, Verbatim USB drives and memory cards are susceptible to data loss. Whether you can recover data from a Verbatim memory card or USB drive depends on the cause of the data loss. Here I will show you the common reasons and the chances of data recovery.
- Human errors: Human errors such as accidental deletion, formatting, partition deletion, or other improper operations can lead to data loss. If you recover data from your Verbatim drive timely, the chances of a successful recovery are high.
- Logical failure: Logical errors on your Verbatim drive may prevent you from accessing the drive and require you to format the drive before using it. To avoid data loss during the repair or the formatting process, you are suggested to recover data from the Verbatim drive first. With professional data recovery software, you can easily retrieve files from the corrupted Verbatim drive.
- Physical damage: Compared with logical errors, physical damage can make Verbatim drive data recovery more difficult. A Verbatim USB or memory card that is physically damaged may result in data loss. However, data recovery software and other data recovery solutions won’t work in this situation. You should seek help from competent data recovery services to see if file recovery is feasible.
- Improper removal: If you eject the Verbatim drive forcefully when it is working, data stored on this device may be lost or become corrupted. You can try file recovery services to find the lost files. But for corrupted files, you should use file repair tools to repair these files.
When your files are lost from your Verbatim USB drive or memory card, stop using this device to save new data immediately and start to recover data from a Verbatim USB flash drive or memory card.
Part 2. Recover Data from a Verbatim Memory Card/USB Flash Drive
Different from files deleted from the internal disk, USB/memory card deleted files are permanently removed from the device. Secure file recovery services should be the best option for implementing Verbatim memory data recovery.
MiniTool Power Data Recovery should be mentioned here. This trustworthy USB and SD card recovery software can handle data recovery tasks in most cases, including simple deletion, disk formatting, drive not recognized, etc. MiniTool Power Data Recovery contains several editions with different functions and limitations. You can get MiniTool Power Data Recovery Free by clicking the download button to experience its robust features.
MiniTool Power Data Recovery FreeClick to Download100%Clean & Safe
Step 1. Choose the target drive to scan.
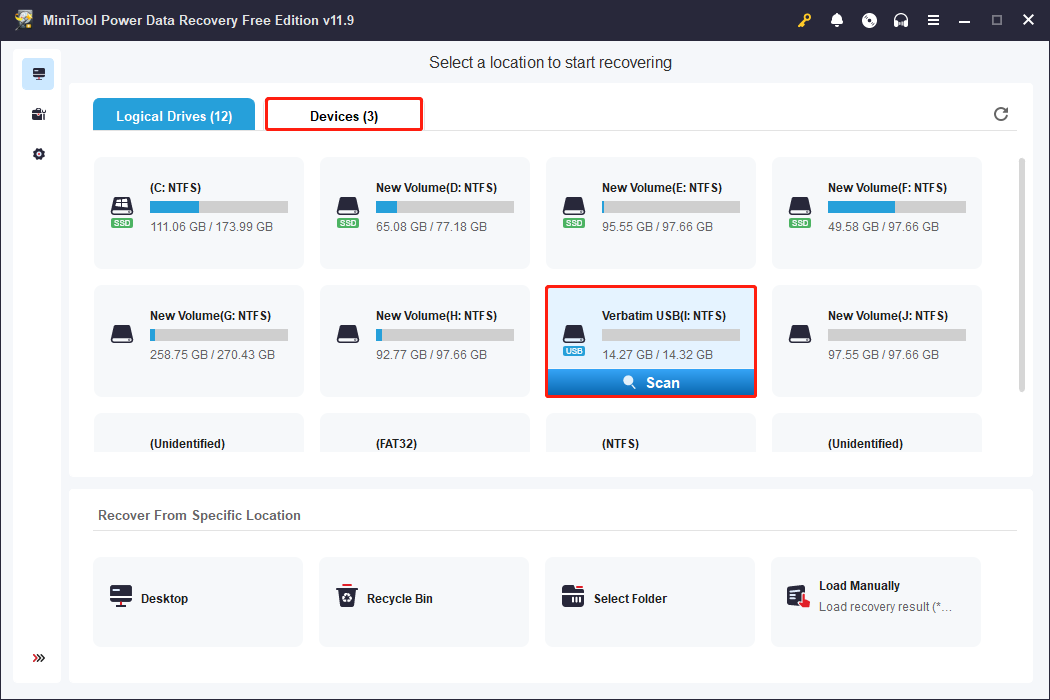
You should connect your Verbatim USB drive or memory card to your computer, then double-click on the software to launch it. In the main interface, you can find all partitions and detected devices. You can find the target partition with the USB label. Optionally, switch to the Devices tab to scan the whole USB drive or SD card directly. Hover your mouse over the target partition and click Scan.
Step 2. Locate the required files with multiple features.
The scan will take a few minutes or longer, depending on the number of files and disc capacity. For the best data recovery outcome, please wait until the scan process completes automatically.
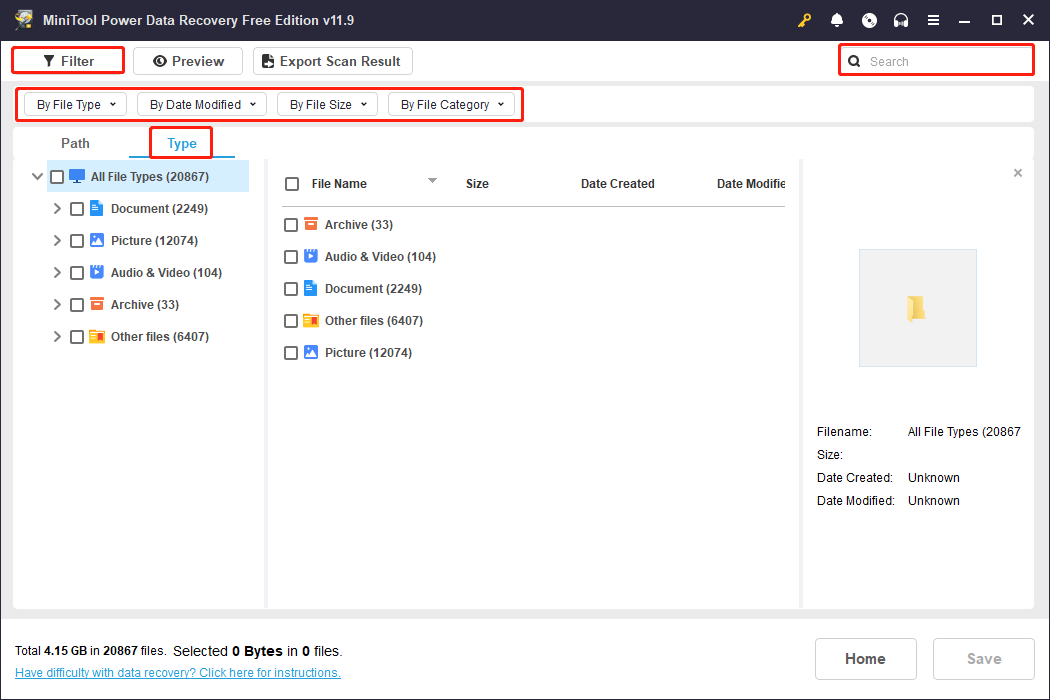
All found files are displayed under the Path tab with three classifications: Deleted Files, Lost Files, and Existing Files. You can expand these folders to find your wanted files. This can be time-consuming for a considerable number of files. Thus, try features like Filter, Search, and Type to narrow down the file list by setting filter conditions, searching by filename, or checking file types.
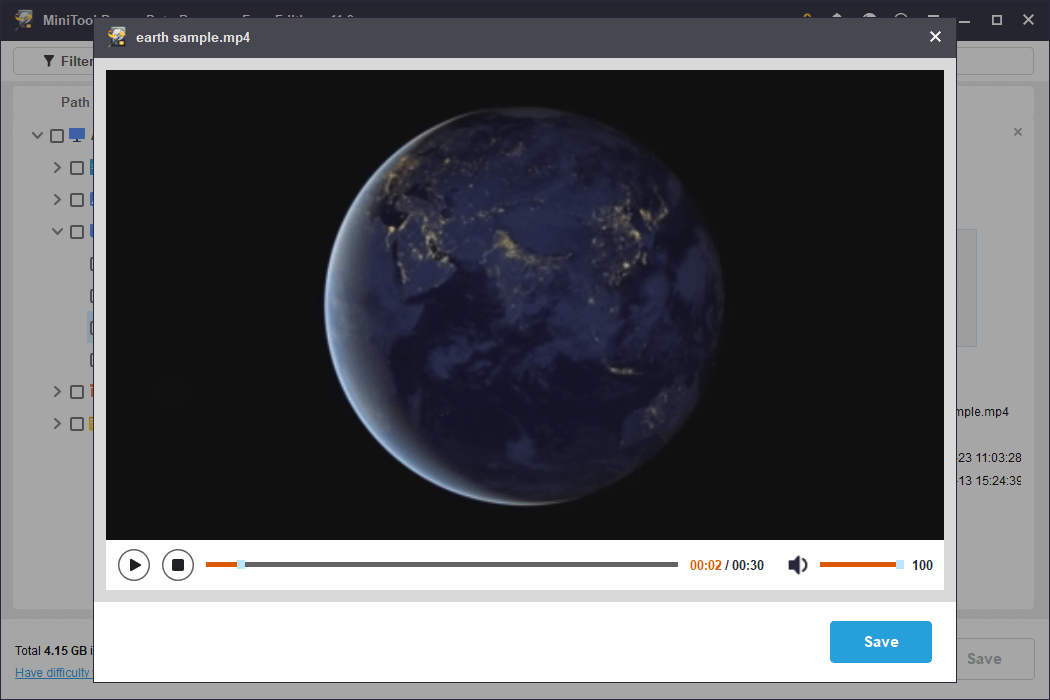
If you just need to recover files less than 1GB, you should make full use of the Preview feature. Just choose the file and click the Preview button to check the file content. Documents, pictures, videos, audio files, and some other file types are supported for preview.
Step 3. Recover files to another save location.
Add checkmarks in front of the files you need and click the Save button. To avoid data recovery failure due to data overwriting, you should choose a new destination for the recovered files.
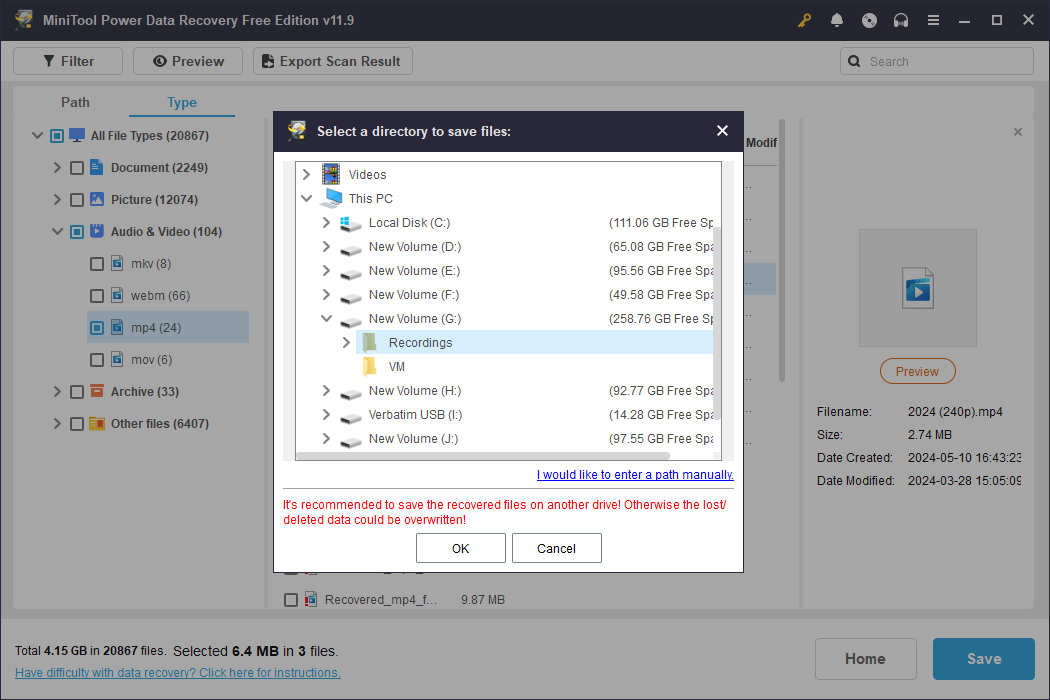
As mentioned above, the free edition only has 1GB of free data recovery capacity. If you need to recover more data, you need an advanced edition to enlarge the data recovery capacity. Go to the MiniTool Store to choose one edition that suits your demands.
As data recovery isn’t always successful, it’s a good idea to back up your important files to a variety of devices to be prepared for all eventualities, especially data stored on USB drives, SD cards, and other removable devices. I recommend you to an effortless backup software, MiniTool ShadowMaker. This software provides different backup types and allows you to set backup cycles to back up files, folders, partitions, and disks. Get the Trial edition to experience excellent backup features for free within 30 days.
MiniTool ShadowMaker TrialClick to Download100%Clean & Safe
Part 3. Repair Verbatim USB Drive
Data loss is not the only problem you might encounter in daily device use. But when you are stuck by other problems like a Verbatim USB flash drive not showing up, corrupted, etc., you should recover data from a Verbatim USB flash drive to prevent second damage to your data in further operations.
MiniTool Power Data Recovery FreeClick to Download100%Clean & Safe
The following content shows you two common issues you may encounter with a Verbatim USB flash drive as well as corresponding solutions to these scenarios.
Situation 1. Verbatim USB Not Showing up/Not Recognized
Several factors can lead to the Verbatim USB flash not showing up in File Explorer or Disk Management. You can try to resolve the problem with the methods below.
Way 1. Change a USB Port
Sometimes a damaged USB port can’t properly connect the USB device to the computer, so the USB drive won’t appear on the computer. You can change a USB port or connect the USB drive to another computer to check the problem.
Way 2. Assign a Drive Letter
If the USB drive doesn’t show up in File Explorer, one possible reason is the USB drive isn’t assigned a drive letter properly. You can assign a drive letter to the USB drive in Disk Management.
Step 1. Right-click on the Windows logo and choose Disk Management.
Step 2. Right-click on the USB drive and choose Change Drive Letter and Paths.
Step 3. Click Add and select one drive letter from the dropdown menu of Assign the following drive letter.
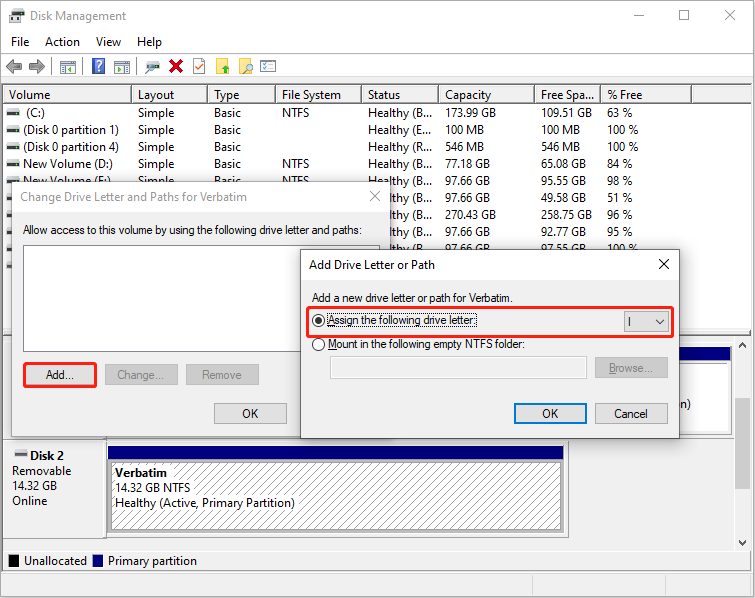
Step 4. Click OK to save the change.
Way 3. Update the Disk Driver
When you can’t find the USB drive in Disk Management, you should go to check the disk driver to see if this problem is caused by a corrupted or outdated driver.
Step 1. Right-click on the Windows logo and choose Device Manager.
Step 2. Expand Disk drives and right-click on the USB drive.
Step 3. Choose Update driver > Search automatically for drivers.
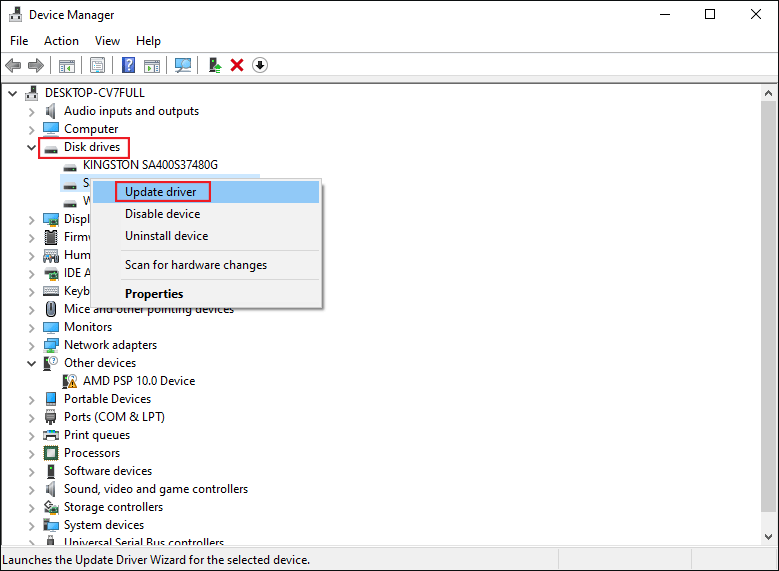
Wait for your computer to install the compatible driver automatically. If the problem still exists, choose Uninstall device in Step 3 and click Uninstall again to confirm. Afterward, reboot your computer to let the driver install during the startup process.
Situation 2. Verbatim USB Write Protected
When your Verbatim USB drive is write-protected, you are unable to make any changes to the USB drive. You can’t edit, remove, or copy any files on the USB drive. To remove write protection on your USB drive, you can try the next troubleshoots.
Way 1. Run the Diskpart Command Line
The Diskpart utility is a Windows-embedded tool to manage partitions on your computer with command lines. You can run its command line to format a partition, remove attributes, set mirror volumes, etc.
Step 1. Type Command Prompt into the Windows search bar.
Step 2. Right-click on the best-matched result and choose Run as administrator.
Step 3. Type the following command lines and hit Enter at the end of each command.
- diskpart
- list disk
- select disk X (change X with the number of the USB drive)
- attributes disk clear readonly
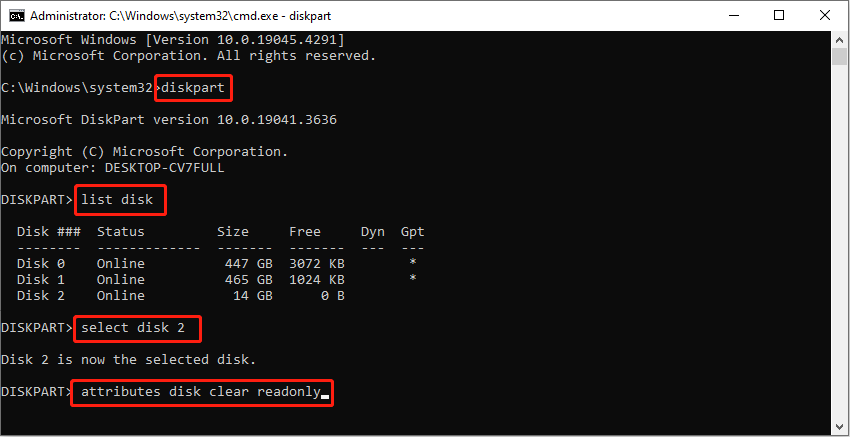
Wait for the process to end. You can go to check if your USB drive works normally.
Way 2. Format the USB Drive
Formatting the USB drive is another method. However, the write-protected USB drive can’t be formatted in Disk Management directly. You can remove the read-only attribute on the USB drive and then format it in Disk Management.
Optionally, you can choose a comprehensive partition manager to format the write-protected USB drive. MiniTool Partition Wizard allows you to format, partition, wipe, and copy disks. Different from Disk Management, this tool is friendly to novices and has one more chance to revoke the wrong operation.
MiniTool Partition Wizard FreeClick to Download100%Clean & Safe
Step 1. Launch the software to locate the USB in the main interface.
Step 2. Right-click on it and choose Format. You should set the Partition Label and File System in the small window, then click OK to apply the change.
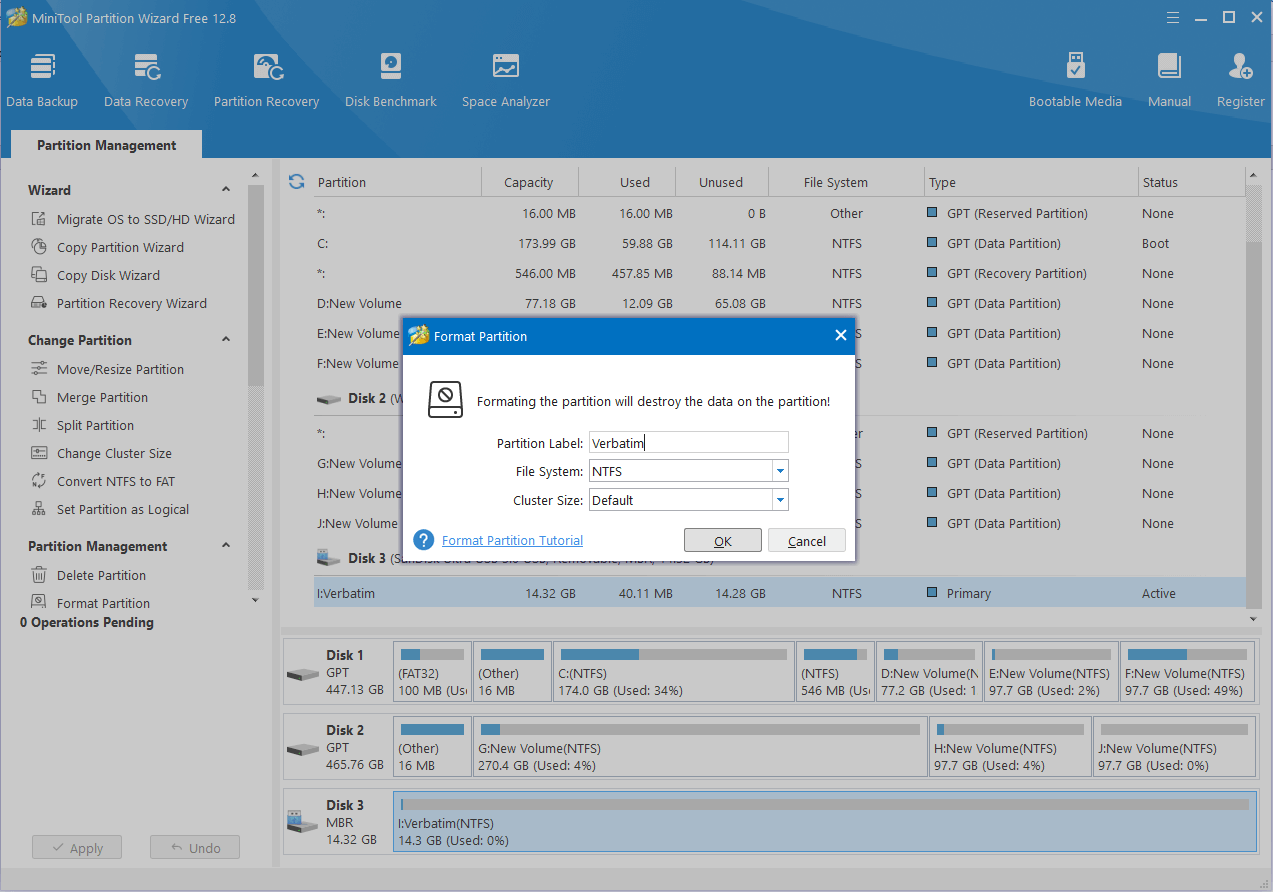
Step 3. You can preview the status of the Verbatim USB drive. Click Apply at the left corner to complete the suspending process.
Part 4. Repair Corrupted Verbatim Memory Card
What if a Verbatim memory card gets corrupted? You should recover data from a Verbatim memory card with MiniTool Power Data Recovery first with the guide explained in Part 2. Then, start to fix the corrupted card. Here are two solutions that may work to repair the damaged Verbatim SD card.
Solution 1. Run the CHKDSK Command
CHKDSK is a system utility that checks file system integrity and repairs disk logical errors. You can run this command line to detect logical errors on your internal or external disk, USB drive, SD card, and other types of devices. If your Verbatim SD card becomes corrupted due to file system error or bad sectors, you can work with the following steps to try to repair it.
Step 1. Press Win + R to open the Run window.
Step 2. Type cmd into the dialog and press Shift + Ctrl + Enter to run Command Prompt as administrator.
Step 3. Type CHKDSK X: /f /r and hit Enter to execute the command line. You should replace X with the drive letter of your Verbatim SD card.

Solution 2. Format the Verbatim Memory Card
Formatting is able to resolve almost all drive issues while it will erase all your data on the device. Ensure that you have completed the Verbatim memory card data recovery before performing this operation. If your Verbatim memory card can be recognized on your computer, use Disk Management to complete formatting easily. If the Verbatim memory card not showing up in Disk Management, you should choose a third-party partition manager, like MiniTool Partition Wizard.
MiniTool Partition Wizard FreeClick to Download100%Clean & Safe
Format Verbatim Memory Card in Disk Management
Step 1. Right-click on the Windows logo and choose Disk Management.
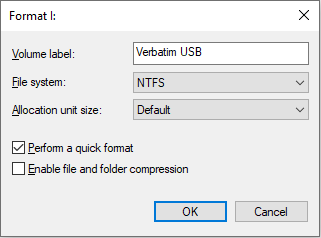
Step 2. Right-click on the memory card and choose Format.
Step 3. Decide the Volume label and File system in the prompt window and click OK to confirm.
Part 5. Bottom Line
This post shows you how to recover data from a Verbatim memory card and USB drive. You can complete the Verbatim drive data recovery with MiniTool Power Data Recovery in three simple steps. Additionally, this post shares several solutions to common Verbatim drive issues. You can try these methods to fix the problem.
If you have encountered any problems when using MiniTool software, please feel free to let us know via [email protected].
