In this post on MiniTool Software, you will learn how to recover deleted DNG files on both the Windows operating system and Mac. You can perform DNG file recovery with the help of Recycle Bin/Trash, File History, and free data recovery software.
DNG, short for Digital Negative, is a lossless RAW image format developed by Adobe and used for digital photography. It is widely used by photographers and image processing enthusiasts for its wide versatility, excellent image quality, and smaller picture size than RAW format. However, DNG files may get deleted or lost due to a variety of accidents.
Common Reasons Why DNG Files Are Deleted/Lost
There are many situations in which DNG pictures are lost. Listed below are common reasons why your DNG photos are missing:
- Human errors: DNG files may get lost due to human errors, such as mistaken deletion, incorrect disk formatting, incomplete file transfer, violent removable drive removal, and so on.
- Hard drive failure: One of the biggest threats to DNG file loss is hard drive failure. If your camera SD card or computer hard drive where DNG pictures are stored is corrupted or damaged, files on the drive may get deleted or corrupted.
- Virus infection: If you connect your camera or camera SD card to multiple devices, the drive may be infected by a virus, leading to DNG file loss/corruption.
No matter why your DNG pictures disappeared, there is a possibility to recover them as long as they are not overwritten by new data.
How to Recover Deleted DNG Files Windows
In the following part, we will explain how to recover DNG files with/without backup files on Windows.
Way 1. Recover Deleted DNG Files From the Recycle Bin
If the lost files were stored on your computer hard drive, you can check the Recycle Bin for deleted DNG photos. Files deleted from the computer’s internal hard drives will be sent to the Recycle Bin, allowing you to perform deleted file recovery easily.
To get deleted DNG files from Recycle Bin, you need to open Recycle Bin by double-clicking its icon on your desktop, then right-click on the target DNG file(s) and select Restore from the context menu. The file(s) will be restored to the original location(s).
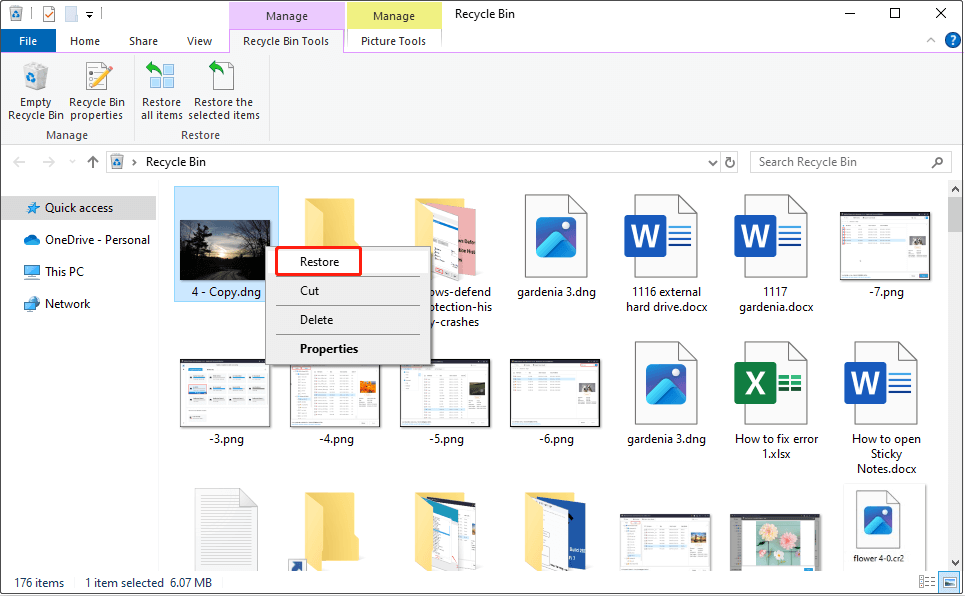
Although using the Recycle Bin is an easy way to get deleted DNG files back, if the Recycle Bin is grayed out or you have emptied it, you are unable to carry out DNG file recovery from it.
Way 2. Perform DNG File Recovery by Using MiniTool Power Data Recovery
The next way is suitable when you cannot rescue your DNG photos from Recycle Bin, which is to choose a professional data recovery tool. Among secure data recovery services on the market, MiniTool Power Data Recovery is the most recommended one.
Why you should choose MiniTool Power Data Recovery?
- Data recovery versatility: This file restoration tool supports recovering images in multiple formats, including DNG pictures and assortments of other types of files like documents, videos, audio, emails, and so on. Additionally, it allows you to recover files from different file storage media, such as camera SD cards, computer hard drives, external hard drives, USB drives, and so on.
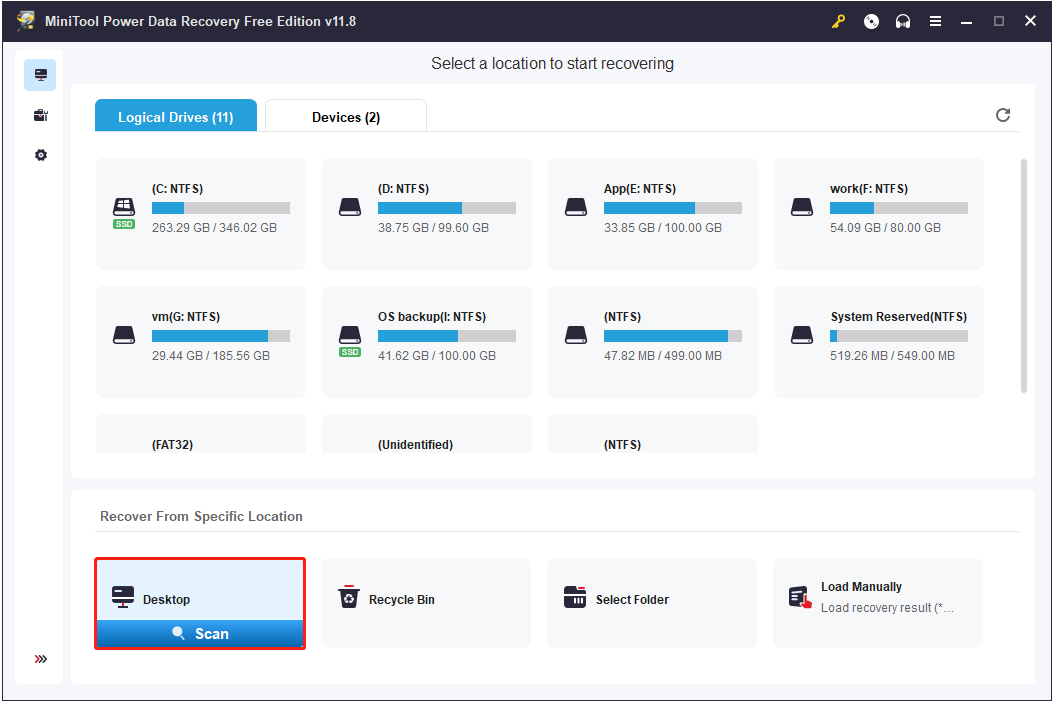
- Quick data scanning modules: To reduce disk scanning and data recovery time, this software provides you with three individual scanning modes: Desktop Recovery, Recycle Bin Recovery, and Select Folder.
- Comprehensive file discovery features: After scanning your disk drive for lost files, you are allowed to locate the DNG files directly or filter out unwanted data from the scan results.
- Free data recovery capacity: MiniTool Power Data Recovery Free is capable of recovering 1 GB of files for free.
Major steps to recover deleted DNG files:
Step 1. Download, install, and launch MiniTool Power Data Recovery Free on your Windows computer.
MiniTool Power Data Recovery FreeClick to Download100%Clean & Safe
If you need to recover DNG files from a camera SD card, you need to connect the card to the PC via a card reader.
Step 2. On the home page of this MiniTool file restoration tool, move your mouse cursor to the partition/location where the deleted DNG files should exist and click the Scan button. Here we take scanning the desktop for example.
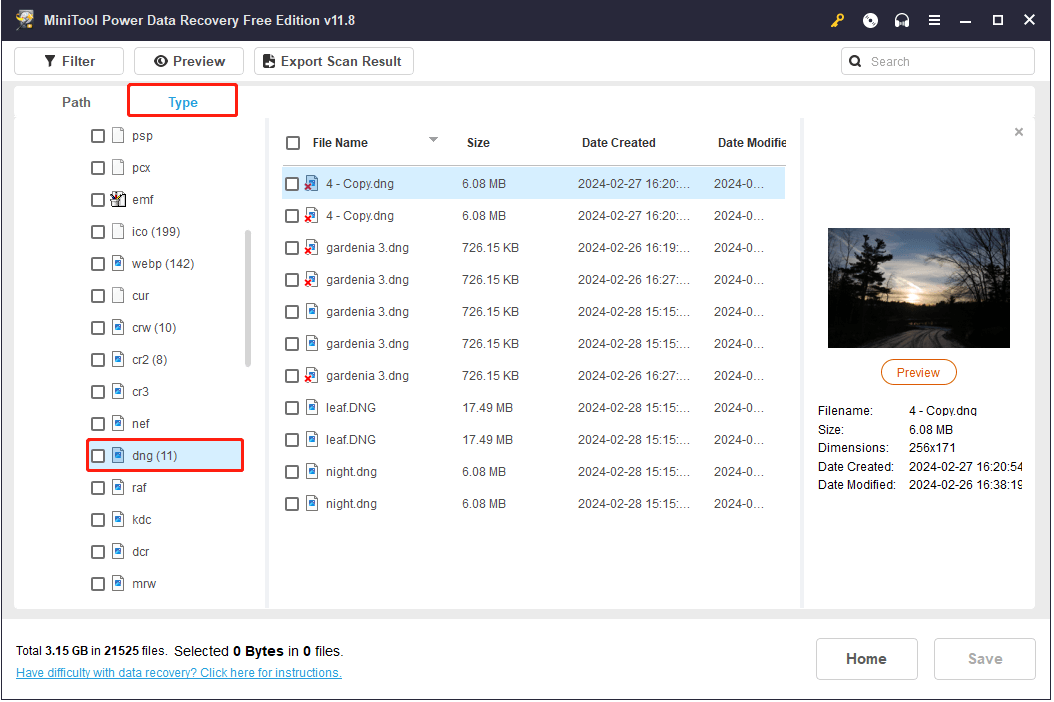
Step 3. To get the best file scanning result, it is advisable to complete the whole scan process. On the scan result page, all found files are categorized by file path by default. Since you only need to recover DNG files, you can move on to the Type category list and view DNG files individually under Picture.
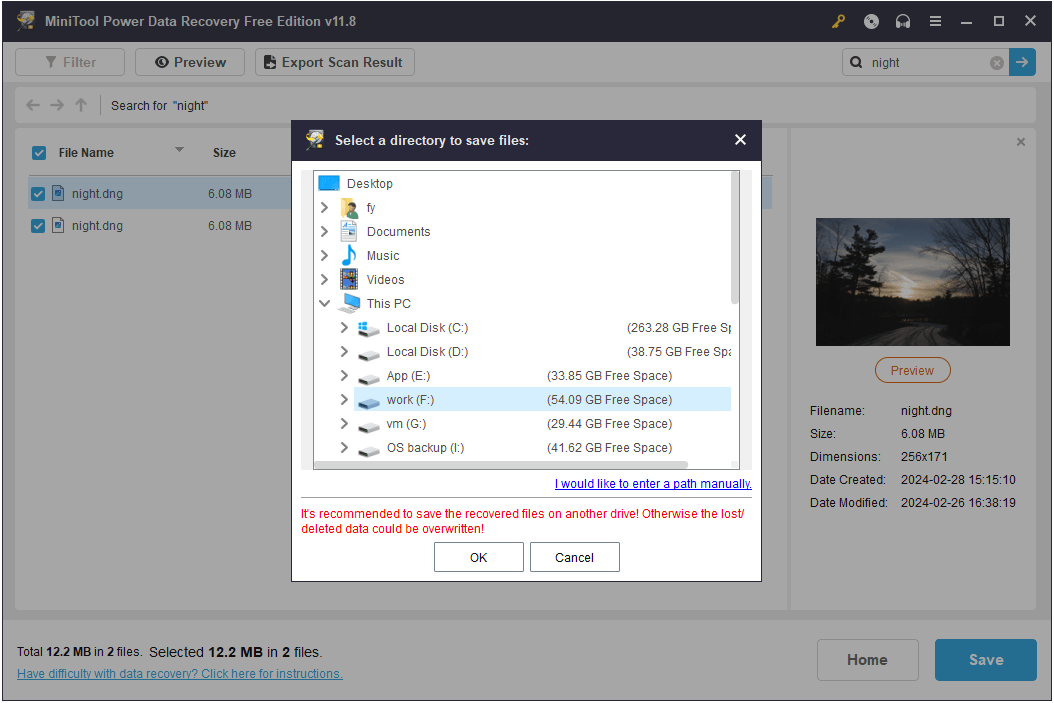
If there are a large number of DNG files, to find the wanted ones faster, you can make use of the Search feature. As long as you type the partial or complete file name of the DNG file into the search box and press the Enter key, the target photo will be displayed.
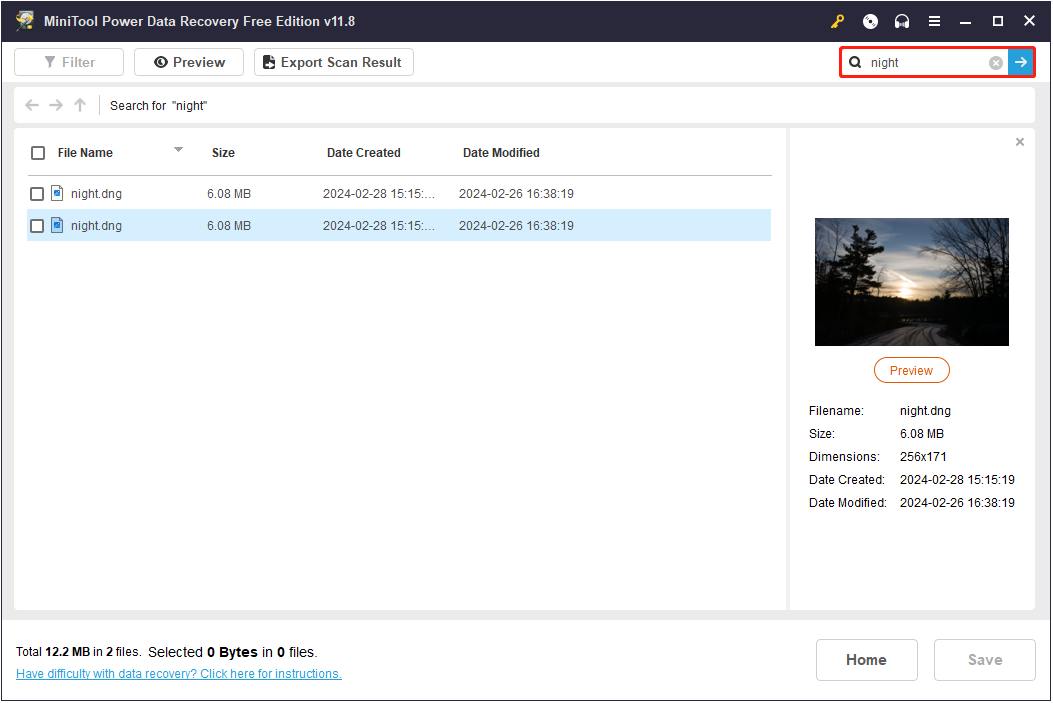
Furthermore, this green file recovery tool offers a Preview feature for DNG images, ensuring you retrieve the correct files. To preview a DNG photo, either select it and hit the Preview button or just double-click the file.
Step 4. Finally, select all required items and click the Save button. In the pop-up window, choose an appropriate file directory to store the chosen data. Note that you should not store the recovered files to the original drive to avoid data overwriting.
As mentioned before, MiniTool Power Data Recovery Free only helps recover up to 1 GB of files. If you need to recover DNG photos exceeding this limitation, you need to choose an advanced edition from the MiniTool Store. Furthermore, a full edition supports creating bootable media and recovering files from unbootable computers.
MiniTool Power Data Recovery FreeClick to Download100%Clean & Safe
Way 3. Recover DNG Files With File History
File History is a continuous, file-level backup utility on Windows that helps back up the standard Windows libraries: Contacts, Desktop, Documents, Downloads, Favorites, Links, Music, OneDrive, Pictures, Saved Games, Searches, Videos, and Camera Roll. If the lost DNG photos were stored in these folders and you have enabled File History, you will be able to get deleted files from backups.
Step 1. Press the Windows + I key combination to open Settings.
Step 2. Click Update & Security > Files backup > More options under Back up using File History.
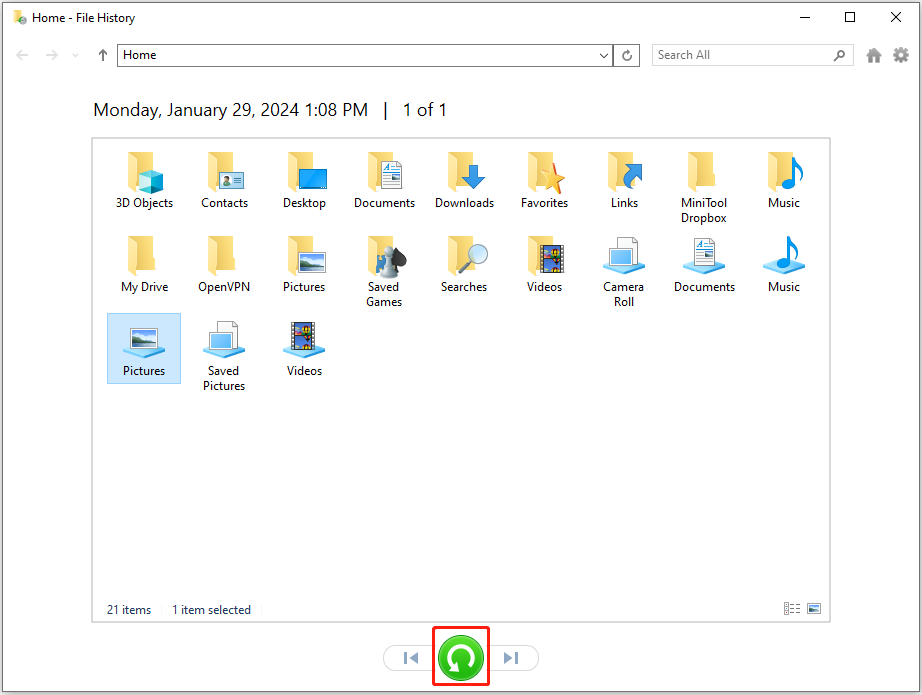
Step 3. In the new window, scroll down to click Restore files from a current backup.
Step 4. Select the needed files, then click the green Restore button to get them back.
How to Recover Deleted DNG Files Mac
If you are a Mac user, the previously mentioned techniques are not suitable for you. To retrieve DNG files on a Mac, consider using the following methods instead.
Way 1. Using Trash
Similar to Recycle Bin, Mac Trash is a location where deleted files from computer internal hard drives are temporarily stored. If DNG files are suddenly lost on your Mac computer, you can check the Trash folder first of all.
First, open Trash from your desktop. After that, you are supposed to find and right-click the desired DNG files and then choose Put Back.
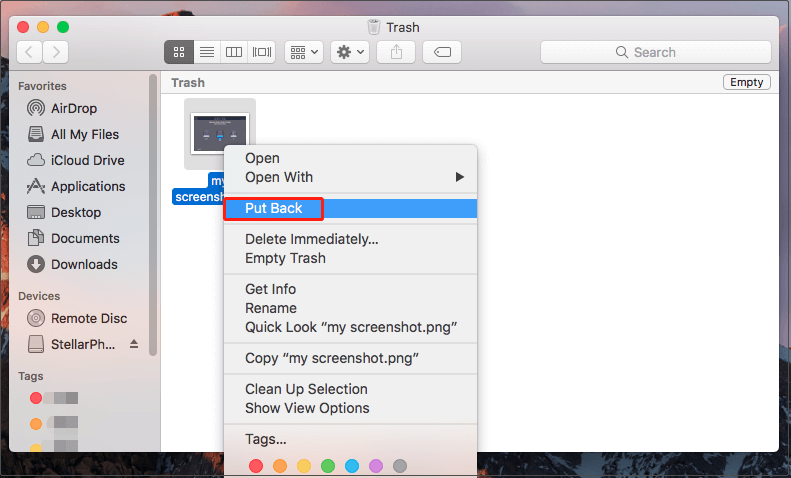
The recovered files will be put back to their original locations for direct viewing and editing.
Way 2. Using Stellar Data Recovery for Mac
Should the Trash folder be emptied, either automatically or by hand, recovering files from it becomes impossible. Under these circumstances, Stellar Data Recovery for Mac can be utilized to recover your files.
Benefits of Stellar Data Recovery for Mac:
- This all-in-one file recovery tool is capable of recovering a wide range of files, such as photos (including DNG files), videos, documents, archives, emails, and other types of files.
- It enables you to recover data from almost all types of file storage media, including digital cameras, Mac notebooks/desktops, USB flash drives, memory cards, SSDs, and so on.
- No matter whether the partition where the deleted DNG files were stored is corrupted or not, the software can help scan the drive for lost files.
- This software also helps repair not opening, pixelated, distorted, or split photos. Besides, it can extract thumbnails of severely corrupt photos.
Now, you can click the button below to get this professional file restoration tool installed and start file recovery.
Data Recovery for MacClick to Download100%Clean & Safe
2. To safeguard the deleted files from being overwritten, avoid installing this file restoration software on the drive where the deleted DNG files previously resided.
Regarding DNG file recovery via Stellar Data Recovery for Mac, you can refer to this tutorial: How to Recover Mac Photos Free.
Bonus Time: Effective Tips to Prevent DNG File Loss
Just as we should recover data immediately after data loss occurs, it is essential to take some precautionary measures to reduce the loss of recovered DNG files and other files. We have collected several useful tips below for your reference.
Back up DNG Photos Regularly:
Prevention is always better than cure. Having file backups is a fundamental method of disaster recovery. It helps protect your data from accidental deletion, hard drive corruption, system failure, and operational errors.
When it comes to file backup, MiniTool ShadowMaker, the best Windows backup software, is highly recommended. It provides data protection services and disaster recovery solutions for PCs, Servers, and Workstations. You can use it to back up files, folders, partitions, disks, and systems.
You can download the Trial Edition of MiniTool ShadowMaker to enjoy its backup and restore features for free within 30 days.
MiniTool ShadowMaker TrialClick to Download100%Clean & Safe
Step 1. Launch MiniTool ShadowMaker, then click Keep Trial to continue.
Step 2. Go to the Backup tab, click SOURCE > Folders and Files > select all required DNG photos you want to back up, and click OK.
Step 3. Click DESTINATION to choose an appropriate location to store the backup images.
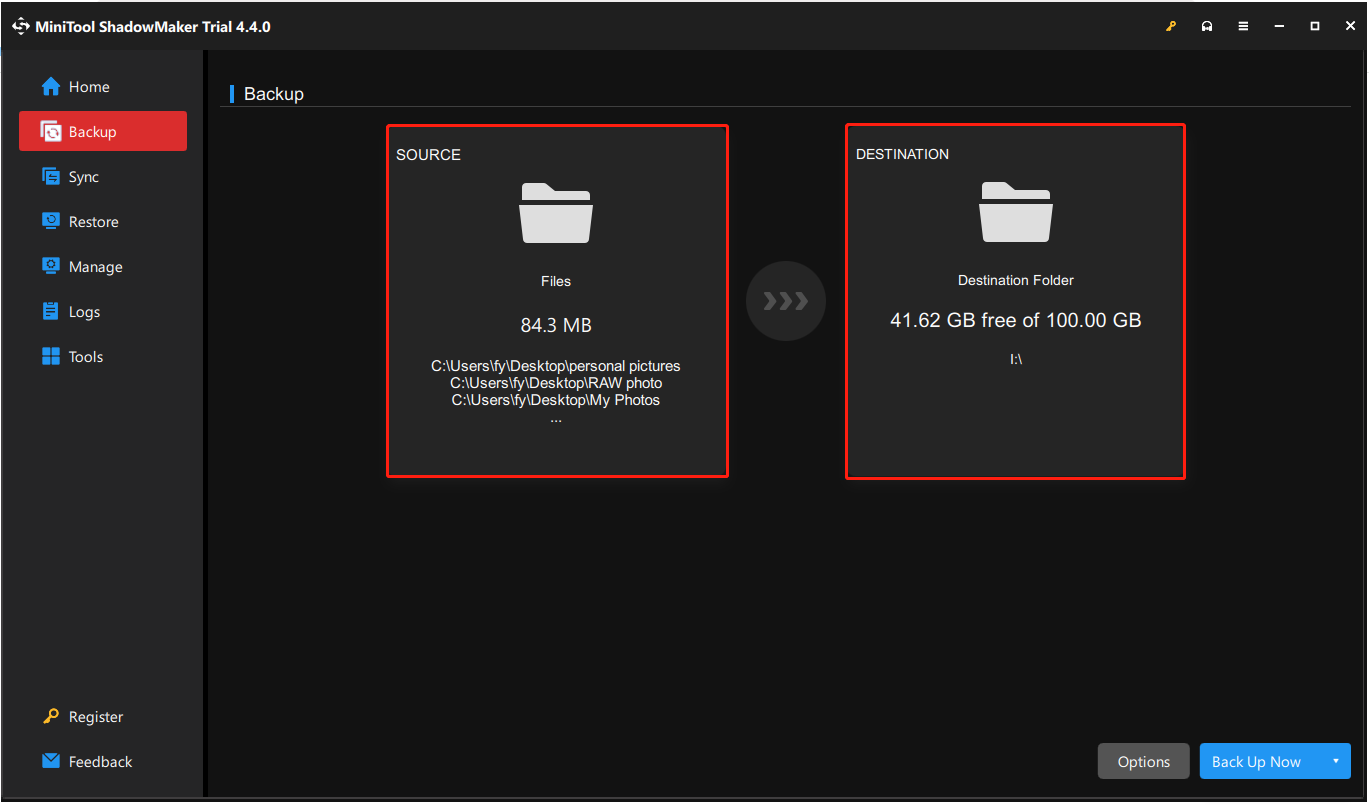
Step 4. Finally, click the Back Up Now button located in the lower right corner to start the file backup process.
Alternatively, you can back up DNG photos by transferring them to external hard drives or cloud drives.
Other Tips:
Apart from data backup, there are additional preventive measures to avoid DNG photo loss/corruption.
- Operate devices/files with caution: Thinking twice before deleting files, formatting disks, emptying the Recycle Bin/Trash, etc. is the most controllable method to avoid file loss.
- Opt for high-quality camera/SD card: Digital cameras or SD cards produced by big brand product manufacturers are usually of better quality, bringing them with a lower risk of data loss/corruption.
- Avoid frequent read and write to the card: Do not frequently perform reading and writing operations on the camera SD card helps extend card lifespan.
- Check storage media errors regularly: Checking the disk where valuable files are stored for errors regularly can reflect the health status of the disk so that it can be repaired in time to avoid complete disk damage and data loss.
Final Words
Hope you can recover deleted DNG files on Windows/Mac by utilizing MiniTool Power Data Recovery or Stellar Data Recovery for Mac. Also, hope the above tips can help you avoid the dilemma of data loss forever.
MiniTool Power Data Recovery FreeClick to Download100%Clean & Safe
Should you encounter any issues or have any questions about MiniTool software, please do not hesitate to send an email to [email protected].
