Accidental deletion of a crucial SVG file can be quite a hassle, particularly if it is essential for your project. Fortunately, there are various methods and SVG file recovery software that you can utilize. In this MiniTool guide, we’ll provide methods for recovering lost or deleted SVG files in the event of data loss.
What is an SVG file? The SVG file format is important for high-quality webpages and is familiar to website designers, whereas the process of creating or optimizing SVG files is complex and labor-intensive. This makes it crucial to have a reliable solution in place to recover SVG files when they are deleted or lost. This post will provide a comprehensive overview of the SVG file format and the tools used for SVG file recovery.
About SVG File
Let’s begin with the fundamentals – what is an SVG file?
Scalable vector graphics, abbreviated as SVG, were first introduced in 2001. SVG is a graphic file type primarily employed for displaying 2-D images online. In contrast to more common image formats, SVG files encapsulate images in a vector format, comprising various lines, curves, points, and geometric shapes derived from mathematical equations. The versatility of SVG files in web design, as opposed to CDR and AI formats, has spurred the ascent of responsive web design.
SVG is the preferred file format for web designers due to the ability to scale dynamically without compromising image quality or data integrity. This feature ensures sharpness and clarity across various devices and screen sizes, making SVGs highly suitable for responsive web design. In addition to their scalability, SVGs offer the advantages of smaller file sizes, easy editability, support for specific types of animations, and programmability, making SVGs a versatile and practical choice for web design and development.
How to Create an SVG File
Creating and modifying SVG files can be achieved using a text editor like Notepad, solely through coding. However, you have to be well-versed in graphic design and file format using a text editor to create SVG files.
Alternatively, you can choose visual design software like Adobe Illustrator or Corel Draw to create SVG files. Inkscape provides a free alternative for producing SVG files. For those who prefer, Adobe Photoshop allows the production of SVGs by selecting the layer and choosing Export As from the right-click menu. It is important to note that only the Shape Layers will function as true SVG files.
Creating SVG files, whether for work or personal projects, requires much time and effort. So inadvertently deleting SVG files or experiencing hardware failure and losing them can be particularly distressing.
However, recovering lost or deleted SVG files isn’t as difficult as you think. You are not alone in looking for methods to rescue SVG files and it is possible to recover your SVG files as long as you don’t overwrite them with new data. Let’s start with the feasible methods on how to recover a deleted SVG file.
Way 1: Recover SVG Files from the Recycle Bin
Before trying more advanced methods, start by checking your computer’s Recycle Bin, as it’s the first way to recover your data. It is crucial to check the Recycle Bin’s contents because there is a chance that the SVG file is still here. You can recover SVG files from the Recycle Bin, as long as you do not empty the Recycle Bin. Here’s how to do it:
Step 1: Double-click the Recycle Bin icon on the Desktop.
Step 2: Find and right-click SVG files, and then choose Restore from the context menu.
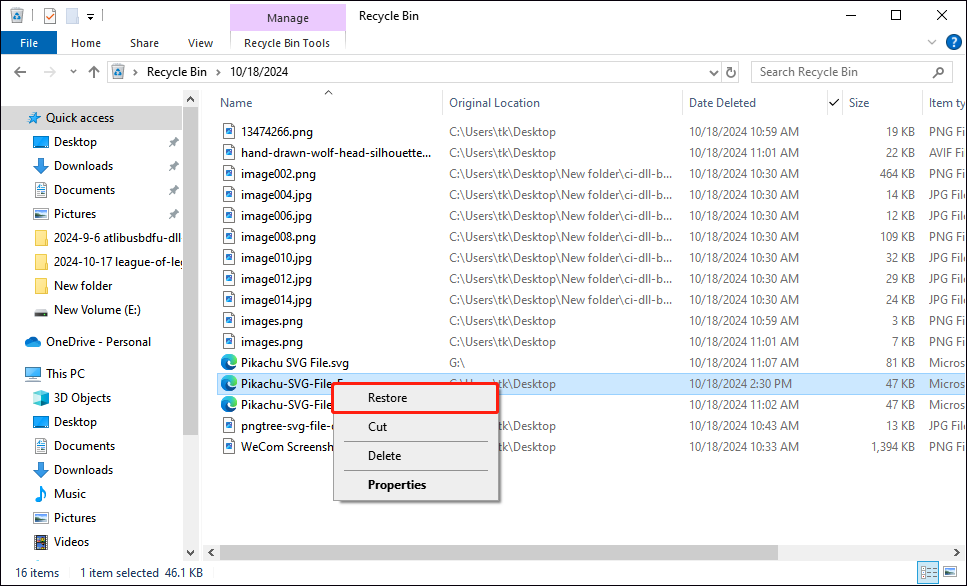
Your SVG files will now be available in their original location.
Way 2: Recover SVG Files from Adobe Illustrator
Fortunately, those who use Adobe Illustrator to edit SVG files have a chance to recover deleted or lost SVG files in this application, even if the files have not been saved. The Autosave feature (auto-recovery) is enabled by default in Adobe Illustrator. If an abrupt system shutdown or crash prevents you from saving your work, this recovery method allows you to retrieve your unsaved SVG files.
This data recovery solution is not very complicated. Here are the steps to achieve it:
Step 1: Relaunch the Adobe Illustrator app.
Step 2: A message box will pop up, indicating that there is a document that has not been saved yet. Press OK to confirm.
Step 3: The SVG file will show up with the Recovered suffix.
Step 4: Access the File menu and select Save As in order to save the restored SVG file using a new name.
In case you close the file with the Recovered suffix without saving it, you can still get your files back through this process:
If you do not save the file with the Recovered suffix and then close the window, you can use this method to recover your files.
Step 1: Type %AppData% in the Windows Search bar.
Step 2: Navigate to the following path:
Roaming\Adobe\Adobe Illustrator [version] Settings\en_US\x64\DataRecovery
Step 3: Open the file with the .aid extension to recover your SVF files.
>> Turn on the backup feature
If you don’t turn on the automatic SVG file backup feature in the Adobe Illustrator app, you can follow the steps below to turn it on to prevent file loss next time:
Step 1: Launch Adobe Illustrator.
Step 2: Go to Edit > Preferences > File Handling & Clipboard… and check the box of the Include SVG Code option located after On copy.
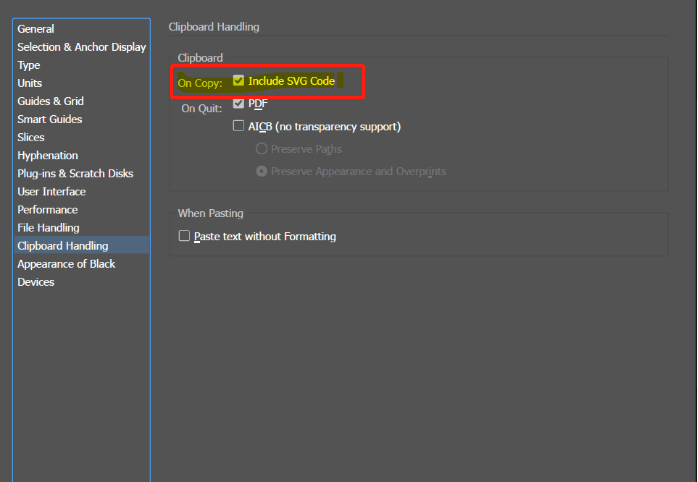
Step 3: Go to the File Handing tab in the left panel and check the box next to Automatically Save Recovery Data Every:. Go to the prompt next to it and specify the time interval you want to save the data. If you want the frequency to be every minute, just click the down arrow to set it. The minimum interval is 30 seconds and the maximum interval is 1 hour.

Step 4: Click OK to save the change.
Way 3: Recover SVG Files from File History
Backing up your files—do you make it a habit? If the File Explorer backup function is enabled on your computer, and the folder where the SVG file is saved is allowed to be backed up, you might be lucky to recover deleted or lost SVG files from Windows File History.
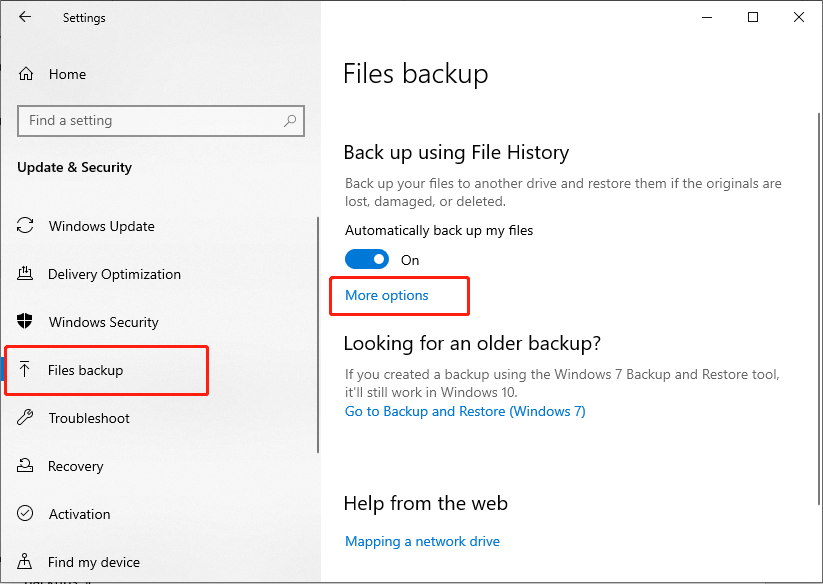
Step 1: Press Win + I simultaneously to open Settings. Navigate to the following path: Update & Security > Files backup.
Step 2: Then you can click the More options link under Back up using File History.
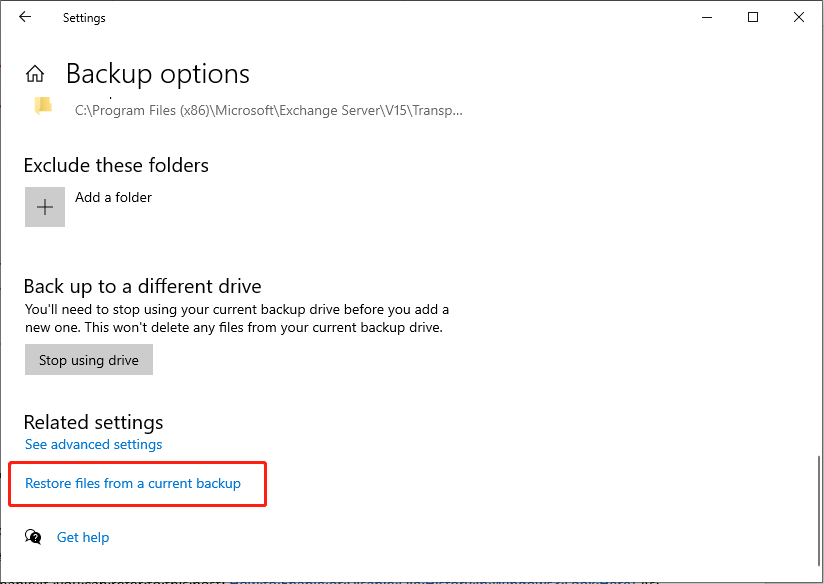
Step 3: In the following window, scroll down to find and click Restore files from a current backup link to enter into the File History backups window.
Step 4: Choose the file or folder you want to restore, and then click the green “Restore” button.
Way 4: Recover SVG Files with MiniTool Power Data Recovery
If you haven’t enabled Windows File History or cannot find the deleted/lost SVG file in the Recycle Bin, how do you get back the SVG files in Windows? The solution is to utilize the best data recovery software.
MiniTool Power Data Recovery FreeClick to Download100%Clean & Safe
With an effective data recovery tool, users can recover their important data from a variety of data loss scenarios like file deletion, virus invasion, disk failure, formatting, file system error, etc. MiniTool Power Data Recovery is one of the best applications available for this job, thanks to its combination of impressive recovery rates, a user-friendly interface, and useful additional features.
This SVG files recovery software should be an optimal choice to recover deleted or lost files from Windows 11/10/8.1/8 computers, external hard drives, SSDs, USB flash/pen/thumb drives, SD cards, camera memory cards, and more. It can restore all types of audio files including SVG.
Steps to recover SVG files using MiniTool Power Data Recovery
Download and install the MiniTool Power Data Recovery, and then follow the instructions.
MiniTool Power Data Recovery FreeClick to Download100%Clean & Safe
Step 1: Click the MiniTool Power Data Recovery icon on the desktop to enter its main interface.
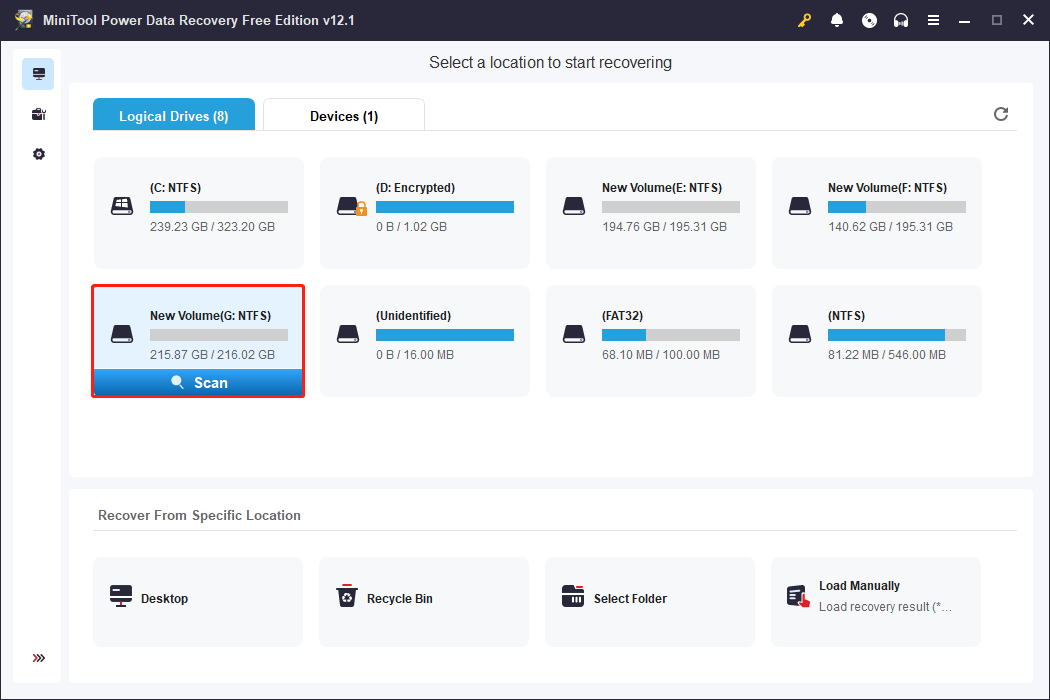
Step 2: In this concise window, you can see a This PC interface with two sections: Logical Drives and Devices.
- Logical Drives: This module displays all detected partitions of internal disks and external devices, and lists some specific locations, such as Desktop, Recycle Bin, and Select Folder. In the interface, you can also load previous scan results you have saved before by clicking the Load Manually button.
- Devices: Click the Devices tab and you will see the entire disks on your computer. If you want to scan files in multiple partitions of the entire disk simultaneously, you can go to this section and select the whole disk to scan.
Here, you can choose the Logical Drives tab and scan the target partition containing deleted or lost SVG files by moving the mouse on the partition and hitting the Scan button. If you’d like to recover data from a USB drive, external hard drive, SD card, etc., you can select the Devices section to scan the drive containing the lost SVG files. It will take a few minutes to complete the entire scanning process. For the optimal scan result, we recommend you wait patiently until the scan process is completed automatically.
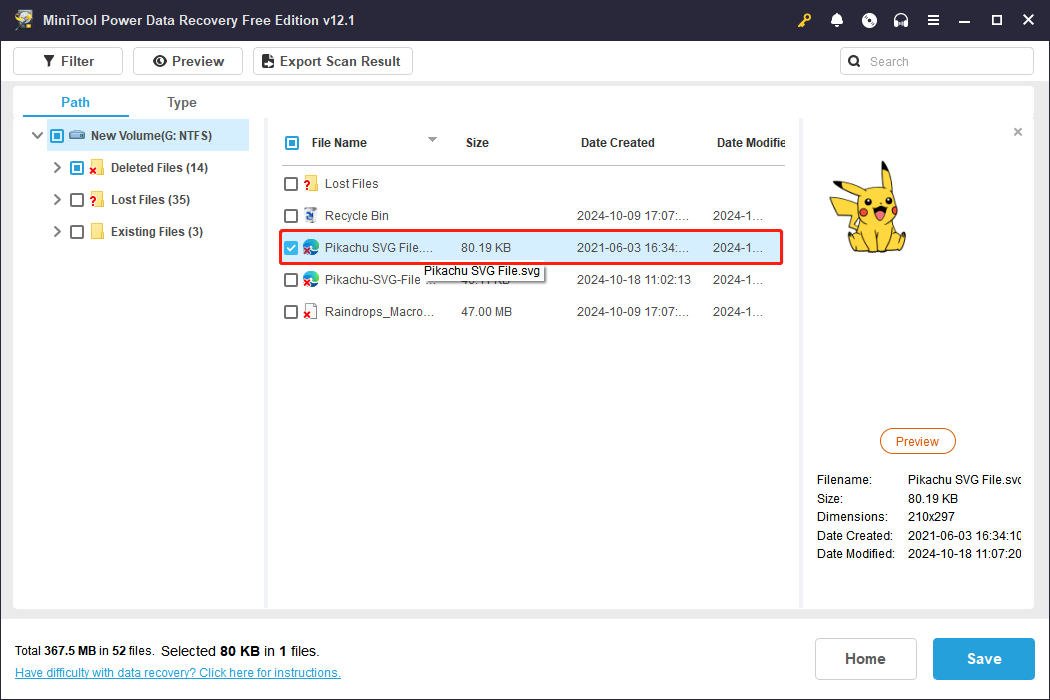
Step 3: By default, files are listed by path on the result page. When there are fewer files, you can directly expand the Lost Files or Deleted Files folder to find the required file.
If there are piles of files in the result lists, you can use some functions to swiftly locate files:
- Filter: To apply specific criteria to your file search, click the Filter button, which will display the filter criteria. This function allows you to refine your search based on file size, date modified, file type, and file category, thereby enabling you to efficiently locate files based on specific conditions. Here you can select Picture only from the By File Type drop-down menu to find SVG files promptly.
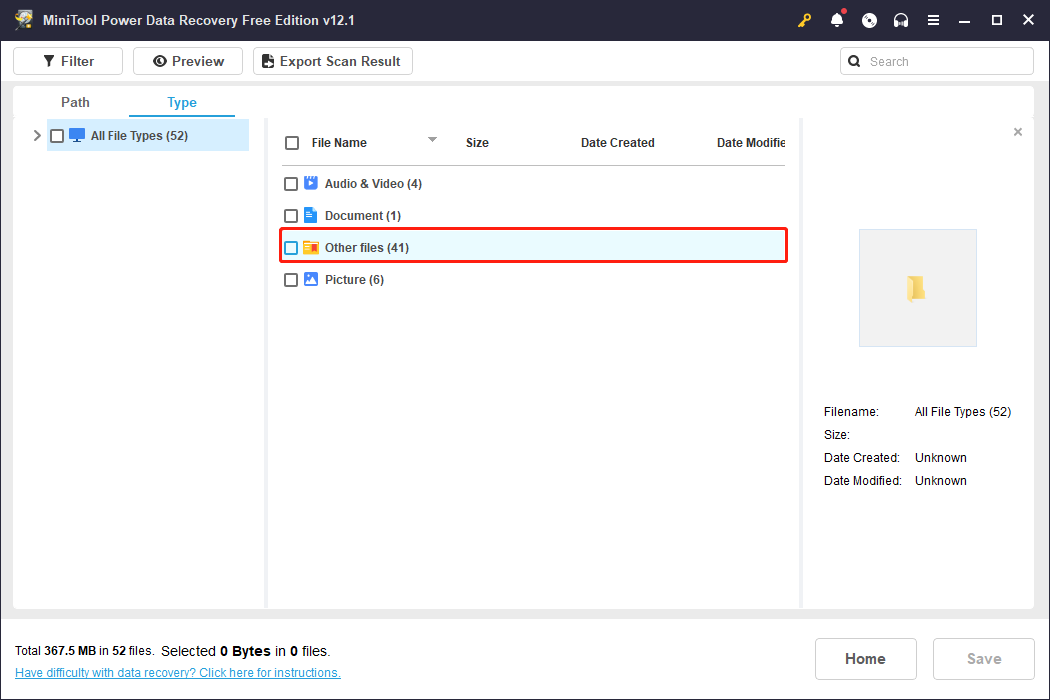
- Type: Click the Type button to check files according to their types. This function works significantly when you want to restore a certain type of file, including Picture, Audio & Video, Document, and Other files. For instance, by expanding the Other files options, you can check photos more precisely by file format such as SVG.
- Search: Located in the top right corner, the Search function helps locate exact files quickly. By entering relevant keywords in the designated search bar and subsequently pressing Enter, users can efficiently locate files based on their names. For instance, you can type SVG in the box and press Enter to find your deleted or lost SVG files.
- Preview: Since the free edition of MiniTool Power Data Recovery has a 1GB data recovery capacity limit, it is vital to ensure the accuracy of the recovered files. You can click the Preview button to check whether the chosen file is what you want. This function allows you to preview files, photos, audio, and videos during the scanning process. And it ensures data recovery accuracy. You can browse this guide to learn about the preview file formats supported by MiniTool Power Data Recovery. Please note that the previewed videos and audio should not be larger than 2GB.
Step 4: Check all wanted files and click the Save button located in the lower right corner to choose a location path to store them. You had better store them on another drive. Otherwise, the original data could be overwritten.
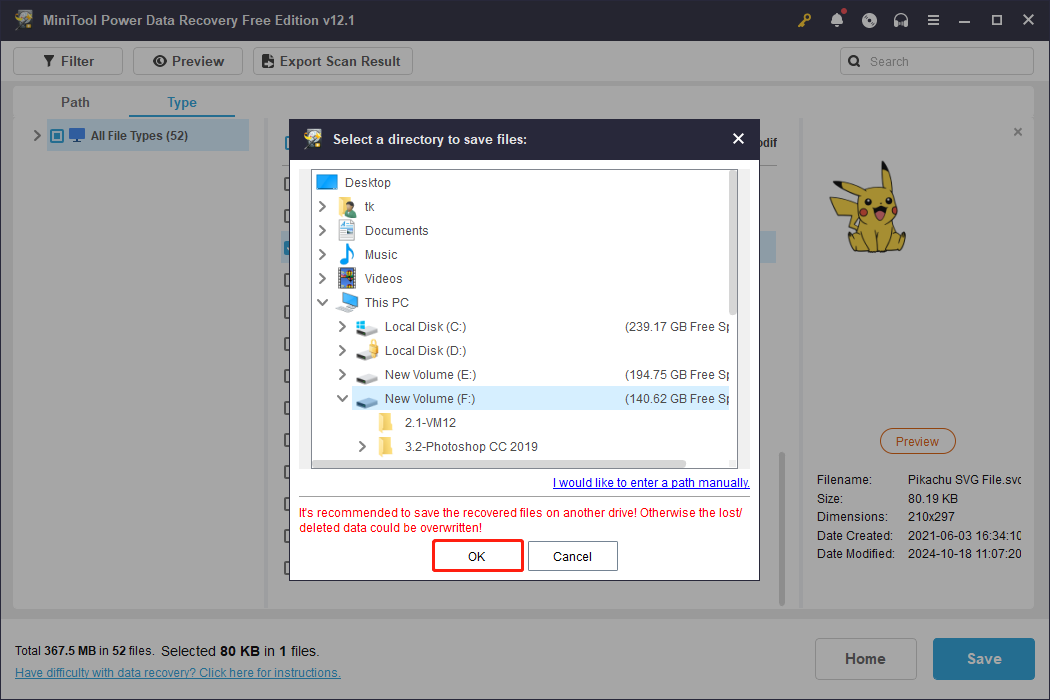
Step 5: In the pop-up interface, you need to choose the correct restoration path for those files and click OK to confirm the action.
If the software has recovered 1GB of files, a “File Saving Limit” prompt window will pop up. You can upgrade the software to an advanced edition to accomplish the SVG file recovery process if you choose files to recover larger than 1GB.
After all steps are completed, you have successfully recovered lost/deleted SVG files.
Final Words
To sum up, recovering lost or deleted SVG audio files might seem a bit daunting for many Windows users. With MiniTool Power Data Recovery at hand, you can easily perform SVG file recovery without worrying about data safety on your computer.
MiniTool Power Data Recovery FreeClick to Download100%Clean & Safe
We extend our best wishes for the successful restoration of your SVG files. If you encounter any errors or have any questions while using MiniTool Power Data Recovery, please send an email to [email protected] for assistance.
