If you encounter the 0x8024a112 error while applying the update, don’t worry too much. The problem probably occurs because another update is waiting in line or Task Scheduler is malfunctioning. to fix this issue, you can refer to this post offered by MiniTool Solution to get some methods right now.
You may find that certain pending Windows 10 updates fail with the 0x8024a112 error code. Most of the time, you will lose the ability to restart your system. Apparently, every restart attempt ends up failing with the following error text:
We’re having trouble restarting to finish the install. Try again in a little while. If you keep seeing this, try searching the web or contacting support for help. This error code might help: (0x8024a112)
Typically, the 0x8024a112 error occurs if you are the user that is signed into the Windows 10 Insider build programme. This error is indicative of the OS failing to schedule a sequence of tasks.
In most cases, this happens because another update is waiting in line or Task Scheduler is malfunctioning.
If you are currently struggling with this particular problem, the following approach will most likely help resolve the Windows 10 update error 0x8024a112.
Method 1: Use the Restart and Update Button
The system in the middle of applying another update is the most common reason why a pending update will fail with the 0x8024a112 error. Thus, Windows 10 requires a restart in order to complete the process. As you probably noticed, Windows will complete the updates during the startup process.
To do this, left-click the Start menu, click the Power button and click the Update and restart button. Then, your computer will restart and complete the pending updates.
After that, you should be able to complete the newest updates without the 0x8024a112 error. If the 0x8024a112 error still persists when applying the update, move over to the next methods.
Method 2: Run the Windows Update Troubleshooter
If the method above didn’t work, you can try running the Windows Update troubleshooter to avoid the 0x8024a112 error.
Windows Update Troubleshooter is a Windows built-in utility. It is configured to automatically detect and fix incorrect Windows Update settings and glitches. Follow the guidelines below to run the Windows Update troubleshooter.
Step 1: Press the Win key + R key at the same time to open the Run dialog box. Then, type ms-settings:troubleshoot and press Enter.
Step 2: From the right side, find Windows Update in the list and click Run the troubleshooter.
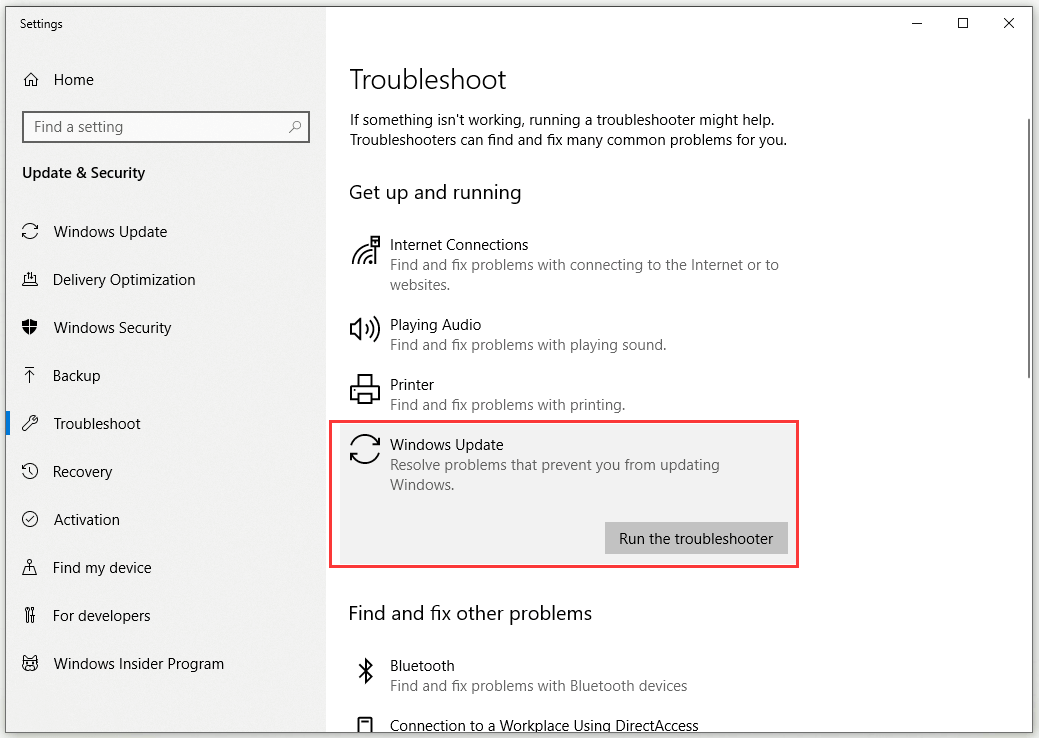
Step 3: Wait until the Windows Update Troubleshooter detects potential problems with your update component. Once the process is complete, click Apply this fix and wait until the repair process is complete.
Step 4: Restart your computer and check if you are able to install the Windows Update at the next startup without the 0x8024a112 error.
Method 3: Modify the Startup Type of Task Scheduler
The 0x8024a112 error might also be caused by a broken Task Scheduler. Task Scheduler can become corrupted or even disabled by third-party interference.
You can try to resolve the issue by using Registry Editor to re-enable Task Scheduler. This will enable Windows Update to complete the updating process. Here’s a quick guide on how to do that job.
Step 1: Type regedit in the Search bar, navigate to Registry Editor and select Run as administrator.
Step 2: Navigate to this path: HKEY_LOCAL_MACHINE\SYSTEM\CurrentControlSet\Services\Schedule. You can simply copy and paste this path in the address bar. Then, press Enter.
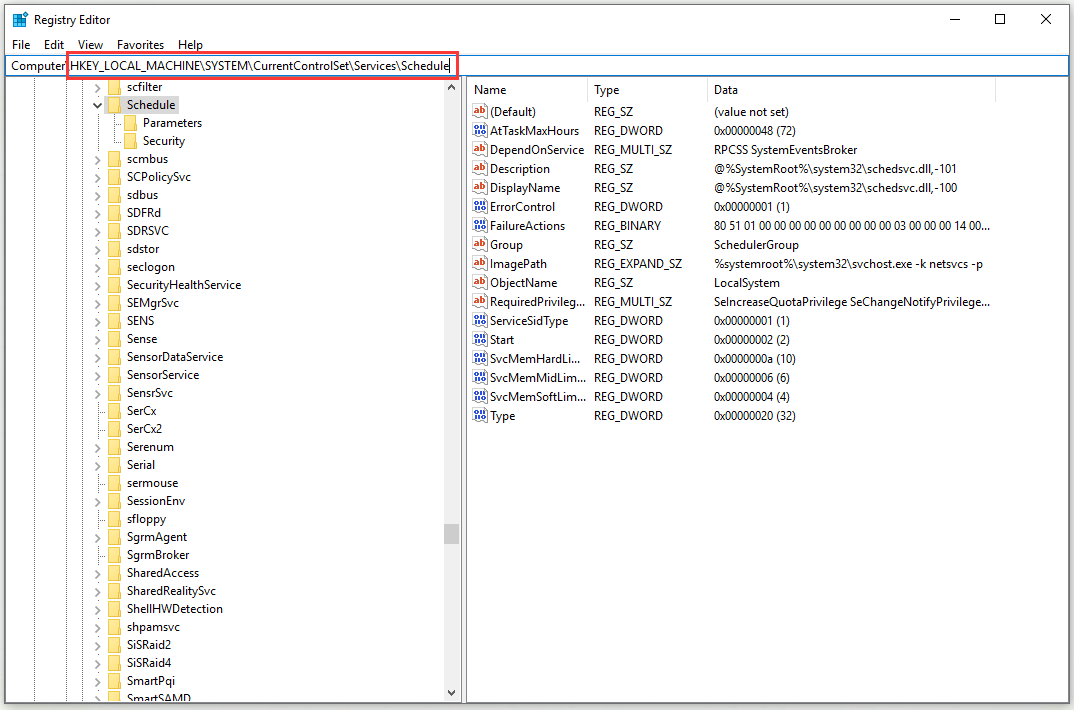
Step 3: Move over to the right-hand pane. Now, right-click Start and choose Modify….
Step 4: Change Base to Hexadecimal and set Value data to 2.
Step 5: Click OK to save your changes.
Restart your computer and check if you are able to update without the 0x8024a112 error at the next startup.
Method 4: Upgrade via the Media Creation tool
If all the methods above don’t help you, you can try to force the update to install by using the Media Creation Tool. Follow the guidelines below to do this.
Step 1: Enter this link and click Download tool now to download the Media Creation tool.
Step 2: Open the MediaCreationTool executable and launch the Media Creation tool.
Step 3: At the next screen, select Upgrade this PC now and click the Next button.
Step 4: Then, wait until the Windows 10 iso is downloaded on your computer. Click Next to apply the upgrade process.
Step 5: Restart your computer at the end.
After that, the 0x8024a112 error should be fixed.
Bottom Line
To sum up, this post has shown you 4 workable methods to fix the 0x8024a112 error while applying the update. If you encounter the same error, don’t hesitate to try the methods above to fix it.
