Dell SupportAssist is a useful utility that helps Dell users to booster their systems, protect their system from threats, and more. However, you might find Dell SupportAssist installation failed at times. To help you get rid of this issue, we will show you some applicable methods in this post on MiniTool Website.
Dell SupportAssist Installation Failed
Dell comes with a utility called Dell SupportAssist to help you in many ways, for example, get required updates, protect your Dell computer from virus & malware, booster your system and more. Usually, this program is preinstalled on your computer and you can uninstall it at any time.
Some of you might fail to reinstall Dell SupportAssist and receive the error message below:
Installation failed.
We were unable to complete the installation. Please reboot your PC and try again.
Luckily, the solutions below will help you to fix the Dell SupportAssit installation failed error for you. You can try them one by one until your problem gets fixed.
MiniTool ShadowMaker TrialClick to Download100%Clean & Safe
How to Fix Dell SupportAssist Installation Failed?
Fix 1: Restart Your Computer
Any incomplete installation of this application might lead to issues like installation failed error on Dell SupportAssist. At first, check if Dell SupportAssist is still listed in Control Panel or in the Windows installed app list. If yes, uninstall it and then reboot your computer. After restarting your computer, you can run the installer file to see if the same error crops up.
Fix 2: Install Microsoft .NET Runtime 6.0.9
Dell SupportAssist requires .NET Runtime 6.0.9. If the .NET runtime version you have is higher than 6.0.9, you will also be likely to encounter Dell SupportAssist installation failure. Therefore, you can uninstall the higher version of .NET Runtime and download it from the official website of Microsoft.
Fix 3: Remove All Other Programs Related to Dell
It is reported that other Dell programs also have this installation issue. So, you can remove all these programs. After deleting all the contents inside the Dell and Dell Inc folders, you will find these files in the ProgramData folder on your C drive. Follow these steps:
Step 1. Press Win + R to open the Run box.
Step 2. Type the following command in the Run dialog and hit Enter after each command:
%programdata%\Dell
%programdata%\Dell Inc
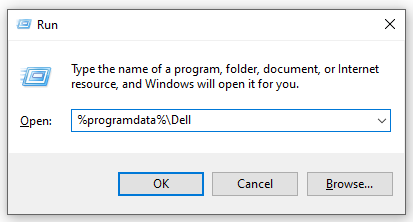
Step 3. Once the process is complete, restart your computer and run the installer file to see if Dell SupportAssist installation failed appears again.
Fix 4: Clean Install Dell SupportAssist
Before you are about to reinstall Dell SupportAssist, make sure to completely remove it from your system. When we uninstall a program or application, some traces are left behind in the system’s registry. In consequence, you should follow the following steps to remove these traces:
Step 1. Go to Windows Settings > Apps > Apps & features.
Step 2. Now, you can see all the installed programs on your computer. Click on Dell SupportAssist, hit Uninstall, and then follow the on-screen wizard to complete the process.
Step 3. After uninstalling it, run Command Prompt with administrative rights and run the following command one by one.
SC DELETE “SupportAssistAgent”
SC DELETE “DDVDataCollector”
SC DELETE “DDVRulesProcessor”
SC DELETE “DDVCollectorSvcApi”
Step 4. Now, open the ProgramData folder on your C drive and delete the folders below (if exist):
PCDR
Supportassist
Dell > Dell data vault
Dell > Supportassist
Step 5. Clean the Temp folder, restart your computer and then reinstall Dell SupportAssist.
Fix 5: Create a New User Account
Another way to address the Dell SupportAssist installation failed error is to install it by logging into a new account. Here’s how to create a new user account:
Step 1. Type netplwiz in the Run dialog and hit Enter to open User Account.
Step 2. Hit Add > Sign in without a Microsoft account > Local Account.
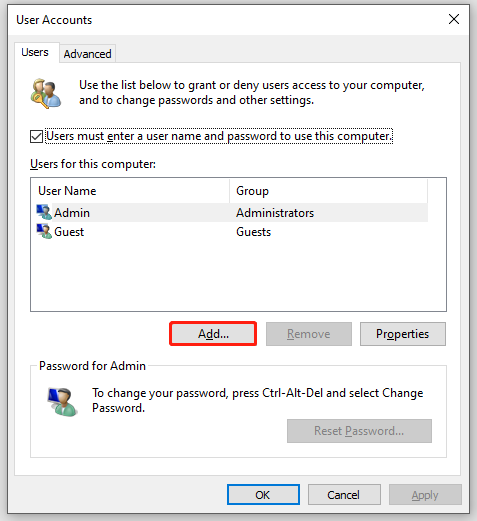
Step 3. Enter your user name, password, password hint and hit Next to continue.
Step 4. After creating the profile, select it, and tap on Properties.
Step 5. In the Group membership tab, tick Administrator and hit OK to save the changes.
Final Words
That’s all solutions for Dell SupportAssist installation failure. Hope you can succeed in installing this program to protect your computer again.
About The Author

Position: Columnist
Aurelie is a passionate soul who always enjoys researching & writing articles and solutions to help others. Her posts mainly cover topics related to games, data backup & recovery, file sync and so on. Apart from writing, her primary interests include reading novels and poems, travelling and listening to country music.