What happens when Do Not Disturb is on? How to put Mac on Do Not Disturb? Some detailed information about Do Not Disturb on Mac is introduced in this post by MiniTool. Just follow the given ways to turn on this feature so that you can keep your Mac quiet when you trying to do something.
What Does Do Not Disturb Do?
In macOS, there is a feature called Do Not Disturb and it is very helpful to let you work in an uninterrupted environment. To be specific, if you turn on this feature, all Mac’s notifications from emails, calendar events, phone calls, messages, app updates, and so on won’t interrupt you. These notifications will go to Notification Center and you can view them later.
If you are concentrating on a specific task, enable Do Not Disturb immediately and you won’t be distracted by the myriad endless alerts from your Mac. Well then, how to put Do Not Disturb on Mac? Follow the below-given instructions now.
How to Turn on Do Not Disturb Mac
Activate Mac Do Not Disturb in Notification Center
The operations are simple and do these steps:
- Go to the Menu bar at the top-right corner and choose the Notification Center Alternatively, you can use two fingers to swipe to the left from the right edge of the Mac’s trackpad.
- You can see the option called DO NOT DISTURB. Just change the toggle to On. To disable this feature, toggle the option to the Off position.
Automatically Schedule Do Not Disturb
This is another way to put your Mac on Do Not Disturb. You can customize the setting based on your needs. The following is how to schedule this feature on your Mac:
1. In a Mac, go to Notification Center in the menu bar and click the Settings icon in the bottom-right corner to get the notification settings window.
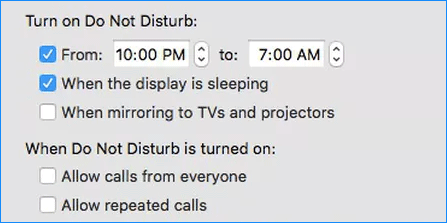
2. Navigate to the Turn on Do Not Disturb section, schedule the feature:
- If you want your Mac to keep quiet for some time, check the box next to From: [time] to: [time], and select the time range.
- Also, you can put the machine to Do Not Disturb when your Mac display is sleeping, the screen is locked or when mirroring to TVs and projectors.

Furthering Reading: Do Not Disturb on Mac Shortcut
In addition to the above ways to enable Do Not Disturb, you can try to create a shortcut for your Mac to turn on this feature.
- Go to the Apple menu and click System Preferences > Keyboard.
- Under the Shortcuts tab, choose Mission Control and check the box next to Turn Do Not Disturb On/Off.
- Press Enter and then you can set a keyboard shortcut combination. Make sure the combination is unique and won’t overlap with other combinations.
After creation, you can easily use the shortcut to enable or disable Do Not Disturb.
Final Words
Want to turn on Do Not Disturb on Mac but don’t know what to do? Take it easy and now you know much information after reading this post. Follow the given ways to easily do this work. Do you have any suggestions? Let us know in the comment part.

