Is TLS 1.2 enabled by default on Windows? How to enable TLS 1.2 Windows 10/11 and Windows 7 & Server 2012? The steps are different based on different systems. From this post, you can find details given by MiniTool.
What Is TLS
TLS, short for Transport Layer Security, is a cryptographic protocol to ensure communication security over a network in computing. It primarily secures the connection between a web application and a network using data encryption to prevent eavesdropping and tampering. TLS has multiple versions like TLS 1.0, TLS 1.1, TLS 1.2, and TLS 1.3 (the latest one currently).
Nowadays TLS 1.2 is the widely used version and today we will show you how to enable TLS 1.2 in some Windows versions.
MiniTool ShadowMaker TrialClick to Download100%Clean & Safe
Is TLS 1.2 Enabled by Default on Windows
Usually, protocol usage is controlled at 3 levels – the application level, the framework or platform level, and the operating system level.
At the operating system level (in Windows 11/10/8/1/Windows Server 2012R2/2016/2019/2022), TLS 1.2 is enabled by default. In some old Windows versions like Windows 7 and Windows Server 2012, they require you to configure some settings before enabling TLS 1.2. Windows Vista and XP don’t support TLS 1.2.
Sometimes the protocol may be disabled due to some reason and you need to re-enable it. See how to do it in the following part.
How to Enable TLS 1.2 Windows 11/10/7/Server
Enable TLS 1.2 Windows 10/11
If you are running Windows 10 or 11, follow these steps below to do this thing:
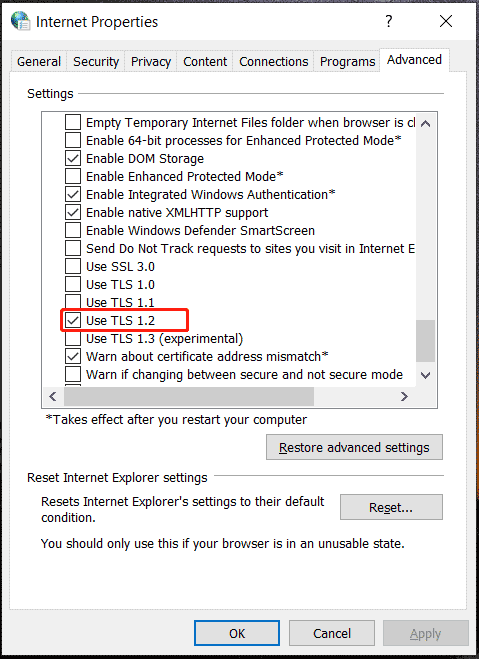
Step 1: Press Win + I to open Run, type inetcpl.cpl, and click OK to open the Internet Properties window.
Step 2: Under the Advanced tab, scroll down to find Use TLS 1.2. If it is not selected, check the box and tap on Apply. If you want to also enable TLS 1.3, check Use TLS 1.3.
Enable TLS 1.2 in Windows 7 and Server 2012
If you use a PC that runs an old version like Windows 7 or Server 2012, they don’t enable TLS 1.2 by default. You need to install the KB3140245 update and modify some registry values.
Step 1: Visit https://catalog.update.microsoft.com/search.aspx?q=kb3140245, click the Download button based on your system architecture, and tap on the download link to get the installation file. Double-click on the .msu file to install this KB update.
Step 2: Open Windows Registry Editor by typing regedit to the search box.
Step 3: Go to check if there is the registry key –HKEY_LOCAL_MACHINE\SYSTEM\CurrentControlSet\Control\SecurityProviders\SCHANNEL\Protocols\TLS 1.2\Client and see if its key DisabledByDefault has been set to 0. If not, you should create the Client folder and the DisabledByDefault DWROD value to configure it.
Besides, check HKEY_LOCAL_MACHINE\SYSTEM\CurrentControlSet\Control\SecurityProviders\SCHANNEL\Protocols\TLS 1.2\Servers and make sure Enabled is set to 1.

Step 4: To use TLS 1.2, you are required to add it to the default secure protocols list for WinHTTP.
Navigate to HKEY_LOCAL_MACHINE\SOFTWARE\Microsoft\Windows\CurrentVersion\Internet Settings\WinHttp or HKEY_LOCAL_MACHINE\SOFTWARE\Wow6432Node\Microsoft\Windows\CurrentVersion\Internet Settings\WinHttp. Then, verify the value of the DefaultSecureProtocols registry key (DWORD) is 0xAA0.
Step 5: Finally, install NET Framework like version 4.6 to support TLS 1.2. Just download it from this link – https://www.microsoft.com/en-US/download/details.aspx?id=48137. Then, double-click on this .exe file to install.
Verdict
That’s the detailed guide on how to enable TLS 1.2 in Windows 7/10/11 and Windows Server 2012. Follow the steps above to easily perform this task if you need. Hope this tutorial can help you a lot.
About The Author

Position: Columnist
Vera is an editor of the MiniTool Team since 2016 who has more than 7 years’ writing experiences in the field of technical articles. Her articles mainly focus on disk & partition management, PC data recovery, video conversion, as well as PC backup & restore, helping users to solve some errors and issues when using their computers. In her spare times, she likes shopping, playing games and reading some articles.