If you are experiencing the error message which states that “Failed to initialize unity graphics”, don’t worry too much. It is easy to solve this error. Right now, you can read this post offered by MiniTool Solution to get some useful methods.
When you are launching Unity which is a cross-platform game engine developed by Unity Technologies and then you encounter an error message saying “Fatal Error! Failed to initialize unity graphics”, don’t panic. It is a common error in Windows and you can fix it easily.
Here are some causes for this error: failed to initialize Unity Graphics Linux, unable to initialize Unity Engine or failed to initialize Direct3D Unity.
Right now, you can follow the solutions below to fix the error “Failed to initialize unity graphics”.
Fixes for Failed to Initialize Unity Graphics
Fix 1: Enable the DirectX Features
In order to solve the “Failed to initialize unity graphics” error, the first thing you need to do is to make sure that the DirectX features especially Direct3D acceleration in your computer are enabled and working properly. Here are the steps to do that job.
Step 1: Press the Win key + R key at the same time to open the Run dialog box. Next, type dxdiag in the dialogue box and press Enter.
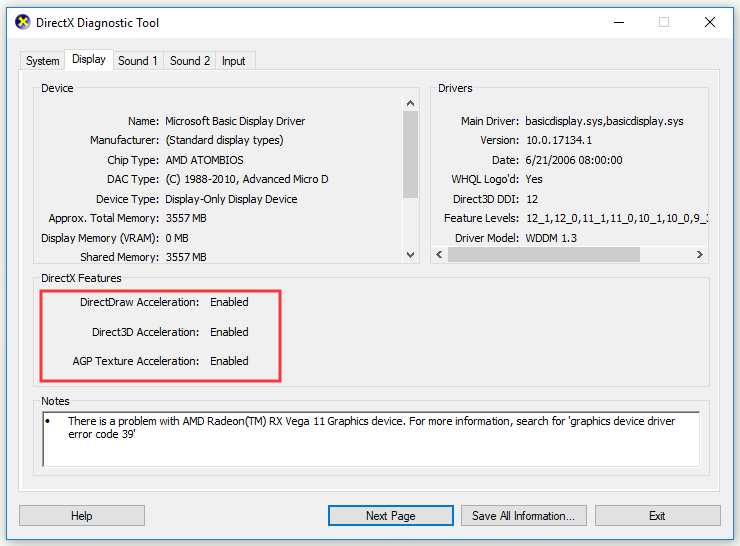
Step 2: In the DirectX Diagnostic Tool window, switch to the Display tab.
Step 3: Under the DirectX Features section, check to see if DirectDraw Acceleration, Direct3D Acceleration and AGP Texture Acceleration are marked as Enabled.

Step 4: If any of the features are disabled, enable them and restart your computer. There are 2 ways you can try to enable the DirectX features: updating the graphics driver or downloading the latest version of DirectX on your computer. Navigate to DirectX official website to install DirectX.
Step 5: Wait for the installation process to complete, restart your computer and try to launch Unity again.
Now, check if the “Failed to initialize unity graphics” error has been solved. If not, move down to the fix below.
Fix 2: Update Graphics Card Driver
If the graphics card driver on your computer is missing or outdated, the “Failed to initialize unity graphics” error will occur. In this case, you need to update your graphics card driver to solve this problem.
There are 2 ways to do this job: automatically update or download the driver manually from the manufacturer’s website and install it on your computer. Here are the steps on how to automatically update.
Step 1: Press the Win key + R key at the same time to open the Run dialog box. Next, type devmgmt.msc in the dialogue box and press Enter.
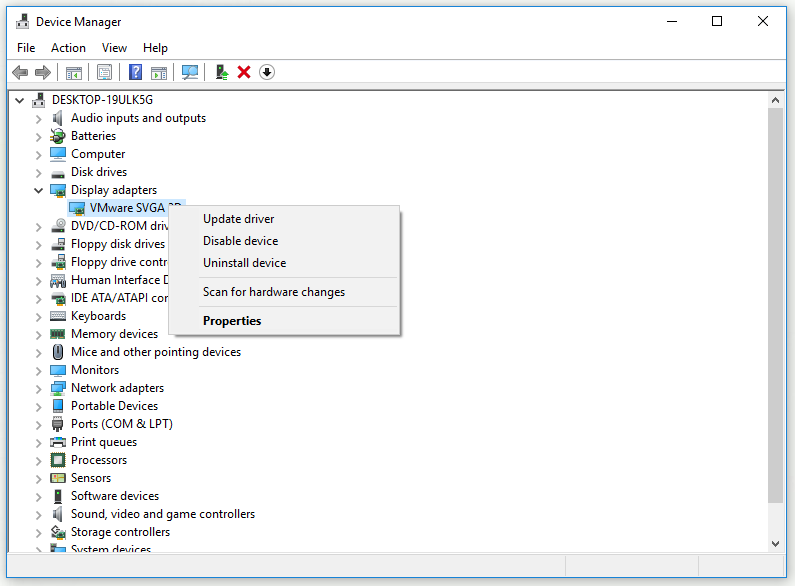
Step 2: Once in the Device Manager window, click Display adapters to expand it, right-click on your graphics card driver and select Update driver.

Step 3: Click Search automatically for updated driver software.
Step 4: Follow the instructions on the screen to finish updating your graphics card driver.
After you complete all the steps below, check if the “Failed to initialize unity graphics” error has gone.
Fix 3: Roll Back Graphics Card Driver
If all the fixes above can’t help you, now you can try to roll back your graphics card driver. Here is a quick guide on how to do that.
Step 1: Right-click the Start menu and then choose Device Manager from the popup menu to open it.
Step 2: Click Display adapters to expand it.
Step 3: Double-click your graphics card driver to open its Properties window.
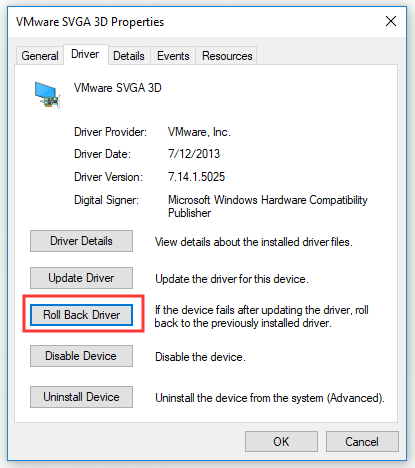
Step 4: Switch to the Driver tab and then click the Roll Back Driver button. Finally, click Yes.

Step 5: Follow the instructions to finish the driver rollback process.
Restart your computer and check if the error has gone.
Bottom Line
In conclusion, this post has shown you 3 fixes for the error “Fatal Error! Failed to initialize unity graphics”. If you are troubled by this error, it’s time to try the fixes mentioned by this post.
