If you are bothered by DHCP error 0x79, you come to the right place. In this post, MiniTool Software will explain some reasons for this error and show you how to resolve this problem using different methods. At the same time, you can find the best free data recovery software to help you get your lost and deleted data back on Windows.
Best data restore tool for Windows:
MiniTool Power Data Recovery is a professional file recovery tool. It can recover deleted files from data storage devices like computer internal hard drives, external hard drives, USB flash drives, memory cards, SD cards, and more. MiniTool Power Data Recovery Free Edition allows you to scan drives and recover up to 1 GB of files for free.
MiniTool Power Data Recovery FreeClick to Download100%Clean & Safe
Reasons for DHCP error 0x79
About DHCP error 0x79
Here is a rare report about an internet issue: unable to connect to the network and the event says DHCP error 0x79.
The following screenshot is an example:
Your computer was not assigned an address from the network (by the DHCP Server) for the Network Card with network address ********. The following error occurred: 0x79. Your computer will continue to try and obtain an address on its own from the network address (DHCP) server.

If you see the DHCP error 0x79, it usually means that your computer has a preassigned IP address, which has already been given out to another device. The other possibility is that the DHCP server is currently offline or experiencing issues unexpectedly, and this status cannot fulfill the request for the device’s IP address.
Reasons for DHCP error 0x79
Here are the main reasons for this issue:
- The network connection is unstable, causing can’t reach the DHCP server.
- The DHCP server is unavailable, so it cannot respond to the request for the device’s IP address.
- Two computers are using the same IP address.
- The DHCP client settings are not configured correctly.
- Your firewalls or other security software is blocking the communication with the DHCP server.
The reasons can help you find a suitable solution to solve the problem.
How to Fix DHCP error 0x79? Here Are 5 Ways
We collect 5 ways that can effectively remove DHCP error 0x79.
Way 1: Reset the TCP/IP values using Command Prompt
Step 1: Click the search box from the taskbar, then search for cmd.
Step 2: Right-click Command Prompt and select Run as administrator.
Step 3: Run netsh winsock reset catalog in Command Prompt.
Step 4: Run netsh int ipv4 reset reset.log in Command Prompt. This can reset the IPv4 TCP/IP stack on your PC.
Step 5: Run netsh int ipv6 reset reset.log in Command Prompt. This can reset the IPv6 TCP/IP stack.
Step 6: Close Command Prompt.
Step 7: Restart your computer and check if the error disappears.
If this method doesn’t work for you, you can try the next one.
Way 2: Reconfigure the DHCP Client service
Step 1: Press Windows + R to open the Run box.
Step 2: Type services.msc into the Run dialog and press Enter to open Services.
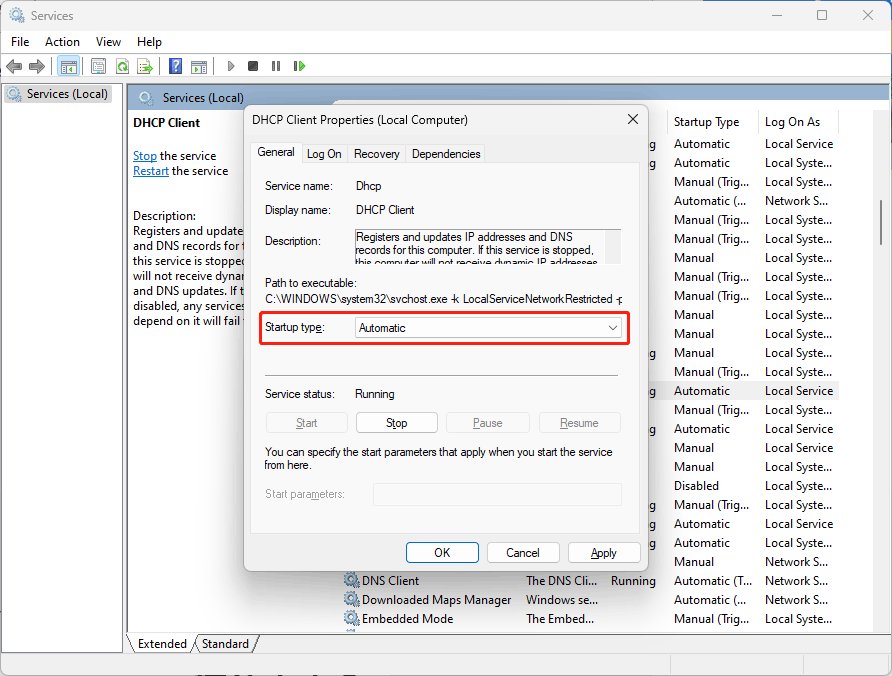
Step 3: Scroll down to find DHCP Client and double-click it to open it.
Step 4: Check the status of the service. Make sure Automatic is selected for Startup type and click Start to enable this service.

Step 5: Click Apply.
Step 6: Click OK.
Now, you can go to check if your network works normally. If the issue persists, you can try the next way.
Way 3: Disable static IP configurations
Step 1: Click the search box and search for view network connections.
Step 2: Select View network connections from the search result. Then, you will enter the Network Connections page.
Step 3: Right-click your network connection and select Properties.
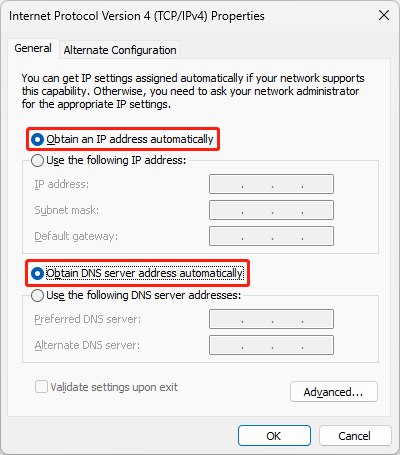
Step 4: Select Internet Protocol Version 4 (TCP/IPv4) and then click the Properties button.
Step 5: Select both Obtain an IP address automatically and Obtain DNS server address automatically.

Step 6: Click OK to save the settings.
Way 4: Disable IPV6
IPV6 can also cause internet connection issues. You can choose to disable it and see if the DHCP error 0x79 can be removed.
Here is a full guide: How to Disable IPv6 on Windows 11 or Windows 10?
Way 5: Run the Network Adapter troubleshooter
Windows has a built-in network adapter troubleshooter to help you diagnose network connection issues. You can also try it to solve DHCP error 0x79.
On Windows 11
Step 1: Press Windows + I to open the Settings app.
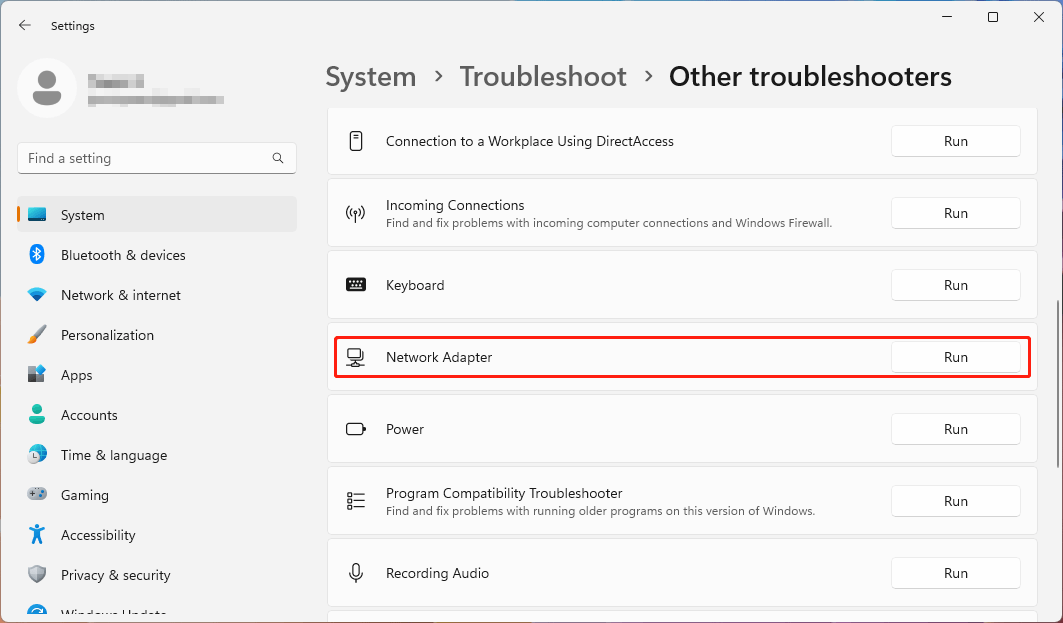
Step 2: Go to System > Troubleshot > Other troubleshooters.
Step 3: Scroll down to find the Network Adapter option and click the Run button next to it.

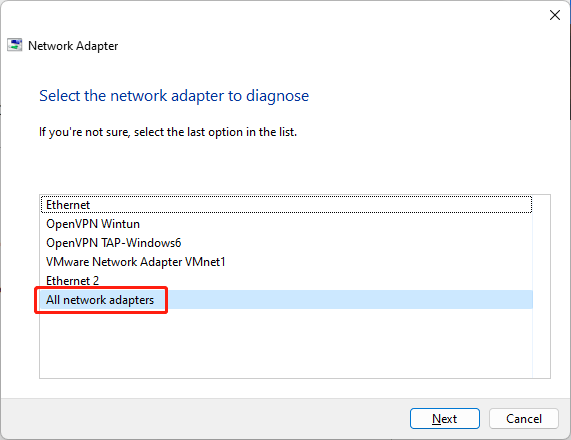
Step 4: All network adapters is selected by default. Click the Next button to start detecting and follow the on-screen instructions to fix found issues.

On Windows 10
Step 1: Press Windows + I to open the Settings app.
Step 2: Click Network & Internet to continue.
Step 3: Under the Status tab, click Network troubleshooter under Advanced network settings.
Step 4: Select All network adapters to diagnose.
These are the 5 ways to remove DHCP error 0x79. We hope you can find a proper way here.
More Information about MiniTool Power Data Recovery
MiniTool Power Data Recovery can help you recover data under different situations:
- You delete some files by mistake.
- The data gets lost due to virus attacks.
- The drive becomes inaccessible.
- The drive becomes RAW.
- The drive is formatted by mistake.
- Your system crashes unexpectedly.
MiniTool Power Data Recovery FreeClick to Download100%Clean & Safe
No matter which situation you are facing, you can try this free data recovery tool to see if it can find your needed files and recover them.