It is a frustrating thing that your audio icons are incorrectly displayed or not displayed at all when you are running Windows 11, especially when you rely on audio playback for work or entertainment. Don’t worry, this article from the MiniTool website has provided several ways to fix incorrect Windows 11 audio icons to help you out of trouble.
There are a few reasons that cause audio icon problems. Insufficient system memory, outdated apps or operating systems, too many programs running at the same time, outdated audio-related drivers, etc., can cause the incorrect speaker or sound icon to show in the taskbar. Now we’ll walk you through the steps to fix incorrect Windows 11 audio icons
Restart Your Computer
A simple restart can fix a number of issues, including incorrect audio icons on the taskbar. Sometimes, the audio drivers or other system files may become corrupted with increasing growth of use time, causing the icons to display incorrectly. A restart can fix most of these files and get audio icons back to normal.
Check the Sound Settings
You can also check the sound settings at the early fix stage. Just go to Settings > System > Sound. In the Sound settings window, make sure that your current chosen output device is the correct one, and that the volume is turned on. Sometimes, the wrong output device can cause to display the wrong audio icon on Windows 11.
Check the App’s Compatibility
If you’re only encountering audio issues when using a certain app in Windows 11, it’s possible that it can only operate properly on a more advanced computer. In this case, you should look for a System Requirements reference on the app’s download page to check if your device is compatible.
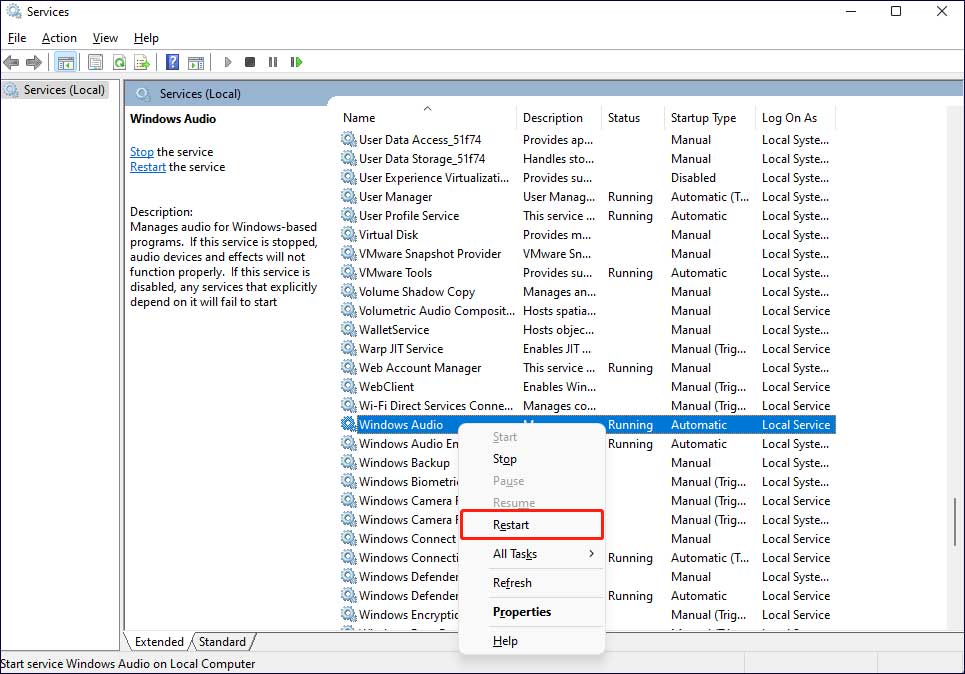
Restart the Windows Audio Service
If the above methods don’t fix the corrupted audio icons in Windows 11 issue, you can try restarting the Windows Audio service. This operation will restart the audio service and may fix certain issues causing incorrect or missing audio icons on the taskbar.
To restart the Windows Audio service, follow the steps below.
- Press the Windows and R keys together to open the Run panel, and type the command services.msc into it. Then click OK to continue.
- In the Services window, scroll down to find Windows Audio and right-click on it, then select Restart.

Related post: 4 Ways To Fix Audio Services Not Responding Windows 10
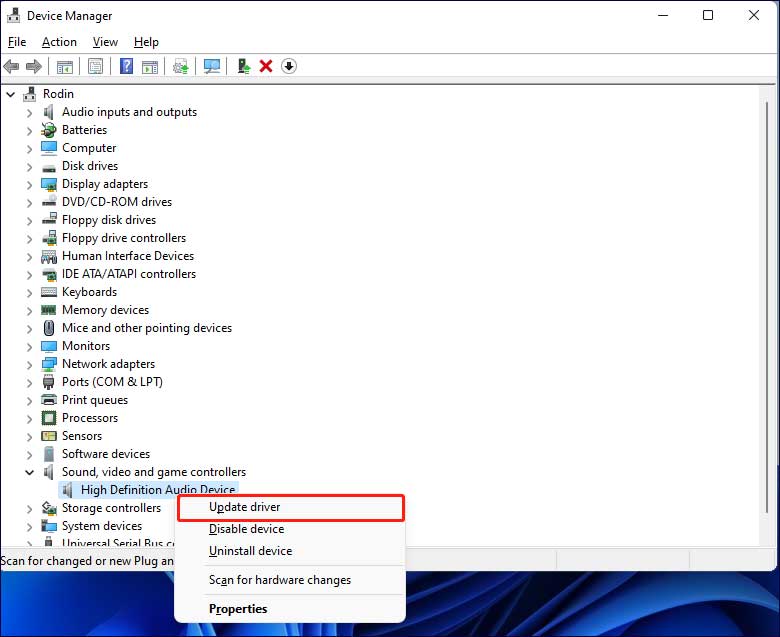
Update Your Audio Drivers
Outdated or corrupted audio drivers can cause lots of problems on Windows 11, including incorrect audio icons. In this case, you are supposed to check if there are any driver updates available for your audio device.
To check and update audio drivers, you can refer to the following tutorial.
- In your Windows 11 search bar, type in Device Manager and open it.
- Expand Sound, video and game controllers, select your audio device and right-click on it, then choose Update driver. Then you can choose Search automatically for drivers or Browse my computer for drivers. Then Windows will then look for any available driver updates and then install them if they are found.

Reset Your Windows 11 PC
If none of the above methods can fix incorrect or slow Windows 11 audio icons, the last resort is to reset your computer. This operation will effectively return your device to a new state where all of the apps need to be reinstalled, and most possibly get audio icons back to normal.
To reset your PC, you can click on Start > Settings > System > Recovery, then from the Reset this PC section, click the Reset PC button. Choose to Keep my files or Remove everything to start the process.
MiniTool ShadowMaker TrialClick to Download100%Clean & Safe
Bottom Line
Now, you have learned how to fix incorrect Windows 11 audio icons, and you can try them out in turn until you fix this issue. Hope this article can lead you out of the woods.