Microsoft Edge is used by a large number of Windows users to access any webpage or website in order to get information they need. However, errors could occur in the Microsoft Edge suddenly, just like any other web browsers. Some of the errors will even stop you from accessing any page successfully. For instance, you may receive Hmm, we can't reach this page error when trying to visit a page.
Hmm, We Can’t Reach This Page in Microsoft Edge
What is Microsoft Edge? Introduced in 2015, it is a web browser released by Microsoft to replace the older Internet Explorer.
- Microsoft Edge was firstly introduced in 2015 for Windows 10 and Xbox One.
- In 2017, Microsoft released a new version of Edge for iOS.
- Microsoft Edge’s version for macOS was finally released in 2019.
Though Microsoft Edge is used widely, it’s not useful every time. What I mean is errors may occur suddenly in the browser to prevent users from accessing the website/webpage they request. For instance, many users reported that they come across can’t reach this page in Edge even when the internet connection works fine.
Microsoft Edge Windows 10 Is Now Officially Available!
Edge Can’t Reach This Page Error
You open Microsoft Edge as usual, type a correct URL into the address bar (or copy & paste the link into it), only to find you can’t get access to where you want to go. The following message appears on your screen:
Hmm, we can’t reach this page.
Try this
- Make sure you’ve got the right web address.
- Refresh the page.
- Search for what you want.
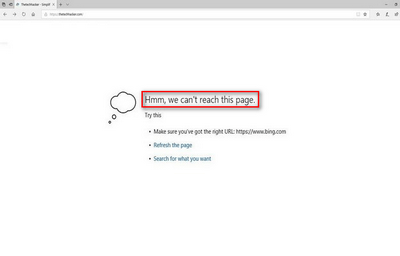
At this time, you should first go to check the internet connection: open other browsers and apps to see whether they work fine. If not, you should change the network to eliminate internet connection error. If you only encounter the problem when using Microsoft Edge, you should suspect there are some problems with the browser itself or system.
How to Fix Microsoft Edge Can’t Reach This Page
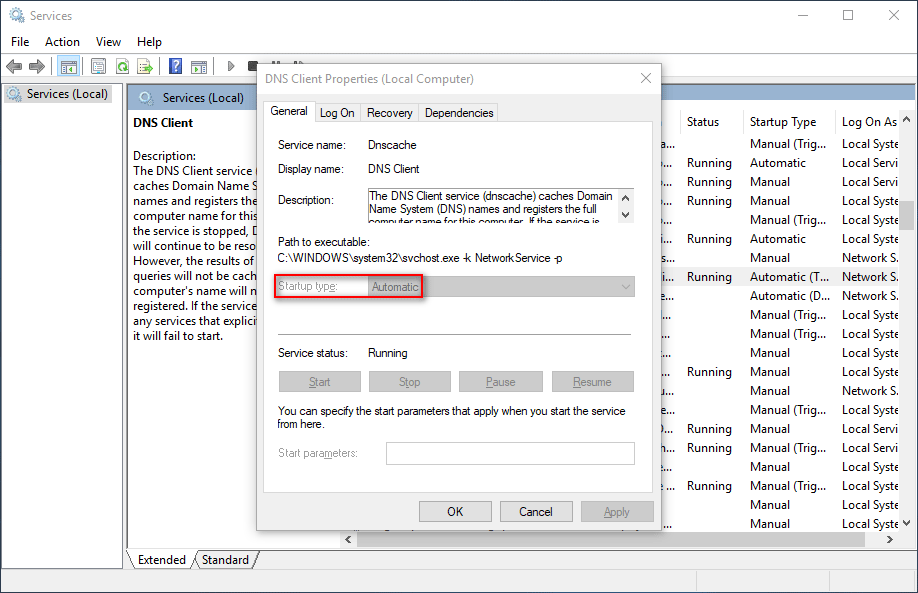
One: make sure the DNS Client is running.
- Right click on the Start button in the lower left corner.
- Choose Run from the menu. (You can also press Start + R on the keyboard to open Run dialog box.)
- Type msc into the textbox and hit Enter.
- Scroll down to find DNS Client in the list.
- Right click on DNS Client and choose Properties.
- Look for the Startup type section under General.
- Check whether the Automatic is selected for it.
Two: change DNS server addresses.
- Press Start + S to open Windows search.
- Type control panel into the textbox and hit Enter.
- Click Network and Internet.
- Click Network and Sharing Center in the right pane.
- Select Change adapter settings from the left sidebar to open Network Connections window. (You can also type ncpa.cpl into the Run dialog box to open this window directly.)
- Right click on the network you’re using and choose Properties.
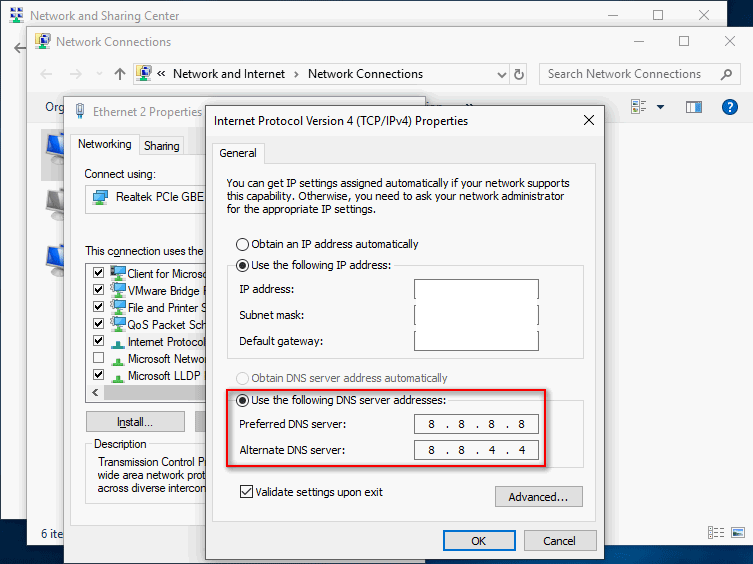
- Look for Internet Protocol Version 4 (TCP/IPv4) under Networking and double click on it.
- Check Use the following DNS server addresses.
- Enter 8.8.8.8 for Preferred DNS and 8.8.4.4 for Alternate DNS.
- Click OK to confirm and reboot computer.
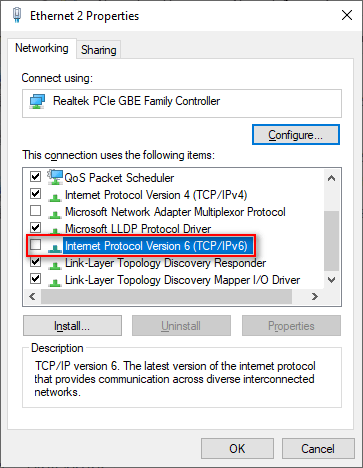
Three: disable IPv6.
- Repeat step 1 to step 6 mentioned in the previous method.
- Look for Internet Protocol Version 6 (TCP/IPv6) and uncheck it.
- Click OK and reboot PC.
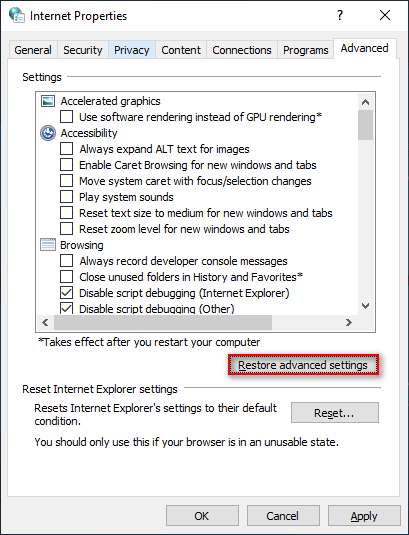
Four: restore Internet Properties to default.
- Open Run dialog box.
- Typecpl and hit Enter.
- Shift to Advanced tab in the Internet Properties window.
- Click on the Restore advanced settings button.
- Click Apply at the bottom to save changes.
You can also use the following methods to troubleshoot when seeing can’t reach this page error message.
- Reset TCP/IP.
- Clear caches and cookies. (How to recover Google Chrome history?)
- Run internet connections troubleshooter.
- Change network from Public to Private or vice versa.
- Remove the extensions of Microsoft Edge.
- Open a new private window.
- Use Emulation Mode.
- Enable Loopback in Microsoft Edge.
- Repair/reset Microsoft Edge.