The Android app support is not available on official Windows 11. But if you are a Windows Insider in the Beta Channel, you can try it now. In this post, we will show you how to use Android apps on Windows 11 including how to install and uninstall Android apps on your device.
Can You Use Android Apps on Windows 11?
Microsoft has delayed the rollout of the Android app support on Windows 11. But now you can run Android apps via the Windows Subsystem for Android platform because the preview of this platform is now available in the Beta Channel of the Windows Insider Program. The premise is that you are running the latest version of Windows 11 and Microsoft Store. Besides, it is only available in the United State. This means that you need a Unite States-based account to access the Amazon Appstore.
Well then, how to use Android apps on Windows 11? In this post, MiniTool Software will show you how to get started with Android apps on Windows 11 if your device supports this feature.
- How to install Windows Subsystem for Android on Windows 11?
- How to install Android apps on Windows 11?
- How to uninstall Android apps on Windows 11?
- How to uninstall Windows Subsystem for Android on Windows 11?
How to Install Windows Subsystem for Android on Windows 11?
Step 1: Check Whether Your Computer Meets the System Requirements to Install Android Apps on Windows 11
If you want to install Android apps on Windows 11, you need to make sure that your device meets the following requirements:
- Memory: 8GB (16GB is recommended).
- Processor: Intel Core i3 8th Gen, AMD Ryzen 3000, Qualcomm Snapdragon 8c, or better.
- Storage: Solid-state drive (SSD).
- Microsoft Store app: Version 22110.1402.6.0 or higher.
- Windows 11 version: Build 22000.xxx or higher.
- Windows Insider Program: Beta Channel.
Step 2: Join the Windows Insider Program
The Android apps support is only available for Insiders in the Beta Channel. So, you also need to join the Windows Insider Program if you want to use Android apps on Windows 11 before others.
Step 3: Update Windows 11 to the Latest Version
Now, you can go to Windows Update to check whether you are running the latest version of Windows 11 in the Beta Channel. In Windows Update, you can click Check for updates to see if there are available updates. If yes, you need to download and install the updates on your computer.
Step 4: Update Microsoft Store
- Click Start and select Microsoft Store to open it.
- Click Library from the left side menu.
- Click Get updates.
- Click the Profile menu from the top menu and select App settings.
- Scroll down to the About this app section and check the version of your Microsoft Store. It should be equal to or higher than 22110.1402.6.0.
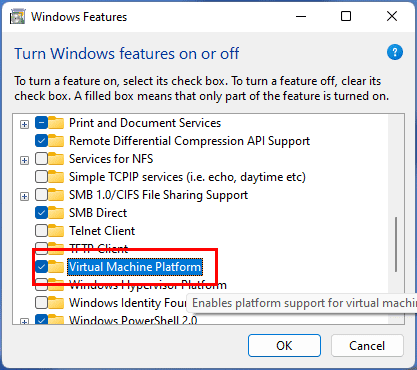
Step 5: Enable Virtual Machine Platform
If you want to install Windows Subsystem for Android on your Windows 11 computer, you also need to enable virtualization.
- Click the search icon and search for turn windows features on or off.
- Select the first result to open Windows Features.
- Scroll down to Virtual Machine Platform and check it.
- Click OK to save the setting.
- Click Restart.

Step 6: Install Windows Subsystem for Android on Windows 11
- Search for Amazon Appstore in Microsoft Store and select the first result to open it.
- Click Install.
- Click Set up.
- Click Download.
- Click Next.
- Click Restart.
After doing these things, you can sideload Android apps on your Windows 11 computer.
How to Install Android apps on Windows 11?
When you want to install Android apps on your Windows 11 computer, you can follow these steps:
- Use Windows search to search for Amazon Appstore and click the first result to open it.
- Click Sign in.
- Sign in with your United States-based Amazon account.
- Search for the apps you want to get.
- Click Get.
- Click Download.
How to Use Android Apps on Windows 11?
After installing an Android app on Windows 11, the app will act like a normal application on your device. You can open it from the Amazon Appstore. You can also add it to the Start menu or from the All apps section.
After opening it, you can maximize, minimize, or resize its window. You can use the mouse and keyboard for input. If you want to quit it, you just need to click the Close button.
How to Uninstall Android Apps on Windows 11?
When you don’t want to use the Android app, you can just uninstall it like uninstalling a Microsoft Store app.
Way 1: Uninstall Android Apps on Windows 11 from Start
- Click Start and search for the Android app you want to uninstall.
- Right-click the target app from the search result and select Uninstall.
Way 2: Uninstall Android Apps on Windows 11 from Settings
- Go to Start > Settings > Apps > Apps & features.
- Find the app you want to uninstall.
- Click the 3-dot menu next to the app and select Uninstall.
You can select your preferred method to uninstall Android apps from your Windows 11 computer.
How to Uninstall Windows Subsystem for Android on Windows 11?
- Go to Start > Settings > Apps > Apps & features.
- Find Windows Subsystem for Android.
- Click the 3-dot menu next to the app and select Uninstall.
- Restart your computer.
Tip
If you want to recover deleted files on Windows 11, you can use MiniTool Power Data Recovery, a free file recovery tool. With this software, you can recover all kinds of files from different types of storge devices like internal hard drives, external hard drives, memory cards, SD cards, and more. You can first try the trial edition of this software to see if it finds your needed files. If yes, you can use a full edition to recover all your needed files.
MiniTool Power Data Recovery TrialClick to Download100%Clean & Safe
Bottom Line
Now, you should know how to use Android apps on Windows 11. For users who are running the official Windows 11, they still need to wait until the Android apps support rolls out to the public. Should you have other issues, you can let us know in the comments.
