This Recall AI feature records everything you do on your PC, helping you find anything quickly. However, many users consider the Recall AI feature a privacy and security concern. This post from MiniTool introduces how to disable Recall AI on Windows 11 completely or temporarily.
The latest “Recall” feature helps you search past activities on Windows PCs. Recall records your activity across all apps on your PC by taking screenshots every few seconds and you can access it at any time when needed. If you accidentally closed your web browser but can’t remember which tabs you had opened, Recall can easily restore it.
While Recall appeared in the recently released Windows 11 24H2 preview, Microsoft made it clear that the feature is not available for current PCs as it requires a Copilot+ PC. This feature is enabled by default. Many users may think there are privacy and security issues with this feature and they want to know how to disable Recall AI on Windows 11.
MiniTool ShadowMaker TrialClick to Download100%Clean & Safe
How to Disable Recall AI on Windows 11 Completely
This part introduces how to disable Recall (AI timeline) on Windows 11 completely.
Way 1: Via Settings
You can turn off the Recall feature during setup of your Copilot+ PC or while creating a new user account (Recall is set up separately for each user account). During setup, while the information screen for Recall appears, you can click the option to manage your Recall and Snapshots preferences and turn off the feature. However, However, if you take no action during setup, Recall will be enabled by default.
Step 1: Press the Windows + I keys together to open the Settings application.
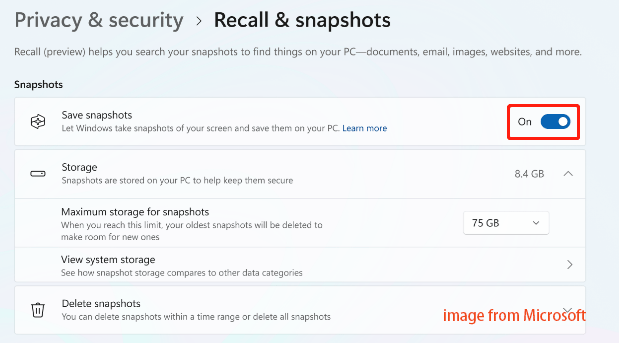
Step 2: Go to the Privacy & Security tab. Then, go to Recall & Snapshots.
Step 3: Under the Snapshots part, turn off the Save Snapshots toggle. Then, the Recall feature will be disabled. If you want to use the feature again, you need to enable the toggle again.

Way 2: Via Local Group Policy
If you are a Windows 11 Pro, Enterprise, or Education user, you can disable the Recall feature from the Group Policy Editor. This option isn’t available on Windows 11 Home. Here is how to disable Recall AI on Windows 11 via Local Group Policy.
Step 1: Type group policy in the Search box and then select Edit group policy from the start menu list.
Step 2: Go to the following path:
User Configuration > Administrative Templates > Windows Components > WindowsAI
Step 3: Find and right-click the Turn off saving snapshots of Windows policy and choose the Edit option.
Step 4: Check the Enabled option. Click Apply > OK.
How to Disable Recall AI on Windows 11 Temporarily
This part introduces how to turn off Recall on Windows 11 temporarily.
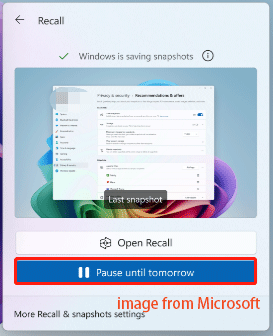
Step 1: Click the Recall button in the Taskbar.
Step 2: Click the Pause until tomorrow button. After you complete the steps, the AI timeline will pause temporarily or until you turn on the feature again.

Final Words
This post introduces how to disable Recall AI on Windows 11. Once you complete the steps, the Recall feature should no longer run on your computer. I hope that this post will be useful to you.

