If you don’t want the viewers of your Excel file to edit the contents in the cells, you can make the Excel file read only and then send it out. However, do you know how to make an Excel file read only? In this post, MiniTool Software will show you the methods you can try.
How to Protect an Excel File from Editing? Make Excel Read Only
You create an Excel file and you need to send it to others for viewing. But you don’t want others to accidentally modify the contents in the cells? How to protect an Excel file from editing? You can make the Excel file read only before you send it to others. The second choice is to restrict formatting and editing in the Excel file. All these two methods can restrict editing in Excel.
When you make your Excel file read only, it can be read and copied. But it will not be modified. When a viewer tries to make some changes to a read-only Excel file, the changes can only be saved when he or she gives the document a new name or saves the file to a new location.
Now, we will show you how to use these two methods to prevent your Excel file from editing. These guides are for Excel for Microsoft 365, Excel 2021, Excel 2019, Excel 2016, Excel 2013, Excel 2010, and Excel 2007.
How to Make an Excel File Read Only in Excel Web?
Way 1: Restrict editing
You can restrict the editing of an Excel, then it will open in view-only mode. Here we go:
Step 1: Open the target Excel file.
Step 2: Go to File > Info.
Step 3: Click Protect Workbook.
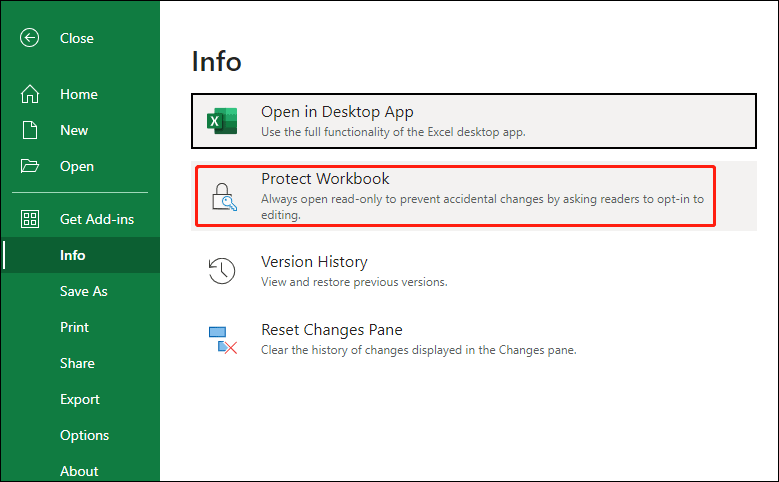
After these steps, you can click any cell in the Excel file and see all cells become uneditable.
How to remove read only in Excel?
Step 1: Open the target Excel file.
Step 2: Go to File > Info.
Step 3: Click Protect WorkBook again. This will make your Excel file go out of the read-only mode.
Way 2: Change the Viewing Mode
You can also change the viewing mode to make the viewers only view the contents in Excel.
Step 1: Open the target Excel file.
Step 2: Expand the view options. Usually, the button is on the top-right corner of the interface.
Step 3: Select Viewing. Then, viewers can only view the file but make no changes. You can have a try.
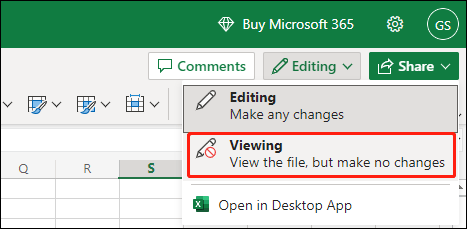
If you want to make the Excel file editable again, you can select Editing in Step 3.
If you are using the Excel desktop version, you can keep reading.
How to Make an Excel File Read Only in Excel Newer Versions?
Way 1: Lock and Protect Cells in Excel
If you want to restrict editing in Excel, you can lock and protect cells in Excel. You can choose to lock all cells in Excel. You can also set your Excel file to lock and protect specific cells. Then, anyone who opens that Excel file can only view contents in cells.
Way 2: Set to Always Open Read-Only
You can also set an Excel file always open read-only.
Step 1: Open the target Excel file.
Step 2: Go to File > Info.
Step 3: Expand Protect Workbook, then select Always Open Read-Only.
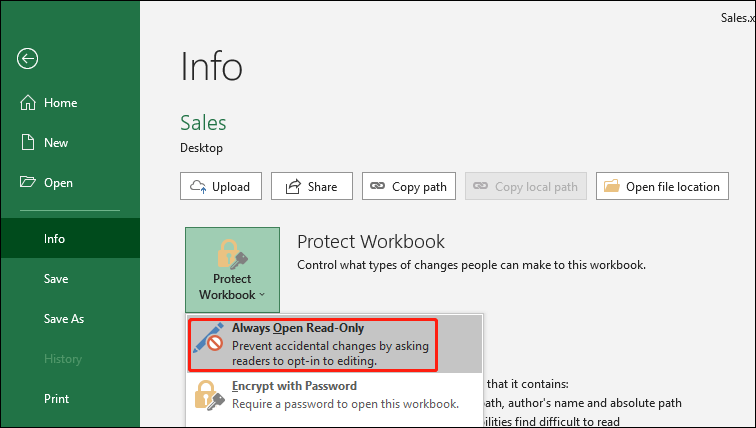
Step 4: Click Save to save the change.
Step 5: Close the Excel file.
How to open an Excel file in read-only mode?
Open the Excel file, then you can see the following window.
- To open the Excel document as read-only, you need to click the Yes
- To open the Excel document in editing mode, you need to click the No

When you open an Excel file in read-only mode, you can type text into the cells but you can’t save them. You will see the following window after you click the Save button.

How to remove read-only in Excel?
Step 1: Open the target Excel file.
Step 2: Go to File > Info.
Step 3: Expand Protect Workbook, then select Always Open Read-Only. This will clear the highlight of Always Open Read-Only.
Step 4: Click Save to save the change.
How to Make an Excel File Read Only in Excel 2007?
If you are using Excel 2007, you can follow these steps to save your Excel file as read only:
Step 1: Click the Microsoft Office button, then click Save or Save As if you have saved the Excel file.
Step 2: Expand Tools.
Step 3: Select General Options.
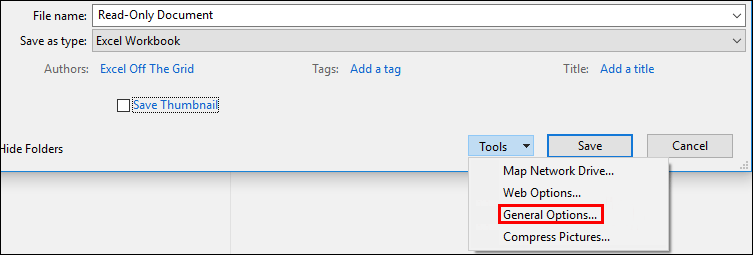
Step 4: Click the Read-only recommended check box.
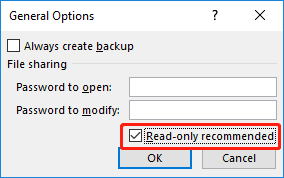
Step 5: Click OK.
Step 6: Save the Excel file. You may need to save it with another name if you have named the file.
How to remove read only in Excel?
Step 1: Click the Microsoft Office button, then click Save or Save As if you have saved the Excel file.
Step 2: Expand Tools.
Step 3: Select General Options.
Step 4: Clear the Read-only recommended check box.
Step 5: Click OK.
Step 6: Save the Excel file. You may need to save it with another name if you have named the file.
Bottom Line
These are the methods to make an Excel file read only and remove read only in Excel in different situations. Besides, if you want to recover your lost or deleted Excel files, you can try the free file recovery tool MiniTool Power Data Recovery.
MiniTool Power Data Recovery FreeClick to Download100%Clean & Safe
