How to set priority Windows 10? How to change priority Windows 10? How to set a program to high priority Windows 10? This post from MiniTool will show you how to set priority Windows 10.
As is well known, Windows shares the computer’s CPU resources between running programs. However, how many resources will be given to a process is determined by its priority. In general, the higher the priority level is, the more resources will be allocated to the process.
So, in this post, we will show you how to set priority Windows 10 or how to set a program to high priority Windows 10.
2 Ways – How to Set Priority Windows 10
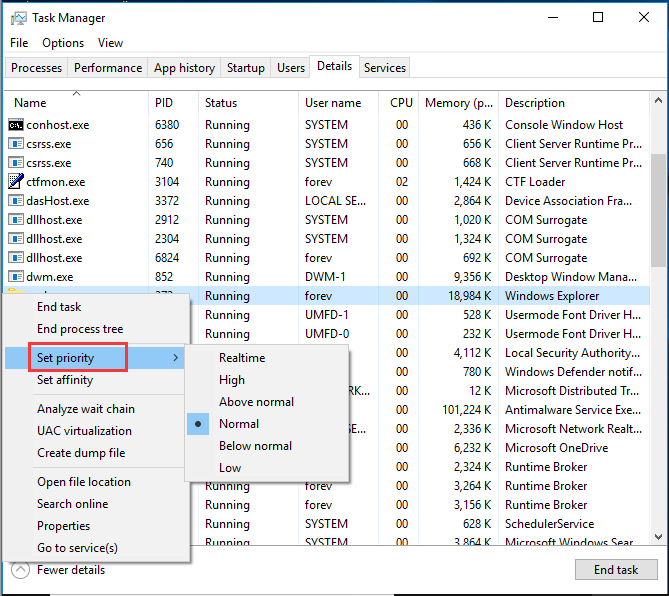
In this part, we will show you how to set priority Windows 10. Before going ahead, you should know some basic information about the priority. There are 6 priority levels available to processes in Windows, and they are:
- Realtime
- High
- Above normal
- Normal
- Below Normal
- Low
Normal is the default level and most programs with normal priority are able to run without issues. However, users can choose to change process priorities to speed up the app or slow down it so as to consume fewer resources.
And the new priority level applied to the app will take effect until the app’s process stops to work. Once it is stopped, the next time it will open with the default priority level unless the app itself has a setting to change its priority automatically.
Some programs are able to change their priority automatically, such as the WinRAR and 7-Zip. They are able to change their priority to Above normal to speed up the archiving process.
Note: You need to know that the Realtime priority level cannot be set by the users since it can cause system instability. An application with the Realtime priority may consume 100% of CPU and intercept keyboard and mouse input, making the PC unusable.
How to Set Priority Windows 10 via Task Manager
Now, we will show you how to set priority Windows 10.
- Open Task Manager.
- In the pop-up window, click More details.
- Then navigate to the Details tab.
- Select the process you want to set priority and right-click it.
- Then choose Set priority from the context menu and choose the desired priority level.
- After that, in the pop-up window, click Change priority to continue.

Once all steps are finished, you have set or changed the priority level of a process successfully.
Besides the above way, you can also set priority Windows 10 in another way. So, it will be introduced in the following part.
How to Set Priority Windows 10 via WMIC
In this part, we will show you how to set priority Windows 10 via WMIC.
Now, here is the tutorial.
- Open Command Prompt as administrator.
- Input the command wmic process where name=”Process Name” call setpriority “Priority Level” and hit Enter to continue. (You should replace the Process Name with the actual name of the process and replace the priority level according to the following table.
| Priority Level Value | Priority Level Name |
| 256 | Realtime |
| 128 | High |
| 32768 | Above Normal |
| 32 | Normal |
| 16384 | Below Normal |
| 64 | Low |
After that, you have successfully changed the priority level of the process.
Final Words
As for how to set high priority Windows 10, this post has shown 2 ways. If you want to set or change priority Windows 10, you can try these ways. If you have any better solutions, you can share it in the comment zone.
