How to install Windows Subsystem for Linux on Windows 11? If you want to run Linux tools and apps on your PC, you can choose to install WSL. This brief tutorial from MiniTool will show you how to do this task and just follow the full guide to have a try.
Windows Subsystem for Linux
Back in 2016, Microsoft introduced Windows Subsystem for Linux (WSL). It allows developers to run a GNU/Linux environment on Windows without a dual boot or setting up a virtual machine. In this environment, you can run many command-line utilities, tools, and apps.
In 2019, WSL2, an improvement of version 1, is released. To get improved compatibility, this new version runs a full Linux kernel in a Hyper-V hypervisor. When enabling this feature, a Microsoft-built Linux kernel running in the background will be downloaded and Windows keeps the kernel updated.
To use WSL2, Windows 10 should be version 1903 or higher with Build 18362 or higher for x64 systems while for ARM64 systems, the system should be version 2004 or higher with Build 19041 or higher. Besides, if you are running Windows 11, all the editions including Home are supported.
Well then, how can you use WSL on Windows 11? Follow the guide below to do this work.
How to Install Windows Subsystem for Linux on Windows 11?
There are some ways for you to install WSL in Windows 11 and you can choose one to have a try. Now, let’s go to see them.
Install Windows Subsystem for Linux in Windows 11 Command Prompt
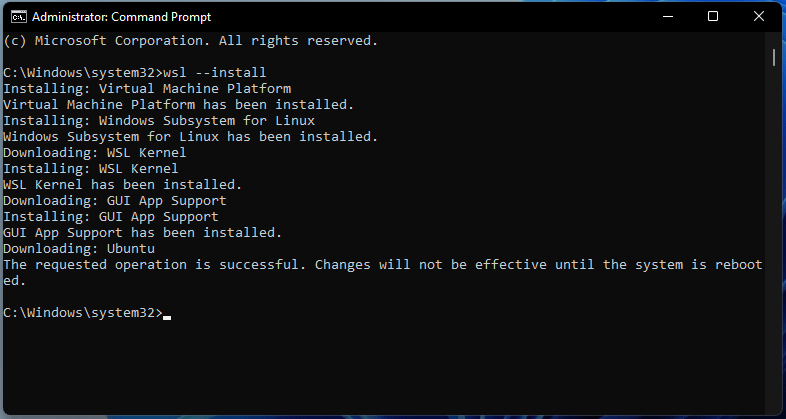
In Windows 11, Microsoft simplifies the installation process of Windows Subsystem for Linux – only a single command is required to download and install all the necessary components.
Step 1: Type cmd to the search box and right-click this tool to run it as an administrator.
Step 2: Type this command – wsl –install and press Enter. Wait for WSL to be installed on your PC.
Step 3: A few minutes later, Windows will ask you to restart your PC to let changes effective. Do as the prompt says.

Step 4: When you log in to Windows after reboot, WSL will automatically resume a moment later to install the Linux distro like Ubuntu.
Step 5: After that, you need to enter a user name and password to create a user account for the Linux distro.
Install WSL with Specific Distro in Windows 11
In addition, you can install a specific distro with the WSL command, and here is what you can do.
Step 1: Also run Command Prompt with admin rights.
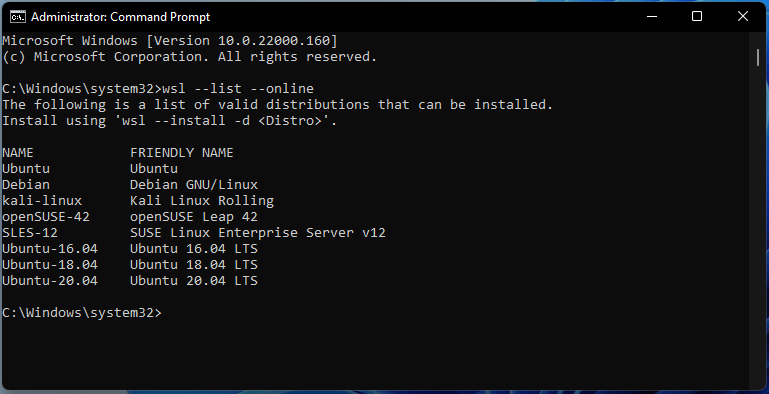
Step 2: Type wsl –list –online and press Enter. This command can list all the available WSL distros you can install on Windows 11.

Step 3: Run this command wsl –install -d DISTRO-NAME. Replace DISTRO-NAME with the distro that you want to install, for example, Debian.
Step 4: Restart the PC to finish the WSL installation.
Enable WSL and Install a Distro
This is another way to install Windows Subsystem for Linux on Windows 11. This is a slow way and is usually used in Windows 10. Of course, it also applies to Windows 11.
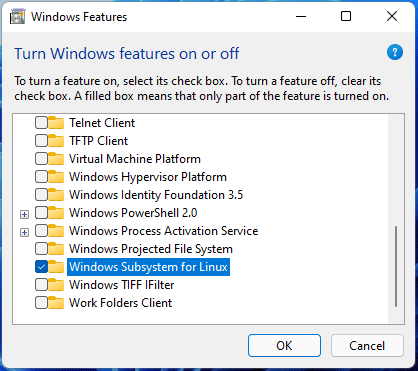
Step 1: Type windows features to the search box and click Turn Windows features on or off.
Step 2: Make sure the box of Windows Subsystem for Linux is checked.

Step 3: Run Microsoft Store, search for the Linux distro you want to install like Ubuntu.
Step 4: Install this Linux distro to your computer and then you can use it.
Wrapping up
That’s the information about how to install Windows Subsystem for Linux in Windows 11. The common way to install WSL in Windows 11 is to run the WSL command. Just have a try by following the guide above.

