In general, this article sponsored by MiniTool Software Limited will show you how to update your Dell computer configuration to enable the successful installation of the latest Windows 11 operating system (OS) with various media sources.
How to Load Windows 11 on Dell Laptop?
To install Windows 11 on your Dell PC from a Dell Windows recovery media, DVD or USB, that is supplied with the machine, just follow the below guide!
1. Power on your Dell computer and continuously press F2 to enter its BIOS.
2. Alter Boot List Option from UEFI to Legacy.
3. Change boot priority and keep Internal Hard Drive as primary boot device/first boot device.
4. Alter the Boot List Option back to UEFI.
5. Navigate to the Advanced Boot Options and disable the Secure Boot.
6. Exit and save the changes.
7. Restart your machine and tap the F12 key to access the boot menu.
8. Select UEFI DVD/USB boot and press Enter.
9. Then, the Dell screen will show for a few seconds and sometimes may be delayed to several minutes.
10. A message will appear asking you to Press any key to boot from CD or DVD…Just press the Space key to go on.
11. Then, it will pop up requiring your system settings: language and region.
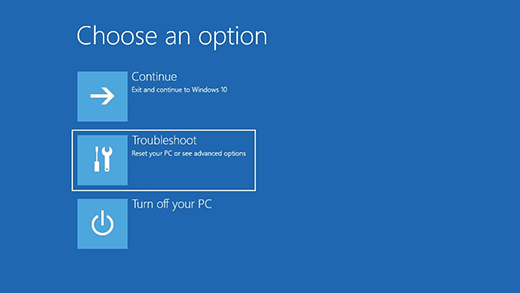
12. Next, choose Troubleshoot.

13. Select Recover from a drive.
14. Choose either Remove my files or Fully clean drive.
15. Next, click the Recovery option and it will start recovering.
Finally, the computer will restart into Windows 11 when the installation is done.
How to Download Windows 11 ISO (DVD Version) on Dell Laptop?
The following steps display how to download the newest Windows 11 on your Dell PC.
1. Go to https://www.dell.com/support/home/drivers/osiso/recoverytool to download the Dell Windows 11 Recovery ISO image.
2. Go to BIOS to make sure it is in UEFI mode and the SATA Controller is set to RAID ON.
3. Boot from the Win11 recovery DVD (set from boot menu UEFI Option > DVD) and press Enter.
4. When prompted, select your language and region.
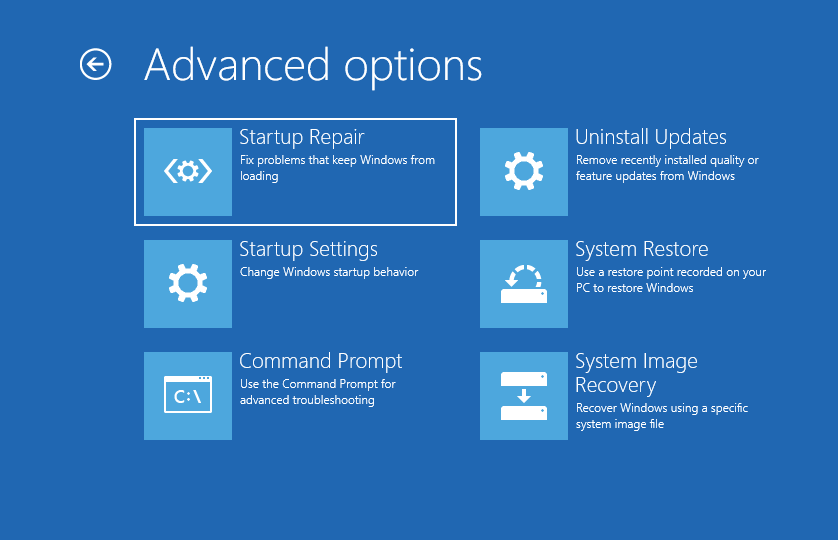
5. Then, choose Troubleshoot > Advanced Options > Command Prompt.

6. In the CMD, Input the following commands one by one and tap Enter after each command.
- Diskpart
- List disk
- select disk 0 (If your OS isn’t installed on disk 0, just replace 0 with the disk where your system is located.)
- Clean (All data on the target disk will be wiped. If you have any crucial data on it, you need to back up it with the tool recommended at the end of this article before carrying out this task.)
- Exit
- Exit
7. Reboot the machine and select UEFI DVD boot.
8. Then, you will see a popup Press any key to boot from CD or DVD… Press the Space key to continue.
9. Select your language and region.
10. Choose Troubleshoot > Recover from a drive > Remove my files (or Fully clean drive).
11. Click the Recovery button in the new window and it will begin recovery.
12. Once done, your device will reboot into Windows 11.
How to Download Windows 11 ISO (USB Version) on Dell Laptop?
The process for downloading Windows 11 ISO version for Dell laptops are similar to that of DVD version. The only difference is that you need to input the downloaded ISO into your USB drive.
- Go to https://www.dell.com/support/home/drivers/osiso/recoverytool to download the Dell Windows 11 Recovery ISO image.
- Follow this link https://www.dell.com/support/kbdoc/000123667/how-to-download-and-use-the-dell-os-recovery-image-in-microsoft-windows to create a Dell Windows recovery USB. Click the arrow next to Win 11 and then the arrow next to Create USB installation media. Then, follow the instructions.
- Boot from the Win11 recovery DVD (set from boot menu UEFI Option > DVD) and press Enter.
- When prompted, select your language and region.
- Then, choose Troubleshoot > Advanced Options > Command Prompt.
- In the CMD, Input the following commands one by one and tap Enter after each command.
- Diskpart
- List disk
- select disk 0
- Clean
- Exit
- Exit
- Reboot the machine and select UEFI USB boot.
- Then, you will see a popup Press any key to boot from CD or DVD… Press the Space key to continue.
- Select your language and region.
- Choose Troubleshoot > Recover from a drive > Remove my files (or Fully clean drive).
- Click the Recovery button in the new window and it will begin recovery.
Windows 11 Assistant Software Recommended
The new and powerful Windows 11 will bring you many benefits. At the same time, it will also bring you some unexpected damages such as data loss. Thus, it is strongly recommended that you back up your crucial files before or after upgrading to Win11 with a robust and reliable program like MiniTool ShadowMaker, which will assist you to protect your increasing data automatically on schedules!

