If you find the Malwarebytes service demonstrates abnormally high CPU usage and you want to fix this issue, you need to read this post. It will show you what causes this issue. Meanwhile, it will also show you some useful solutions to fix it. Right now, you can get these solutions from MiniTool.
Malwarebytes, a popular Windows antivirus tool that is one of the best anti-malware scanners on the market. However, sometimes the Malwarebytes service high CPU problem may occur on Windows and this problem makes it difficult for you to use the full suite.
As long as your computer is running Malwarebytes, this problem will persist. There are several methods that could help you fix the Malwarebytes service high CPU problem, and you can try them.
What Causes the Malwarebytes Service High CPU Problem on Windows?
It is difficult to pinpoint the direct reason why the Malwarebytes service consumes so much CPU power. There is an official response by Malwarebytes – you can simply perform a clean install and then you need to install the latest version, and this solution actually works for many users.
This means it was an error in the Malwarebytes version you have installed, and they managed to resolve it with the next version.
If the next version is not available, you can only uninstall the other antivirus tool and check to see if it causes the problem. If not, you need to stop the Malwarebytes service and wait for a patch to be released.
Solution 1: Replace the Other Antivirus Tools You Are Using
Although Malwarebytes is intended to work with the other antivirus tool you have installed on your computer, some free security tools have shown incompatibility with Malwarebytes, so you need to uninstall them.
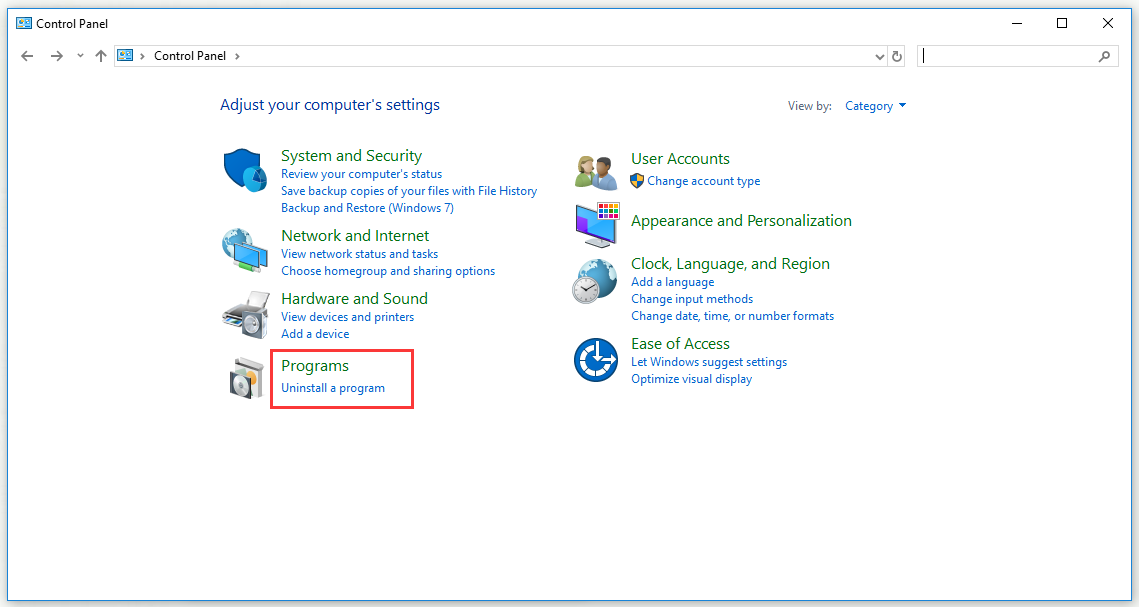
Step 1: Type control panel in the search bar and click Control Panel to open it.
Step 2: Click Uninstall a program under the Programs section.

Step 3: Find your antivirus tool, right-click it and choose Uninstall.
Step 4: Follow the instructions of its uninstall wizard to uninstall it.
Step 5: Click Finish after completing the process and restart your computer.
Now check to see if the Malwarebytes service high CPU problem will still appear and be sure to choose a better antivirus option.
Solution 2: Perform a Clean Install of Malwarebytes
You can also try reinstalling Malwarebytes from the beginning to resolve your issue.
Step 1: Press the Win + R keys to open the Run utility. Type regedit and click OK to open Registry Editor.

Step 2: Retrieve your ID and Key by using one of the locations in the registry presented below.
Location for Windows x86 32-Bit:
HKEY_LOCAL_MACHINE\SOFTWARE\Malwarebytes’ Anti-Malware
Location for Windows x64 64-Bit:
HKEY_LOCAL_MACHINE\SOFTWARE\Wow6432Node\Malwarebytes’ Anti-Malware
You can continue with the actual reinstallation process after retrieving your ID and Key. If you want to continue using the Premium version, follow the instructions.
Step 1: Find MBAM > My Account and then click Deactivate. Find Settings > Advanced Settings and uncheck Enable self-protection module.
Step 2: Close MBAM and download the mbam-clean.exe tool from the site of Malwarebytes. Disable all open programs and turn off other security tools temporarily.
Step 3: Launch the mbam-clean.exe tool and follow the instructions displayed. Reboot your computer when prompted to do so.
Step 4: Download the MBAM latest version from their site and follow the instructions to install it.
Step 5: Uncheck Trial and then click Activation. If you still want to use the trial version, you can skip the following steps.
Step 6: Input your ID and Key and your license will be activated automatically.
Now check if the Malwarebytes service high CPU problem disappear.
Solution 3: Stop the Malwarebytes Service from Running
If you stop running the Malwarebytes service, you will be prevented from running some features, such as real-time protection. Meanwhile, you can still use the malware scanner. If you don’t want to unload Malwarebytes, this is a simple solution.
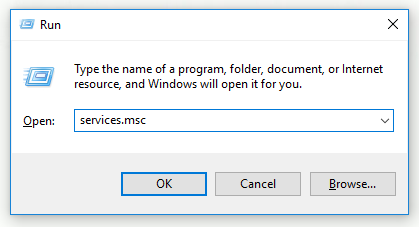
Step 1: Press the Win + R keys to open the Run utility. Type services.msc and click OK to open Services.

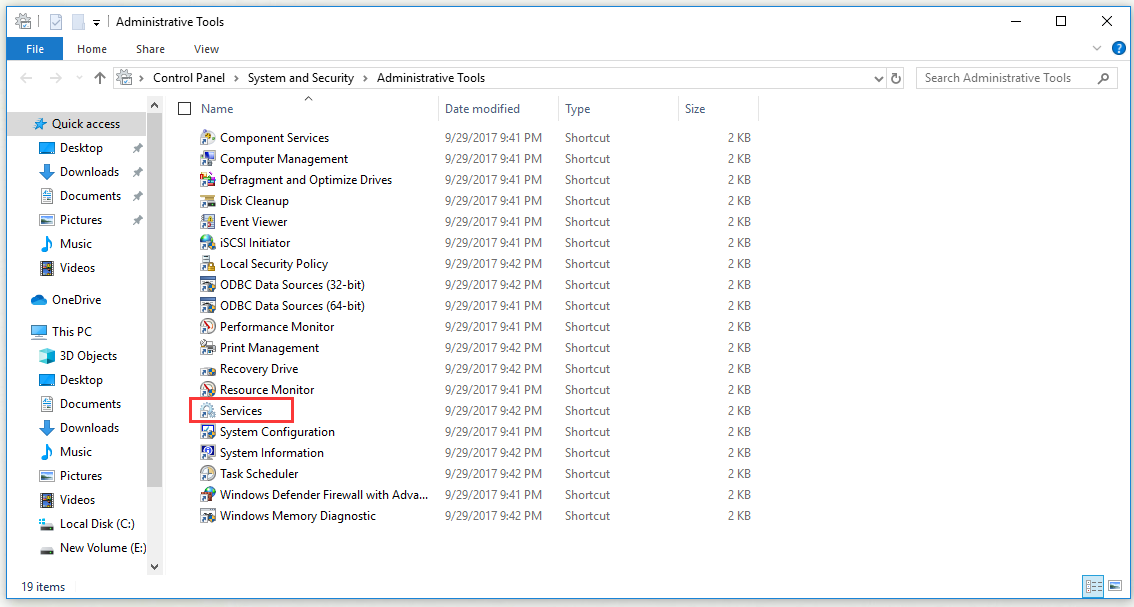
Step 2: Click System and Security and then click Administrative Tools. Then click Services to open it.

Step 3: Right-click Malwarebytes Service on the list and select Properties.
Step 4: Make sure Startup status of the service is set to Stopped and Startup type is set to Automatic.
Step 5: Click Start before exiting. You may receive the following error message: Windows could not start the Malwarebytes service on Local Computer. Error 1079: The account specified for this service differs from the account specified for other services running in the same process.
Follow the instructions below to fix this error.
Step 1: Follow Step 1 to Step 3 above to open Services. Find the Log On tab and click the Browse… button.
Step 2: Under the Enter the object name to select entry section, input your account’s name, click Check Names and wait for the name to be available. Click OK.
Step 3: Input the password in the Password box if you have set up a password.
The Malwarebytes service high CPU problem may not occur again.
Bottom Line
In conclusion, this post has shown you what causes the Malwarebytes service high CPU problem and shown you some solutions to fix this problem. If you meet this issue, you can try solutions in this post.

