Removed/Added Features in Nexus LiteOS 11
Nexus LiteOS 11, a pre-tweaked Windows 11, is made to improve gaming performance, privacy, and overall stability of the system. Compared with the standard Windows 11, this system is lighter as many features or apps are removed or disabled in it.
Here, we summarize the removed or disabled features/apps in Windows 11 LiteOS as follows.
All the disabled features can be enabled by using Toolkit.
- All bloatware apps
- Microsoft Sync
- Prefetch
- People
- Help (HTML)
- Print Spooler (disabled)
- Action Centre (disabled)
- Hibernation (disabled)
What’s new in Windows 11 LiteOS? Well, you can enjoy the features below in this system.
- Updated to the latest build
- Added custom Power Plan
- Low resource consuming
- Better FPS at games
- Treatment: required, use any activator to activate OS
- Great for 4GB RAM computers (more memory is recommended)
There are some systems like Nexus LiteOS 11 that you can try if you run a low-end PC.
Ghost Spectre Windows 11 Superlite
Ghost Spectre Windows 10 Superlite
Download Nexus LiteOS 11 ISO
Before you download Nexus LiteOS 11 ISO, you need to check if your computer meets the system requirements of this OS.
- CPU: 1GHz or faster
- GPU: DirectX 9 graphics device or a newer version
- RAM: 4GB
- Hard disk space: 20GB at least
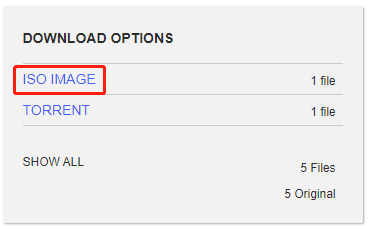
Then you can download Nexus LiteOS 11 ISO on the Internet. For instance, you can navigate to this website and then click ISO IMAGE in the right side of the page. Then Windows 11 LiteOS ISO file will be automatically downloaded.

You can also click SHOW ALL and then click a link from the list based on your preference. The Nexus LiteOS 11 download process may take you some time, so wait patiently.

Also read: Safe Download Windows 10 China Government Edition ISO
Install Windows 11 LiteOS
Install Windows 11 LiteOS by following the steps below after you have successfully downloaded Nexus LiteOS 11 ISO file on your computer. You should download Rufus or Ventory and make a bootable USB drive with them. Then install the system from the bootable drive instead of directly running the setup.exe on a live OS.
Step 1: Download and install Rufus on your device.
Step 2: Run Rufus to enter its main interface.
Step 3: Connect an empty USB drive to your computer.
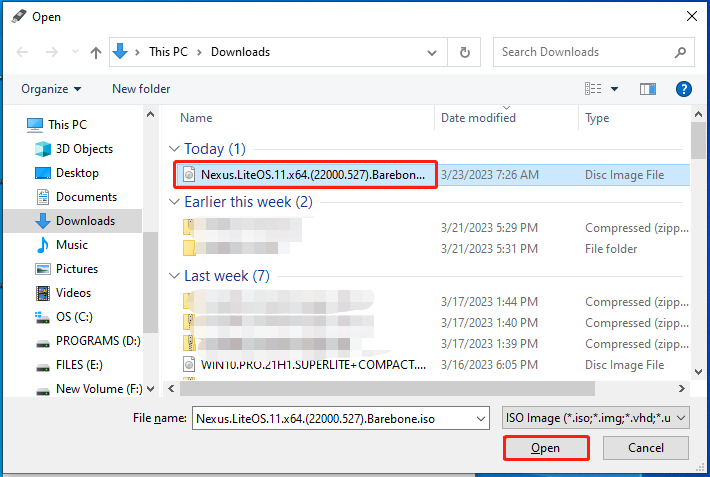
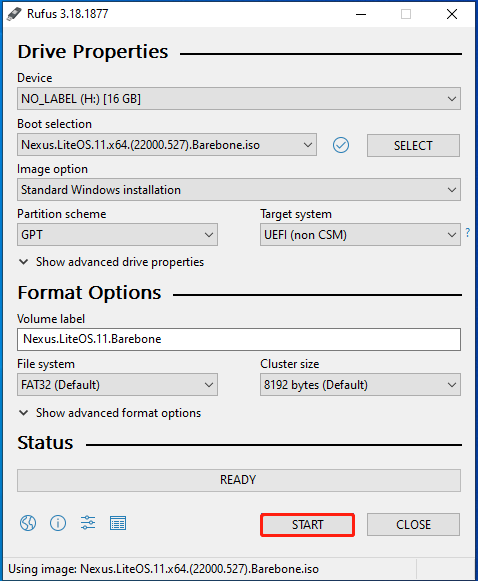
Step 4: Click SELECT, and then find and open the downloaded Nexus LiteOS 11 ISO file.

Step 5: If you don’t have further requirements, click START to begin the installation media creation process.
You’ll be warned that all the data on the USB drive will be destroyed during the process. Since there are no important data on it, confirm the operation.

Step 6: After the process ends, click CLOSE to exit the interface.
When the READY bar turns green, it means that the installation media is created successfully.
Step 7: Plug the bootable USB drive into the computer on which you would like to install Windows 11 LiteOS.
Step 8: Restart the device and boot into its boot menu. You just need to keep pressing the boot key while the PC boots up.
Step 9: You will enter the Windows setup process after you select the bootable USB drive as the boot option.
Step 10: Follow the on-screen instructions to complete the installation.
Bonus Tip
As you see, it is complicated to install Windows 11 LiteOS from an ISO file. To get Nexus LiteOS 11 in a flash, you can directly migrate it from another computer if there’s a configured Windows 11 LiteOS. You just need a system migration tool like MiniTool Partition Wizard to perform the operation.
For doing that, follow the guide below.
1. Get MiniTool Partition Wizard on the PC that runs Windows 11 LiteOS.
MiniTool Partition Wizard DemoClick to Download100%Clean & Safe
2. Connect your PC’s hard drive to the computer with Nexus LiteOS 11 installed.
3. Launch the software and click Migrate OS to SSD/HD or Copy Disk.
4. Follow the prompted instructions to finish the migration process.
5. Connect the drive with Nexus LiteOS 11 to your original computer.
