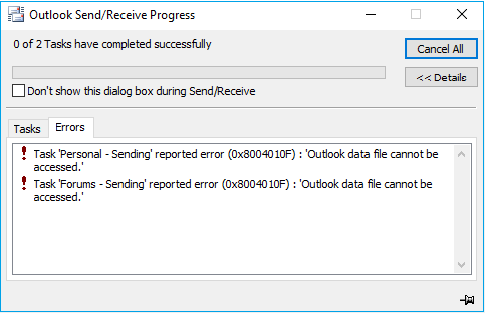
If you receive an error message saying “Outlook data file cannot be accessed” and you want to find a way to fix this issue, this post is what you need. Get 3 feasible methods from MiniTool. You can try to set up a new Outlook profile, disable your antivirus utilities and turn off Windows Defender Firewall.
If you are using Outlook 2010/2013, you might encounter an 0x8004010 error. The complete error message is 0x8004010F: Outlook data file cannot be accessed. It is a common error message.
If you try to send emails with the software, you may receive this error message and then you will be unable to send or receive emails when this error arises.

Methods to Fix Outlook Error 0x8004010F in Windows 10
Method 1: Set up a New Outlook Profile
Corrupted Outlook user profiles can always cause the 0x8004010F error. In order to ix this issue, you can try to set up new Outlook profiles based on default data files.
First, locate the default Outlook data file.
Step 1: Press the Windows key + R key at the same time to open the Run dialog box. Type Control Panel in the box and click the OK button.
Step 2: Choose View by: Small icons. Click Mail and click the Show Profiles button.
Step 3: Select your current Outlook profile and click the Properties button.
Step 4: Click Data Files.
Step 5: Switch to the Data Files tab, note down the name and location of the default Outlook profile and click the Close button.
Next, create new Outlook profile.
Step 1: Open the Mail Setup window by using the Control Panel again.
Step 2: Click Show Profiles, select your current Outlook profile and then click the Add button to open a New Account window.
Step 3: Type a name for the new profile and click OK.
Step 4: Choose the POP or IMAP (or Internet E-mail) option, and click Next.
Step 5: Type your email information and then click Next.
Step 6: Click Finish.
Finally, configure the new Outlook profile as the default profile.
Step 1: Open Mail with the Control Panel again.
Step 2: Click Show Profiles, choose Always use this profile and then choose the new profile from the drop-down menu.
Step 3: Click OK to exit Mail.
Now, check if the Outlook error 0x8004010F still persists.
Method 2: Disable Antivirus Utilities
Antivirus utilities may also conflict with Outlook, triggering the Outlook error 0x8004010F. Thus, you can try to disable your antivirus utilities to fix this issue.
Step 1: Right-click the taskbar and choose the Task Manager option.
Step 2: Switch to the Startup tab, right-click your antivirus software and then choose the Disable button.
Step 3: Restart Windows and send an email with Outlook to check if the Outlook error 0x8004010F disappears.
Method 3: Turn off Windows Defender Firewall
You need to make sure that Windows Defender Firewall does not block Outlook in any way. Thus, you should turn off Windows Defender Firewall.
Step 1: Type control panel in the search bar and click Control Panel to open it.
Step 2: Choose View by: Small icons and then click Windows Defender Firewall to open it.
Step 3: Click Turn Windows Defender Firewall on or off from the left side.
Step 4: Click both Turn off Windows Defender Firewall under Private network settings and Public network settings to disable Windows Defender Firewall.
Step 5: Click OK to exit the window.
After you finish the steps above, you can check if Outlook error 0x8004010F still exists.
Bottom Line
These are all the methods to solve the error 0x8004010F in Windows 10. Hope this post is helpful for you. After you fix this issue, you can send and receive messages with Outlook once again.
