If you have ever used Windows 11 or took a look at the screenshots of the new system, you’ll know it provides a new context menu. The new simplified context menu will appear after right clicking. However, many users said they still prefer the old context menu to the new one. Can you restore the old classic context menu? How to do it?
Windows 11 Context Menu Change
Microsoft has added many new features and improvements to Windows 11, its latest operating system. The context menu of Windows 11 is one of the things that have been changed a lot.
- Windows 11 context menu is a good mix of old and modern UI elements.
- The new context menu has rounded corners, transparent UI, and design elements found in mobile interface.
- The “Open in Windows Terminal” is added as a new option to the context menu of Windows 11.
- “Show more options” is added to the context menu to hide some entries so as to simplify the menu.
- Some traditional options are removed from the old right-click menu.
- The new context menu does not show action from a third-party app.
What if you want to restore old context menu Windows 11? Some people said they still prefer the old and classic context menu provided in Windows 10. Luckily, this is not a hard task to complete. How to get full context menus in Windows 11 will be discussed here.
MiniTool Power Data Recovery TrialClick to Download100%Clean & Safe
How to Restore Old Context Menu Windows 11
There are basically two methods for Windows 11 disable Show more options. You should follow the steps mentioned below carefully to restore classic context menu on Windows 11.
How To Get Back The Classic Start Menu In Windows 11?
Method 1: Get Old Context Menu Windows 11 Using Registry Editor
Step 1: open Registry Editor on Windows 11.
- Click on the Start button in taskbar -> type regedit -> click Open.
- Press Windows on the keyboard -> type regedit -> press Enter.
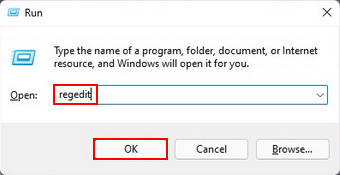
- Press Windows + I to open Run -> type regedit -> press Enter or click OK.

Step 2: back up your Registry.
- Click File at the top left.
- Select Export.
- Browse and choose a storage location.
- Give a name to the backup.
- Click Save.
Step 3: edit Registry entry.
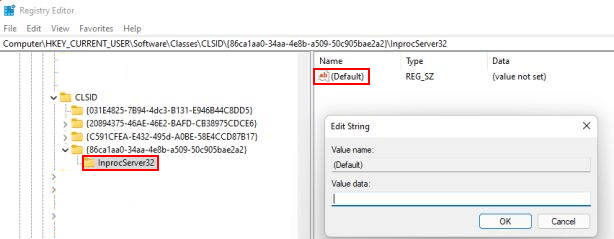
- Navigate to Computer\HKEY_CURRENT_USER\Software\Classes\CLSID You can also copy & paste it into the address and press Enter.
- Right click on the blank area in the right pane.
- Select New -> Key.
- Name the new key as {86ca1aa0-34aa-4e8b-a509-50c905bae2a2}.
- Right click on the new key.
- Select New -> Key and name it as InprocServer32.
- Make sure InprocServer32 is selected. Then, double click on Default in the right pane.
- Click OK without changing any values.
- Restart Windows Explorer or restart the Windows 11 computer. The old classic context menu will be back.
If you want to restore the new Windows 11 context menu, just delete the new key you created in Registry Editor and restart your PC.

How To Fix The System Registry File Is Missing Or Corrupt Error?
Method 2: Restore Classic Context Menu Windows 11 with .reg File
Step 1: create a text file Windows 11.
You should right click on the blank area on Windows 11 desktop and select New -> Text Document. Then, copy and paste the following content into Notepad. Close Notepad and click Save.
Windows Registry Editor Version 5.00
[HKEY_CURRENT_USER\Software\Classes\CLSID\{86ca1aa0-34aa-4e8b-a509-50c905bae2a2}]
@=””
[HKEY_CURRENT_USER\Software\Classes\CLSID\{86ca1aa0-34aa-4e8b-a509-50c905bae2a2}\InprocServer32]
@=””
Step 2: change the .txt file to a .reg file.
You should right click on the .txt file and click the Rename icon. Then, delete .txt and type .reg. After that, press Enter to save the change. You can change the name to “classic” or anything else that you can remember.
If you can’t see the .txt extension, you should first change the settings to show file name extensions.
Step 3: execute the .reg file.
Please double click on the .reg file you created and click Yes in the prompt window to confirm. Then, restart your Windows 11 computer to make the changes take effect.
After that, you should restart your Windows 11 computer. This time, you are able to open full context menus in Windows 11 by right clicking on the desktop or in File Explorer.
