This article ideated by MiniTool Software Limited mainly provides 7 methods to help you solve printer or scanner keeps disconnecting from PC. These solutions apply to most brands including HP, Epson, Brother, Canon, Fujitsu, etc.
Have you ever encountered a problem that your scanner keeps losing connection Windows 11? If so, how do you deal with the issue? Or, are you still suffering from this problem?
Although it is not long after the official release of the newest Microsoft operating system (OS) – Windows 11, there are not a few users who have already complained about the unstable connection of their peripheral devices such as the scanner. How does that happen and how to fix the issue? let’s see.
#1 Some Quick Possible Methods
First of all, you are recommended to try the following fixes that are easy to operate.
- Restart scanner or PC.
- Reconnect the scanner to your computer or change a connection USB port.
- Connect the scanner to another PC to see whether it keeps disconnecting or not.
#2 Reset Scanner
- Turn on your scanner and wait for it to be idle and silent.
- Disconnect its power cord from the reader of the scanner.
- Unplug the power cord from the wall outlet.
- Wait for a while, at least one minute.
- Plug the power cord back into the wall outlet.
- Reconnect the power cord to the reader of the scanner.
- Turn on the scanner if it doesn’t turn on automatically.
#3 Reste Network Router/Modem
Usually, the unstable scanner connection is due to an unstable Internet connection. Thus, you may fix the scanner that keeps losing connection Windows 11 problem by making the network connection stable – Reset Router or modem.
The way to reset a router or modem is similar to resetting the scanner or printer. Just cut off their power supply for a few seconds and power them on again.
Tip: Besides, check the network cable connection if you are using a wired network.
#4 Update/Reinstall Scanner Driver
You need to update your scanner driver to the latest version. Or, uninstall it and download the newest version.
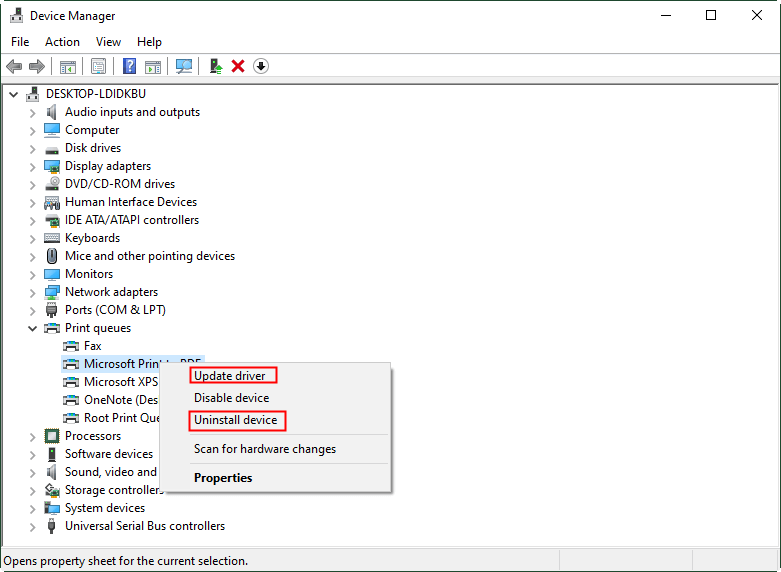
- Go to Windows 11 Device Manager.
- Expand the Print queues.
- Right-click on the target scanner in the unfolded list and select Update driver or Uninstall device.

If you choose Uninstall device, you need to restart your computer to let Windows reinstall the scanner driver automatically. Or, you can manually download and install the related driver from the scanner’s official website.
#5 Disable Computer Fast Startup
Sometimes, turning off the fast startup option of your machine can also help to solve the scanner keeps losing disconnection Windows 11 problem.
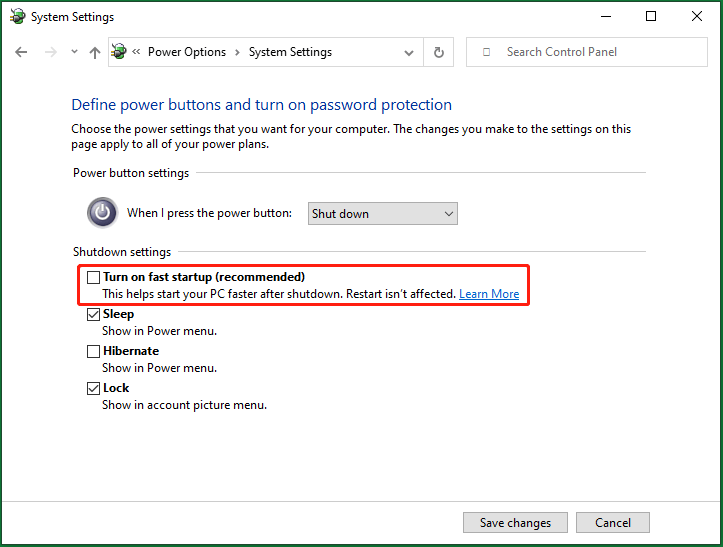
- Move to Windows 11 Control Panel > All Control Panel Items > Power Options.
- On the Power Options page, select Choose what the power button does in the left panel.
- Click on Change settings that are currently unavailable.
- Uncheck Turn on fast startup.
- Click Save changes.

#6 Disable USB Selective Suspend Setting
Besides turning off PC fast startup, you can further turn off the USB selective suspend setting to fix the scanner keeps losing connection Windows 11 issue.
- Go to Windows 11 Control Panel > All Control Panel Items > Power Options.
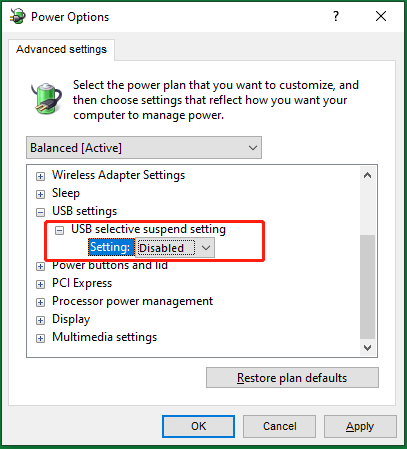
- On the Power Options page, select Change plan settings for your selected power plan. (the balanced power plan is recommended here.)
- Then, choose the Change advanced power settings.
- In the pop-up window, unfold the USB settings.
- Set the status of the USB selective suspend setting to Disabled.
- Click Apply > OK.

#7 Troubleshoot Hardware and Device
If you still can’t find a fix, you can try to troubleshoot for a solution.
- Navigate to Windows 11 Settings > System > Troubleshoot.
- Then select Scanner. If you can find it directly, just click on Other troubleshooters.
- Then choose Hardware and device to go on.
Just follow the on-screen instruction to complete. It will find your problem and probably fix it with your cooperation.
Windows 11 Assistant Software Recommended
The new and powerful Windows 11 will bring you many benefits. At the same time, it will also bring you some unexpected damages such as data loss. Thus, it is strongly recommended that you back up your crucial files before or after upgrading to Win11 with a robust and reliable program like MiniTool ShadowMaker, which will assist you to protect your increasing data automatically on schedules!
![[SOLVED] USB Keeps Disconnecting and Reconnecting? Best Solution!](https://mt-test.minitool.com/images/uploads/2019/03/usb-keeps-disconnecting-thumbnail.jpg)
