Sleep Mode is designed to conserve power and save battery life. Usually, your computer will enter Sleep Mode automatically when it is idle for a quite a while. What if your computer fails to enter Sleep Mode? In this post from MiniTool Solution, we will help you to identify the causes of Sleep Mode not working and find out some solutions.
Why Is Sleep Mode Not Working/Available?
Sleep Mode refers to a power-saving state that helps you to conserve more energy. When your computer enters Sleep Mode, your data will be saved in the RAM. It will turn off the display and stop most running processes. This mode can save power and extend the battery life.
Sometimes, you might find Sleep Mode stops working due to the following factors:
- Enabled Fast Startup.
- Interference of peripherals.
- Some apps or programs are hanging.
- Improper Sleep Mode settings.
- Changes made to power plan settings on your computer.
MiniTool ShadowMaker TrialClick to Download100%Clean & Safe
How to Fix Sleep Mode Not Working on Windows 10/11?
Fix 1: Check Sleep Mode Settings
At first, you can check if the Sleep Mode settings on your computer are configured properly. Here’s how to do it:
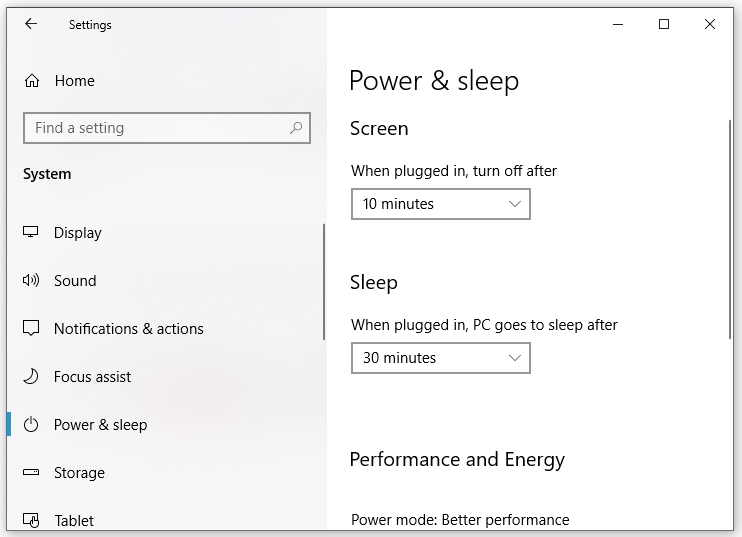
Step 1. Press Win + I to open Windows Settings and go to System.
Step 2. In the Power & sleep tab, you can modify the Sleep Mode settings on your computer according to your need.

Fix 2: Remove Peripherals
Some external devices connected to your computer like printers, scanners, webcam, and more can also be the culprit of Sleep Mode not working. To exclude their interference, you can remove them to check whether if your computer is able to enter Sleep Mode.
Fix 3: Disable Fast Startup
Although Fast Startup might help you to boot your computer faster, this feature might trigger some problems such as Sleep Mode not working. If you have enabled this feature, disabling Fast Startup might be helpful. To do so:
Step 1. Open Control Panel.
Step 2. Click on System and Security > Power Options > Choose what the Power buttons do.
Step 3. Untick Turn on fast startup (recommended) and save the changes.
Fix 4: Check for Power Requests
Some programs or processes might prevent your system from entering Sleep Mode. Therefore, disabling this process might help you to fix Sleep Mode not working. Here’s how to do it:
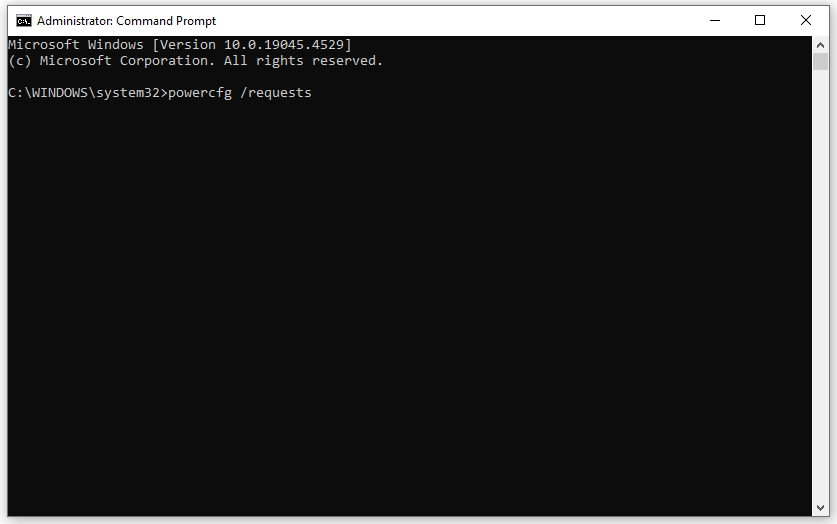
Step 1. Launch Command Prompt as an administrator.
Step 2. In the command window, type powercfg /requests and hit Enter.

Step 3. Now, you can see a list of applications that prevent you from entering Sleep Mode. You can terminate them in Task Manager and enter Sleep Mode again to see if it still fails to work.
Fix 5: Run Windows Power Troubleshooter
Windows Power Troubleshooter can help to fix some power issues including Sleep Mode not available or working. Follow these instructions:
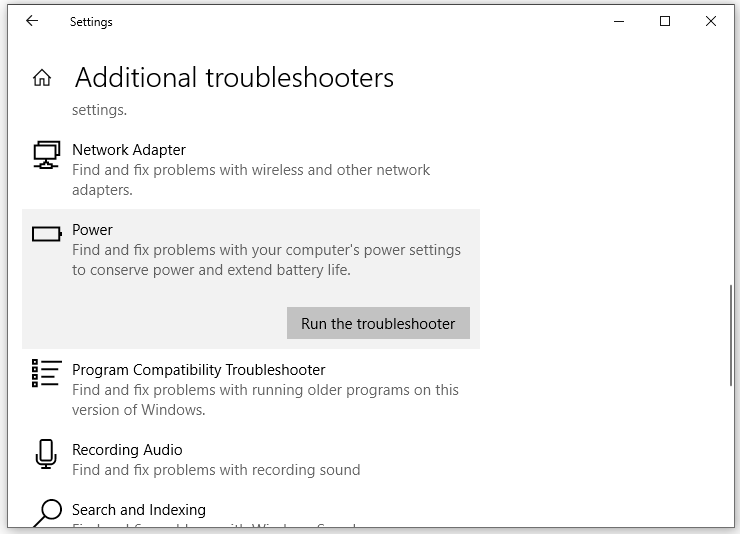
Step 1. Press Win + I to open Windows Settings and go to Update & Security.
Step 2. In the Troubleshoot tab, click on Additional troubleshooters.
Step 3. Scroll down to find Power, hit it, and then hit Run the troubleshooter.

Fix 6: Restore Power Plans to Default
At times, changes to power plan settings can also interfere with the functionality of Sleep Mode. In this condition, it is a good idea to restore your power plan settings to default. Here’s how to do it:
Step. 1. Open Control Panel.
Step 2. Navigate to Hardware and Sound > Power Options.
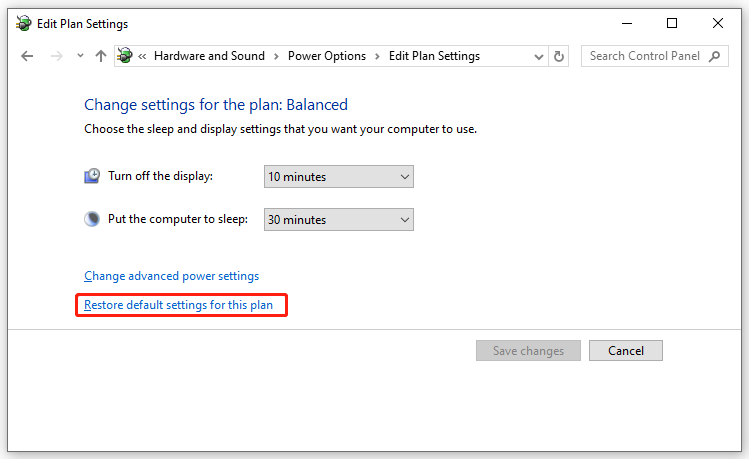
Step 3. Beside the power mode you are currently using, click on Change plan settings.
Step 4. Tap on Restore default settings for this plan and hit Save changes.

Also see: 3 Ways to Turn Off Sleep Mode Windows 11
Final Words
That’s all you can do for Sleep Mode not working. After trying these solutions, your computer can enter Safe Mode when it is idle to save more energy.
