Superfetch is a utility that preloads the apps you use most frequently. What to do when you are unable to find Superfetch in Services? Take it easy! You’re not alone. This post from MiniTool Solution will walk you through on how to access it in Windows 10/11.
Unable to Find Superfetch in Services
Superfetch is a feature introduced with Windows Vista in 2007. It aims to speed up your computer by preloading the apps you use most frequently. However, quite a few of you are unable to find Superfetch in Services. What’s wrong with it?
In fact, the answer is quite simple. Microsoft decided to rename Superfetch to SysMain in Windows 10 1809 and later. In other words, Superfetch and SysMain are the same thing. If you can’t find Superfetch in Services, check if there is the SysMain service.
How to Fix Unable to Find Superfetch in Services on Windows 10/11?
Way 1: Start SysMain in Services
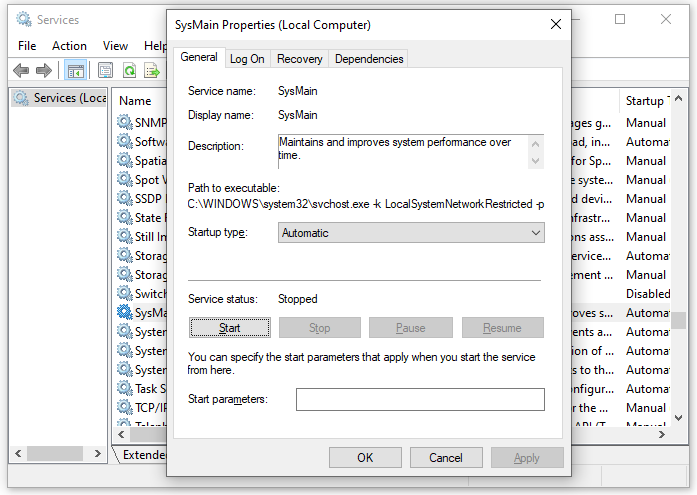
As mentioned earlier, Superfetch is renamed as SysMain in the more advanced system, so you can go to Services to access SysMain instead. To do so:
Step 1. Press Win + R to open the Run box.
Step 2. Type services.msc and hit Enter to launch Services.
Step 3. Scroll to find SysMain and double-click on it.
Step 4. Set the Startup type to Automatic > hit Start > tap on Apply & OK.

Way 2: Enable Superfetch via Command Prompt
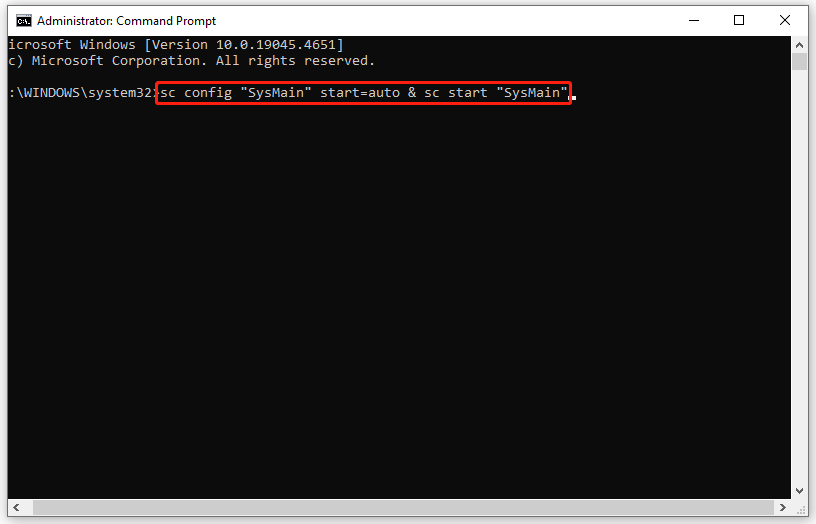
When you are unable to find Superfetch in Services, consider enabling it via Command Prompt. To do so:
Step 1. Press Win + S to evoke the search bar.
Step 2. Type command prompt and select Run as administrator.
Step 3. In the command window, type the following command and hit Enter to enable Superfetch:
sc config “SysMain” start=auto & sc start “SysMain”

Way 3: Enable Superfetch via Windows PowerShell
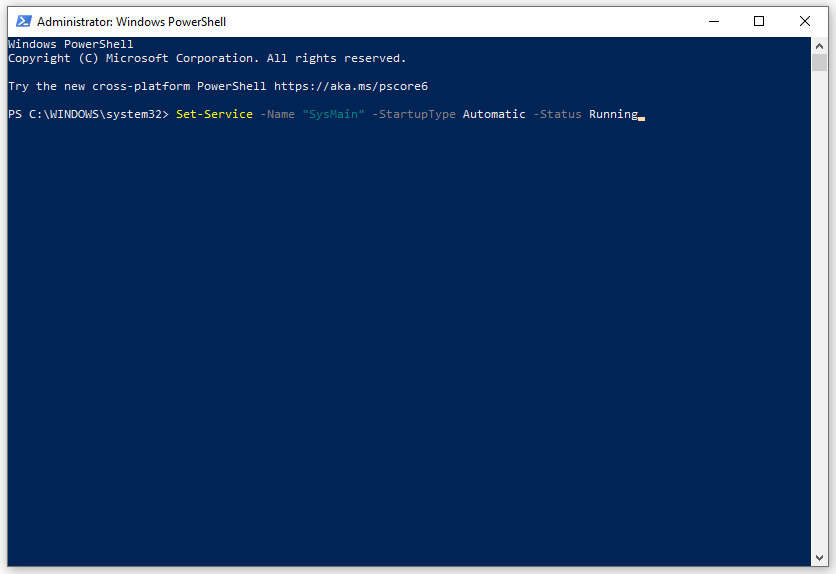
Another way to fix Superfetch service missing is to enable it via Windows PowerShell. To do so:
Step 1. Right-click on the Start menu and select Windows PowerShell (Admin).
Step 2. In the command window, run the command below and don’t forget to hit Enter.
Set-Service -Name “SysMain” -StartupType Automatic -Status Running

Way 4: Enable Superfetch via Registry Editor
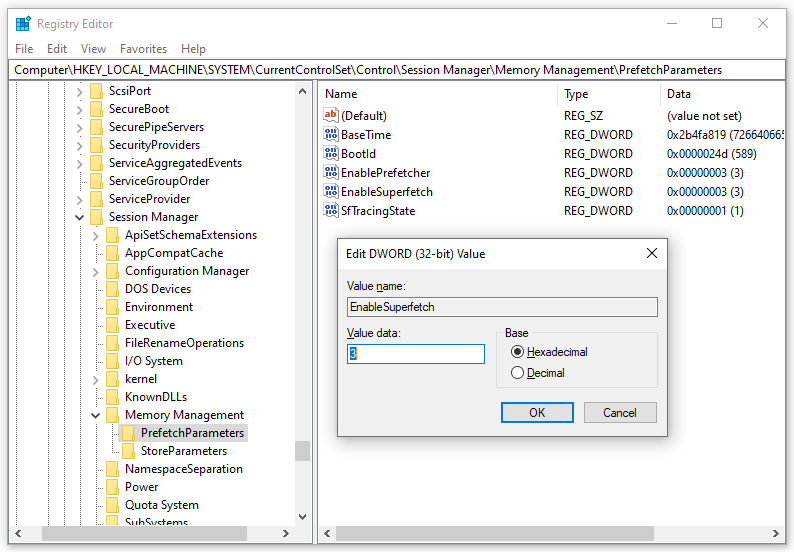
Meanwhile, changing the value data of EnableSuperfetch in Registry Editor also does the trick. To do so:
MiniTool ShadowMaker TrialClick to Download100%Clean & Safe
Step 1. Press Win + R to open the Run box.
Step 2. Type regedit.exe and hit Enter to launch Registry Editor.
Step 3. Navigate to the following path:
HKEY_LOCAL_MACHINE\SYSTEM\CurrentControlSet\Control\Session Manager\Memory Management\PrefetchParameters
Step 4. In the right pane, right-click on any empty space > select New > DWORD (32-bit) Value > rename it as EnableSuperfetch.
Step 5. Right-click on the newly created value to select Modify and give it one of the following value data:
- 0 – disable Superfetch.
- 1 – enable prefetching when the program is launched.
- 2 – enable boot prefetching.
- 3 – enable prefetching of everything.

Step 6. Save the changes and quit Registry Editor.
Wrapping Things Up
After applying these solutions above, you must be free from Superfetch not showing up in Services. If you are using Windows 10 1809 or later, you can utilize SuperMain instead because they are just the same.