About Windows 11 Workgroup Not Showing All Computers on the Network
A network is a group of devices connected to the same workgroup or domain at the office or home that can share the Internet, files/folders, hardware (e.g. printer), etc. This is usually called a private network. On the contrary, there is a public network whose devices can’t see or communicate with each other. The public network should mostly be used on public networks like coffee shops or airports with public Wi-Fi hotspots.
You can find computers or other devices connected to the same network router or switch. Yet, sometimes, it may show you a message saying “File sharing is turned off. Some network computers and devices might not be visible. Click to change…”. Why and how to solve the problem? Let’s see.
How to Fix Windows 11 Workgroup Not Showing All Computers on the Network?
The following solutions will help you handle not all network devices show up problem.
#1 Enable Private Network in Windows 11
Just as mentioned above, only devices within the private network will be discovered. So, to make all the network computers show up, first of all, make sure your private network is enabled. If not, just do it as below.
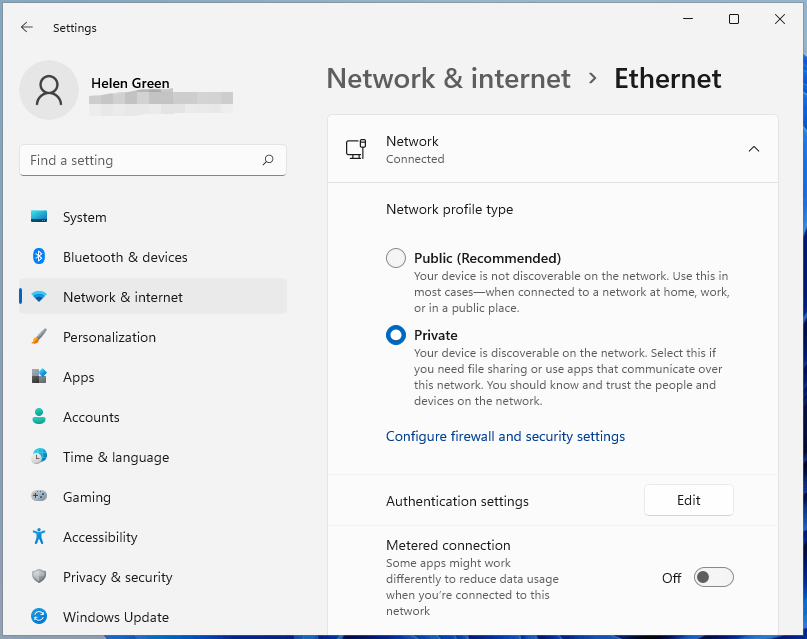
- Navigate to Windows 11 Settings > Network & internet.
- If you are using the wired Ethernet, click Ethernet and select Private. If you are using Wi-Fi, click Wi-fi and choose Private. Of course, you can set up both network connections to private.
- You may need to restart the computer to make the changes take effect.
#2 Enable File Sharing and Network Discovery in Windows 11
To view other machines, network discovery and file sharing must be enabled. If one of them is not, you will suffer Windows 11 workgroup not showing all computers on the network issue.
- Open Control Panel, view its items by icon (either large icon or small icon), and select Network and Sharing Center.
- Choose Change advanced sharing settings in the left panel.
- Then, expand Private (current profile) and select Turn on network discovery and Turn on file and printer sharing options respectively.
- Finally, click the Save changes
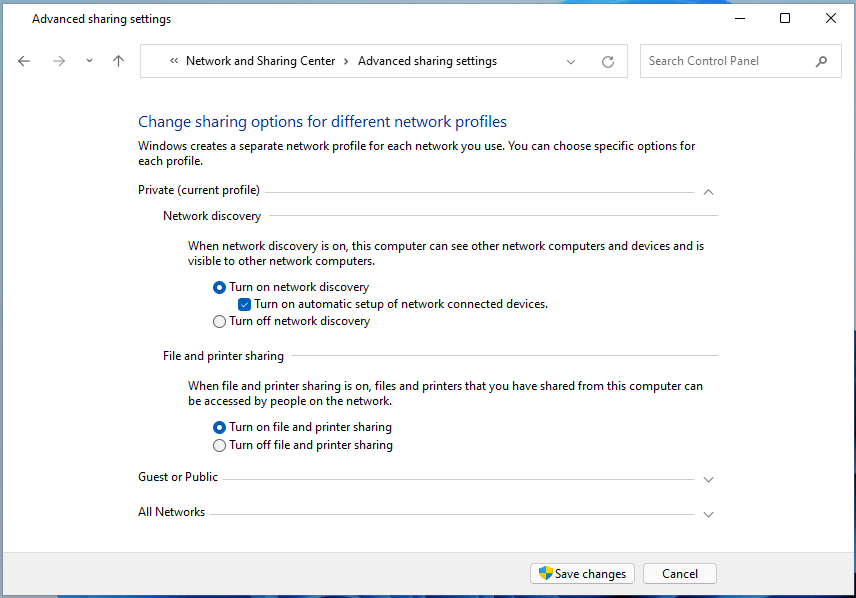
You may also need to enable file sharing and disable password protection sharing for All Networks.
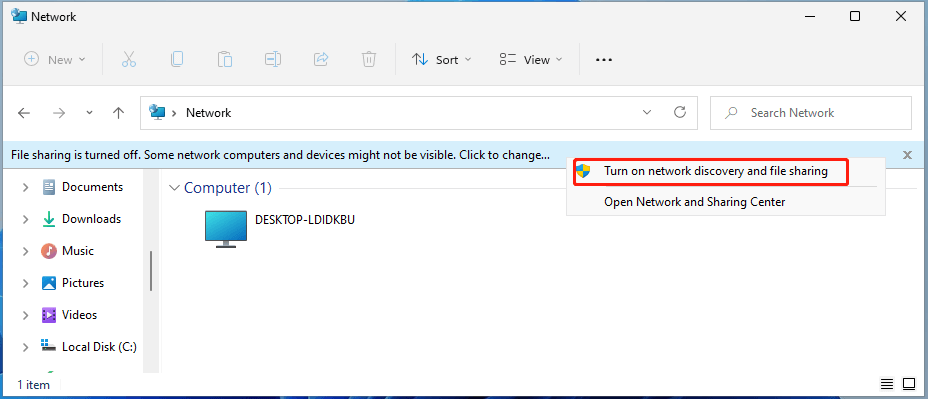
You can directly turn on file sharing and network discovery by clicking the error message “File sharing is turned off. Some network computers and devices might not be visible. Click to change…” when you go to Network in Windows File Explorer and select Turn on network discovery and file sharing.
#3 Enable Network Discovery and File Sharing by Command Line
You can also rely on commands to turn on file sharing and network discovery. Just open a command prompt (CMD) as administrator and input the following command into it one by one and press Enter after entering each command.
netsh advfirewall firewall set rule group=”File and Printer Sharing” new enable=Yes
netsh advfirewall firewall set rule group=”Network Discovery” new enable=Yes
To turn on network discovery through PowerShell, the command order is as below.
Get-NetFirewallRule -DisplayGroup “Network Discovery” -Enabled True -Action Allow -Direction Inbound
#4 Enable Network Discovery Within Windows 11 Defender Firewall
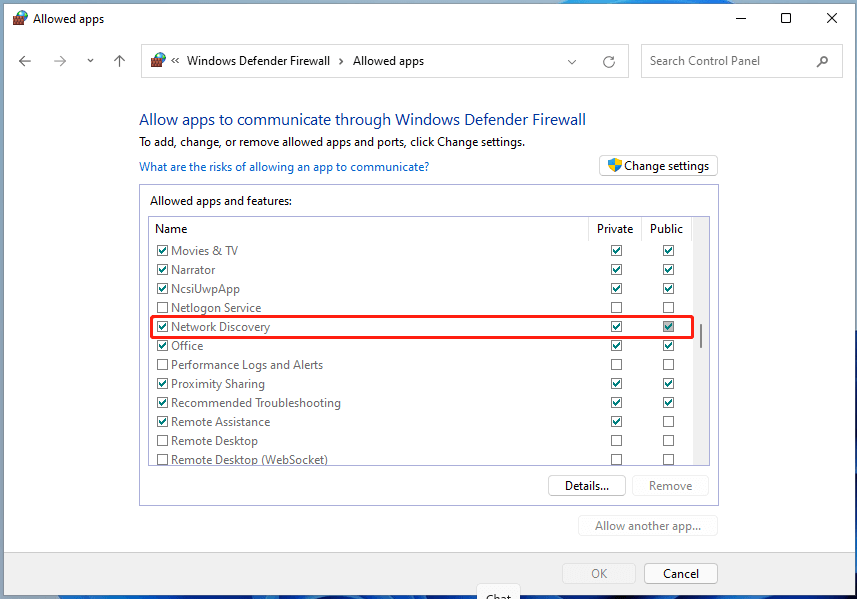
- Just move to Control Panel > All Control Panel Items > Windows Defender Firewall.
- Choose Allow an app or feature through Windows Defender Firewall in the left menu.
- On the new page, scroll down the Allowed apps and features list to see whether the Network Discovery option is checked or not. If not, click the Change settings button above and tick the Network Discovery
- Save changes and exit.
#5 Re-add Unshown Computers to Workgroup
For some situations, Widows PCs may not appear in the network environment due to incorrect workgroup settings. If this is true, just re-add those computers to the workgroup will fix the issue.
1. Move to Settings > System > About.
2. Click the Advanced system settings option behind the Related links.
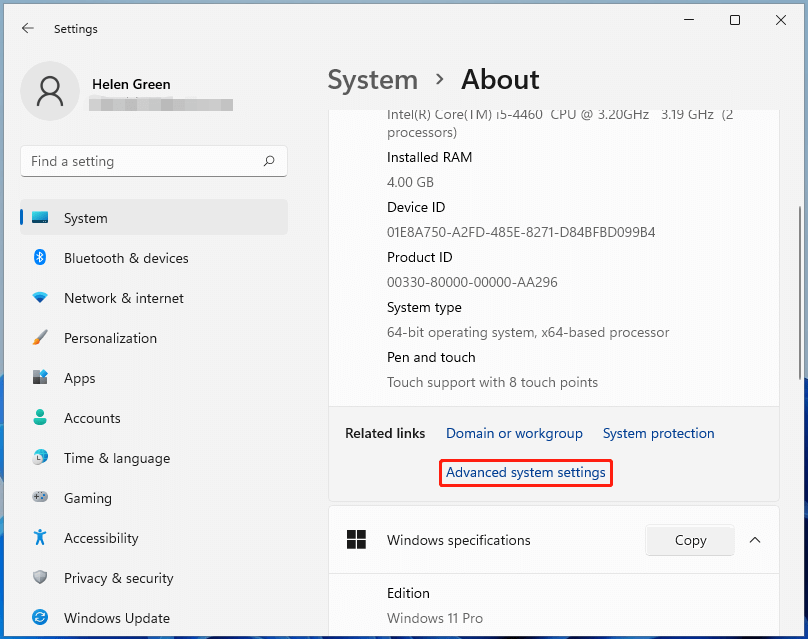
3. In the new pop-up System Properties window, go to the Computer Name tab, and select Network ID.
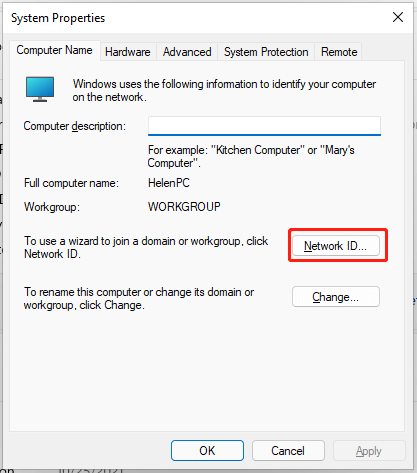
4. In the Join a Domain or Workgroup popup, choose This computer is part of a business network; I use it to connect to other computers at work and click Next.
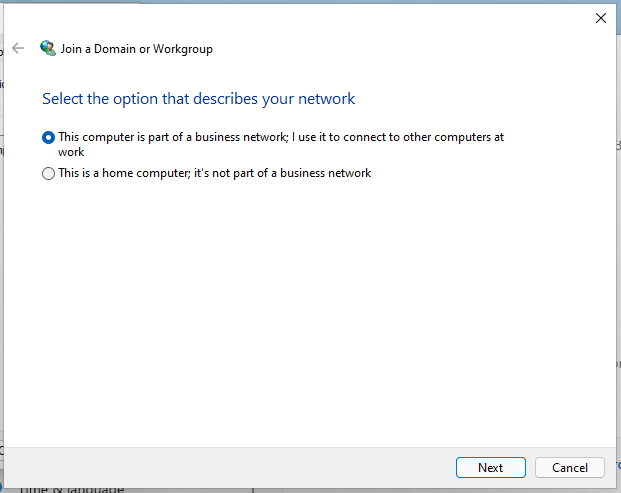
5. Select My computer uses a network without a domain and click Next.
6. Input your workgroup name and continue to Finish the process.
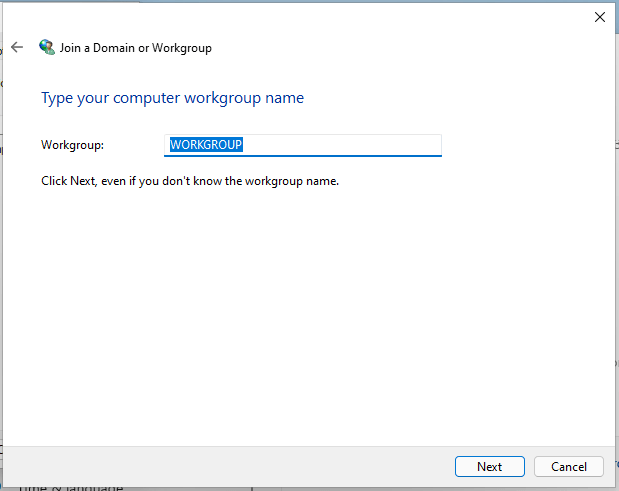
When all steps are done, just restart your machine.
#6 Make Computers Available to be Discovered
If none of the above methods work for you. You can try this one.
- Navigate to Settings > Network & internet > Advanced network settings.
- Select Homegroup in the right section.
- Click Change network location and then select Yes in the dialog box “Do you want to allow your PC to be discoverable by other PCs and devices on this network? We recommend allowing this on your home and work network, but not public ones”.
#7 Reset Network / Renew IP / Flush DNS
If the Windows 11 workgroup still not shows all computers on the network, just go to Settings > Network & internet > Advanced network settings and click on the Network reset option.
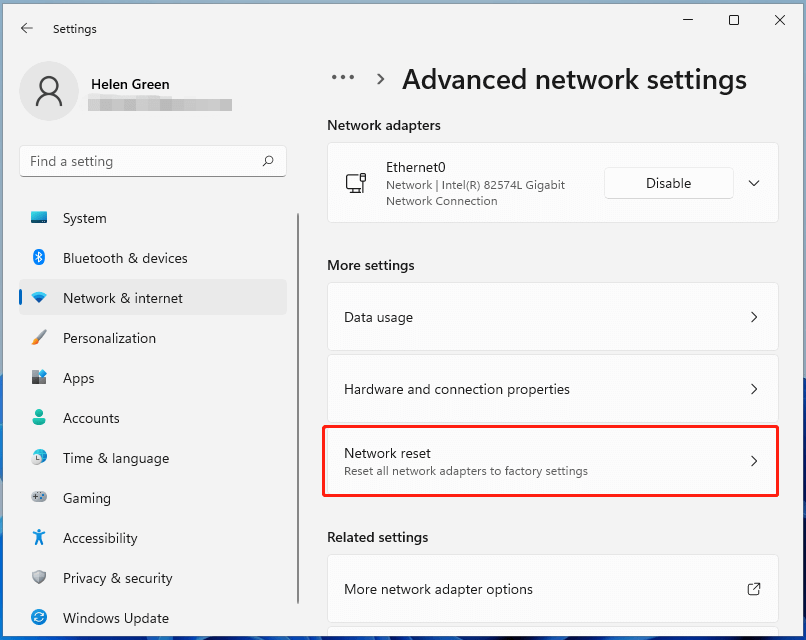
Or, you can reset network settings and firewall rules using the following commands.
netsh int ip reset reset.txt
netsh winsock reset
netsh advfirewall reset
To renew IP and flush DNS, use these commands:
ipconfig /release
ipconfig /renew
ipconfig /flushdns
Then, just reboot your PC.
#8 Update/Reinstall Network Drivers
Sometimes, you need to update or reinstall your network drivers to deal with the Windows 11 workgroup not showing all computers on the network problem.
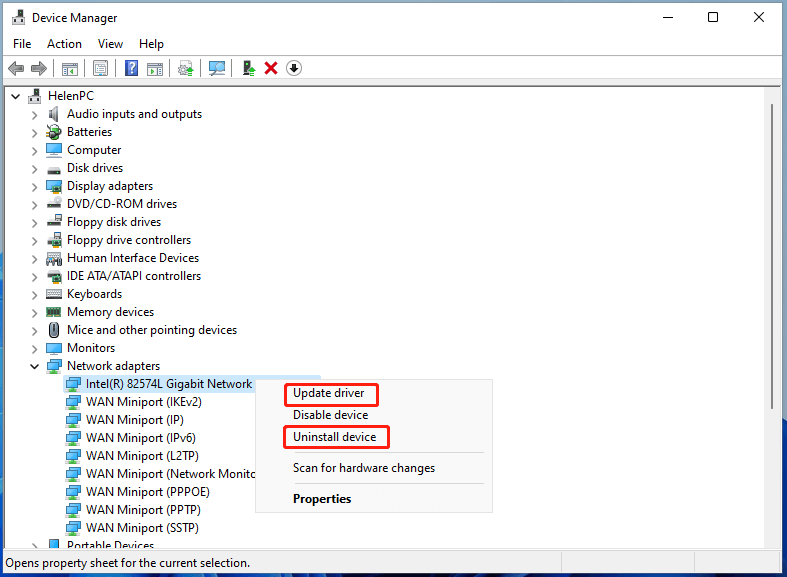
- Open Device Manager and unfold the Network adapters.
- Click on the target item and select Update driver or Uninstall device.
- If you choose Uninstall device in step 2, you need to restart your machine to let Windows automatically install the latest network drivers. This will also reset old protocol settings for the network.
#9 Make Sure Some Special Services are Running
Ensure the following services are running, which is necessary for displaying network computers. Just open Windows 11 services console and check the below items.
- FdPHost (Function Discovery Provider Host): Responsible for other PCs discovering on the network.
- FDResPub (Function Discovery Resource Publication): Enables other computers to detect your device on the network.
- Dnscache (DNS client)
- SSDPSrv (SSDP discovery)
- Upnphost (UPnP device host)
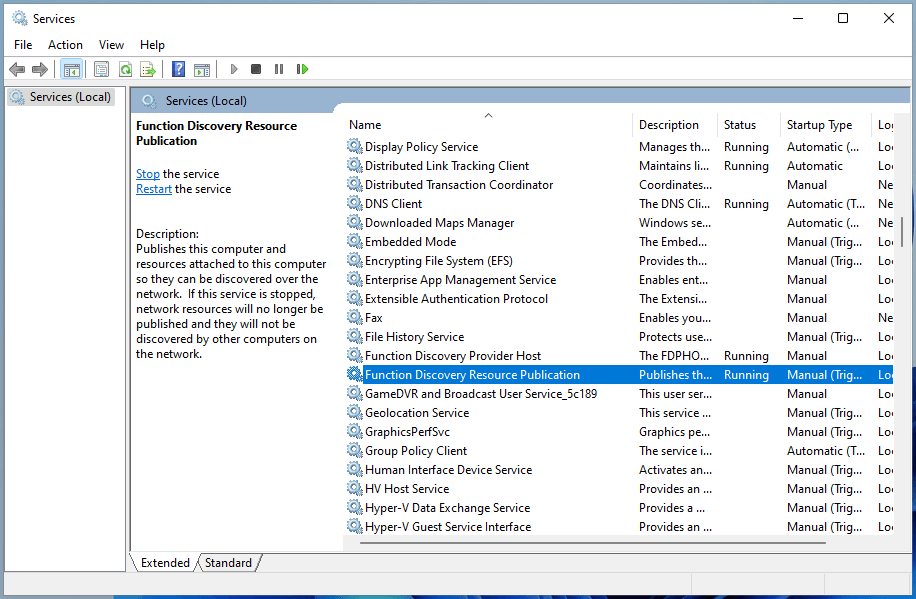
Also, you may need to set fdPHost and FDResPub services to automatically startup. Just right-click the target service and select Properties. In its Properties window and under the General tab, select Automatic (Delayed Start) as the Startup type.
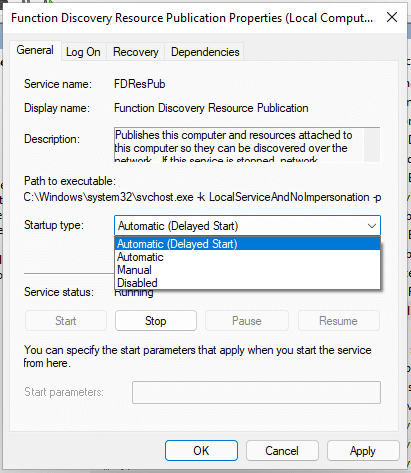
You can change the startup type of service fdPHost and FDResPub to automatic using this PowerShell command: get-Service fdPHost,FDResPub|Set-Service -startuptype automatic -passthru|Start-Service
Moreover, delete the trigger for FDResPub using sc triggerinfo FDResPub delete command.
#10 Enable Remote Desktop
Generally, do as the below guide.
- Go to Settings > System > About > Advanced system settings.
- Choose Remote in the new popup.
- Select Allow remote connections to this computer and click Apply > OK.
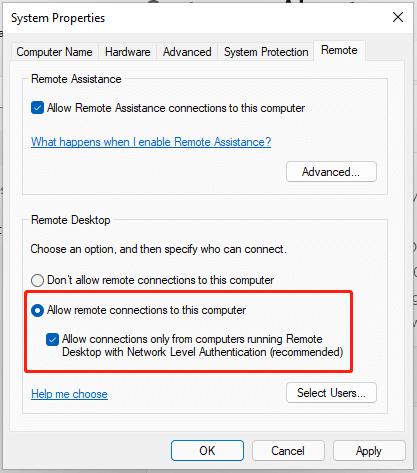
Restart the computer.
#11 Other Possible Solutions
Many other ways may also help you to solve the Windows 11 workgroup not showing all computers on the network problem like simply restarting your computer, upgrading Windows 11 to the newest version, directly accessing the shared items by typing the IP address, troubleshooting network adapter, turning on SMB 1.0/CIFS file sharing support, and so on.
Windows 11 Assistant Software Recommended
The new and powerful Windows 11 will bring you many benefits. At the same time, it will also bring you some unexpected damages such as data loss. Thus, it is strongly recommended that you back up your crucial files before or after upgrading to Win11 with a robust and reliable program like MiniTool ShadowMaker, which will assist you to protect your increasing data automatically on schedules!
MiniTool ShadowMaker TrialClick to Download100%Clean & Safe
Also read
- What Is the Smallest Video Format and How to Convert to It?
- Video Game Sound Effects: Definition/History/Download/Creation
- Best Musicals on Broadway/Netflix/Disney or for Teens/Kids/Family
- [Guides] How to Crop a Photo in Photoshop and Photoshop Element?
- [2 Ways] How to Crop a Photo on Mac by Photos & Preview Apps?
![[2 Ways] How to Set up VPN on Windows 11 Step by Step?](https://mt-test.minitool.com/images/uploads/2021/07/set-up-vpn-on-windows-11-thumbnail.png)