The Windows Sandbox tool acts as a temporary virtual desktop environment. However, while trying to use this tool, you might bump into the “Windows Sandbox failed to start” error. This post from MiniTool tells you how to fix it.
Windows Sandbox is helpful, especially when you download an executable file or an app from risky sources and install it in Sandbox. However, when you try to start Windows Sandbox on Windows 11, you may meet the “Windows Sandbox failed to initialize” issue or “Windows Sandbox failed to start” issue.
Tip: It’s recommended to back up your important data in advance since the apps you download may be malware which could hurt your computer and lead to the “data loss” issue or even corrupt your Windows. To do that, you can try the professional backup software – MiniTool ShaodwMaker.
MiniTool ShadowMaker TrialClick to Download100%Clean & Safe
Besides, the issue always comes with different error codes, such as:
- Windows Sandbox failed to initialize. Error 0x80004001. Not implemented.
- Windows Sandbox failed to initialize. Error 0x800700cb. The system could not find the environment option that was entered.
- Windows Sandbox failed to start. Error 0x80070015. The device is not ready.
- …
The following lists some reasons for the issue:
- Services are disabled
- System files are corrupt or missing
- System requirements don’t meet
- The Sandbox feature is not enabled
- Third-party antivirus software
- Outdated graphics driver
Here, we provide some solutions for the “Windows Sandbox failed to initialize” issue:
Fix 1: Re-Enable the Windows Sandbox Tool
You can disable and re-enable the Windows Sandbox tool to fix the “Windows Sandbox failed to initialize” issue.
Step 1: Type Windows Features in the Search box.
Step 2: Locate Windows Sandbox and uncheck the box and click OK. Then, check it again and click OK.

Fix 2: Start Sandbox Services
The Sandbox error usually appears when some of Windows’ services are disabled. So, you can start them to fix the issue:
Step 1: Press Win + R to open the Run dialog box. Type services.msc and press Enter.
Step 2: Locate the Hyper-V Remote Desktop Virtualization Service, right-click it to select Properties.
Step 3: Next, go to the General tab and click the Startup type drop-down menu to select Automatic.
Step 4: Click the Start > Apply > OK to save these changes.
Fix 3: Restart Hyper V and Other Programs
It’s recommended to restart the Hyper V and other programs to fix the “Windows Sandbox failed to initialize” issue.
Step 1: Type Windows Features in the Search box.
Step 2: Find Virtual Machine Platform and Windows Hypervisor Platform, and check the boxes beside them.
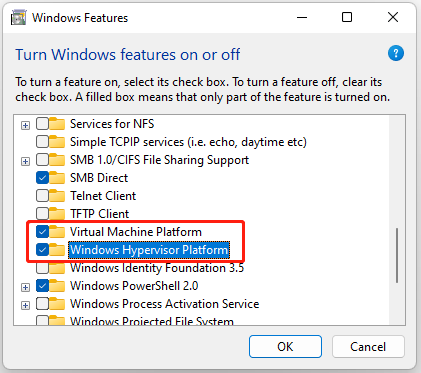
Step 3: Click the OK button.
Fix 4: Try the Troubleshooter
If the Sandbox error is caused by hardware-related problems, you can fix it with the Hardware and Devices troubleshooter.
Step 1: Press Windows+ I to open Settings.
Step 2: Go to System, then click Troubleshoot and click Other troubleshooters.
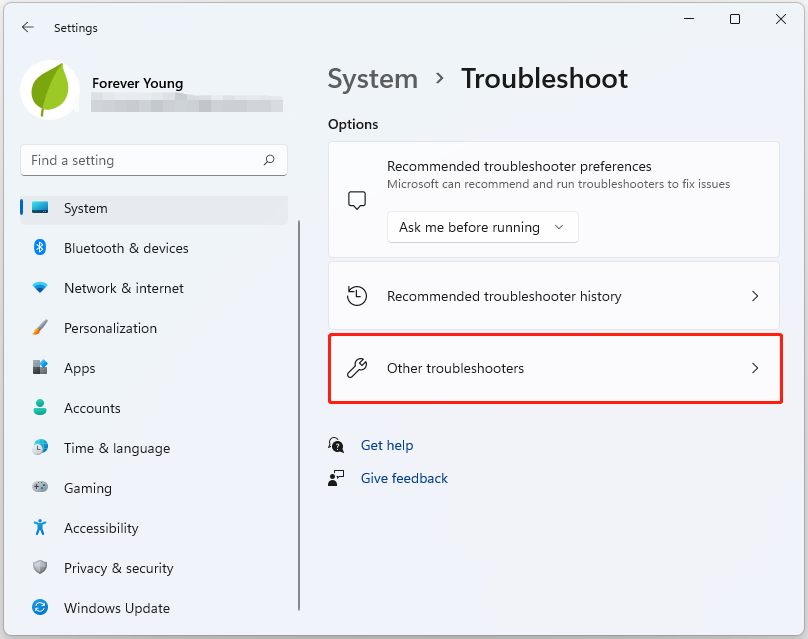
Step 3: Select hardware or device and click Run. Follow the onscreen instructions and restart the computer.
Fix 5: Run SFC
You can also run SFC to fix the “Windows Sandbox failed to initialize” issue. Follow the guide:
Step 1: Launch Command Prompt as administrator.
Step 2: Type sfc /scannow and press Enter. This process may take you much time to scan, and you just need to wait patiently.
Fix 6: Restore Windows to the Previous State
If you have created a system restore point or system image backup with Windows snap-in tools, you can try using the restore point to restore your computer to fix the error message. Here are the steps:
Step 1: In the Search menu, input control panel and open it.
Step 2: Click Recovery and click Open System Restore to continue.
Step 3: In the Restore system files and settings interface, click Next to continue.
Step 4: Select a restore point and click Next to continue.
Step 5: You need to confirm the restore point and click Finish. After the system restore is finished, try to shut down your computer again.
Fix 7: Check for Updates
It’s recommended to update your Windows 11/10 to the latest version to remove the annoying issue. Follow the guide below:
Step 1: Press the Windows + I keys together to open Settings.
Step 2: Go to Updates & Security.
Step 3: Click the Windows Update section, and click the Check for updates button to check if there are any new updates. Then Windows will search for available updates. Just follow the on-screen instructions to finish the process.
Final Words
Here are all of the methods to fix the “Windows Sandbox failed to initialize” issue on Windows 11/10. You can try them one by one. I hope that this post can be useful to you.
About The Author

Position: Columnist
Having been an editor at MiniTool since graduating college as an English major, Daisy specializes in writing about data backups, disk cloning, and file syncing as well as general computer knowledge and issues. In her free time, Daisy enjoys running and going with friends to the amusement park.