What can you do if ZoomFind extension is installed on your computer? Where does it come from? Take it easy. In this post from MiniTool, we will give you a brief introduction to ZoomFind extension and offer several ways to remove it.
ZoomFind Extension
ZoomFind extension falls under a type of browser hijacker that is discovered in an extension setup prompted by a deceptive webpage. This threat can change your browser settings and redirect your browser search queries to another website to generate advertising revenue, track your online activities, attack your system, etc.
Usually, ZoomFind browser hijacker is bundled with other software you intend to install or offered by certain fake advertisement prompts. The information that ZoomFind attempts to track may include keystrokes, webpages viewed, usernames/passwords, URLs visited, internet cookies and more. To prevent your computer from severe system infection or privacy issues, you’d better remove ZoomFind Search browser hijacker as soon as you can.
Back Up Your Data Before Troubleshooting
To prevent further losses, it’s essential to back up anything important with PC backup software – MiniTool ShadowMaker. This program is compatible with almost all the Windows systems and it supports backing up various items including important files/folders, the operating system, selected partitions, and even the whole disk. With a backup in hand, it will be much easier to restore your data in the event of ZoomFind extension infection or other malware attacks. Now, follow these steps to create a file backup with MiniTool ShadowMaker:
Step 1. Launch this free trial to enter its main interface.
MiniTool ShadowMaker TrialClick to Download100%Clean & Safe
Step 2. Head to the Backup page to select the backup source and destination. In the SOURCE section, select Folders and Files and you can check what to backup. As for the destination path, move to DESTINATION to select an external hard drive or USB flash drive.
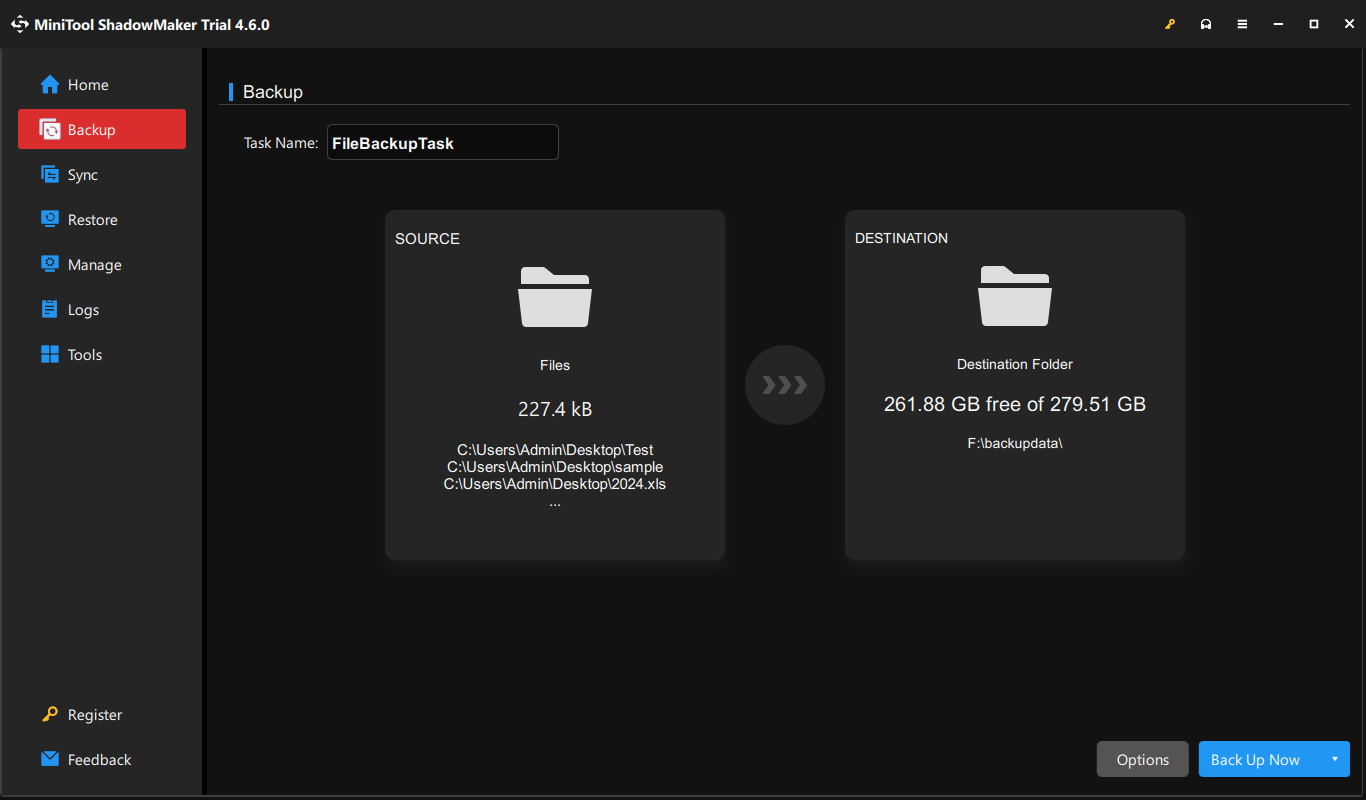
Step 3. Click on Back Up Now in the lower right corner to start the process at once.
How to Remove ZoomFind Extension on Windows 10/11?
Fix 1: Remove ZoomFind Manually on Your Browser
At first, go to the Extensions section of your browser to see if you can terminate the action of ZoomFind Extension and remove it. To do so:
Step 1. Open Settings in Google Chrome.
Step 2. Go to the Extensions section.
Step 3. Toggle off ZoomFind and hit Remove. If this extension is hard to uninstall from this page, please move to the next solution.
Fix 2: Delete the Extensions Folder via File Explorer
If ZoomFind browser hijacker refuses to access the Extension section and redirect you to a different page, you’ll have to find the extension files and delete them manually. Follow these steps:
Step 1. Press Win + E to open File Explorer.
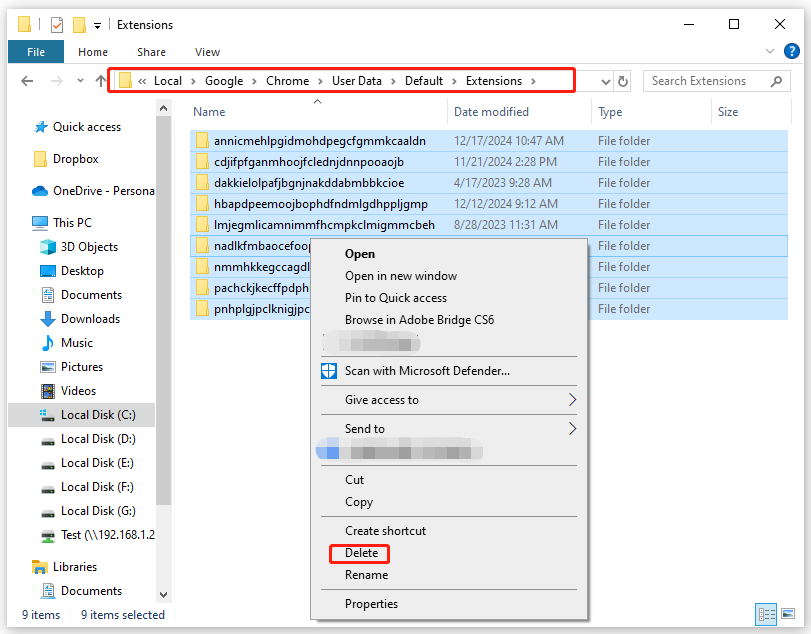
Step 2. Navigate to these paths below one by one:
For Google Chrome:
C:\Users\Username\AppData\Local\Google\Chrome\User Data\Default\Extensions
For Microsoft Edge:
C:\Users\Username\AppData\Local\ Microsoft\ Edge\User Data\Default\Extensions
For Opera:
C:\Users\Username\AppData\Roaming\Opera Software\ Opera Stable\ Default\Extensions

Step 3. Open the Extension folder and then delete all the content inside.
Fix 3: Clear Cookies and Cache
As mentioned in the beginning part, internet cookies are one of target information of ZoomFind extension, so it’s a good option to clear your browsing data like cookies and cached files. Here’s how to do it:
Step 1. Open your Google Chrome and click on the 3-dot icon to select Settings.
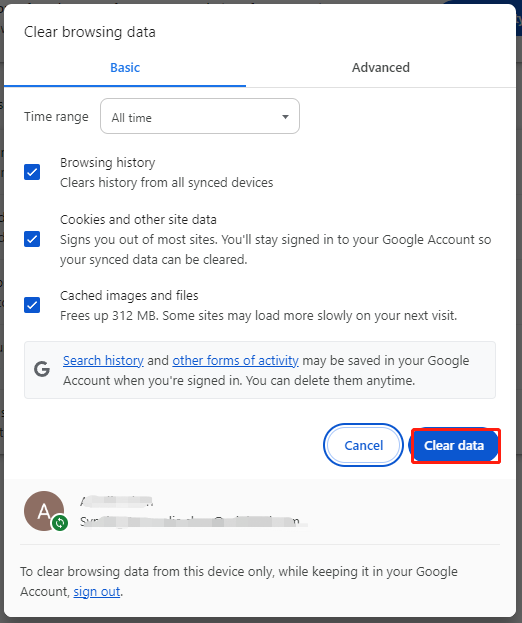
Step 2. In the Privacy and security tab, click on Clear browsing data.
Step 3. Select the time range, tick the items you want to delete and then hit Clear data to start the process.
Fix 4: Uninstall Most Recently-Installed Programs
If ZoomFind extension appears after installing a certain app, this app might be the culprit. In this case, you can navigate to the program list to uninstall it. Follow these steps:
Step 1. Press Win + R to open the Run box.
Step 2. Type appwiz.cpl and hit Enter to launch Programs and Features. Now, you can see a list of programs installed on your computer.
Step 3. Right-click on the suspicious or unfamiliar program and select Uninstall.
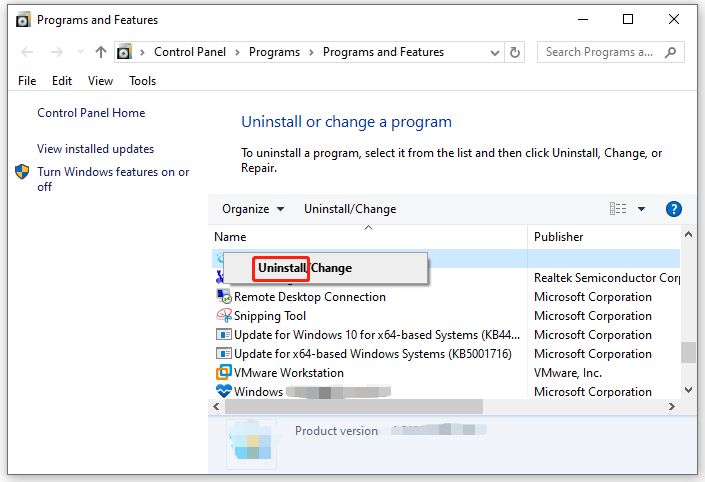
Step 4. Confirm this action and then follow the uninstallation wizard to complete the rest process.
Fix 5: Remove Browser Management Status
Some registry keys might contain malicious configurations, so you need to delete them to remove browser management from Windows devices. Follow these steps:
Step 1. Press Win + R to open the Run box.
Step 2. Type regedit.exe and hit Enter to launch Registry Editor.
Step 3. Locate the delete the following keys:
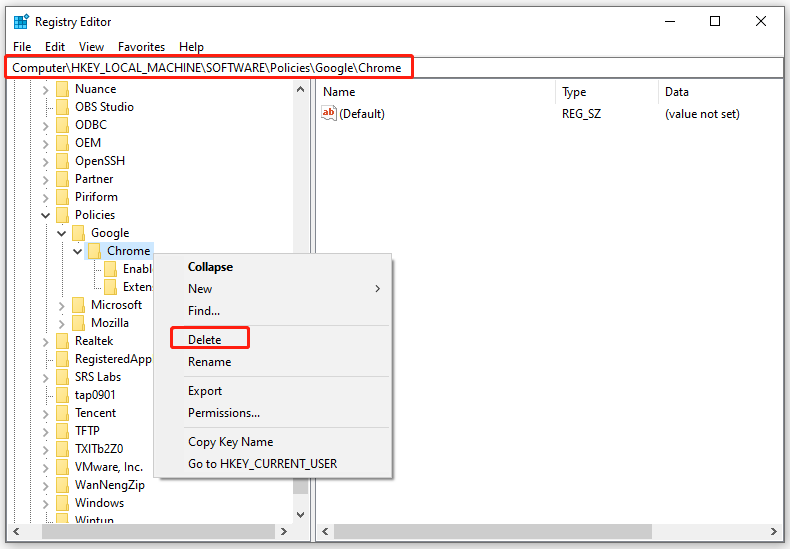
HKEY_LOCAL_MACHINE\Software\Policies\Google\Chrome
HKEY_LOCAL_MACHINE\Software\Policies\Google\Update
HKEY_LOCAL_MACHINE\Software\Policies\Chromium
HKEY_LOCAL_MACHINE\Software\Google\Chrome
HKEY_LOCAL_MACHINE\Software\WOW6432Node\Google\Enrollment
HKEY_CURRENT_USER\Software\Policies\Google\Chrome
HKEY_CURRENT_USER\Software\Policies\Chromium
HKEY_CURRENT_USER\Software\Google\Chrome
Step 4. Navigate to the following path and delete the value named CloudManagementEnrollmentToken.
HKEY_LOCAL_MACHINE\Software\WOW6432Node\Google\Update\ClientState\{430FD4D0-B729-4F61-AA34-91526481799D}
Final Words
After reading this post, you must be aware of what ZoomFind Chrome extension is, how it works, and how to remove it from Windows 10/11. Meanwhile, the importance of data backup can’t be neglected. To safeguard your crucial files, you can take a few moments to back them up with MiniTool ShadowMaker. Have a nice day!

