A great many people suspect that CHKDSK is not beneficial to SSD. When opening the related forums and communities, you may find that there are many questions about the subject such as “does CHKDSK work on SSD”, “how safe is it to run CHKDSK on SSD”, etc. Here is a true example from the superuser forum:
I recently saw Windows 10 pops up with a warning message that I should run CHKDSK on my laptop. My laptop came with an SSD and I’m not sure if there are any negative implications to running CHKDSK on such a drive. Are there any potential issues with reporting “bad sectors” on the drive? How safe is it to run CHKDSK on my SSD drive? The model of SSD that I have is reported as “Samsung SSD PB22-JS3 2.5”.https://superuser.com/questions/209606/how-safe-is-it-to-run-chkdsk-on-an-ssd
Overview of CHKDSK and SSD
CHKDSK is a Windows built-in disk scan and repair utility that can run in Command Prompt to check and repair disk errors. This tool can create and display the drive status based on the partition file system. Besides, you can even run the CHKDSK command from a Windows installation disc when your computer can’t function well. Here’s how to check a hard drive using CHKDSK:
Step 1. Type cmd in the search box, and then right-click the Command Prompt app and select Run as administrator. Then click on Yes in the User Account Panel window to confirm it.
Step 2. In the elevated Command Prompt, type chkdsk E: /f and hit Enter. (Replace E with the drive letter that you want to check)

SSD is a storage device that uses integrated circuit assemblies as memory to store data. Compared with HDD, SSD doesn’t have any mechanical moving parts. Due to this feature, SSD owns more physical stability and faster data access speed. However, each memory bank of SSD has a finite lifespan, which limits the number of times that can be read and written from the system. So, SSD has a more limited lifespan.
With the time going by, the SSD may run into some errors that you have to check and repair. CHKDSK is commonly used to check hard drives, but a lot of people are skeptical about running CHKDSK on SSD. Is it safe to perform the CHKDSK SSD command? Let’s keep reading.
Is It Safe to Run CHKSDK on SSD
Does CHKDSK work on SSD? Of course, the answer is yes. However, many people reported that they encountered some issues after running the CHKDSK command on their C drive. For example, a user from Facebook Hub reported that his computer can’t start normally after running chkdsk c: /f from an elevated Command Prompt.
Thus, lots of people are confused if it is safe to run CHKDSK SSD Windows 10. In fact, the SSD CHKDSK command is not harmful. When running CHKDSK on SSD, the process does more reading than writing to the drive. Since the reading operation is so small and quick that it can be neglected completely, running the SSD CHKDSK command has little impact on the performance.
In addition, it is not necessary to run CHKDSK SSD Windows 10 regularly like performing it on a traditional HDD. This is because SSD owns advanced leveling and controlling technology, which can automatically detect and repair certain drive errors via the drive controller.
However, it is not recommended you run the SSD CHKDSK repair on your C drive because many people experience some problems after doing that. If you are also troubled by the issue after running the chkdsk c: /f command, you can try the following guide provided by Microsoft:
Step 1. Press the Win + I keys to open the Setting app, and then navigate to the Update & Security section.
Step 2. Select Recovery from the left side, and go to the Advanced startup section and click on Restart now.
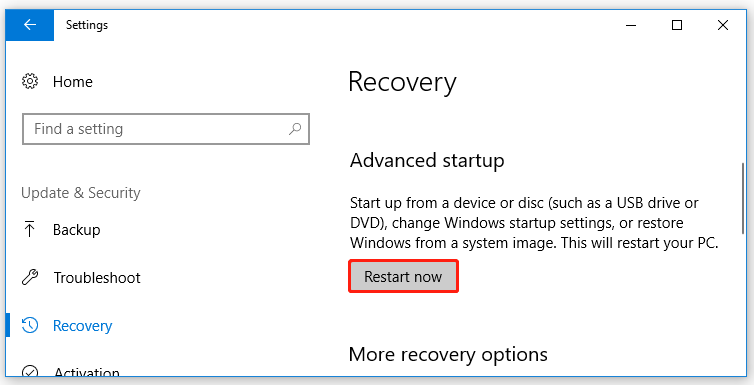
Step 3. In the pop-up window, select Troubleshoot > Advanced options > Command Prompt in order.
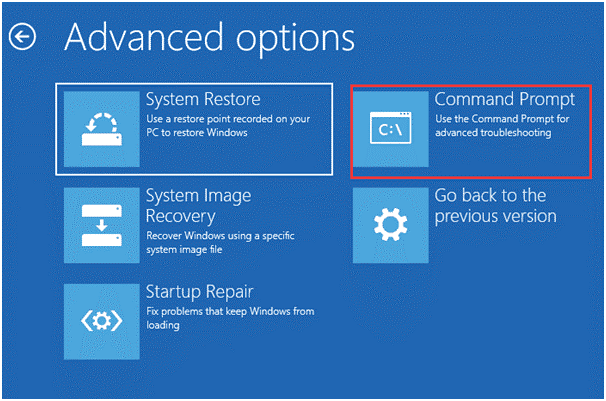
Step 4. Type chkdsk /f in the elevated command prompt and hit Enter.
Step 5. Wait for the CHKDSK utility to complete the scan. Once done, type Exit and hit Enter.
Step 6. Now, your computer should start up as expected. If it restarts into the Recovery Console, you can select Exit and start Windows 10.
CHKDSK can help you repair the logical hard drive errors, but it is not suitable for C drive on SSD and it can run into some issues like CHKDSK write-protected and CHKDSK not working. So, how to check SSD safely and effectively? Let’s keep reading.
How to Check SSD Windows 10 Effectively
Is there an effective way to check SSD? Yes, it is. Here we highly recommend you use MiniTool Partition Wizard. It is a powerful partition manager that can help you fix various errors such as Windows 10 Bootloader repair, WEI could not measure storage performance, HP stream low disk space, and so forth.
Here’s how to check SSD using MiniTool Partition Wizard.
MiniTool Partition Wizard FreeClick to Download100%Clean & Safe
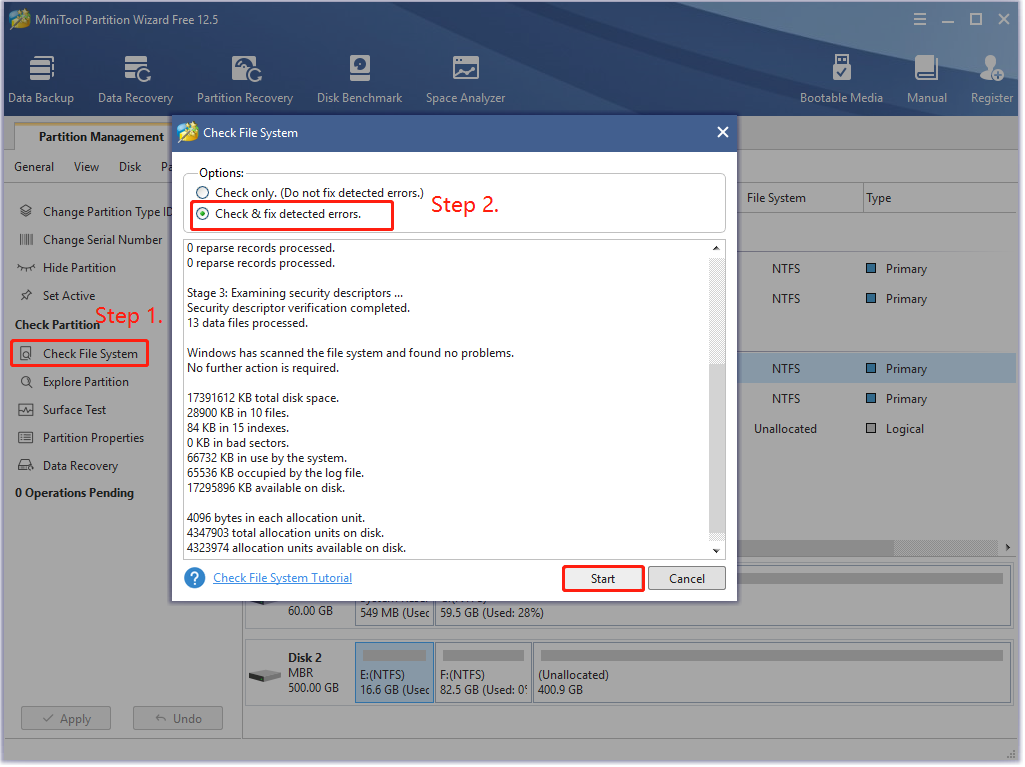
Step 1. Launch this program to enter the main interface after you installed it, and then select the partition that you want to check from the disk map and click on Check File System from the left pane. Also, you can right-click the partition directly and select Check File System.
Step 2. In the pop-up window, select the Check & fix detected errors option and click on the Start button. Then this program will automatically detect and fix the file systems errors on the drive like running the chkdsk /f command.
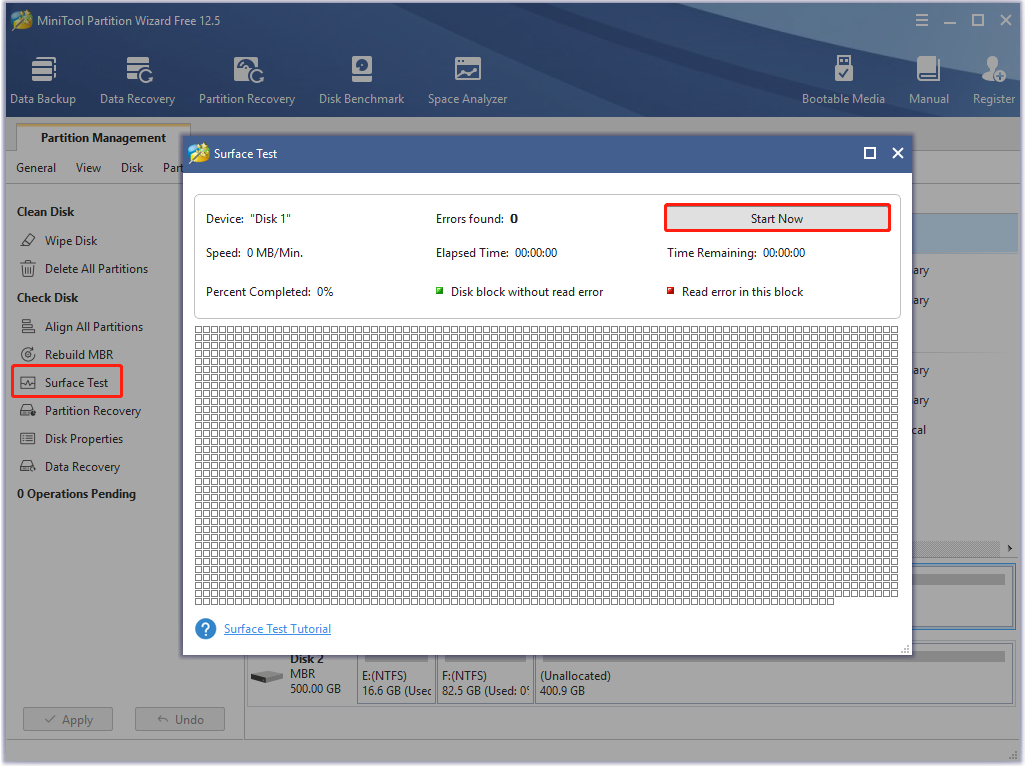
Step 3. If you want to check bad sectors on the drive, you can select the partition and click on Surface Test from the left pane.
Step 4. Click on the Start now button in the pop-up window. After that, this tool will scan the whole drive immediately and show you the test result.
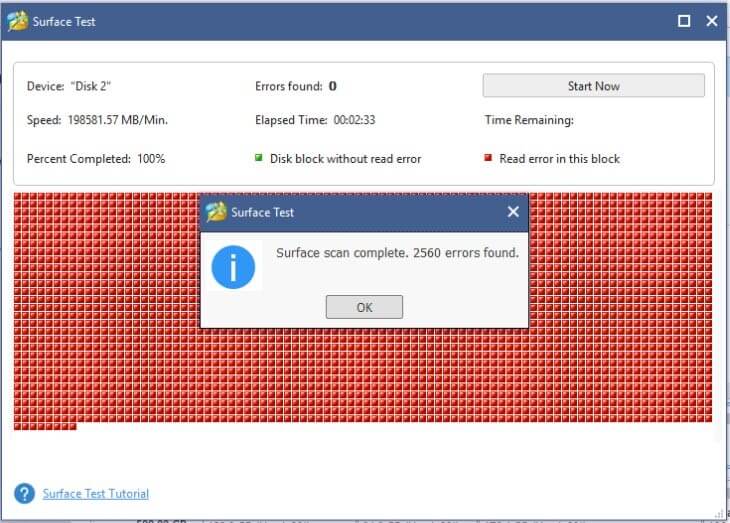
If there are any blocks marked with red color as the following picture shows, it indicates that your hard drive is getting failing. At this time, you may have to consider replacing it with a new one. How to upgrade to SSD without reinstalling OS? Don’t worry. We will walk you through a step-by-step guide.
Bonus Tip: How to Upgrade to HDD/SSD Without Reinstalling OS
As mentioned above, the SSD drive has a limited lifespan. If you have used an SSD for a long time, then the drive may get faulty, and running CHKDSK on SSD can’t help you fix the issue. So, the most effective way is to replace it with a new one.
Here comes a new question: how to update to HDD/SSD without reinstalling OS? You can use the Copy Disk feature of MiniTool Partition Wizard that can migrate OS to the HDD/SSD easily and even copy the entire disk to the new one. To do so, follow the step-by-step guide below:
MiniTool Partition Wizard DemoClick to Download100%Clean & Safe
Step 1. Connect your new HDD/SSD to your computer and launch the program to enter its main interface.
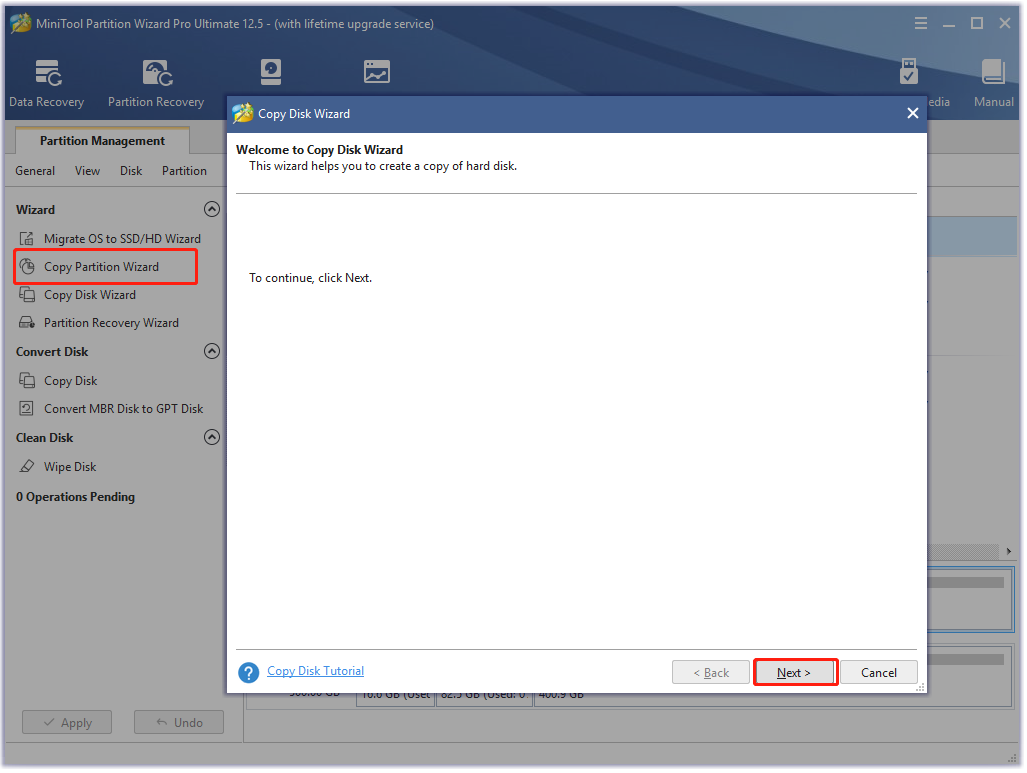
Step 2. Click on the Copy Disk wizard feature on the left pane and click on the Next button.
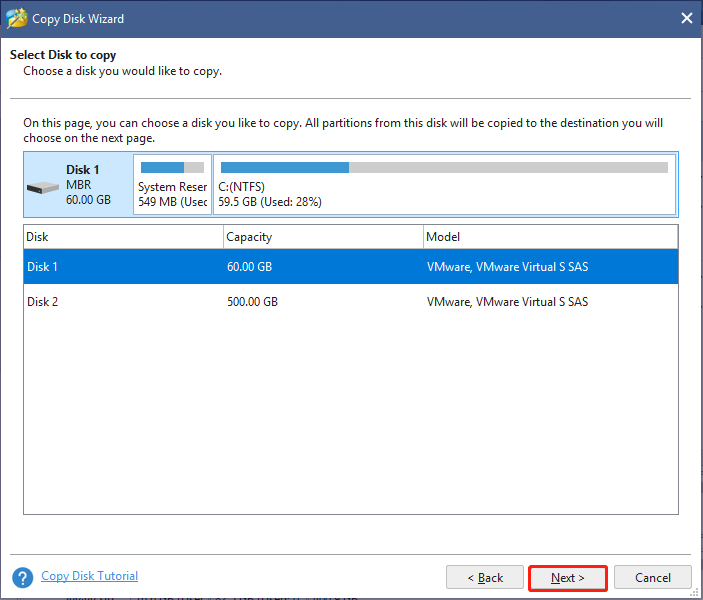
Step 3. Select the original disk that you want to copy and click on Next to go on.
Step 4. Select the target disk that you’re ready to copy the source content to and click on Next. After that, you will be prompted to confirm this operation. Click on Yes to continue.
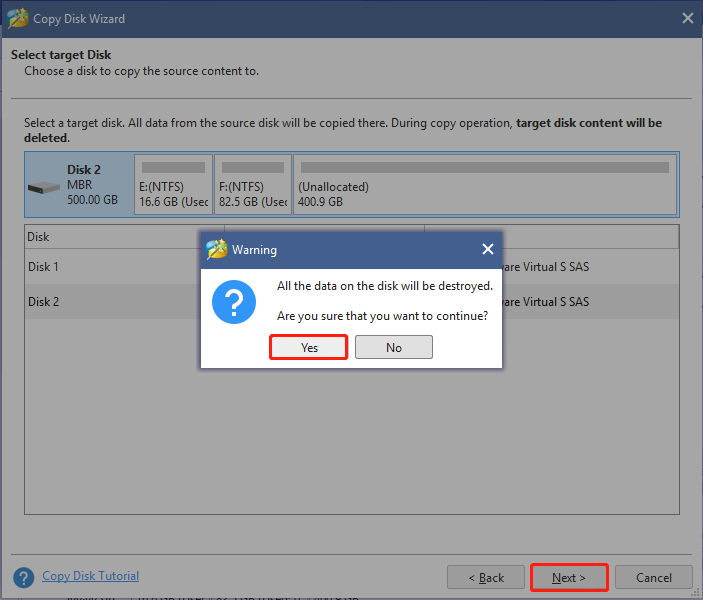
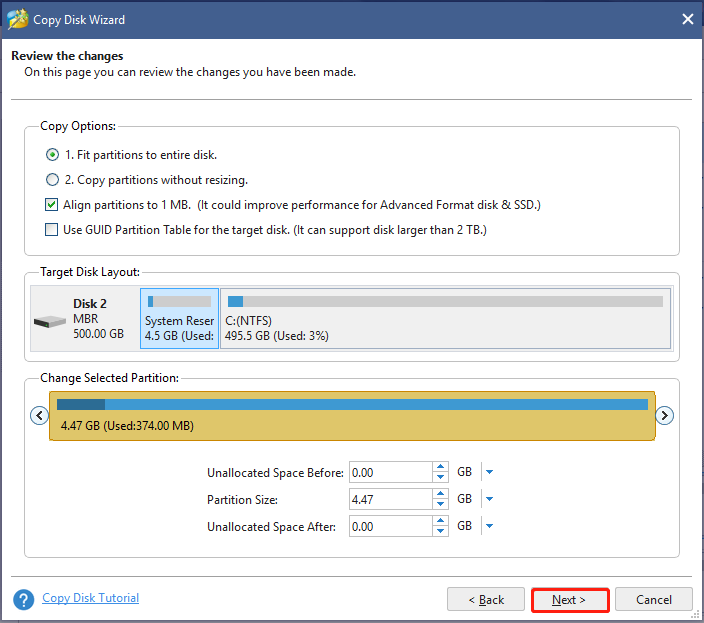
Step 5. Review the changes you have been made. Here you can select the default copy options if you haven’t special demands and click on Next.
Step 6. Click Finish in the next window and click on Apply to execute the pending operation. Then wait for the process to complete.
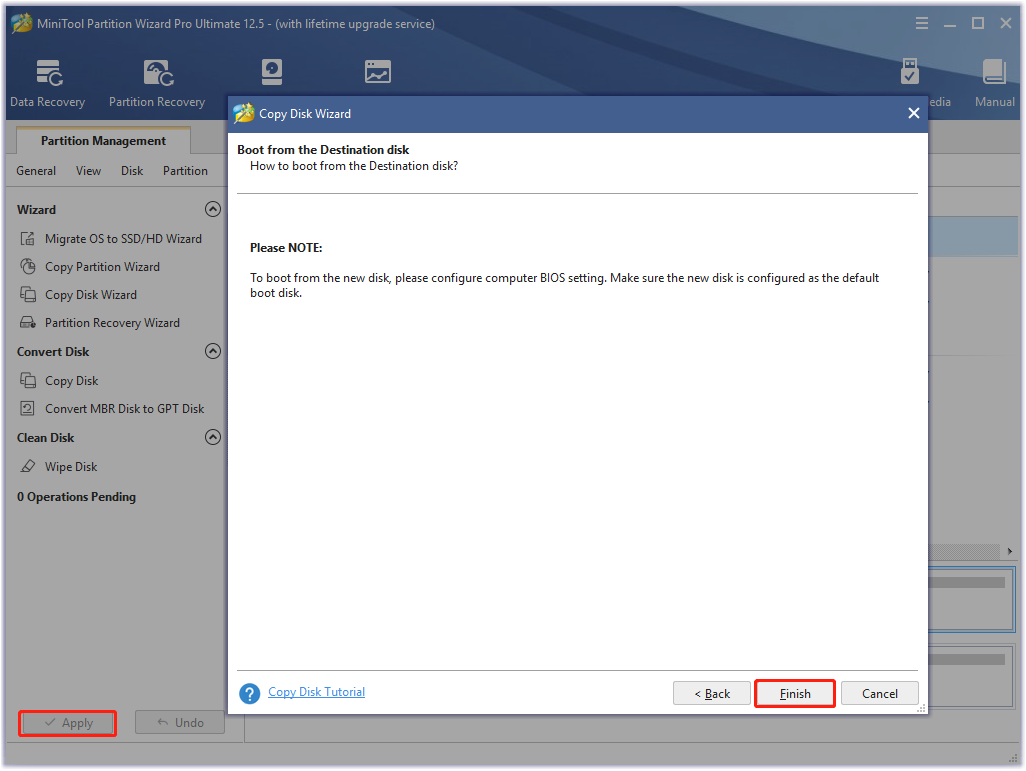
Now, you should complete the copying process successfully and you can set the new HDD/SSD as the boot drive.
What’s Your Opinion
Is it safe to run CHKDSK on SSD? Now, I believe that you already have known the answer. If you encounter any problems when using CHKDSK, you can use MiniTool Partition Wizard to check your SSD. Besides, the MiniTool program can help you upgrade to a new HDD/SSD without reinstalling OS.
Have you any other ideas on this topic? You can write them down in the comment zone. If you have difficulties in using MiniTool Partition Wizard, please send us an email to [email protected] and we will help you ASAP.
