Sometimes, when users try to create a restore point on their system, they may encounter the error message: “Could not configure the disk space used for System Protection”. It prevents new restore points from being created in the system.
It usually occurs because of not having enough drive free space, an internal issue with the Volume Shadow Copy Service (VSS), or a background process conflicts with the restore utility.
Besides, a few users have also encountered the error when they tried to disable System Protection after upgrading Windows to a new build.
If you are one of those who encounter this error and don’t know how to fix it, you can pay attention to the following content and find the suitable ways to sort your problem out.
Fix 1. Free up Space on Target Disk
If the disk you’re using to create the restore point does not have enough space, you may encounter the “could not configure the disk space used for system protection Windows 10” issue. To fix this issue, we recommend you delete unnecessary files from the disk to get more free space.
If you want to quickly create much free space by deleting large files/folders, you may need help from free disk partition software called MiniTool Partition Wizard. Its Space Analyzer feature can help you figure out which files occupy a large capacity of the disk and delete all unnecessary files.
MiniTool Partition Wizard FreeClick to Download100%Clean & Safe
Step 1: Download and install MiniTool Partition Wizard on your PC. Then launch it to enter the main interface.
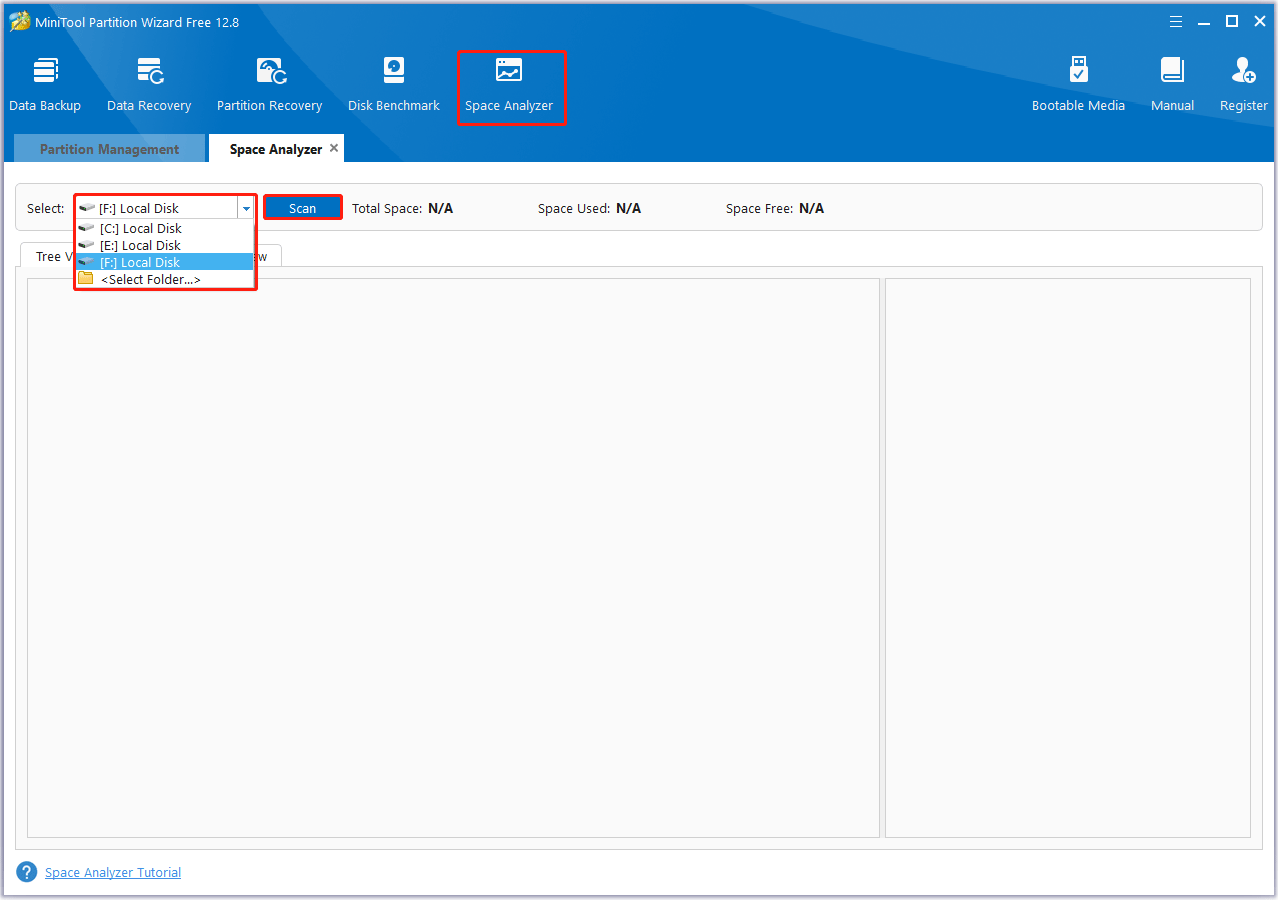
Step 2: Select the Space Analyzer feature on the top toolbar to launch the disk usage analyzer.
Step 3: In the next window, select the target disk from the drop-down menu. Then click on the Scan button.
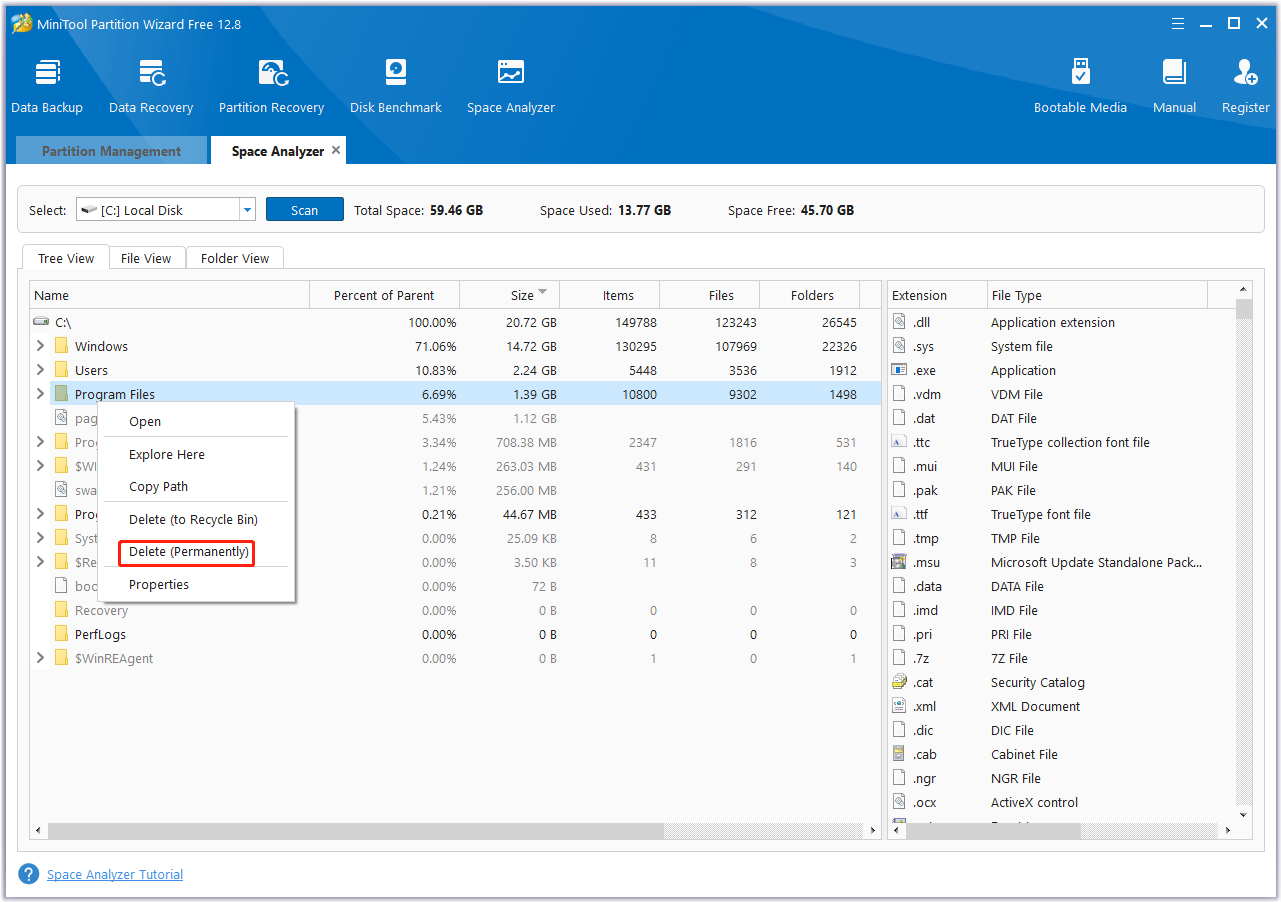
Step 4: Wait until the scanning completes. Right-click on the space-consuming and useless files/folders. Then select Delete (Permanently) to remove them.
Alternatively, you can increase the amount of disk space allocated for System Restore on the disk where System Protection is enabled. Here’s how to do it on a Windows 10/11 PC.
Step 1: Press the Win + R key to open the Run dialog box. Then type systempropertiesprotection in the box and press Enter.
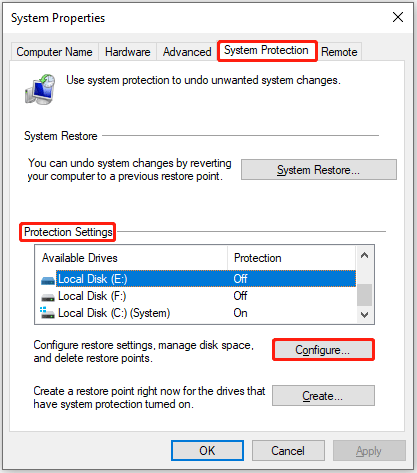
Step 2: The System Properties dialog box will appear. Then switch to the System Protection tab.
Step 3: Under the Protection Settings section, select the drive on which you’re trying to create the restore point. Then click on the Configure button.
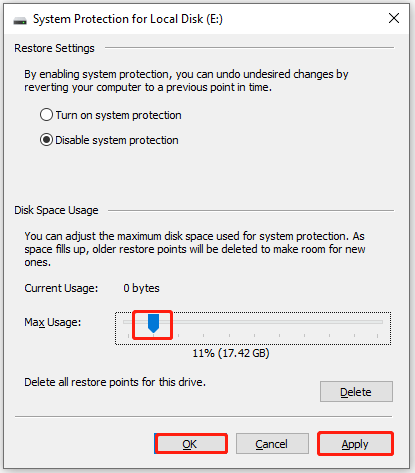
Step 4: In the next pop-up window, use the Max Usage slider to increase the space allocated on the selected drive for System Protection.
Step 5: Finally, click on Apply > OK to save changes.
Fix 2. Perform a Clean Boot
The “clean boot” will start Windows with a minimal set of drivers and startup programs. So, you can perform a clean boot to identify any program conflicts that may be causing the error “could not configure the disk space used for system protection”. Here’s the tutorial:
Step 1: Sign in to the computer as an administrator.
Step 2: Type msconfig in the Search box, and then select System Configuration from the result.
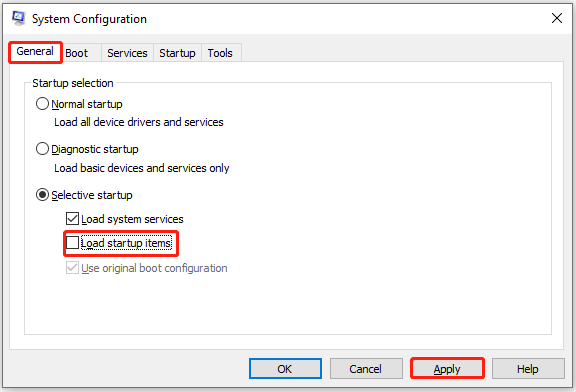
Step 3: In the General tab and under Selective startup, uncheck the Load startup items box and click on Apply.
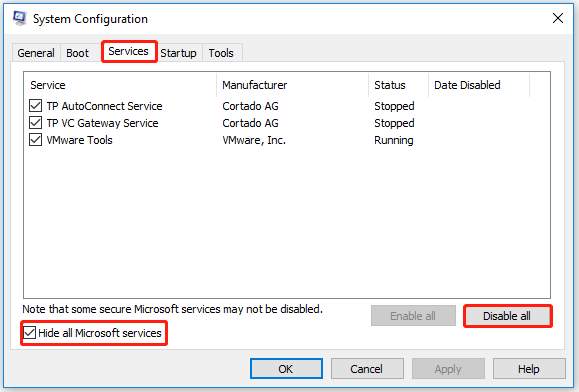
Step 4: Switch to the Services tab, and then tick the Hide all Microsoft services box.
Step 5: Click on the Disable all > Apply > OK button to disable all non-Microsoft services.
Once done, reboot your computer and check if the error disappears.
Fix 3. Perform the CHKDSK Scan
Using CHKDSK is also one solution to fix the “could not configure disk space used for system protection Windows 10” issue. To run CHKDSK in Windows 10/11, you can follow the steps below:
Step 1: Type cmd in the Search box. Then right-click Command Prompt to select Run as administrator.
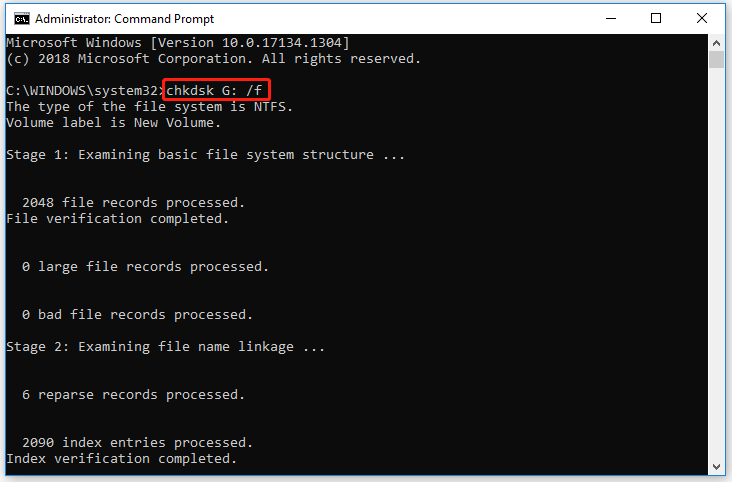
Step 2: In the Command Prompt window, type the chkdsk G: /f command and press Enter. “G” represents the hard drive partition letter.
Fix 4. Run the SFC and DISM Tools
You can try running the System File Checker (SFC) and Deployment Image Servicing and Management (DISM) tools to identify and repair any corrupt system files. If any corruptions are found, SFC will replace those with their cached copies which are saved locally in Windows. To run SFC, you can follow the steps below.
Step 1: Open Command Prompt as administrator as the steps above.
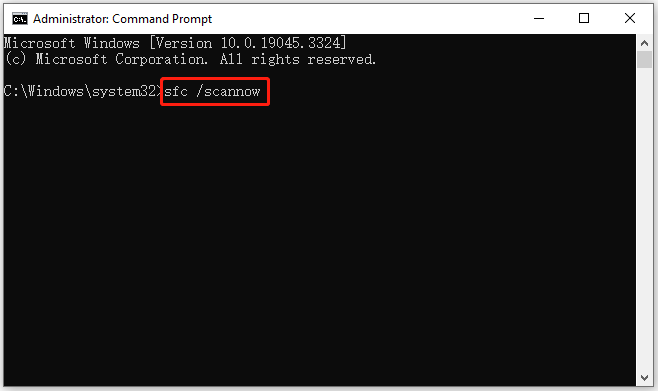
Step 2: In the Command Prompt window, type sfc /scannow and press Enter.
Step 3: When the SFC tool completes its task, type DISM.exe /Online /Cleanup-image /Restorehealth and press Enter.
Step 4: Wait patiently until the process is completed.
Fix 5. Configure Necessary Services
System Restore works primarily with Volume Shadow Copy Service (VSS). If this service has stopped running, you may encounter the “could not configure disk space used for system protection” issue. You can use Windows Services Manager to check the status of a service. To do that, here’s the guide.
Step 1: Type services in the Search box. Then right-click the Services app to select Run as administrator.
Step 2: In the Services window, locate the Volume Shadow Copy service. Then right-click on it, and select Restart. If the service is disabled, double-click it to open its properties window.
Step 3: Set the Startup type to Automatic and click on the Start button.
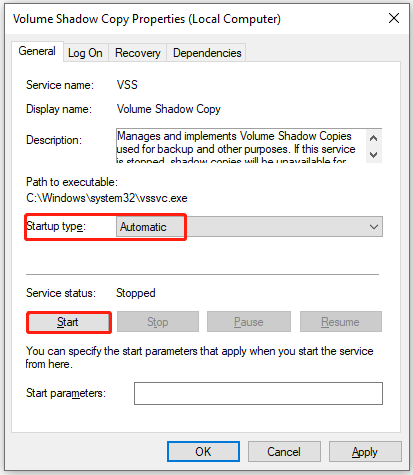
Step 4: Then click on the Apply > OK button to save the changes and exit the service properties window.
The Windows Backup service performs backup operations on the system. If restarting the Volume Shadow Copy service does not fix this problem, repeat the above steps for the Windows Backup service.
Fix 6. Re-register VSS Components
If the error persists after restarting the Volume Shadow Copy service, you’ll need to re-register the VSS components. This includes executing multiple commands in Command Prompt. Here’s how to do that using a batch file.
Step 1: Open Notepad and paste the following commands into a new file:
- cd /d %windir%\system32
- net stop vss
- net stop swprv
- regsvr32 /s ole32.dll
- regsvr32 /s oleaut32.dll
- regsvr32 /s vss_ps.dll
- vssvc /register
- regsvr32 /s /i swprv.dll
- regsvr32 /s /i eventcls.dll
- regsvr32 /s es.dll
- regsvr32 /s stdprov.dll
- regsvr32 /s vssui.dll
- regsvr32 /s msxml.dll
- regsvr32 /s msxml3.dll
- regsvr32 /s msxml4.dll
- vssvc /register
- net start swprv
- net start vss
Step 2: Click on File > Save as. In the Save as dialog box, select All Files in Save as type. Then type VSS.bat in the File name field and click on the Save button to save the file in a desired location on your PC.
Step 3: Right-click on the batch file and select Run as administrator. Then click on Yes in the User Account Control prompt that appears. Command Prompt will launch and execute all commands one after the other.
Once you have re-registered VSS components, close Command Prompt and try creating a restore point again.
Fix 7. Format the Target Disk as NTFS
System Protection requires the Windows NTFS file system to create and store shadow copies. If your target disk is not formatted to NTFS, conflicts may appear during the snapshot process. To fix this, you need to format the hard drive to NTFS. Formatting will destroy all data in the target partition, so you should back up data in advance.
To do that, you should take advantage of a third-party formatting tool to execute the operation. MiniTool Partition Wizard is a great choice. It’s a professional and reliable partition manager that provides you with a wide range of features to create/format/resize partitions, copy/wipe disks, migrate OS to SSD/HDD, etc.
MiniTool Partition Wizard FreeClick to Download100%Clean & Safe
To format the target drive as NTFS with this disk partition software.
Step 1: Launch MiniTool Partition Wizard to enter its main interface.
Step 2: Select the partition that needs formatting and choose Format Partition from the left panel.
Step 3: Set NTFS as File System and then click OK.
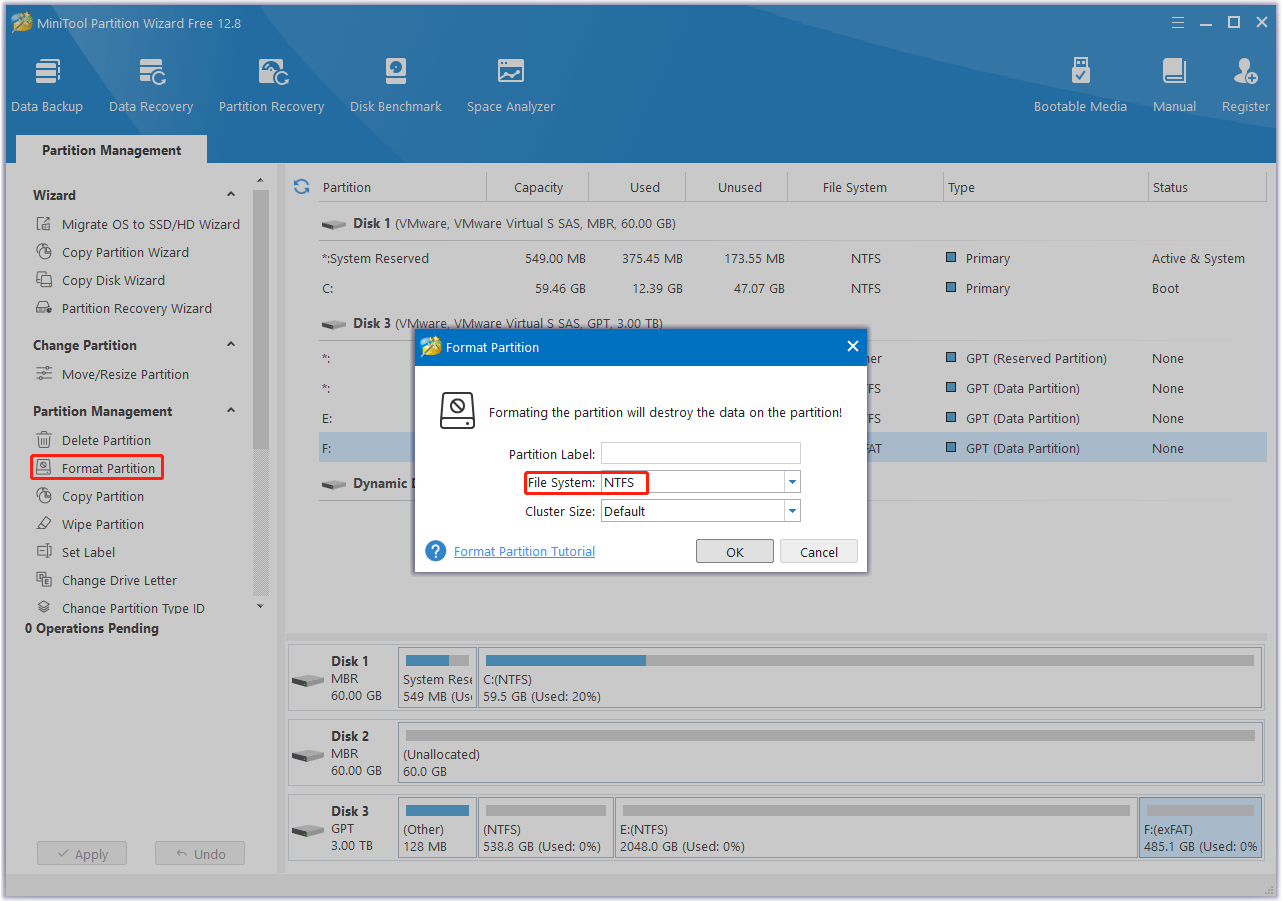
Step 4: Finally, click on Apply and then Yes to save the pending changes.
Bottom Line
When faced with the “could not configure disk space used for system protection Windows 10” issue, you can try to fix it with the above methods. Hope this article can help you solve this issue. If you run into some problems during the fixing process, you can leave them in the following comment zone.
Certainly, if you have any questions about or suggestions for MiniTool Partition Wizard, please do not hesitate to contact us via [email protected].