It is very common to encounter the high disk usage issue on Windows PCs. The typical symptoms of this issue include extremely slow operations, long load time, and disk failure. In addition to that, Windows and installed programs on the PC will become lagging and less responsive.
High disk usage means that the applications and software stored on the disk surpass 95% of the total disk capacity.
Recently, plenty of users complains disk at 99 issue as their system shuts down or restarts because of that. What causes Windows 10 disk usage 99? Please read the next section.
Why Is My Disk Usage at 99
A lot of factors could lead to 99 percent disk usage Windows 10. Here, they are summarized as follows.
- Virus infection
- Corrupt software like Superfetch
- Corrupt hard drives
- Unwanted files and folders consuming memory
- Intel Rapid Storage Technology
- Virtual memory misconfigurations
- Auto-scheduled Windows defragment tasks
- Windows search indexes
- Multiple programs running at the same time
Based on the above causes, we would like to offer you the following Windows 10 99 disk usage fixes.
Fix Nvidia Container High GPU/Memory/Disk Usage [6 Solutions]
How to Lower Disk Usage
Disk at 99? How to lower disk usage? Well, this post summarizes top 8 methods to help you fix disk usage 99% or decrease disk usage.
Method 1: Perform a System Virus Scan
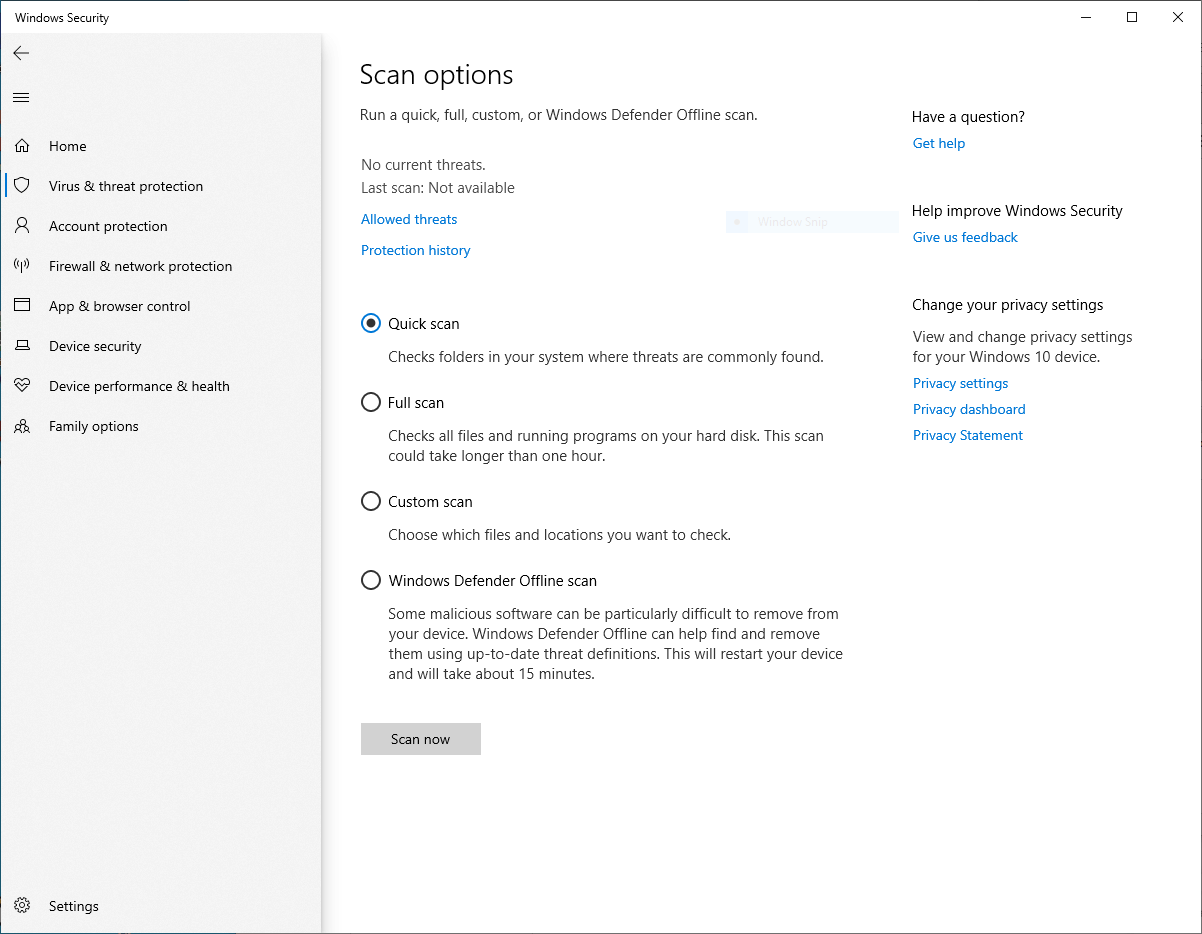
You should conduct a virus scan on your computer after the disk usage 99% issue occurs. You can do that by using the built-in utility Windows Defender or third-party anti-virus software like McAfee or Avast. The guide below shows you how to scan for viruses via Windows Defender.
Step 1: Open Settings by pressing Windows and I keys.
Step 2: Tap Update & Security > Windows Security > Virus & Threat Protection.
Step 3: Click Scan Options and then choose Quick Scan, Full Scan, Custom Scan, or Windows Defender Offline Scan based on your demands.
Step 4: After that, click Scan Now to start the process.
Method 2: End Processes via Task Manager
Task Manager displays the general resource usage and the services & processes running on your computer. From here, you can see what is taking up the disk usage and then end the process. For doing that, follow these steps.
Step 1: Right-click on the Windows icon and click Task Manager from the prompted start menu.
Step 2: Pay attention to the Disk Usage column in the Task Manager window to see which process consumes the highest disk space.
Step 3: Right-click that process and click End task. You can directly do that in general cases. As for a few specific conditions, please refer to the guides below.
Further reading:
If the target process is a critical Windows process like svchost.exe, you are not allowed to kill it as it is vital to keep the system running properly. In this case, it is recommended to perform a clean boot. Alternatively, you can do a clean install to fix the issue.
If browsers like Chrome and Firefox occupy the maximum disk usage, you should update the browser first. If the poorly coded extension or add-on is the fault, type your browser’s name in the search box and select New Incognito Window.
Then open Task Manager to see if the disk usage drops down. If it does, uninstall the browser and then download and install the latest version of browser. If it doesn’t, remove the extensions one by one and restart the browser each time until the disk at 99 issue disappears.
Also read: 3 Solutions to GSvr.exe High CPU Usage in Windows 10/11
Method 3: Find and Delete Unnecessary Files
Unnecessary items like junk and duplicate files can consume much disk space. To clean up your computer, you need to find these junks and duplicates with a space analyzer like MiniTool Partition Wizard and then remove them. Here’s the tutorial for you.
Step 1: Download and install MiniTool Partition Wizard by clicking the button below and following the on-screen instructions.
MiniTool Partition Wizard FreeClick to Download100%Clean & Safe
Step 2: Launch the application and then click Space Analyzer on its tool bar.
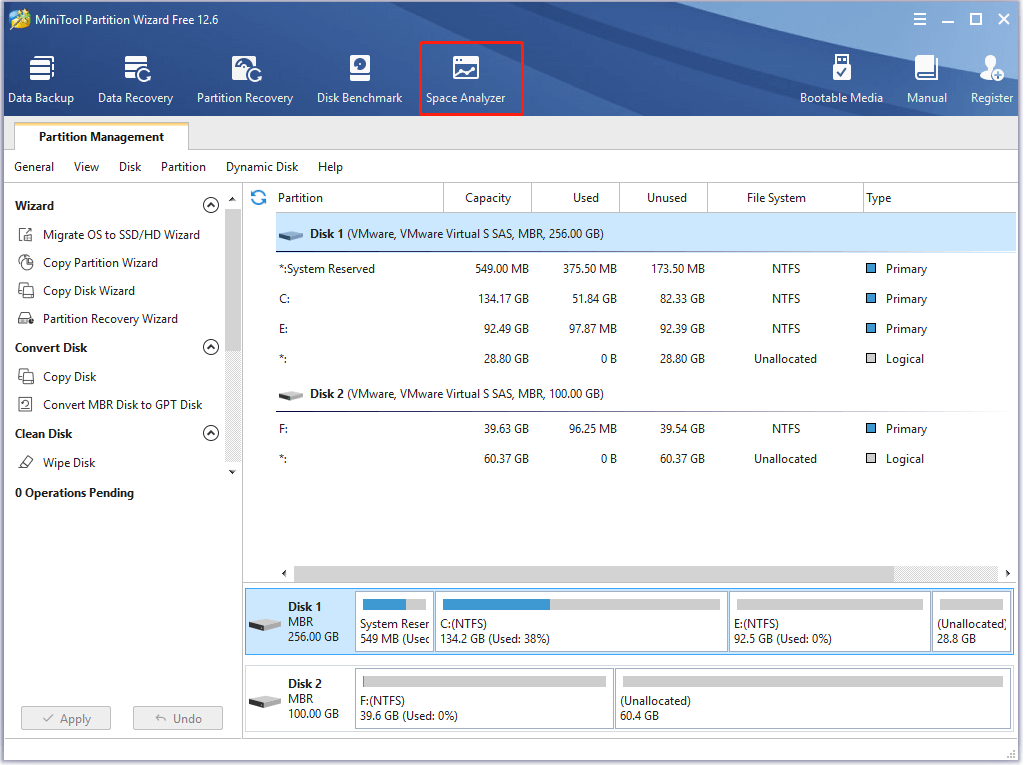
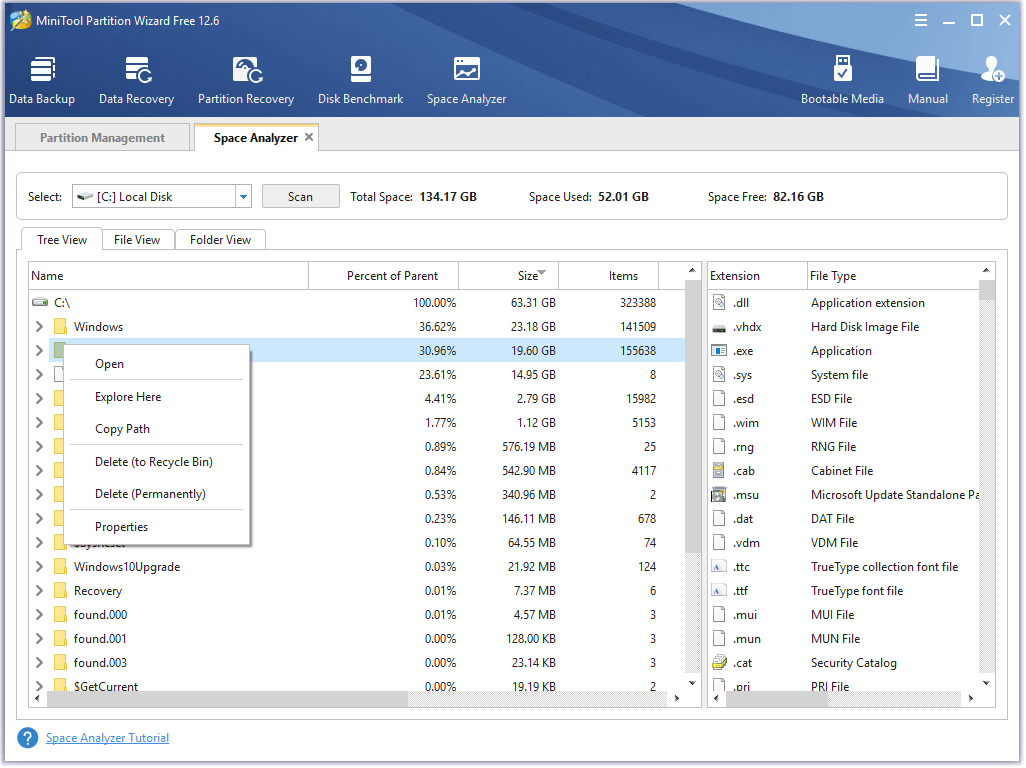
Step 3: In the pop-up window, choose a drive letter or folder from the drop-down menu and click Scan to start the process.
Step 4: After the scan process ends, it will show you the results. You can switch the display mode between Tree View, File View, and Folder View. Once you find the space-consuming and useless files or folders, right-click on them and click Delete (to Recycle Bin) or Delete (Permanently).
Also read: 9 Best Duplicate File Finders Help You Find Duplicate Files
Method 4: Disable Superfetch
If you find that Superfectch is slowing down your computer, you should disable it via the steps below.
Step 1: Open the Run window by pressing Windows and R keys, and then type services.msc and click OK. By doing so, you can open the Windows Service Manager.
Step 2: Scroll down the services to find the Sysmain entry. Then double-click on it and set the status of the Startup type to Disabled.
Step 3: After clicking OK to confirm the changes, reboot your PC.
Method 5: Disable Windows Defrag
Try disabling Windows Defrag if you don’t find any process tagged at Task Manager after the Windows 10 disk usage 99% issue occurs. To do that, you can follow these steps.
Step 1: Input Task scheduler in the search box and click Open under the program.
Step 2: In the Task Scheduler window, locate to Task Scheduler Library > Microsoft > Defrag.
Step 3: Click Disable and then restart your computer.
Get Warzone Unlock All Tool to Unlock Warzone/MW/CW
Method 6: Clean Boot the Computer
Clean boot means that you start Windows with a minimum number of drivers and applications. By doing so, you can identify if the background program interferes with your PC. It’s like the process of starting Windows with safe mode, but it offers you greater control over the applications and services.
Well, you can follow the guide below to perform a clean boot.
Step 1: Open the Run dialog by pressing Windows and R keys.
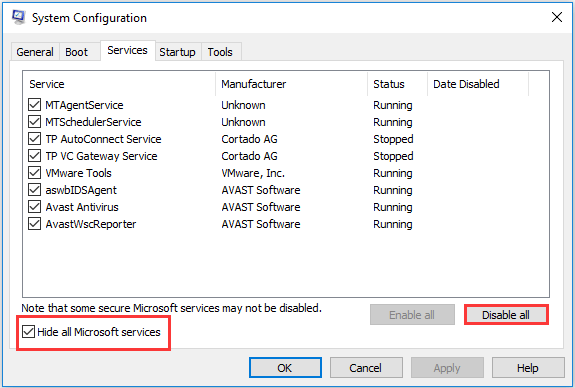
Step 2: Enter msconfig and click OK or hit Enter. This will open the System Configuration window.
Step 3: Navigate to the Services tab, and then select Hide all Microsoft services and click Disable all.
Step 4: Switch to the Startup tab and click Open Task Manager.
Step 5: Right-click on the enabled startup item and click Disable. Repeat this operation until all the enabled startup processes are disabled.
Step 6: Close Task Manager and click OK under the Startup tab. Then your computer will enter the clean boot environment.
If you are prompted to restart, click Restart to confirm the operation.
How Long Does It Take to Reset a PC? Find Answers and Speed Up It
Method 7: Uninstall Intel Rapid Storage Technology
If your computer is an Intel-based one, it might be preinstalled with Rapid Storage Technology. It boosts performance and reliability with SATA hard drives, reduces power consumption, and extends the battery life of your PC through its Link Power Management.
Nevertheless, these features can cause your disk usage to max out. You can fix the disk at 99 issue by turning off Link Power Management in the settings of the app. Alternatively, directly uninstall Rapid Storage Technology via Control Panel.
Since Windows already has features to communicate with hard drives and SSDs, any gains from additional software will be minimal. However, you are required to go to the UEFI/BIOS utility and set your HDD connection type to AHCI if it’s on IDE after uninstalling Rapid Storage Technology.
AHCI refers to Advanced Host Controller Interface, while IDE stands for Integrated Drive Electronics. To know the difference between the two modes, click AHCI vs IDE.
Method 8: Replace the Hard Drive with a New One
The last resort to 99 percent disk usage Windows 10 is to replace the broken hard drive with a new one. Before that, you’d better back up the data on the original drive. Then, MiniTool Partition Wizard comes in handy again.
You can easily make a backup with the Copy Disk and Migrate OS to SSD/HD features of MiniTool Partition Wizard. Here’s the tutorial for you.
MiniTool Partition Wizard DemoClick to Download100%Clean & Safe
Step 1: Connect the new hard drive to your computer and then launch MiniTool Partition Wizard to enter its main interface.
The new hard drive should have a capacity that is larger than that of the original disk.
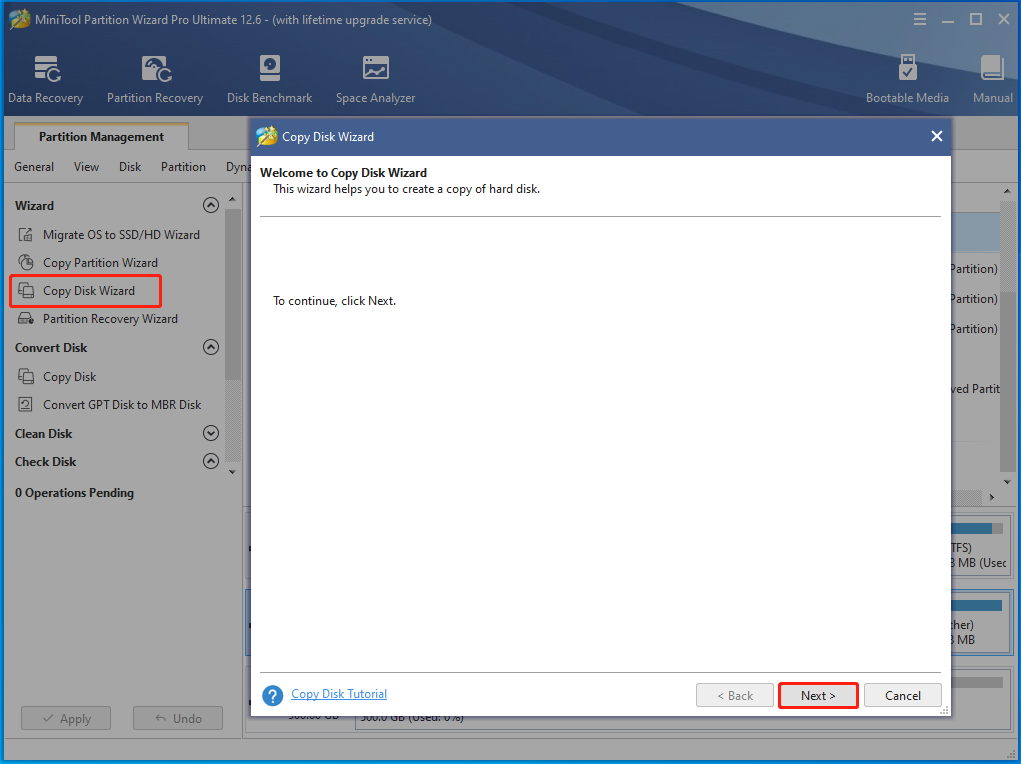
Step 2: Click Copy Disk Wizard in the action panel and then tap on the Next button in the pop-up window.
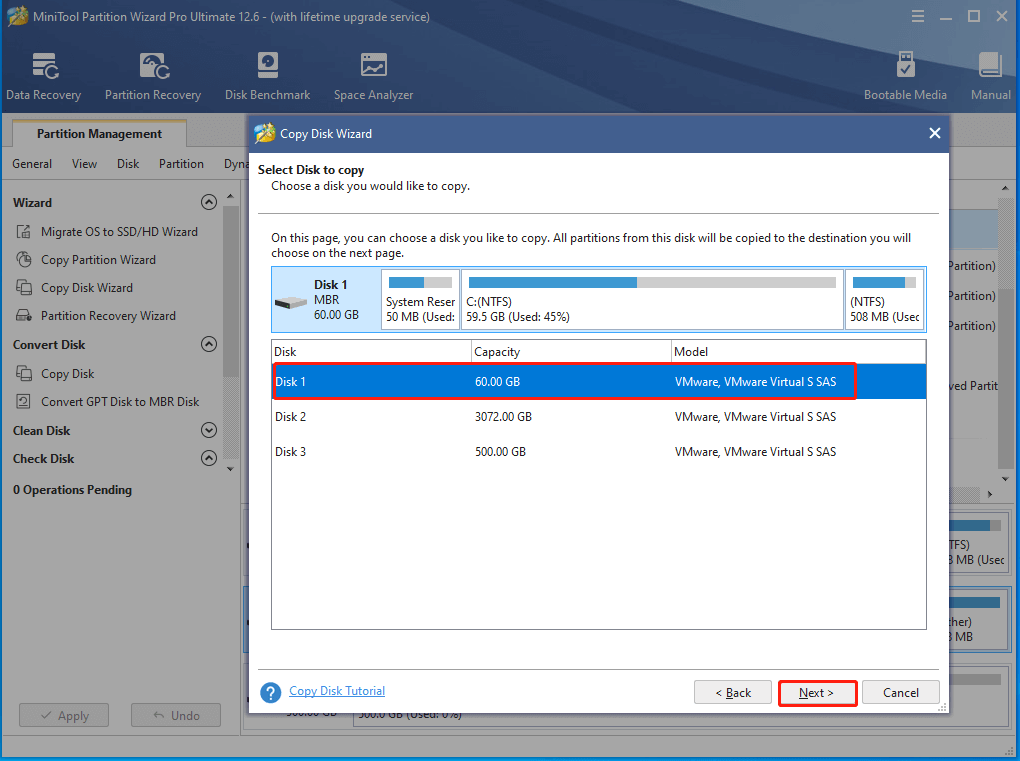
Step 3: Click the original disk and then click Next.
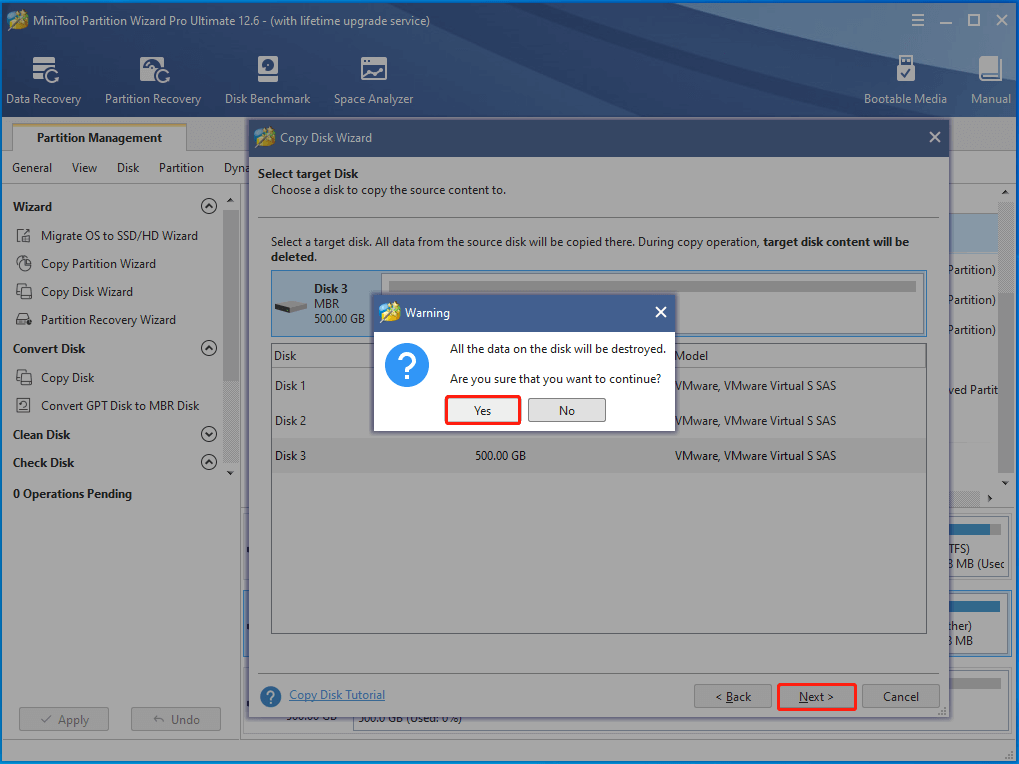
Step 4: In the next window, click on the connected hard drive and click Next.
In the prompted warning window, click Yes to continue the copy process.
Step 5: Pick copy options based on your needs and click Next.
Step 6: Tap Finish to complete the configuration process and then click Apply to execute the pending operation.
Step 7: Power off the computer, and then take out the original disk and put the new disk into the PC. Reassemble the computer and turn on it.
You may also like this: 12 Tips for 100% Disk Usage on Windows 10 Task Manager (2022)
Bottom Line
To sum up, this post mainly includes the causes and troubleshooting methods for the 99 percent disk usage Windows 10 issue. If you are looking for a Windows 10 99 disk usage fix guide, this post is what you need.
If you have other ways to solve the disk at 99 issue, you can share with us in the following comment area. For any problems with MiniTool Partition Wizard, directly send us an email via [email protected].
