What Is Steam Deck?
Steam Deck is a newly announced handheld gaming computer, originally announced on February 25, 2022. It is developed by Valve. Like the Nintendo Switch, you can use the Steam Deck as a handheld or connect it to a monitor and use it to play games.
It’s an x86-64-v3 device running SteamOS with an integrated game input designed to play the full Steam library, including Windows PC games via the Linux-based Proton compatibility layer. The system is an open platform that allows users to install compatible non-Steam games or operating systems on the device.
Also read: Steam Deck FPS: How to See It & Best FPS Games
Why Connect Steam Deck to PC?
The main reason to connect Steam Deck to PC is to transfer files. You can transfer media files, including photos and movies, and then access them through desktop mode. You can also transfer game mods and other stuff you can’t get through Steam.
If your Steam Deck is on the same network and your PC is running Steam, you can also connect Steam Deck to PC through Steam. This doesn’t allow you to transfer files, but it allows you to stream games to your Steam Deck that is connected on your PC.
If you have a powerful gaming PC and a fast home network, this lets you play games without installing them on Steam Deck. It’s also the easiest way to play modded games on Steam Deck, since you just have to mod the game on your PC, then stream it.
To stream a game from your Steam Deck to your PC, open the game from your library on Steam Deck, click the down arrow next to the Install button, and select your PC from the list. The install button will turn into a streaming button, which you can tap to start playback.
Also read: The Best Steam Deck Games You Can Play
How to Use Steam Deck on PC?
The two ways to use Steam Deck on PC are to transfer files between them or to use Steam Deck to stream Steam games installed on PCs. Streaming games is a simple process that only requires connecting both devices to the same network. However, transferring files is much more complicated.
The Steam Deck is a mobile device, but you can’t connect it to your PC via USB like you can with a phone or tablet.
These are the three best options for transferring files between Steam Deck and PC:
- File Transfer Application: Warpinator is a file transfer application that works on Steam Deck and Windows. If you have it installed on both Steam Deck and PC, you can transfer files over your home network.
- Portable Media: USB flash drives and Micro SD cards can be read by your Steam Deck as long as they are properly formatted.
- Network Drive: If you have a Network Attached Storage (NAS) device, you can access it from your Steam Deck and PC and transfer files this way.
Option 1: Connect Steam Deck to PC Using Warpinator
Warpinator is an application available on your Steam Deck through the pre-installed Discover Software Center. Windows and Linux users can transfer files from PC to Steam Deck via Warpinator.
If you install Warpinator on Steam Deck and Winpinator on PC, you can send files between the two. Steam Deck and PC need to be connected to the same network, transfer speed is limited by your local Wi-Fi speed.
Here’s how to connect Steam Deck to PC using Warpinator:
Step 1: Hold down the Power button on your Steam Deck and select the Switch to Desktop option.
Step 2: Tap the Steam Deck icon in the lower right corner, and then click Discover.
Step 3: Type Warpinator in the Search box.
Step 4: When the search result appears, click the Install button. Then click Launch.
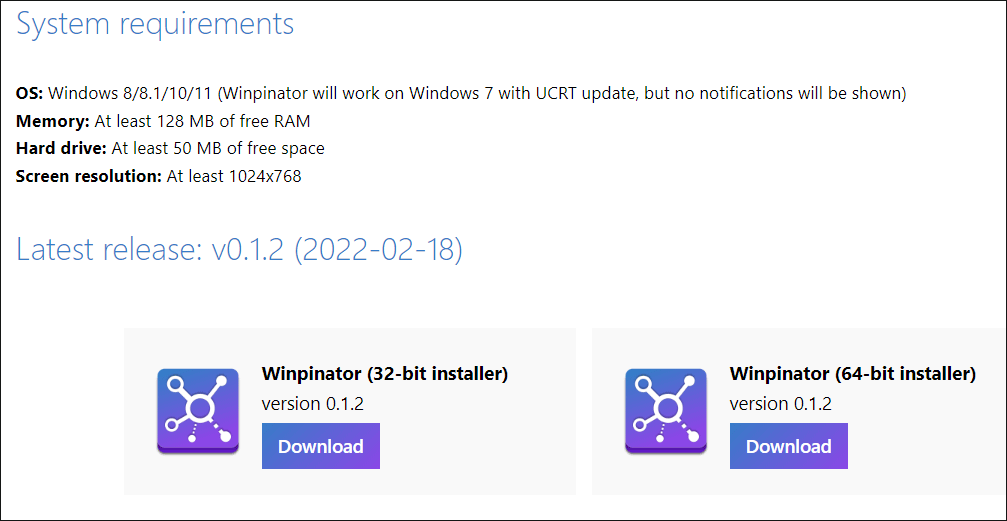
Step 5: Open the Warpinator download site on your computer, click the Download button and install the application.
Warpinator has its system requirements and you should select the correct operating system (32-bit or 64-bit).

Step 6: Access Warpinator on PC and Steam Deck.
Step 7: On your PC, select Steam Deck as the device to receive data from.
Step 8: Click Send files or Send a folder, and then select the file or folder you want to move to your Steam Deck.
Step 9: When you see Awaiting approval from Steam Deck User, switch to your Steam Deck and click your PC username in Warpinator.
Step 10: Click the check mark. Then when you see Completed, the files are now on your Steam Deck.
Click Send files in Warpinator of Steam Deck to reverse this process and transfer files from Steam Deck to your PC.
Also read: How to Use External Controllers on Steam Deck
Option 2: Connect Steam Deck to PC Using USB Drive or SD Card
You can use an SD card or USB flash drive to transfer files between the Steam Deck and your PC, with some limitations. If you’re currently using a Micro SD card to expand your Steam Deck’s storage, you won’t be able to use that card to transfer files.
In order to use an SD card as storage for your Steam games, your Steam Deck will format the card in a format your PC cannot use. That means you’ll need a separate SD card or USB drive if you want to transfer files via this method.
To transfer files between the Steam Deck and a PC card using this method, first format your SD card or USB card to the exFAT file system on your computer. This is a file system that both Windows and Linux can read and write, so you can transfer files in both directions.
How to Format SD card or USB Drive as exFAT?
There are various ways to format SD card or USB drive on PC. For example, you can format them through Windows built-in tools such as File Explorer, Disk Management, and Diskpart, or through MiniTool Partition Wizard (an all-in-one partition manager for Windows OS).
Note: Formatting the SD card or USB drive will cause data loss. So, make sure there is no important file on the SD card or USB drive. Otherwise, please back up important data in advance.
MiniTool Partition Wizard can format drives as ext3 and ext4. Moreover, it can format drives over 32GB into the FAT32 file system, which cannot be done by Windows tools.
Format SD Card or USB Drive via MiniTool Partition Wizard
How to format SD card or USB drive on PC? Using MiniTool Partition Wizard requires several steps, steps are as follows:
MiniTool Partition Wizard FreeClick to Download100%Clean & Safe
Step 1: Connect the SD card or USB flash drive to your PC. To connect the SD card to the PC needs an SD card reader.
Step 2: Launch MiniTool Partition Wizard to access its main interface.
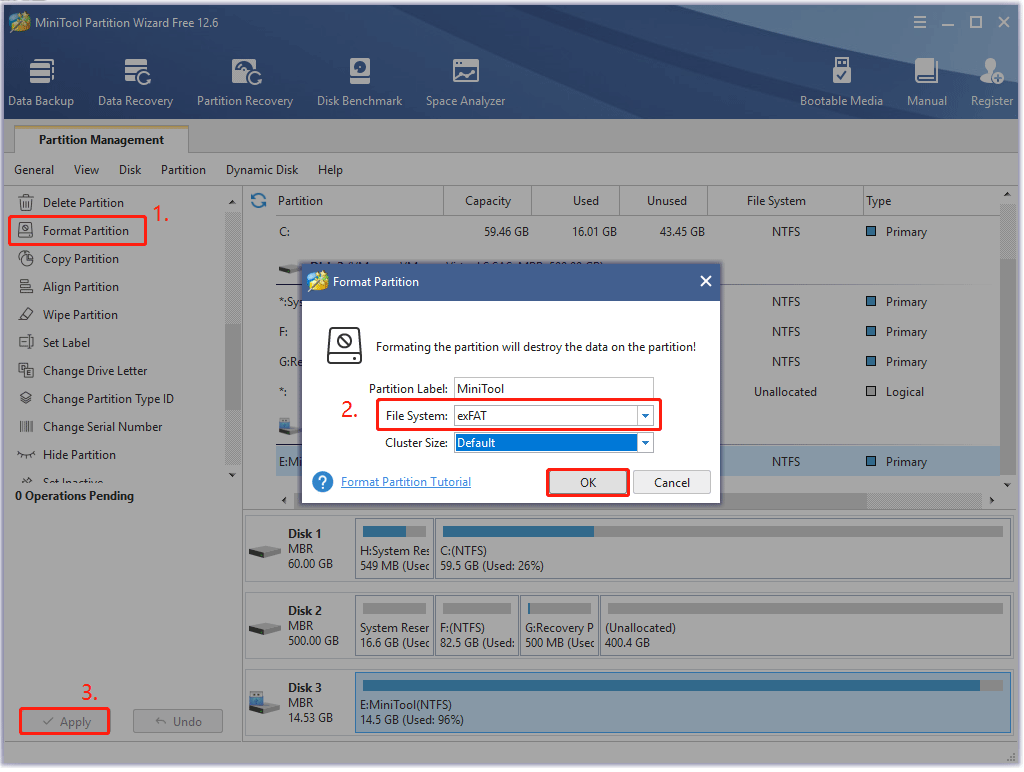
Step 3: Highlight the partition on the SD card and select the Format Partition function from the left pane.
Step 4: Select exFAT from the File System drop-down menu and click the OK button.
Step 5: Click the Apply button on the software interface to perform the formatting task.

Format SD Card or USB Drive via File Explorer
To format an SD card or USB drive on PC via File Explorer, you need to follow these steps:
Step 1: Press the Windows + E key to access File Explorer.
Step 2: Scroll down the left side of the window until you see your USB drive or SD card in the list of drives.
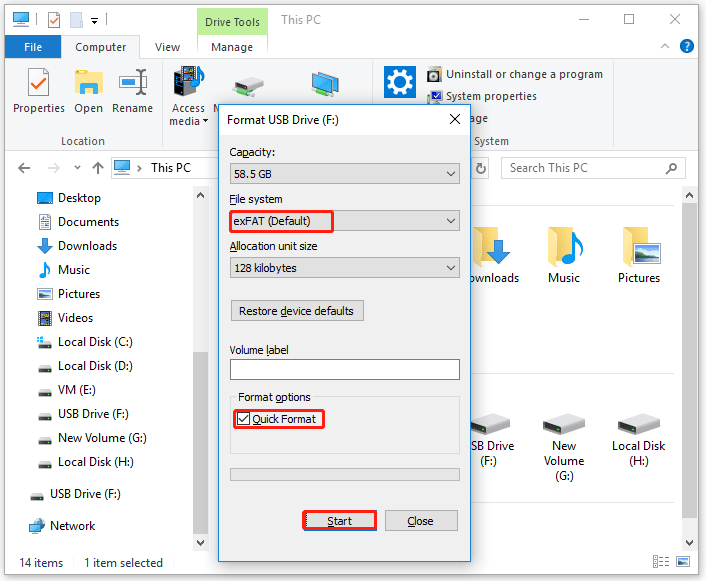
Step 3: Right-click on the drive and select the Format option.
Step 4: In the Format USB Drive window, select exFAT file system, tick the Quick Format checkbox, and click the Start button.

Once formatted, you can take the files from your PC onto the SD card or USB drive, then connect the SD card or USB drive to your Steam Deck, and transfer the files.
Your Steam Deck needs to be in desktop mode to transfer files via Micro SD or USB stick. Make sure to remove the card when you're done. Switching back to game mode with the Micro SD card or USB flash drive still inserted may cause the device to format it.
Option 3: Connect Steam Deck to PC Using Network Drive
NAS (Network Attached Storage) devices can also transfer files from your PC to the Steam Deck. Steam Deck owners can copy files from network storage and access them on their laptops.
To transfer files from a PC to Steam Deck via a NAS device, switch to desktop mode on Steam Deck and follow the steps below:
Step 1: Open Dolphin File Explorer.
Step 2: Select Network.
Step 3: Select a NAS device to access files on Steam Deck.
If you have set up Samba shares on your PC, you can access them using the same method. Open Dolphin File Explorer and you’ll find the Samba share in Network > Shared Folders (SMB).
Also read: Steam Deck vs PS5: Which One is Better for Playing Game?
Bonus: How to Connect Steam Deck to TV or Monitor
Want to use your Steam Deck on the big screen? While Steam Deck is primarily for gaming on the go, there may be times when you want to use it as a stationary device on your desktop or play on a big screen so you can enjoy an optimized big-screen experience.
To connect Steam Deck to a monitor or TV, just follow these steps:
You need an HDMI to USB-C adapter. Plug the HDMI cable into your TV or monitor, plug the adapter into the USB-C port on the Steam Deck, then connect the HDMI cable to the HDMI end of the adapter.
What’s Your Opinion?
This post mainly focuses on how to connect Steam to PC. In addition, we also introduce how to connect Steam Deck to TV or monitor. If you have any ideas about this topic, you can leave them in the following comment zone.
If you have any suggestions or need any help when you use MiniTool Wizard Partition, you can send us an email at [email protected] or leave a comment below. Thank you in advance.