Lenovo is a famous PC brand. Some people may want to upgrade from an HDD to an SSD or from an SSD to another one on Lenovo laptops or desktops. This post from MiniTool offers a detailed guide on the Lenovo SSD upgrade.
When Do You Need to Upgrade Lenovo SSD?
Lenovo is a Chinese multinational technology company specializing in designing, manufacturing, and marketing consumer electronics, personal computers, software, business solutions, and related services.
Products manufactured by the company include desktop computers, laptops, tablet computers, smartphones, workstations, servers, supercomputers, data storage devices, IT management software, and smart televisions.
Its best-known brands include its ThinkPad business line of laptop computers, the IdeaPad, Yoga, LOQ, and Legion consumer lines of laptop computers, and the IdeaCentre, LOQ, Legion, and ThinkCentre lines of desktop computers.
Some people may want to do a Lenovo SSD upgrade for the following reasons:
- Their Lenovo PCs are still using an HDD. Some Lenovo models like the Lenovo V15 Gen 4 laptop still use the SATA HDDs, and many Lenovo desktop PCs support the 3.5-inch SATA drives, not to mention some old Lenovo computers. If they are experiencing slow boot times or lagging applications, they may want to upgrade to an SSD.
- The space on the SSD is not enough, especially if they play games or edit videos. On the other hand, the computer doesn’t have an idle hard drive slot. Then, they need to upgrade SSD on Lenovo laptops or desktop PCs.
- The original SSD is to be failing. They may notice some signs of hard drive failure and want to replace the SSD with a new one.
Check for SSD Compatibility on Lenovo PC
If you want to do the Lenovo SSD upgrade, you need to know what type of SSD your computer supports. To know that, you can take the following measures:
- Check your computer’s specifications and motherboard manual to see what type of SSD it supports.
- Open Device Manager > Disk drives to find the model of the hard drive your PC uses. Then, search for the model online to know the interface and form factor of this hard drive. Then, you can purchase an SSD with the same interface and form factor.
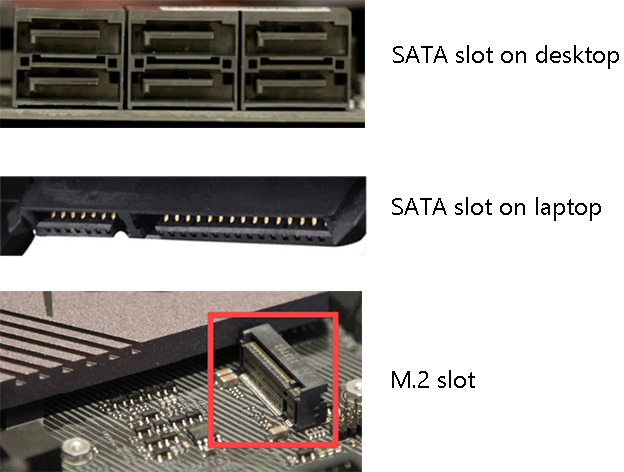
- Disassemble the computer or the chassis to see the hard drive bay, especially the hard drive slot. Lenovo PCs usually support SATA hard drives and M.2 NVMe SSDs. You just need to know what they look like.
Clone the Lenovo to the New SSD
In most cases, when you upgrade SSD on Lenovo laptops or desktops, there should be some data on the original hard drive. Then, you can use the disk cloning method to make an exact copy of the entire content from the hard drive onto the new SSD. Then, replace the hard drive with the new SSD.
How to clone the hard drive to the new SSD? Some SSDs may include a data migration program offered by the SSD manufacturers. If your SSD has such a program, you can use this software to clone the hard drive.
- A Full Guide to Using Samsung Data Migration Software for Windows
- WD and Crucial use Acronis True Image
If your SSD doesn’t have such a program, you can try MiniTool Partition Wizard. This software can clone HDD to SSD, partition hard drives easily, format FAT32 on USB drives and SD cards, convert MBR to GPT without data loss, etc.
How to use MiniTool Partition Wizard to clone Lenovo to a new SSD? Here is the guide:
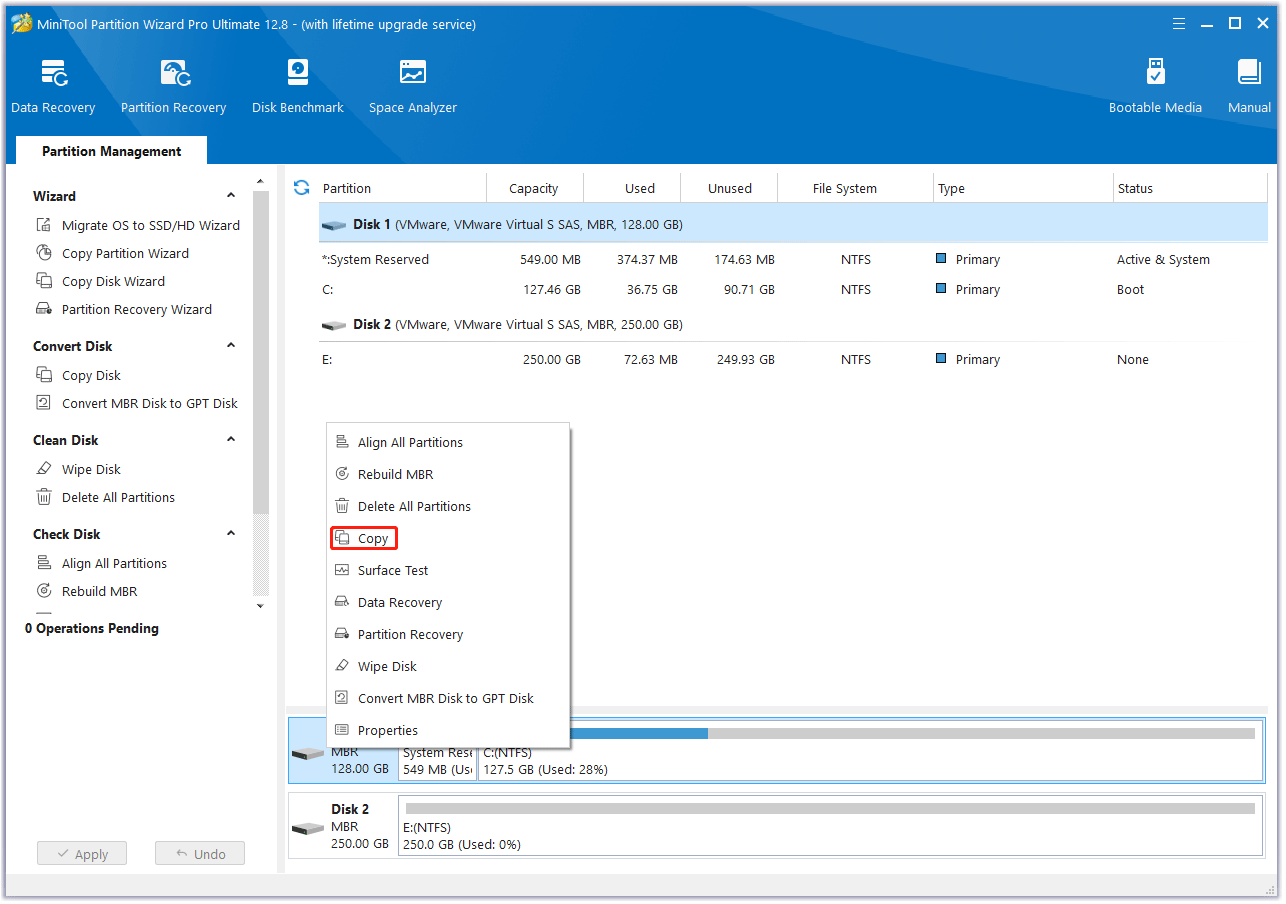
Step 1: Connect the new SSD to your computer via a USB to M.2 or SATA adapter. Then, install MiniTool Partition Wizard and launch it on the computer. Right-click the hard drive that you want to clone and then select Copy from the menu. If the hard drive doesn’t contain a system, the Copy feature is free.
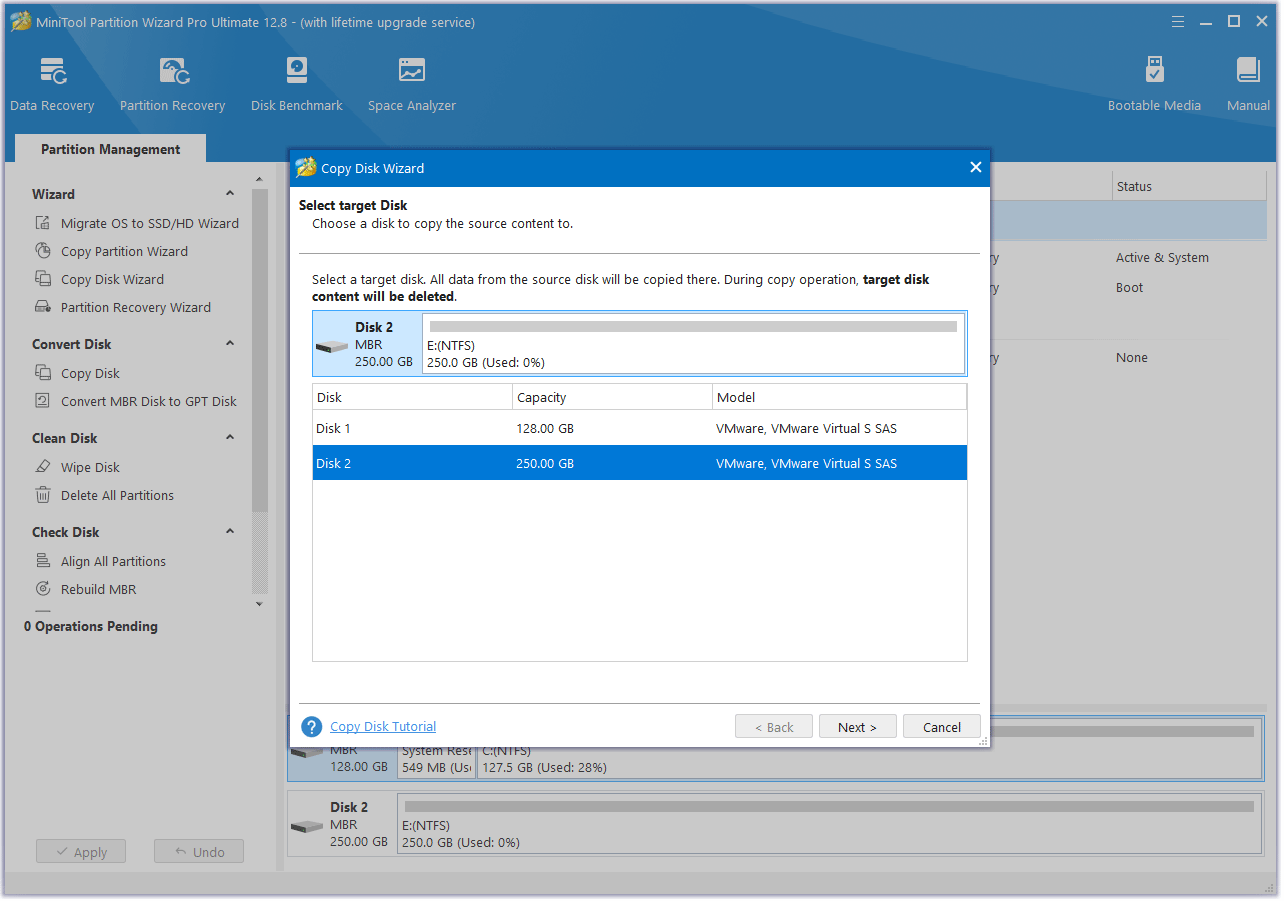
Step 2: On the pop-up window, select the new SSD as the target disk and then click Next. Click OK when it asks you whether you are sure to continue. Note that all data on the new SSD will be destroyed.
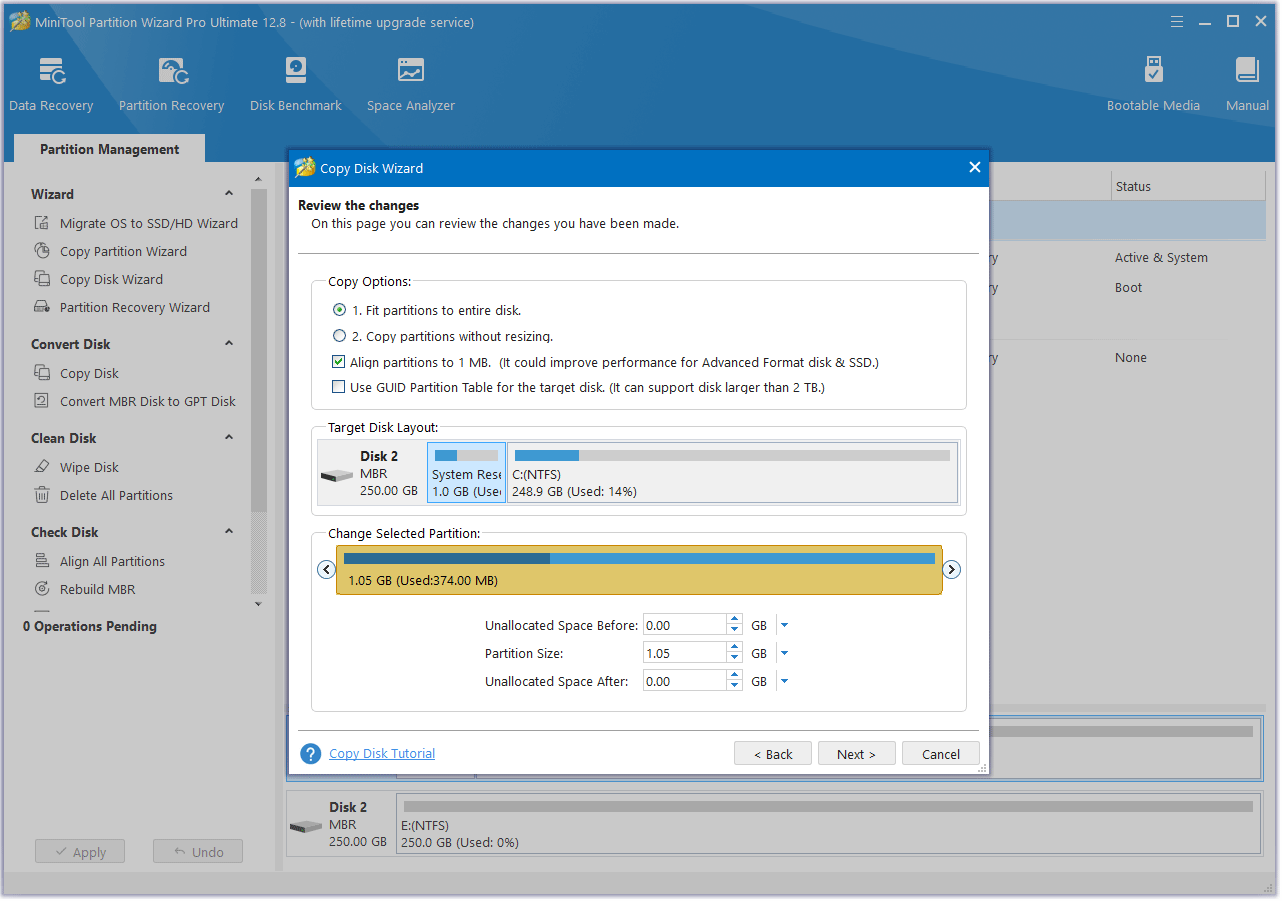
Step 3: Review the Copy Options and Target Disk Layout. If all is OK, click Next.
2. If the original hard drive is an MBR disk, but you want the cloned SSD to be a GPT disk, you can choose the Use GUID partition table for the target disk option.
3. Under the Change Selected Partition section, you can resize or move the partition according to your needs.
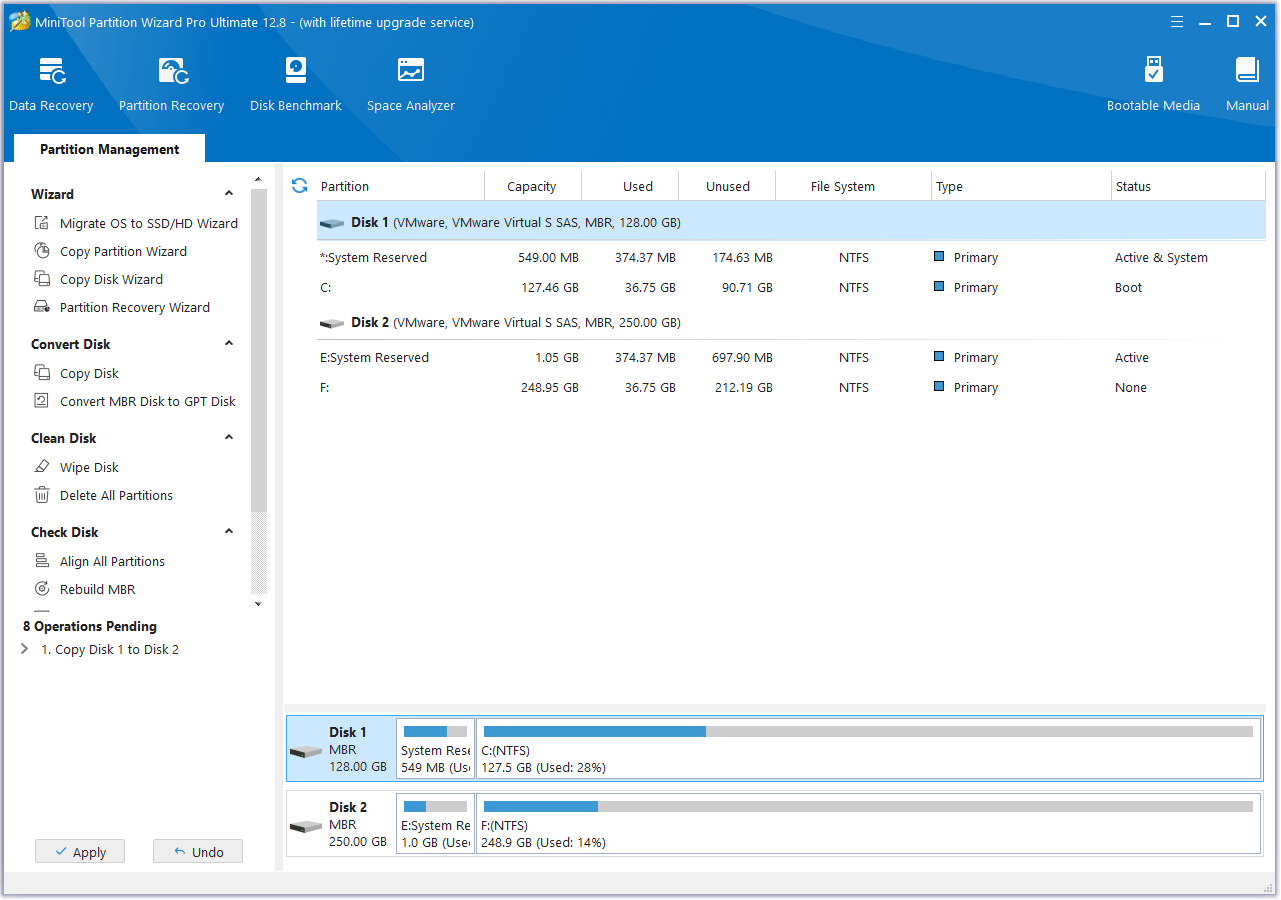
Step 4: Read the NOTE information and then click Finish. Then, click the Apply button to execute the pending operation. Wait until the cloning process is completed.
Install the Cloned SSD on the Lenovo PC
In this part, I will show you how to install SSD on Lenovo laptop and desktop separately.
How to Install SSD on Lenovo Laptop
To replace the old hard drive with the cloned SSD on a Lenovo laptop, you can refer to the following steps.
Step 1: Remove the bottom panel of the laptop.
- Disconnect the power cable from the laptop and turn off the laptop.
- Place the laptop’s bottom side up and then use a screwdriver to remove all screws that fasten the back of the laptop.
- Now, you need to get the plastics back off. To do that, you can use your fingernails, but I recommend you use tools like a plastic pry pick so that the job will be easier.
- After the bottom panel is removed, you can see the motherboard. Find the location of the hard drive. The hard drive bay may be shielded by a metal lid.
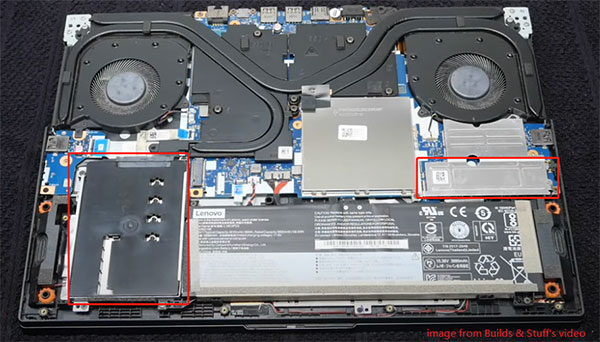
Step 2: Replace the M.2 SSD.
- Remove the metal lid covered on the M.2 hard drive bay. To do that, you may need to remove some screws on the metal lid.
- Remove the screw on the original M.2 SSD and the SSD will be tilted. You can then remove it.
- Install the new M.2 SSD and then fasten it. Then, put back the metal lid and then fasten it.

Step 3: Replace the SATA SSD.
- Remove the metal lid covered on the SATA hard drive bay and then place the SATA SSD into the bay.
- Put back the metal lid and then fasten it so that the SATA SSD can be fastened at the same time.
Step 4: Put back the bottom panel and then fasten these screws.
How to Install SSD on Lenovo Desktop
Installing an SSD on a desktop will be much easier. You can refer to this guide:
Step 1: Disconnect the power to the chassis. Remove some fasteners on the front cover of the chassis and then nudge the cover to the side.
Step 2: Install the M.2 SSD. The way is similar to that on the laptop. You just need to find the M.2 slot on the motherboard and then install the M.2 SSD.
Step 3: Install the SATA SSD.
- Find the hard drive cage and then detach the mounting bracket.
- If you are using a 2.5” drive bay, attach the SATA SSD by aligning the mounting screw holes on the bracket with the holes on the SSD and then mount the SSD in the drive bay.
- If you are using a 3.5” drive bay, you can also fasten the SSD on the bracket directly. But if you can’t do that, you may need a 2.5” to 3.5” convertor. Then, place the SSD back in the cage.
- Attach one end of the SATA cable to the SSD and the other end to the SATA connector on the motherboard (an L-shaped connector).
- Use the SATA power cable that is connected to the power supply and attach it to the SSD.
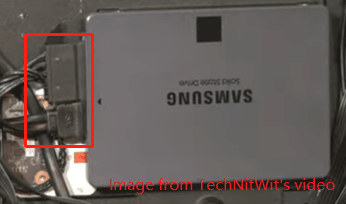
Step 4: Put the computer case panel back onto the desktop and fasten the screws.
Set the New SSD as Boot Drive on the Lenovo PC
Do you want to set the new SSD as the boot drive? If so, you can refer to the following guide:
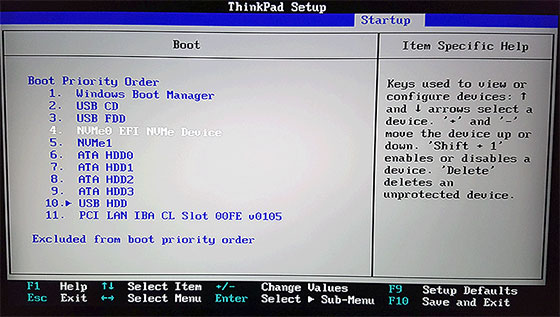
- Power on the Lenovo computer and then press the BIOS key (F1, F12 or Fn + F12) immediately to enter the firmware.
- Navigate to the Boot menu using the arrow keys on your keyboard.
- Select the new SSD using the arrow keys.
- Press the “+” or “–” key to move the SSD to the top of the boot priority list.
- Save the changes and exit the BIOS setup by pressing the appropriate key (for example F10 or ESC).
Bottom Line
When do you need a Lenovo SSD upgrade? How to check SSD compatibility? How to clone the hard drive to the new SSD? How to install SSD on Lenovo laptops and desktops? This post explains these questions.
When you clone the hard drive, MiniTool Partition Wizard is recommended. If you encounter issues when using this software, contact us via [email protected]. We will get back to you as soon as possible.
