If you have an MSI GE75 Raider laptop and are looking for the MSI GE75 Raider SSD upgrade guide, you can focus on this post. Here, MiniTool will show you the details about how to upgrade MSI GE75 Raider SSD.
Why Do You Upgrade MSI GE75 Raider Hard Drive?
MSI GE75 Raider is a high-end 17.3″ gaming laptop. This model packs much-improved gaming performance into a sleeker design. Paired with a 1080p/144Hz display, this MSI is an ideal platform for eSports and other fast-paced games.
This laptop has a large screen that ensures you get an immersive experience when playing games or watching videos. Its speakers support high-resolution audio technology to provide rich and clear sound, and its Dragon Center software allows you to easily customize different settings.
The MSI GE75 Raider is one of the best dual-storage laptops, which allows you to store more games, files, and videos than other laptops.
However, after using the MSI GE75 Raider for a while, the hard drive may run out of space, stop working, or run slowly. Therefore, it is necessary to upgrade MSI GE75 Raider hard drive to a better one. Here are three common reasons:
- To get more storage space.
- To get better performance.
- To get rid of hard drive failure.
Can you upgrade MSI GE75 Raider SSD? Yes, of course you can. You can upgrade MSI GE75 Raider SSD with ease. The MSI GE75 Raider laptop usually comes with multiple storage options. It usually has at least one M.2 slot for an NVMe SSD and one 2.5-inch slot for an HDD or SATA SSD. This provides great flexibility for upgrading the storage.
Also read: How to Perform HP Spectre x360 SSD Upgrade? Here’s a Guide
How to Choose the Best SSD for MSI GE75 Raider?
How to choose a new SSD for MSI GE75 Raider? You should consider the following 3 things.
#1. Storage
Since the MSI GE75 Raider is equipped with two SSD slots, you can choose an SSD as the primary drive or an additional drive.
#2. Form Factor
The MSI GE75 Raider computer can use both 2.5-inch SATA SSDs and M.2 NVMe SSDs. Choose the SSD based on your preference.
#3. Performance
In addition to physical specifications, you should also choose a disk with ideal performance based on your needs, including capacity, rotation speed, read and write speeds, cache, vibration, etc. Before you try to buy a drive, you should carefully read the drive’s product description to learn more about these features.
How to Upgrade MSI GE75 Raider SSD?
How to perform an MSI GE75 Raider SSD replacement? The section below will illustrate the whole process in detail. Please keep reading the post.
Part 1: Before SSD Upgrade
There are some basic prerequisites for upgrading MSI GE75 Raider SSD:
- Buy a new SSD: Choose an SSD that is compatible with the MSI GE75 Raider laptop.
- Prepare a SATA to USB cable: Used to connect the prepared SSD to the computer as an external drive.
- Prepare a suitable Phillips screwdriver: With it, you can open the computer case and remove the original SSD.
Part 2. Migrate Data to the New SSD
After all preparations for the MSI GE75 Raider SSD upgrade, you can proceed to migrate the OS from the original SSD to a new larger or faster SDD.
To do that, I recommend you to use MiniTool Partition Wizard, which is very professional and reliable. It provides the Migrate OS to SSD/HD feature to help you migrate OS to SSD without reinstalling OS, and the Copy Disk feature to clone all data easily.
In addition, this feature-rich tool can also help you format SD card FAT32, rebuild MBR, change cluster size, convert MBR to GPT, resize/move partition, partition hard disk, recover data from hard drives, etc.
Now you can follow the steps below to use MiniTool Partition Wizard to migrate data to the new SSD. Before that, you should download and install this software on your PC.
MiniTool Partition Wizard DemoClick to Download100%Clean & Safe
Way 1. Use the Migrate OS to SSD/HD Feature
Step 1: Connect the new SSD to your computer. Then launch MiniTool Partition Wizard to enter its main interface.
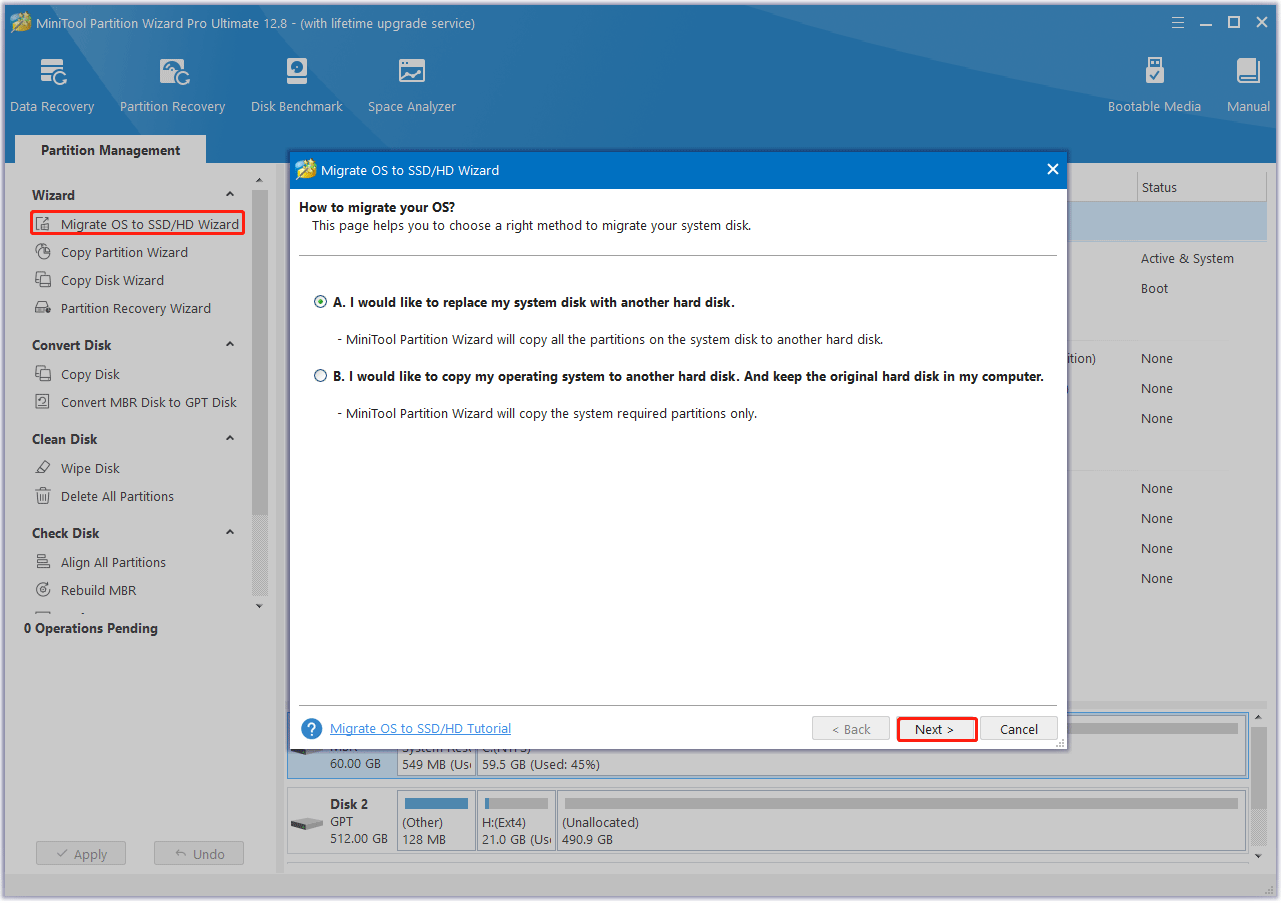
Step 2: Select Migrate OS to SSD/HD Wizard from the left action panel. In the pop-up window, choose an option to migrate the OS based on your needs. Then click Next.
Step 3: In the next window, select the new SSD and click Next. When prompted, click Yes to continue.
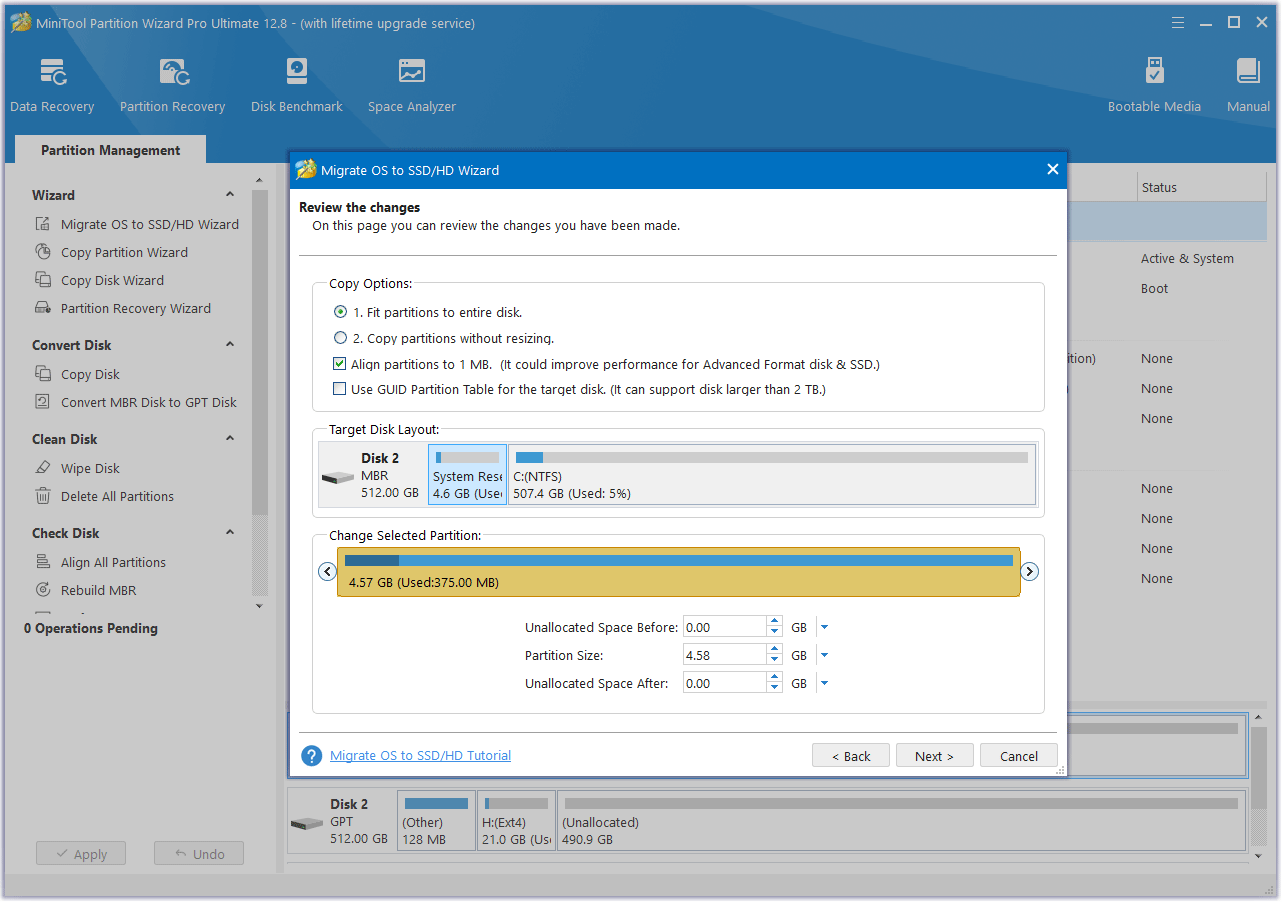
Step 4: After that, choose the desired copy options and click Next.
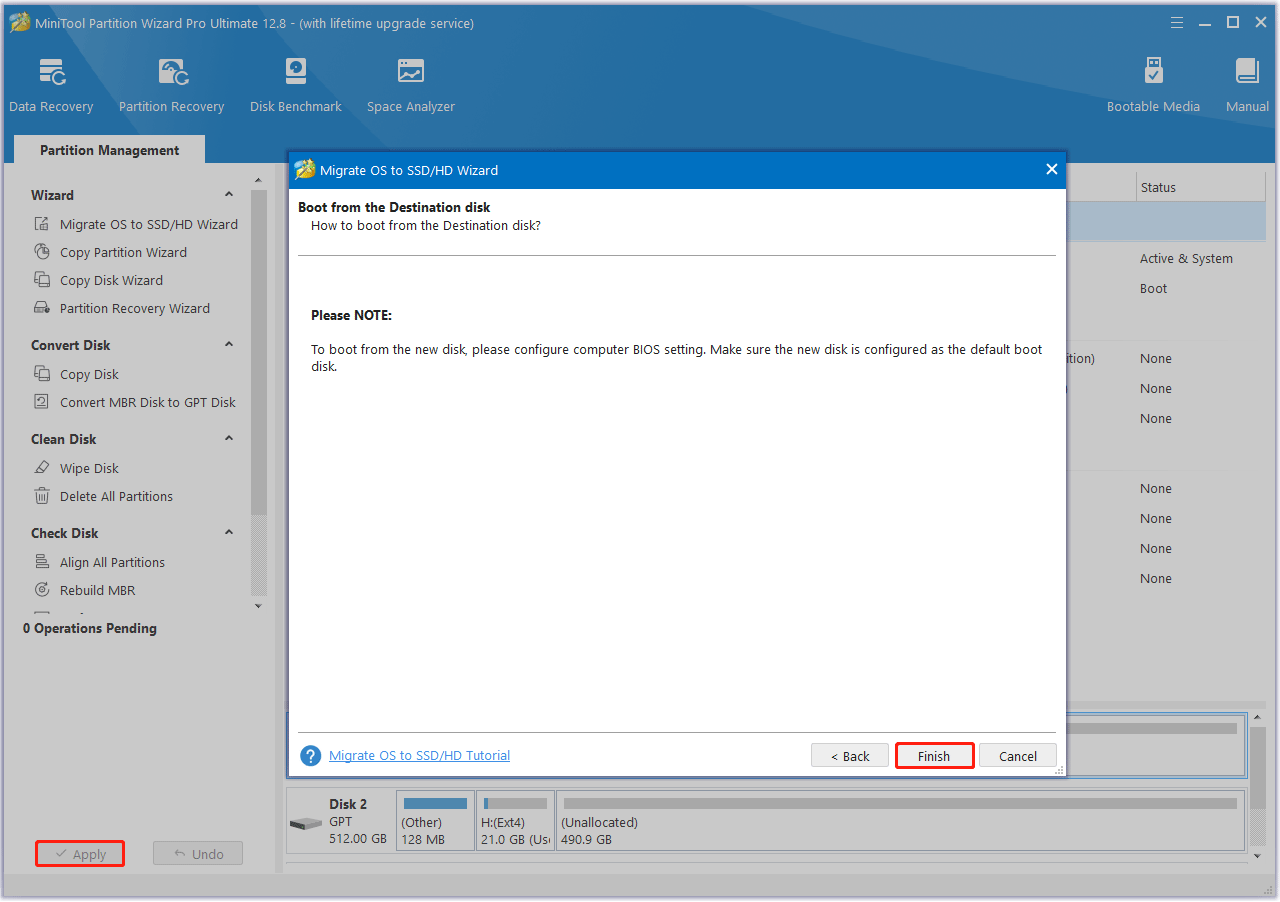
Step 5: Finally, click Finish and Apply to complete the pending operation.
Way 2. Use the Copy Disk Feature
Step 1: Connect the new SSD to your computer. Then launch MiniTool Partition Wizard to enter its main interface.
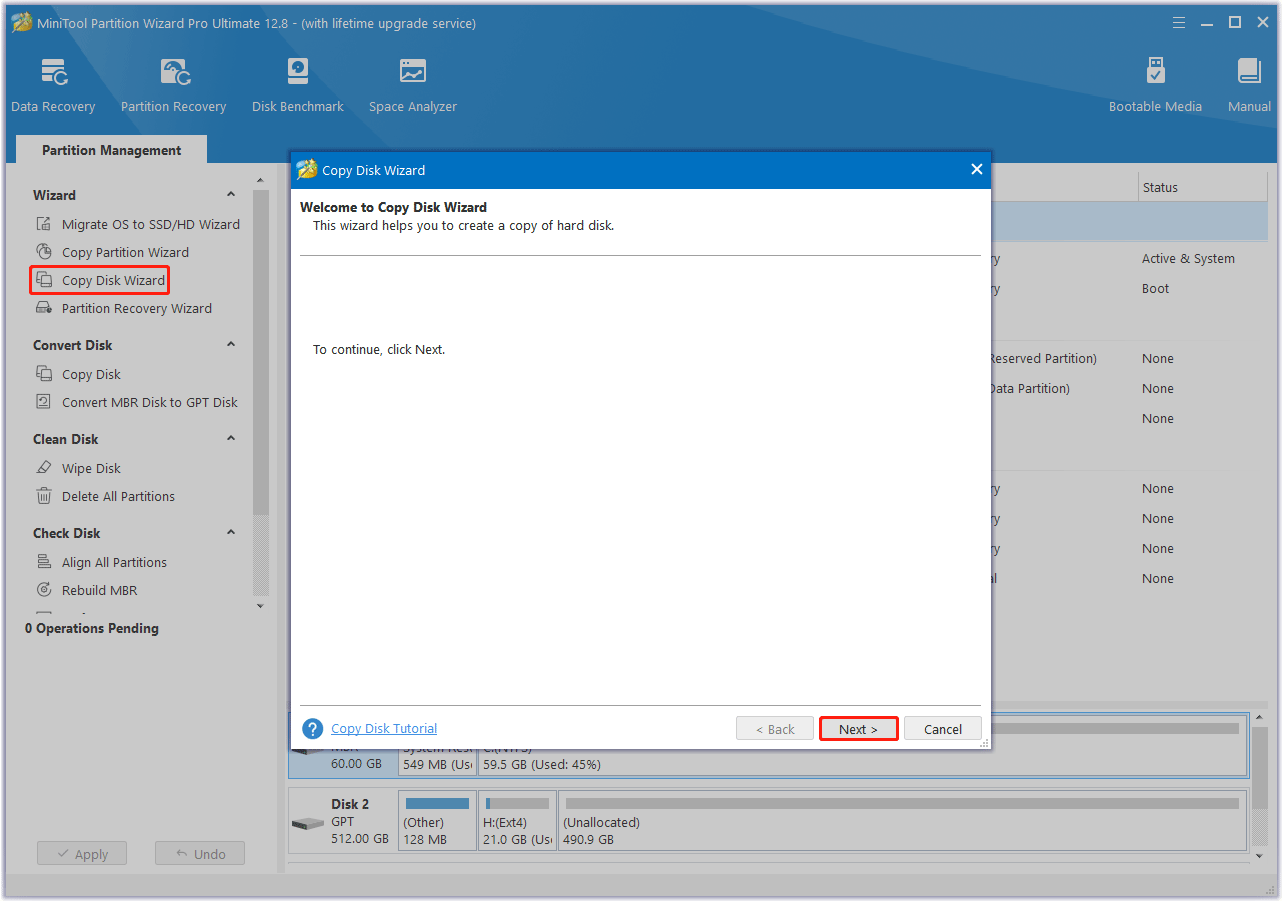
Step 2: Select Copy Disk Wizard from the left action panel. Then click on Next to continue.
Step 3: In the next window, choose the original disk to copy and click on Next.
Step 4: After that, select the new SSD as the destination disk and click on Next. If you are warned that all the data on the disk will be destroyed, click on Yes to confirm.
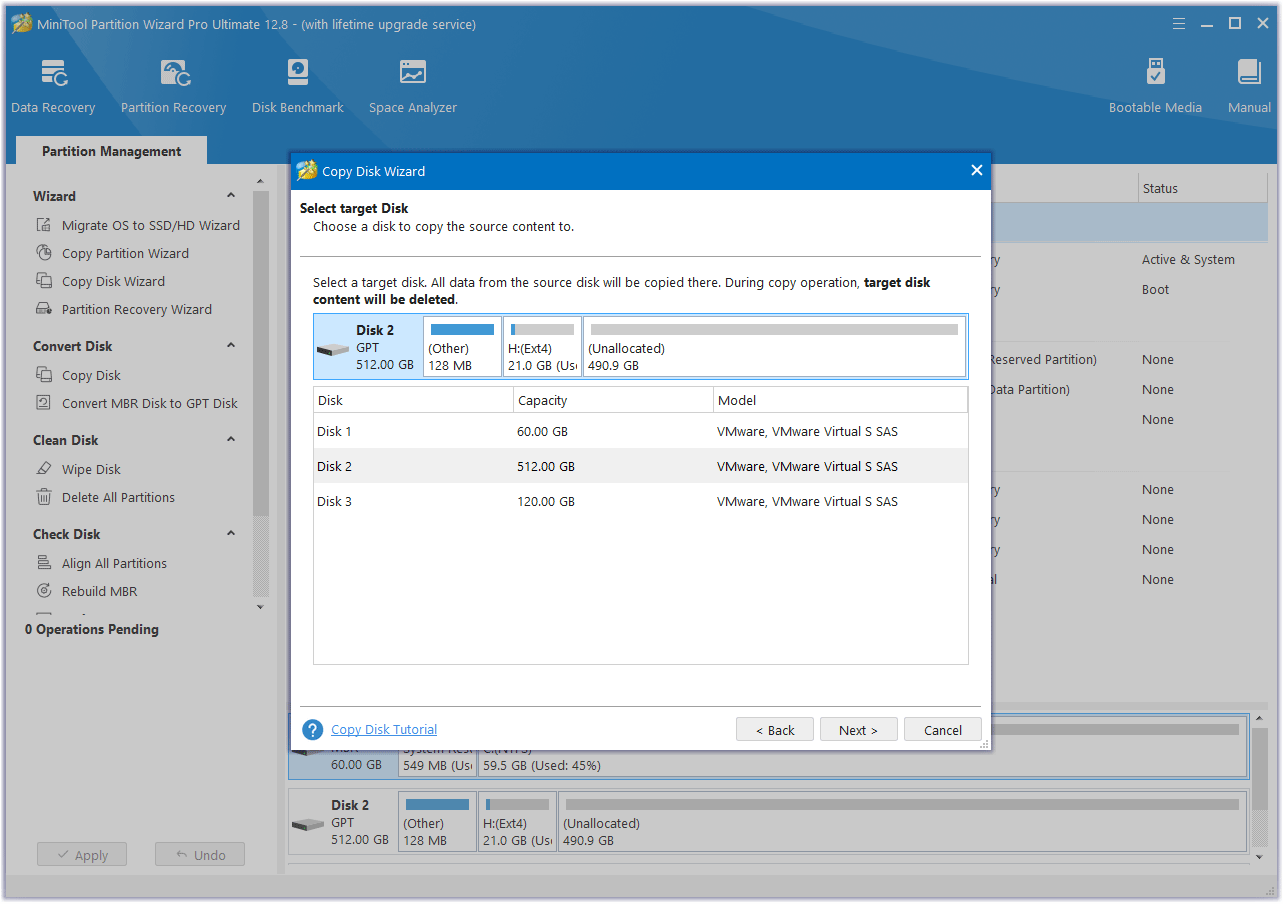
Step 5: In the Review the changes window, choose the preferred copy options. Also, you can configure the target disk layout according to your needs. Once done, click on Next.
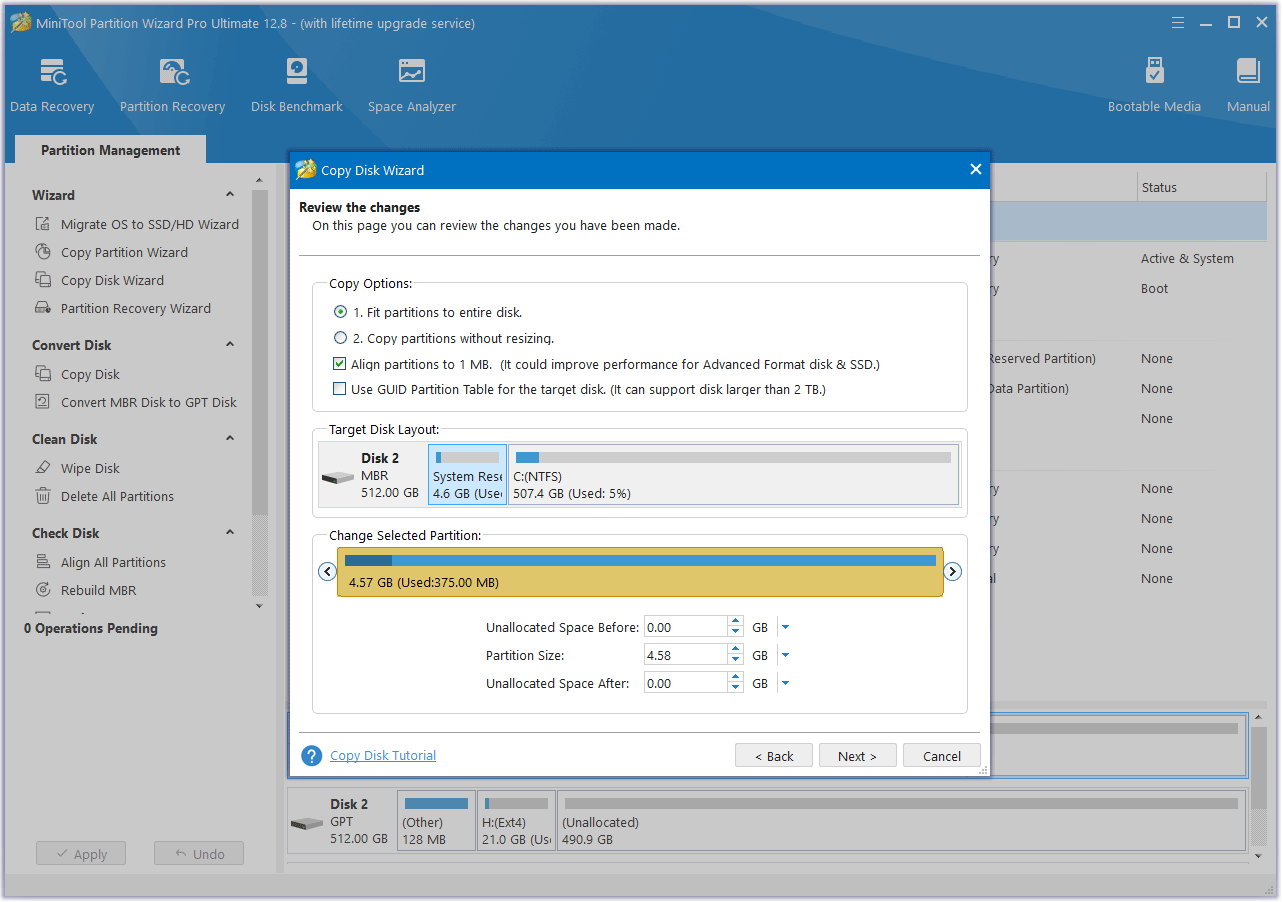
Step 6: Finally, click on Finish and Apply to complete the pending operation.
Part 3. Replace the Old Drive with a New SSD
After cloning the contents on the original drive to the new SSD, now it is time to replace the original drive with the new SSD. The replacement process is complicated and risky, so you need to be careful when doing it.
You can refer to the following steps to perform the MSI GE75 Raider SSD replacement.
- Power off and unplug: Make sure your laptop is fully powered off and unplugged.
- Remove the back cover: Use a screwdriver to remove the screws on the back panel and gently pry it open.
- Locate the drive bay: Locate the existing HDD and unscrew it from its mount.
- Install the SSD: Place the new SSD into the drive bay, secure it with the screws, and reconnect all cables.
- Replace the back cover: Place the back panel in place and tighten the screws.
What to Do After Upgrading MSI GE75 Raider SSD?
After putting everything back in place, it means the MSI GE75 Raider SSD upgrade process is over. Now, turn on your computer and configure/test the SSD. If you cannot boot from the new SSD, enter the BIOS and set it as the boot drive.
Configure the SSD
After booting up your computer, you need to initialize and partition the new SSD. Otherwise, you cannot use it.
Step 1: Press the Windows + R keys to open the Run window. Type diskmgmt.msc and click OK to open Disk Management.
Step 2: Right-click on the SSD and select Initialize Disk. In the next window, select MBR or GPT based on your needs and click OK to save changes.
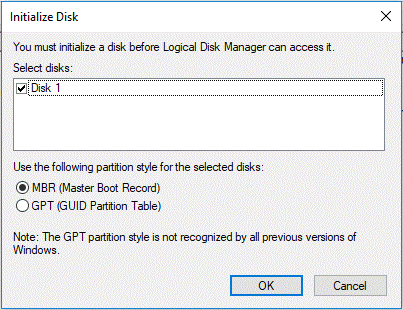
Step 3: Right-click on the unallocated space of the SSD, click New Simple Volume, and follow the on-screen instructions to complete the partitioning process.
In addition to disk management, MiniTool Partition Wizard can also help you partition SSD. This post shows you how to partition SSD in detail.
Test the SSD Speed
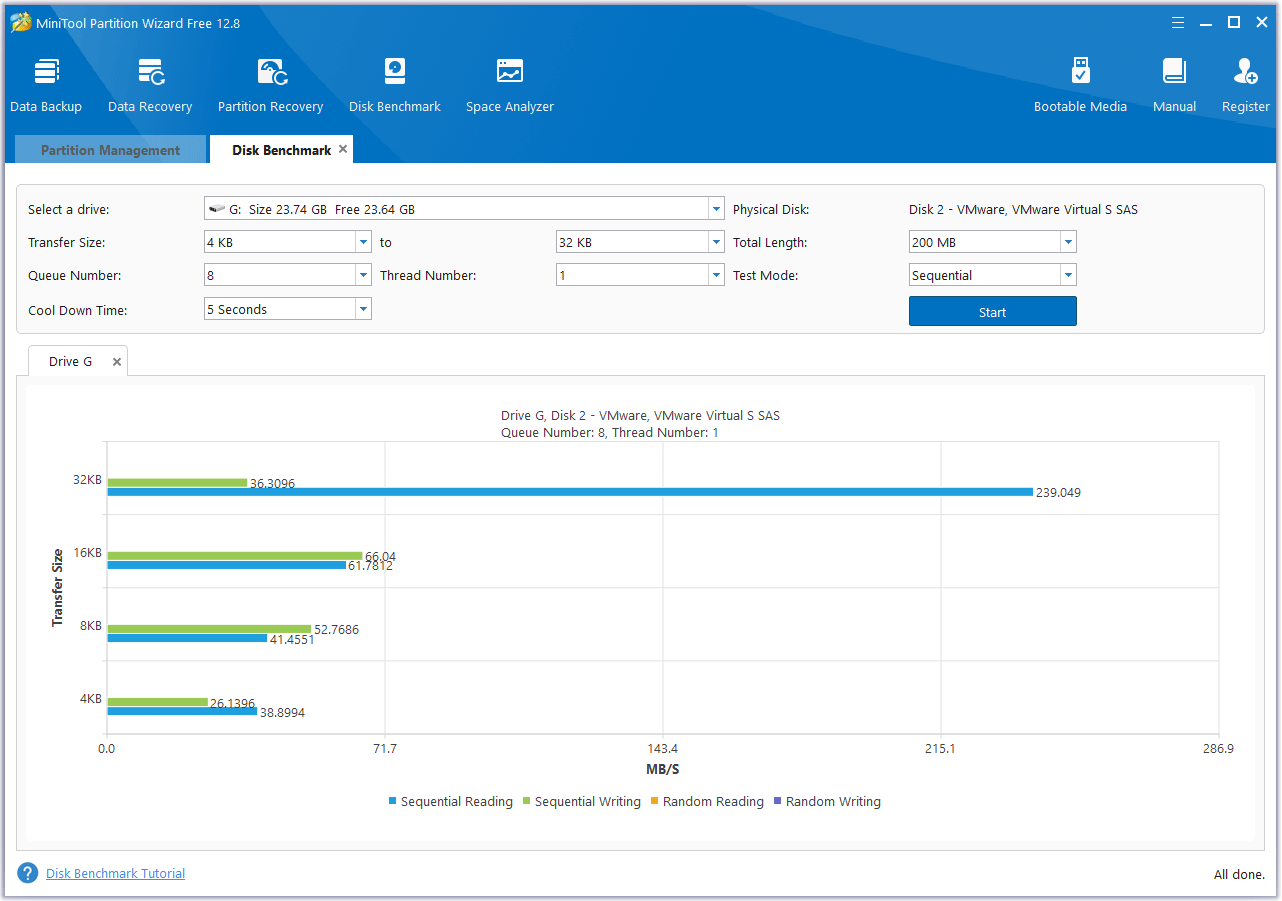
To benchmark the SSD on your computer, you can try MiniTool Partition Wizard. This tool is multifunctional and powerful. Here is the guide:
MiniTool Partition Wizard FreeClick to Download100%Clean & Safe
Step 1: Launch this program to enter the main interface, and then click on Disk Benchmark from the top toolbar,
Step 2: On the Disk Benchmark tab, select the new SSD from the drop-down menu and specify its parameters based on your needs. After that, click on the Start button. Here you can set the Transfer Size, Queue Number, Total Length, and Test Mode.
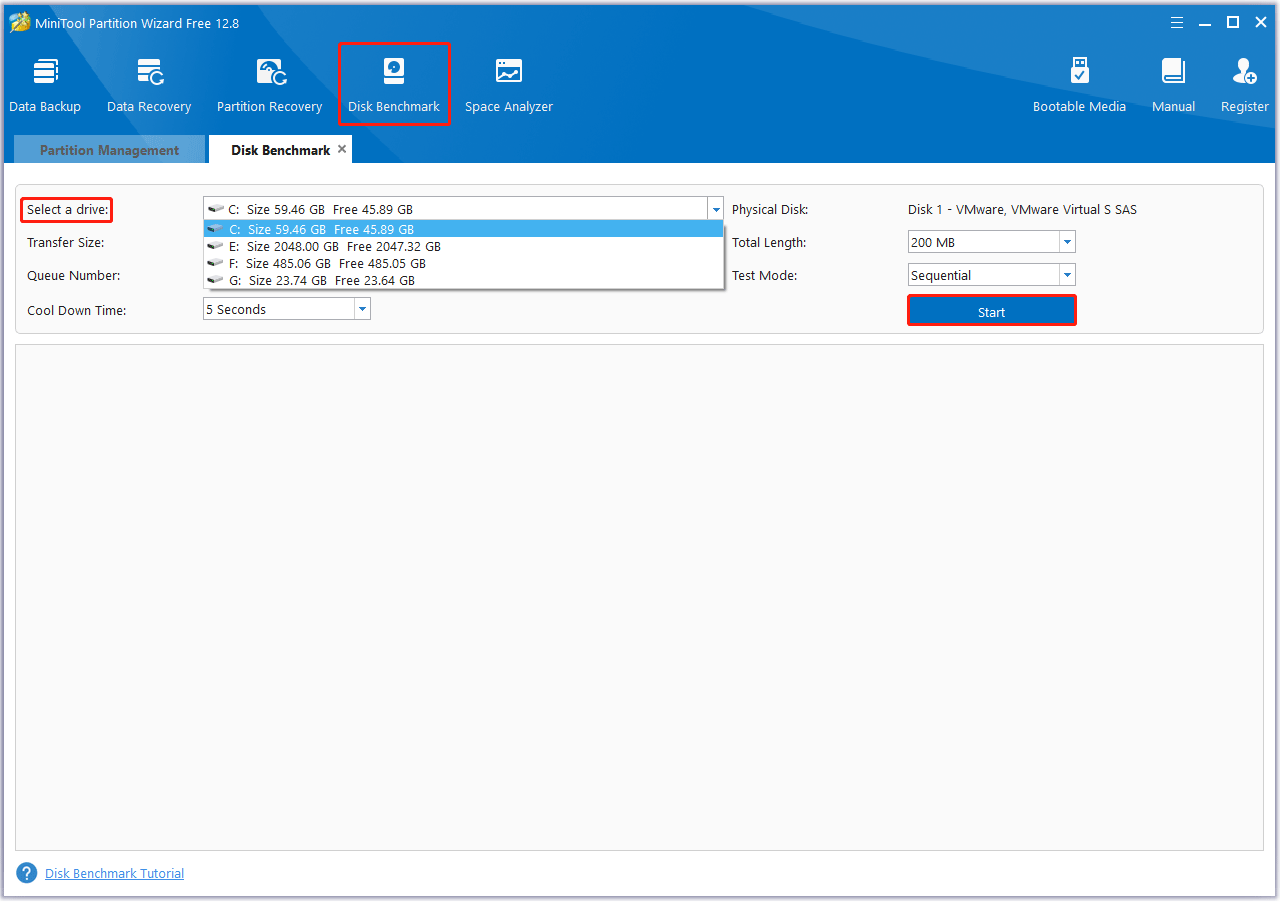
Step 3: Wait for some time to complete this disk benchmark. Once ends, from this test result, you will know some important information including transfer size, random/sequential read, and write speed.
Bottom Line
This post tells you whether you can upgrade the MSI GE75 Raider SSD, shows you how to choose a suitable SSD, and shows you how to do the MSI GE75 Raider SSD upgrade step by step. Finally, you can refer to the guide to utilize new SSD and test the new SSD speed.
During the MSI GE75 Raider hard drive upgrade process, you need to use MiniTool Partition Wizard to migrate your data to the new SSD. If you encounter certain issues while using MiniTool Partition Wizard, you can send us an email via [email protected] to get a quick reply.
MSI GE75 Raider SSD Upgrade FAQ
Check the connections: Make sure the SSD is properly installed in the M.2 slot.
Update the BIOS: Sometimes updating the BIOS can resolve compatibility issues.
Check the BIOS settings: Make sure the SATA mode is set to AHCI instead of RAID.
Compatibility: Verify that the SSD is compatible with your laptop model.