Can you do the Asus ROG Ally storage upgrade? How to upgrade it? If you are curious about these questions, you come to the right place. In this post, MiniTool Partition Wizard shows the answers to these questions and provides detailed ways to help you do the ROG Ally SSD upgrade.
The Asus ROG Ally is a portable gaming computer that was introduced on June 13, 2023. It is developed and produced by Asus, runs on the Windows 11 operating system, and provides 512 GB of storage space to store your games.

However, if you have an extensive library and like to frequently switch between games, you might think the Asus ROG Ally SSD size is not enough and need to upgrade ROG Ally storage space to a larger one. Continue reading you will get a detailed guide on the Asus ROG Ally storage upgrade in this post.
Can You Upgrade Asus ROG Ally Storage?
Can you upgrade Asus ROG Ally storage? Of course, the answer is yes. There are three ways you can choose to upgrade ROG Ally storage:
- Add a MicroSD card to increase storage space on ROG Ally.
- Add a USB external drive to extend storage space on your ROG Ally.
- Upgrade the internal SSD to get more storage space on your ROG Ally.
How to Add an SD Card to ROG Ally?
If you want to increase the storage space of your Asus ROG Ally, adding a MicroSD card is a great option. The ROG Ally comes with a UHS-II MicroSD card slot on its side, and all you need to do is insert a compatible MicroSD card properly and carefully to upgrade your storage space.
If you are curious about what file format should you choose for Asus ROG Ally, you can read this post: [Answered] What’s the SD Card Format for ASUS ROG Ally?
However, the Asus confirms that the SD card reader may malfunction under certain thermal stress conditions. If you also encounter the “Asus ROG Ally Not Recognizing SD Card” issue, you can read and get solutions from this post: Asus ROG Ally Not Recognizing SD Card: Try These 9 Fixes!
How to Add a USB Drive to ROG Ally?
In addition to adding a MicroSD card to ROG Ally to upgrade Asus ROG Ally storage, you can also add a USB drive to ROG Ally to increase its storage. The ROG Ally has a USB 3.2 Gen 2 Type-C/Display Port 1.4/Power (DC) input combo port on its side which you can use to connect a USB drive.
If you are worried about being unable to use the USB drive when charging the ROG Ally, you can also buy a USB-C docking station to satisfy the requirement of USB drive connection and device charging at the same time. For example, the LISEN 13-in-1 Docking Station is such a device that can also perfectly support Turbo 30W mode.

How to Upgrade ROG Ally SSD?
If you are not satisfied with all the above ways to upgrade Asus ROG Ally storage, you can try upgrading Asus ROG Ally SSD. To do the Asus ROG Ally SSD replacement, you have two choices:
- Clean install with a new internal SSD. This way, you will erase your settings, programs, and data. After swapping the SSD, you need to use the Asus Cloud Recovery for ROG Ally to install Windows 11 and various ROG programs needed for the Ally.
- Clone all the data and OS from the original internal SSD to the new one. Use a third-party tool, such as MiniTool Partition Wizard, to clone all the data, including OS, from the original SSD to the new SSD. Then open the ROG Ally and change the SSD to the new one.
What Do You Need to Upgrade Asus ROG Ally SSD?
Before you do the Asus ROG Ally SSD upgrade, you need to prepare some necessary things in the following:
- A new Asus ROG Ally compatible SSD (such as Corsair MP600 Mini, SABRENT Rocket 2230 NVMe 4.0 1TB SSD, Teamgroup MP44S 1TB, WD – BLACK SN770M 2TB Internal SSD, or other Asus ROG Ally compatible SSD)
- A 2.0 x 50mm Screwdriver
- A plastic pick (like a guitar pick)
- A USB C dock
- The latest BIOS software
- Internet connection
- Charger
- An SSD enclosure
- Cloning software
After preparing all the things, you can do the following steps to complete the Asus ROG Ally SSD upgrade. The last two things are only required by method 2. If you follow method 1 to do the Asus ROG Ally SSD upgrade, you don’t need to prepare them.
Method 1. Upgrade ROG Ally SSD with Clean Install Windows
If you choose this way to do Asus ROG Ally SSD replacement, you can do as follows:
Step 1. Completely turn off your ROG Ally. To do that, you can hold down the Volume Down button and the Power button for a few seconds.
Step 2. Open the ROG Ally. Here’s how to do it:
- Place the ROG Ally on a clean and flat surface.
- Use the Screwdriver to remove the six screws on the backside. (Place them in a small bowl or tray so you don’t lose them.)
- Use the plastic pick to undo the clips holding the case together.
Step 3. Disconnect the battery for safety. It’s located near the bottom of the casing.
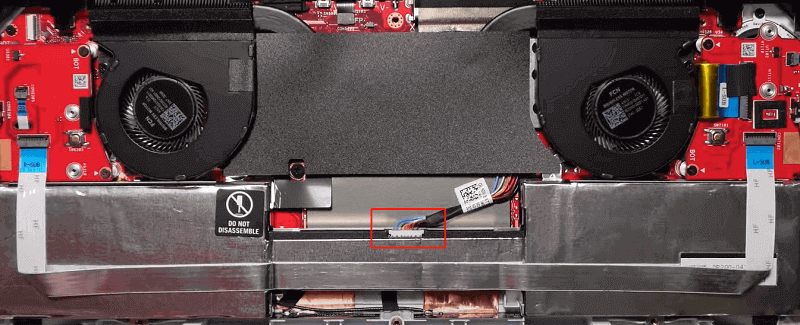
Step 4. Uncover the flat black sticker between the two fans and then set it down in a safe location so that the adhesive doesn’t get dusty or dirty.
Step 5. Unscrew the M.2 screw that holds the original SSD in place and pull the original SSD out. Then, install the new SSD and carefully screw the small M.2 screw back into place.
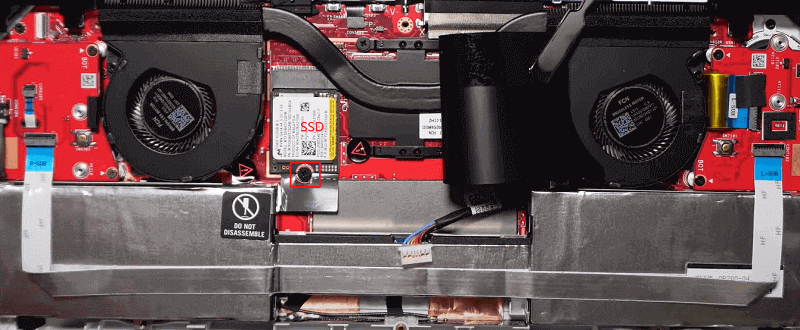
Step 6. Next, put the flat black sticker back where it belongs and plug the battery back in. Then, put the casing back in place and screw the six screws all back.
Step 7. Boot to the BIOS and enter Asus Cloud Recovery. Here’s the guide:
- Plug the official charging adapter into the ROG Ally.
- Hold the Volume Down and the Power button while the device is off.
- Once in the BIOS, press Y to enter Advanced mode.
- Select Asus Cloud Recovery.
- Press View Policy, tick the box I am above the age of 20 years, and then tap Agree.
- Choose the Next [Enter] button to initiate Cloud Recovery downloading.
- Then select your Internet AP and tap Confirm.
- Enter your Wi-Fi password then tap Confirm again.
- Press OK [Enter] to continue.
- Then, choose Next [Enter] to start the download.
- Once it finishes downloading, tap Confirm.
- Wait for your system to restart itself and connect to Cloud Recovery again.
Step 8. Choose whether to back up your files or not. If you want to backup data now, connect a compatible external hard drive to the ROG Ally’s USB-C port, select OK, and complete the process. Otherwise, select No and then Yes to factory reset the ROG Ally, which erases your data and does a clean install of Windows 11/ROG programs.
Step 9. Wait for the Asus Cloud Recovery process to complete. If you choose backup data before, you need to take time to transfer your backup data to the ROG Ally. If you choose to erase data, the Asus Cloud Recovery process will be done when it asks you to choose your country or region.
Method 2. Upgrade ROG Ally SSD Without Reinstall OS
If you choose this way to upgrade and change Asus ROG Ally SSD size, you don’t need to reinstall your Windows OS. Here’s the tutorial:
Part 1. Clone the Entire SSD to the New One
To clone the entire SSD to the new one, I recommend you use MiniTool Partition Wizard. This disk clone software is very professional and reliable. It provides the Migrate OS to SSD/HD feature to help you migrate OS to SSD without reinstalling OS and the Clone Disk feature to clone the whole disk.
In addition, this multifunctional tool can also help you format SD card FAT32, rebuild MBR, change cluster size, convert MBR to GPT, set partitions as logical/primary, resize/move partitions, partition hard drive, recover data from hard drive, and more.
Here are two ways to help you clone the entire SSD:
Do Some Preparation
Before you clone the entire SSD to the new one, you need to connect the new SSD to your Rog Ally. To do that, please do the following:
- Connect a USB-C dock to your Asus ROG Ally.
- Put the new SSD into a compatible enclosure.
- Next, connect the enclosure to the USB-C dock.
# 1. Use Migrate OS to SSD/HD feature
Step 1. Click or press the Download button to get the MiniTool Partition Wizard installation package, and follow the on-screen instructions to install it on your ROG Ally.
MiniTool Partition Wizard DemoClick to Download100%Clean & Safe
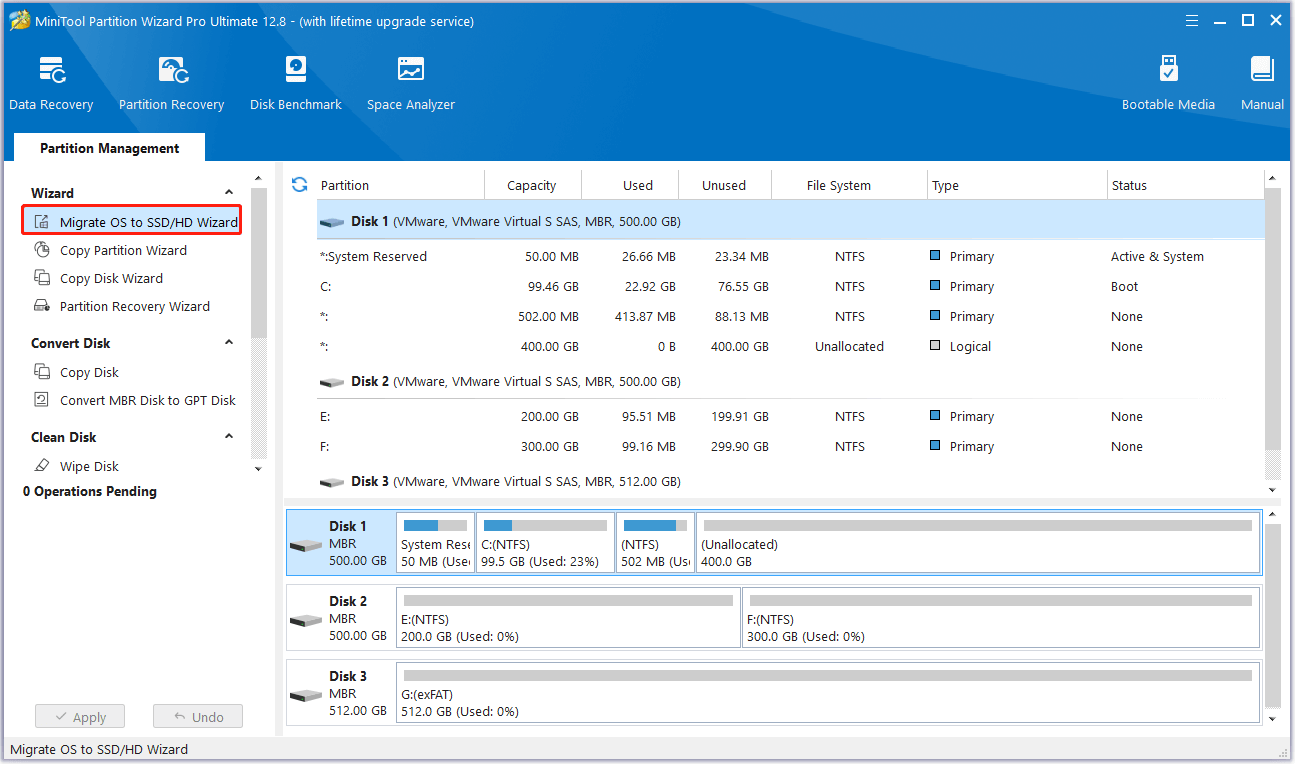
Step 2. Launch it into its main interface and select the Migrate OS to SSD/HD Wizard feature in the left panel.
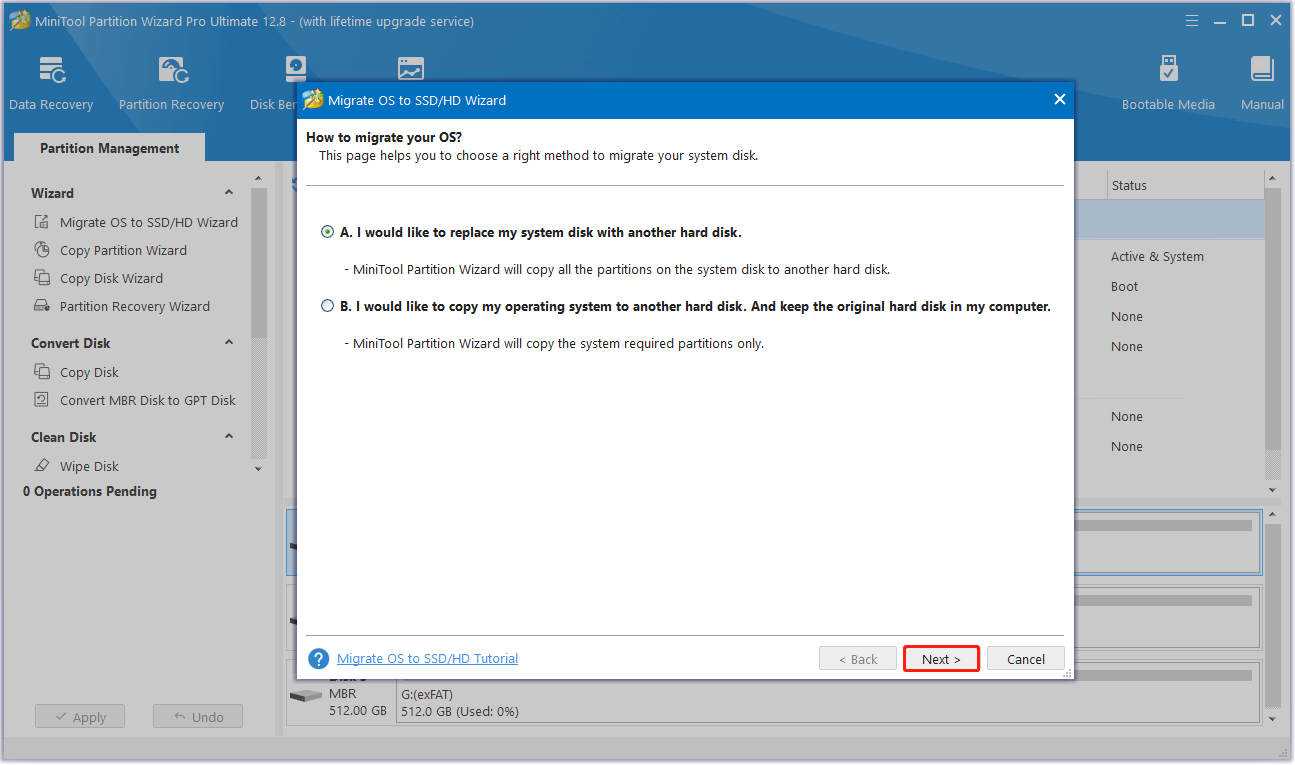
Step 3. In the Migrate OS to SSD/HD Wizard window, choose option A and click Next.
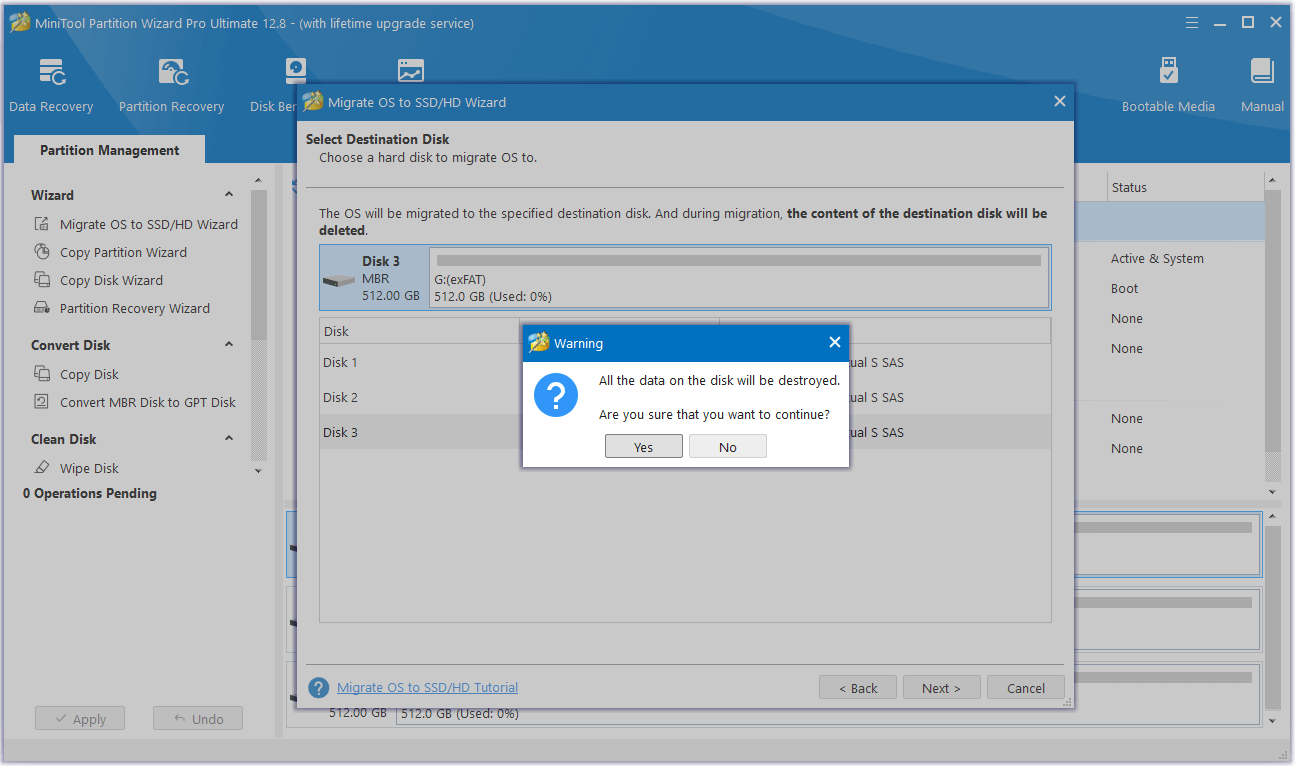
Step 4. Select the destination disk and click Next. Then, click Yes in the Warning window.
Step 5. Choose the copy options and configure the disk layout to change the default settings according to your needs.
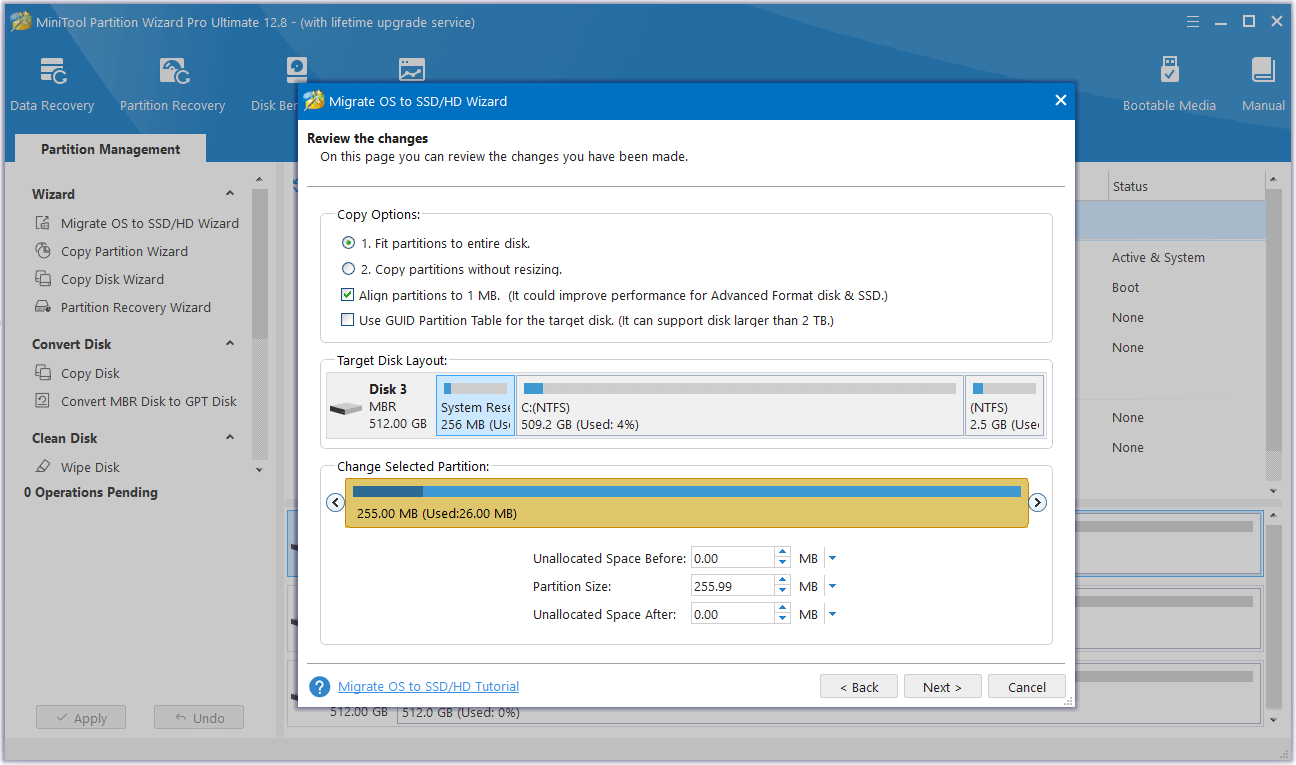
Step 6. Read the note about how to boot from the new SSD and press the Finish button. When you go back to the main interface, click Apply and Yes sequentially to start the cloning process. The cloning process will take some time and please wait patiently during the cloning process.
# 2. Use Clone Disk Feature
In addition to using the Migrate OS to SSD/HD feature, you can also use its Copy Disk feature to copy the whole disk. Here’s how to do it:
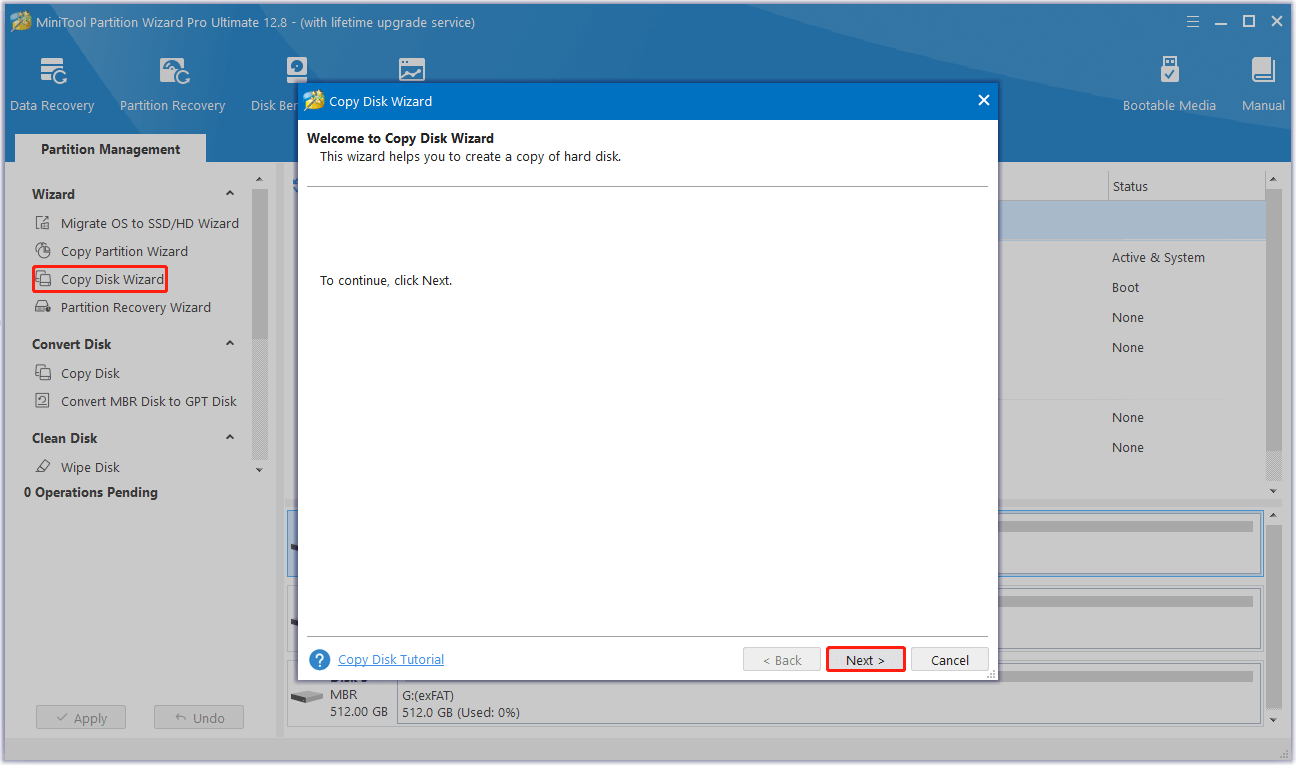
Step 1. Connect the new SSD externally using a compatible enclosure. Launch MiniTool Partition Wizard to its main interface, and choose the Copy Disk Wizard feature from the left pane. Then, click Next in the pop-up window.
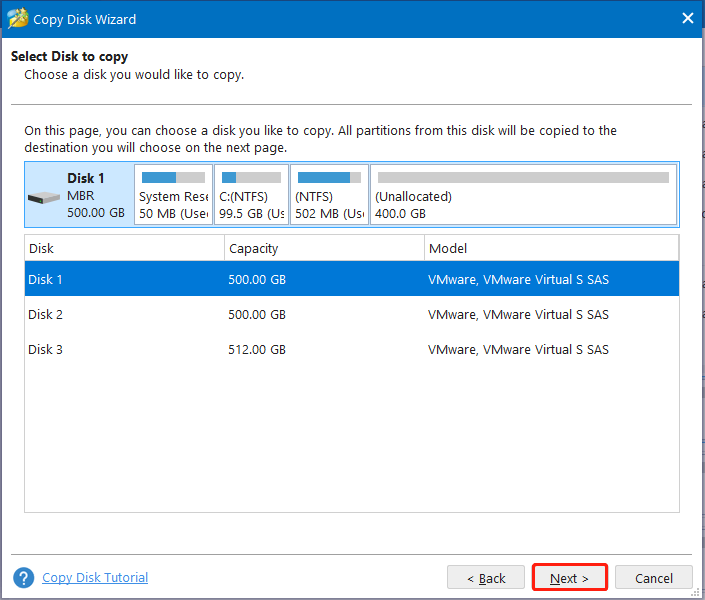
Step 2. In the next window, select the disk to copy and click Next.
Step 3. Choose the target disk and press Next. In the pop-up window, tap the Yes button.
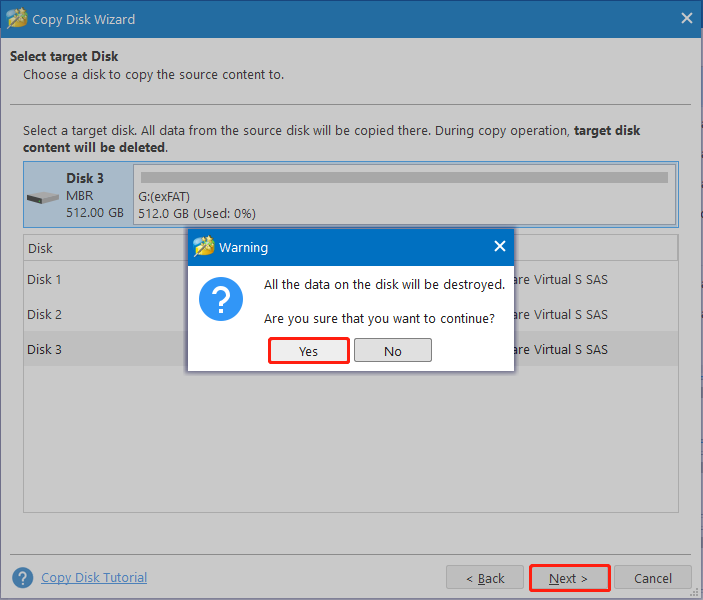
Step 4. Set the copy options and change the disk layout. Then, click Next to continue.
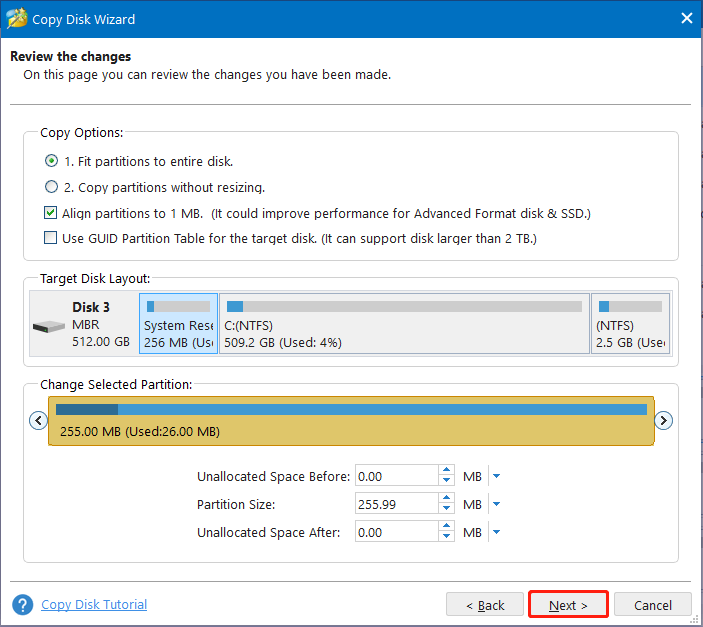
Step 5. Then, click Finish. After that, tap Apply and Yes sequentially to execute the changes.
Part 2. Open ROG Ally and Change SSD
After successful cloning, it’s time to open your ROG Ally and swap the old SSD with the newly upgraded one. To do that, you just need to repeat steps 1-6 in Method 1. Once done, you can successfully upgrade Asus ROG Ally SSD to a larger one without reinstalling the OS.
In Conclusion
How to upgrade Asus ROG Ally storage? How to upgrade ROG Ally SSD? This post provides two ways to help you copy the entire SSD to a new one to help you complete the ROG Ally SSD upgrade. You can choose a way according to your preference. Besides, if you have difficulty using MiniTool Partition Wizard, contact us via [email protected] and we will back you as soon as possible.