Are you stuck in the “SD card not showing up Steam Deck” issue? Don’t worry. Here, this post from MiniTool explores why the Steam Deck SD card not showing up and how to effectively fix it. Just keep reading and choose a suitable way to solve your problem.
Steam Deck is a handheld gaming computer that was developed and released by Valve on February 25, 2022. Thanks to the available microSD card slot on this device, you can easily put an SD card in your device for more storage. However, sometimes you may find the connected SD card doesn’t appear on your Steam Deck.
Why is the Steam Deck SD card not showing up and how to fix it? This post provides the answers below. You can pay attention to the following content to find what you want to know.
Why Is Steam Deck SD Card Not Showing Up
What’s the reason for the SD card not showing up on Steam Deck? Many users report that their Steam Deck SD card not working due to various factors. To help troubleshoot your problem efficiently, this post summarizes several frequently-mentioned causes of the “Steam Deck not detecting SD card” issue below:
- There are minor glitches or bugs on your Steam Deck.
- You place the SD card improperly or connect it to the card slot loosely.
- The dust or debris in the SD card slot may interfere with the SD card being detected.
- Your Steam Deck is running on low battery power.
- The file system of your SD card is not compatible with the Steam Deck.
- The SD card gets corrupted or damaged.
- There is something wrong with the game files on your SD card.
How to Fix If Steam Deck SD Card Not Showing Up
Fix 1: Restart the Steam Deck
Small glitches or bugs on your gaming device may sometimes cause the “Steam Deck SD card not working” issue. As for this, you can perform a restart for your gaming device first, which is the simplest and quickest way to remove these random bugs.
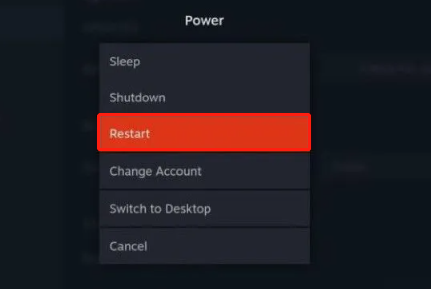
To do this, you need to press the STEAM button on your device to open the main menu and then go to Power > Restart. Also, you can try a force restart of your device. It’s easy and you only need to press and hold the Power button for 3 seconds until your Steam Deck shuts down completely. Wait a while and then press the Power button again to restart the device.
If the error persists after restarting your Steam Deck, you should turn to other solutions.
Fix 2: Reinsert the SD Card
To enable your Steam Deck recognize the SD card, you may also need to make sure you connect it properly. In case of unimpressive connection problems, you can take the SD card out of the card slot and then insert it back carefully. Make sure you put the SD card in the right place of the card slot tightly.
If everything is good with the connection but the error is still here, you need to try more advanced fixes below.
Fix 3: Check the Battery Charge
As mentioned earlier, the low battery charge might be a possible reason for the “SD card not showing up Steam Deck” issue. Therefore, it’s important for you to check the battery charge of your Steam Deck when experiencing such issues. If your device has a charge of less than 20%, you should remove the SD card from it first and then charge it fully.
Fix 4: Clean the SD Card and Slot
If any dust or debris is covering your SD card or getting into the microSD card slot, you may fail to connect it to your gaming device and run into the “Steam Deck SD card games not showing up” issue. To avoid it, you can try cleaning the SD card and card slot by using a soft and dry cloth.
Fix 5: Format the SD Card
In some cases, reformatting the SD card may also help you solve the “SD card not showing up on Steam Deck” issue. You can directly execute the format on your Steam Deck and the following are detailed steps.
Step 1: Connect the SD card to your Steam Deck. Then press the STEAM button on the Steam Deck and select Settings.
Step 2: Switch to System and then hit the Format SD Card option on the right side.
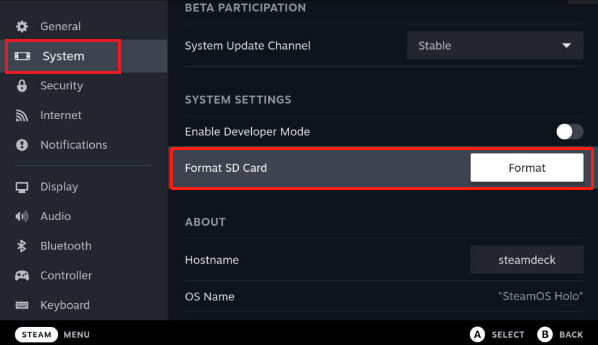
Step 3: After that, hit Confirm to verify the formatting process.
If your Steam Deck is unable to format the SD card, you can then try finishing the format on other devices like a Windows PC. It provides you with several built-in SD card formatters including Disk Management, Windows Explorer, and Diskpart.
Unfortunately, neither of them supports formatting to Ext4, which is the best compatible file system for Steam Deck. Instead, they only allow you to format the SD card to NTFS, FAT32, or exFAT. Therefore, to execute the formatting operation successfully, we’d like to recommend you use MiniTool Partition Wizard.
MiniTool Partition Wizard is a piece of professional third-party disk partition software that offers different kinds of features related to disk and partition management. For instance, it tells you how to partition a hard drive, how to clone a hard drive, how to recover data from hard drive, and more.
The format operation on this partition software is easy and you just need to follow the simple instructions below.
Step 1: Remove the SD card from your gaming device and then connect it to a well-running Windows PC.
Step 2: Download and install MiniTool Partition Wizard on this computer. Then launch this partition manager to enter its main interface.
MiniTool Partition Wizard FreeClick to Download100%Clean & Safe
Step 3: Highlight the partition on the SD card and select Format Partition in the left action panel. Alternatively, you can also right-click the partition on the SD card and select Format.
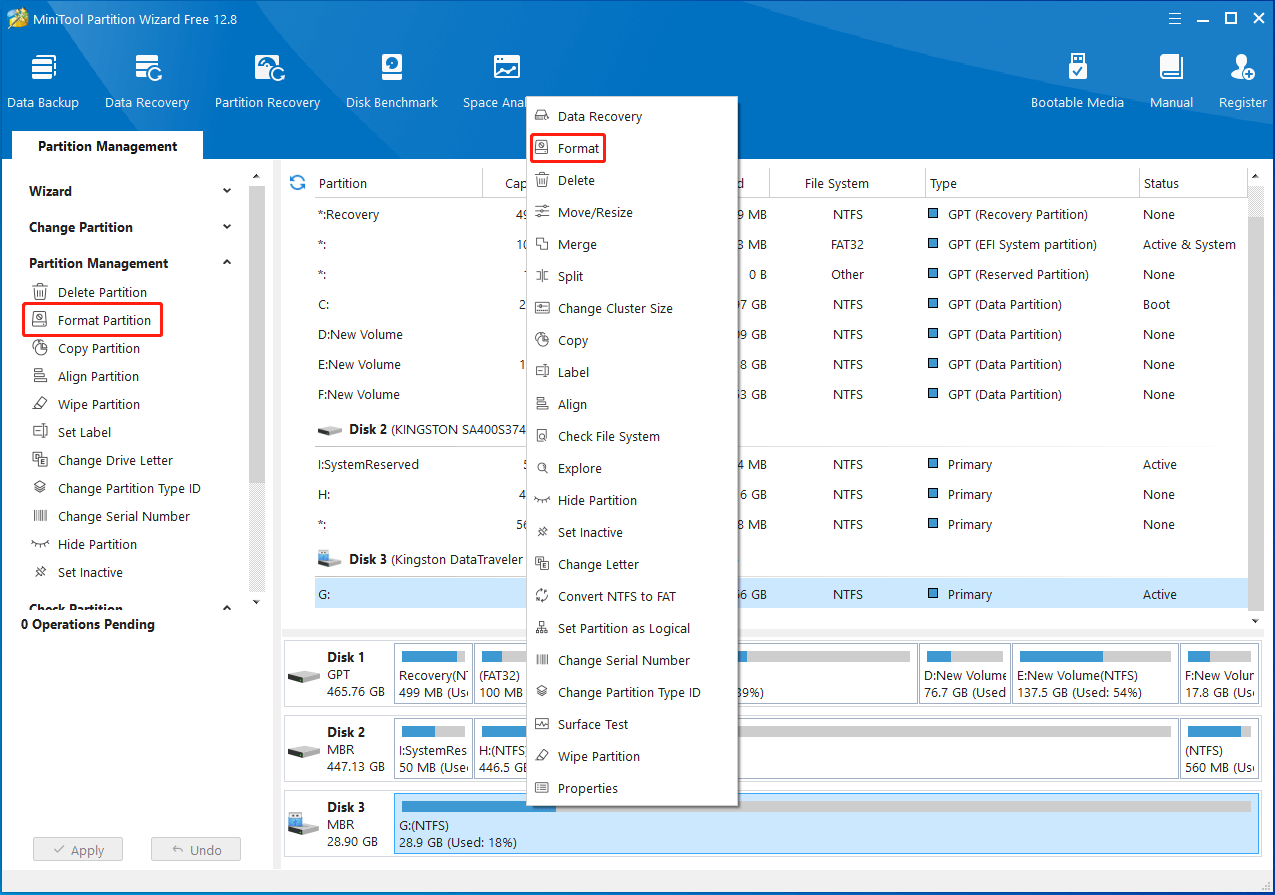
Step 4: When the Format Partition window appears, select Ext4 as the File System and then click OK.
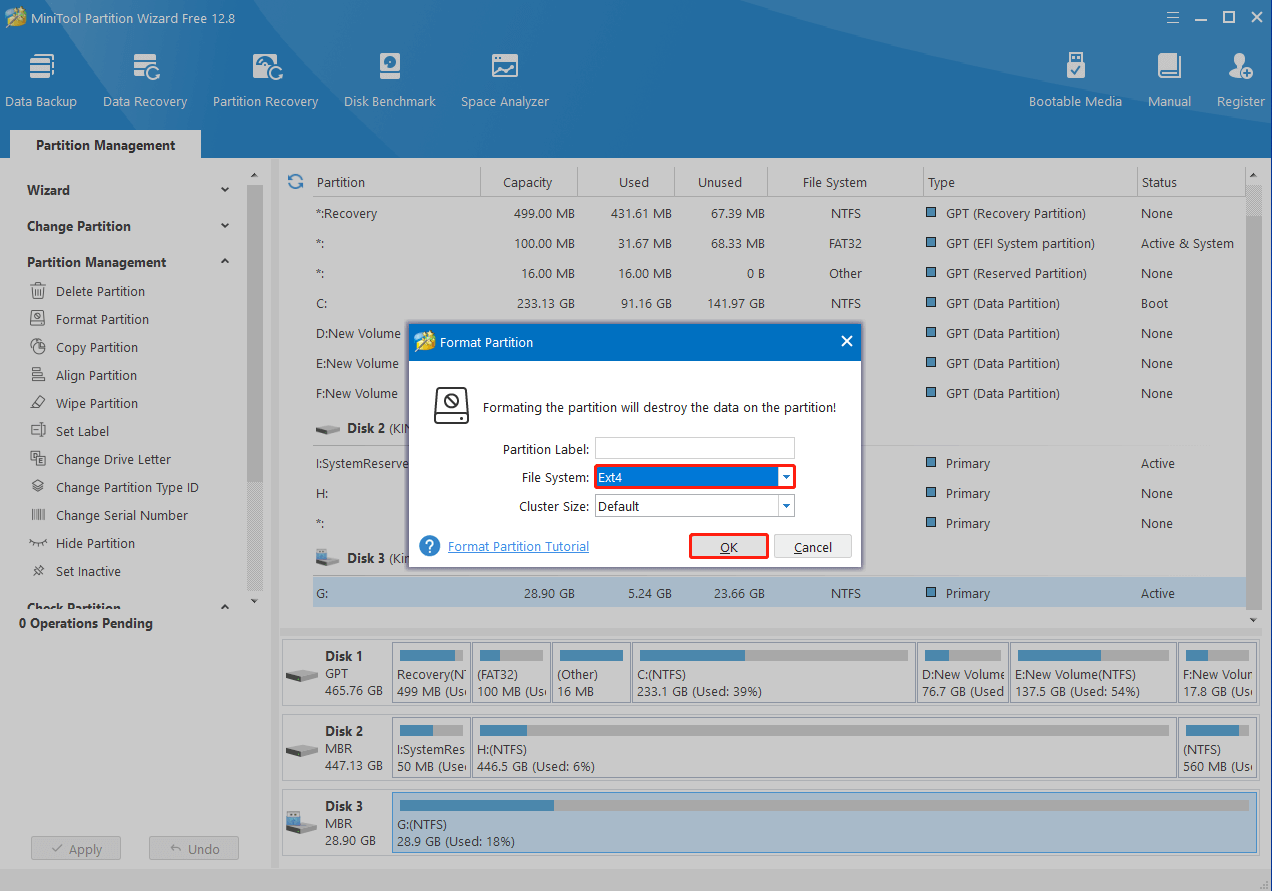
Step 5: Once done, click Apply to execute the pending operation.
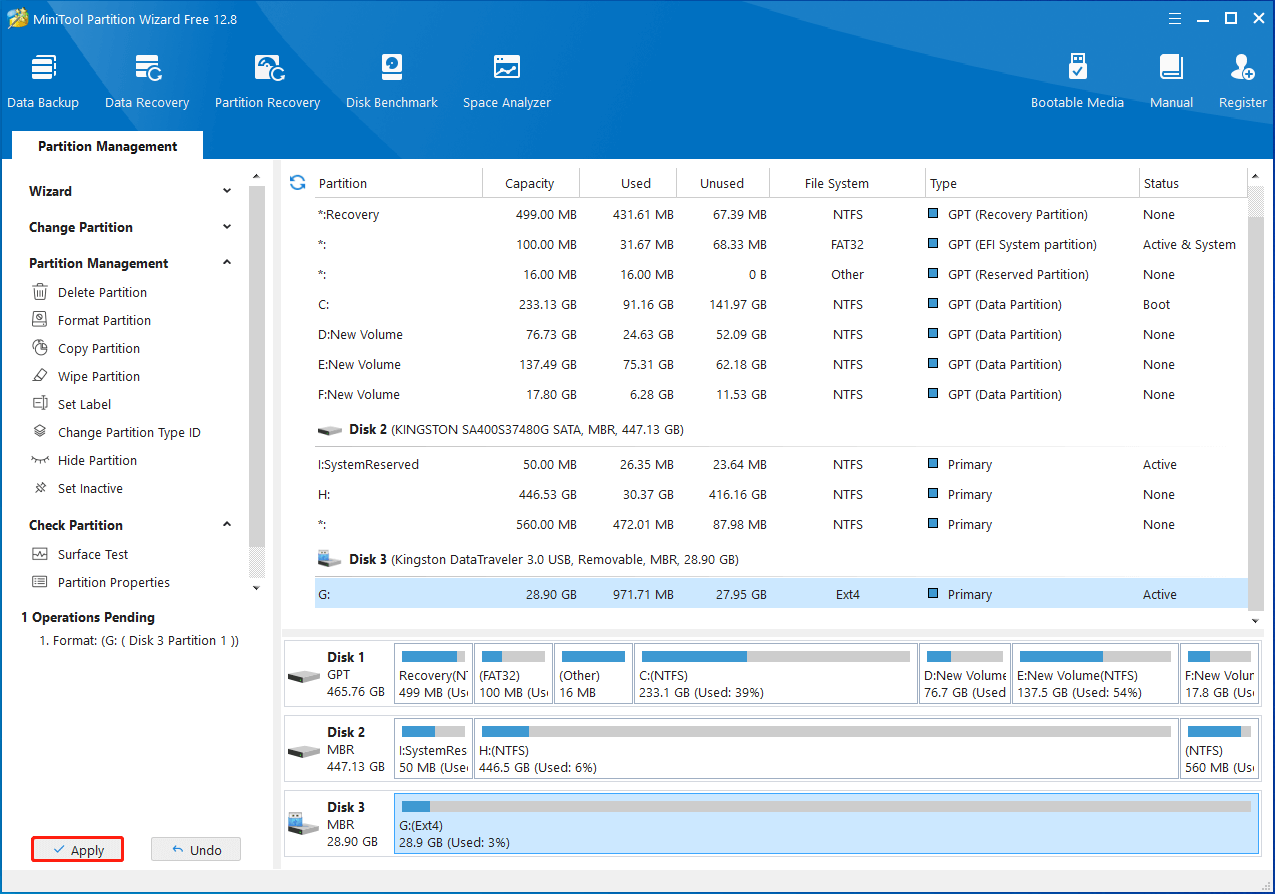
Step 6: After you format the SD card to Ext4 successfully, reinsert it to the Steam Deck to see if it will show up on the gaming console.
Fix 6: Check Your SD Card for Damage
It’s also possible for you to get into trouble with the “Steam Deck not detecting SD card” issue due to the physically or logically damaged SD card. To figure out if it’s the culprit, you can remove your SD card from the portable gaming device and check it carefully. If there are scratches or other physical damages on the SD card, it’s better to replace it with another new one.
To check and fix logical damages (like file system errors and bad sectors) on the SD card, you can use the CHKDSK utility on your Windows computer. If CHKDSK won’t run, it’s recommended that you take advantage of MiniTool Partition Wizard to check your SD card for errors. It can be used as a disk checker as well.
Here’s how to check the SD card health with MiniTool Partition Wizard.
Step 1: Make sure you connect the SD card to your PC. Then get MiniTool Partition Wizard installed on the PC.
MiniTool Partition Wizard FreeClick to Download100%Clean & Safe
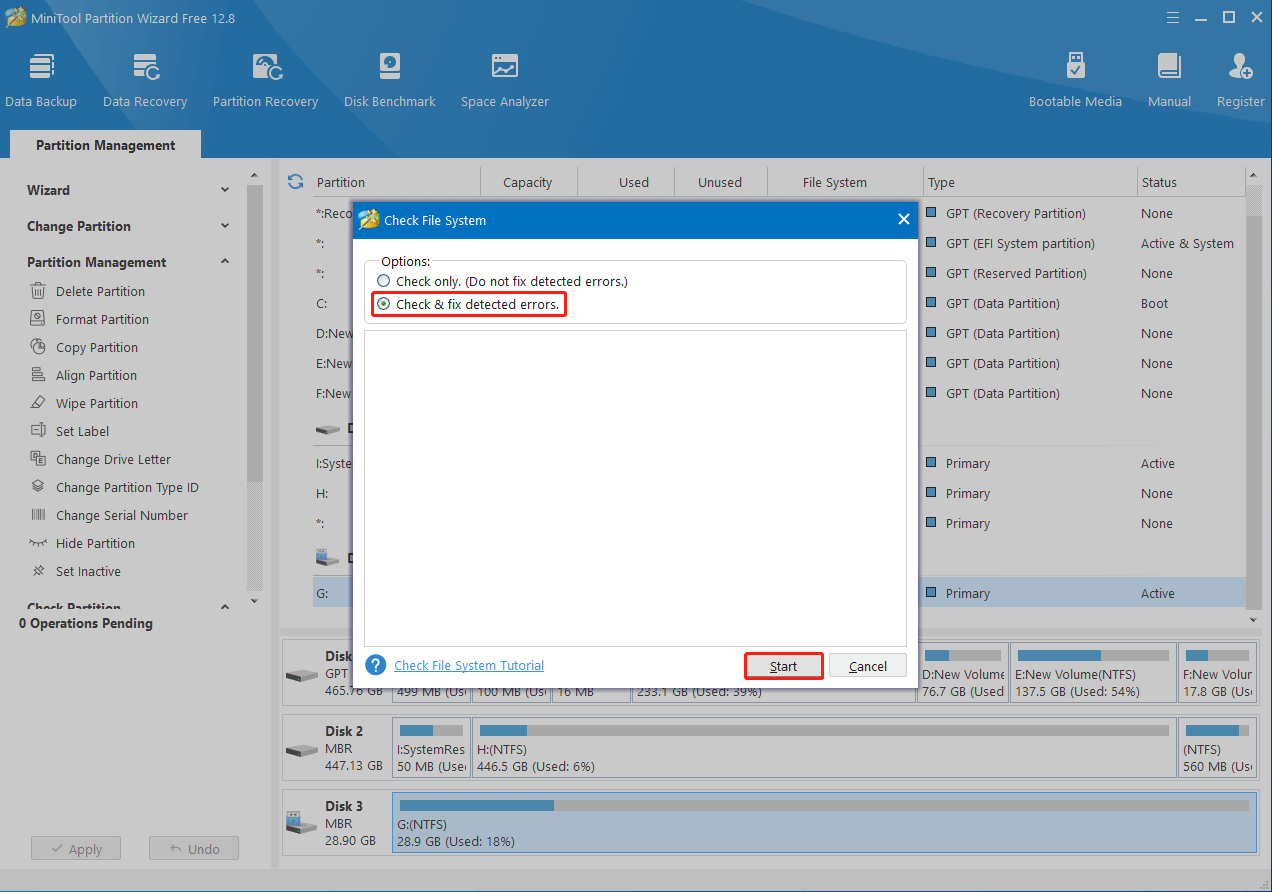
Step 2: Launch this disk checker and right-click the SD card. Then select Check File System.
Step 3: In the pop-up window, select Check & fix detected errors and click Start.
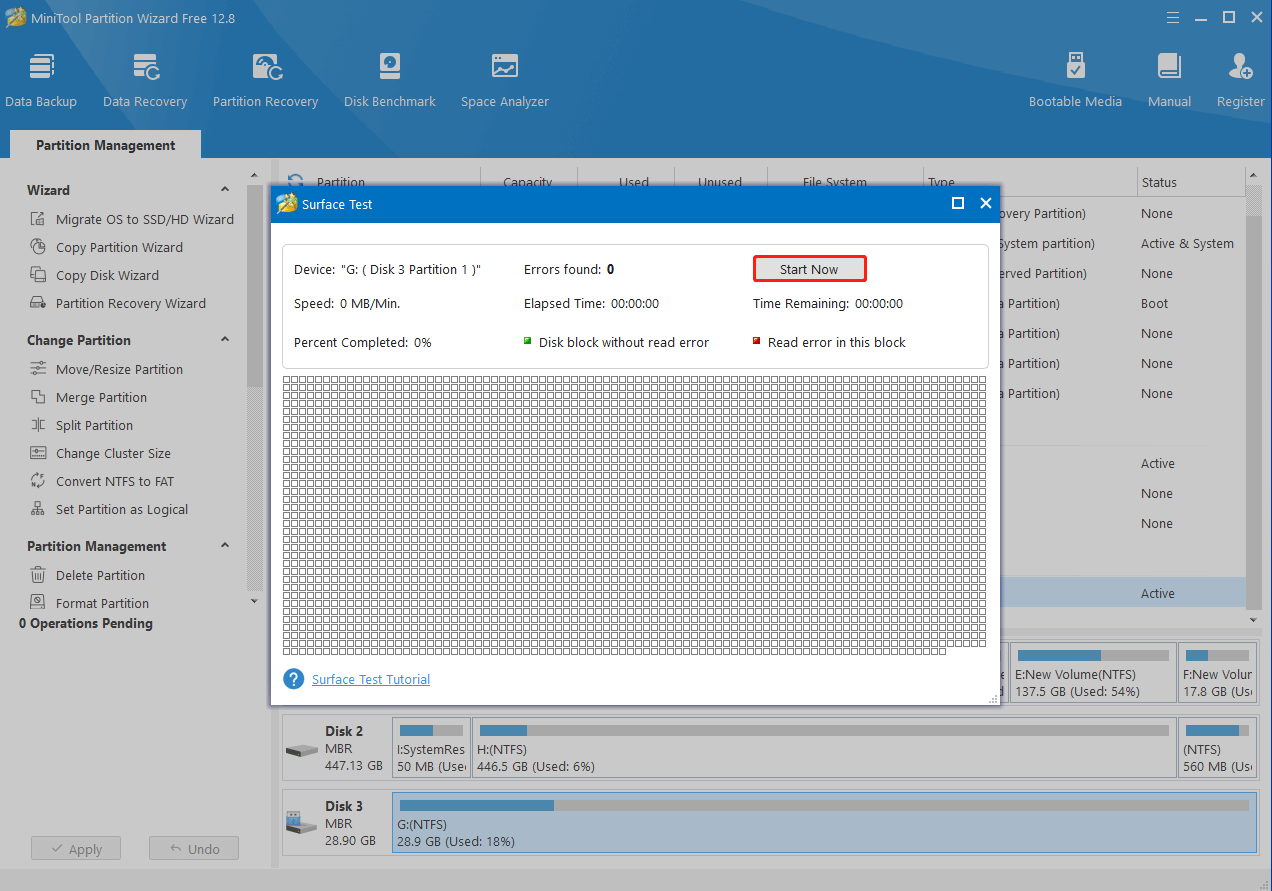
Step 4: To check bad sectors, highlight the SD card in the main interface of MiniTool Partition Wizard and select Surface Test from the left action panel.
Step 5: In the next window, click Start Now to begin the scanning process. Then wait patiently until the process ends.
Fix 7: Update the Steam Deck
The outdated firmware software of Steam Deck is likely to trigger the “Steam Deck SD card games not showing up” issue too. On this occasion, you should try to fix it by updating your Steam Deck to the latest version. To do this, you can follow the given steps below.
Step 1: Make sure your Steam Deck has a stable and fast network connection.
Step 2: Press the STEAM button and then go to Settings > System.
Step 3: After that, hit Check For Updates under the UPDATES section in the right panel.
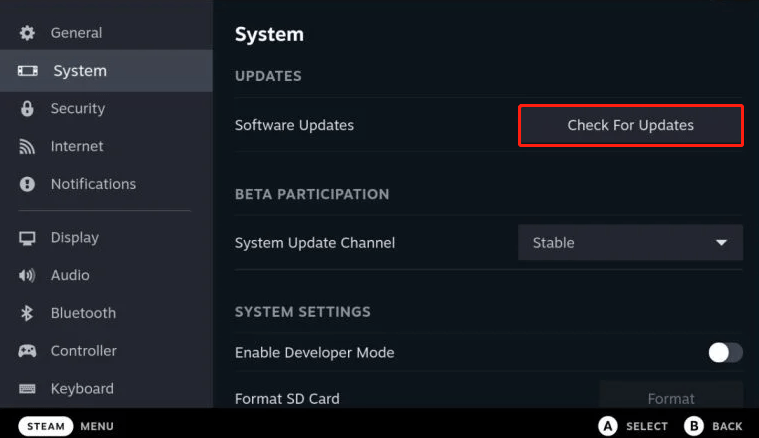
Step 4: If any updates are available, hit Apply after the desired update. Then the update will begin downloading and installing. Just follow the on-screen instructions to complete the operation.
Bottom Line
Is the Steam Deck SD card not showing up? If you are suffering from this issue, you can try to fix it with the above methods. If you have any other great solutions to the “Steam Deck not recognizing SD card” issue, please share them with us in our comment area. We’ll appreciate it much.
If you encounter any problems while using MiniTool Partition Wizard, you can send us an email via [email protected]. We’ll make an in-time reply as soon as we receive it.
![[SOLVED] Failed to Format Ext4 Windows? - Solutions Are Here!](https://mt-test.minitool.com/images/uploads/2018/12/format-ext4-windows-thumbnail.jpg)
