Dell Alienware laptop stuck on boot screen is not a new thing that you might meet when booting up your computer. Do you know how to boot your Alienware laptop without such issues? If you are looking for some solutions at the moment, you can scroll down this post from MiniTool Website to get more information.
Alienware Laptop Stuck on Boot Screen
You might not be familiar with Alienware, but you must know Dell. Alienware is an American computer hardware subsidiary of Dell and the product range of Alienware is dedicated to gaming computers. Like computers of other brands, you are likely to run into all kinds of issues like black screen, blue screen of death, stuck on the logo screen, and more.
Alienware laptop stuck on boot screen is one of them and it indicates that you are unable boot into Windows. Today, we will discuss how to fix Alienware laptop stuck on boot screen for you. If you have a similar problem, you can refer to this post to get some workarounds.
How to Fix Alienware Laptop Stuck on Boot Screen?
Fix 1: Run a Hard Reset
Some issues like Windows not loading, software freezing, a blank display, keyboard not responding and more can be fixed by performing a hard reset to your Windows machine. A hard reset, also known as a power reset, can clear all the information from the computer’s memory. This method is easy and safe to try because it only removes the memory data and keeps your personal data intact. To do so:
Step 1. Power off your computer and remove all attached peripherals like USB flash drives, printers, scanners, digital cameras, phones, optical drives, SD cards, and more.
Step 2. Remove the battery from the battery compartment and then press & hold the Power button for at least 15 seconds.
Step 3. Put the battery back and press the Power button again to boot your Alienware laptop without these external storage devices.
Fix 2: Run ePSA Pre-boot System Assessment
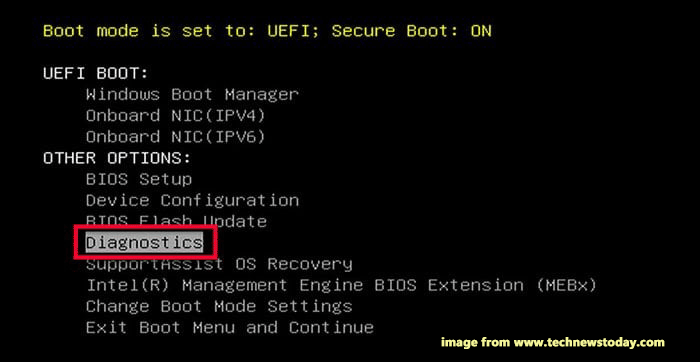
Luckily, Dell comes with a hardware diagnostic feature in BIOS called ePSA Pre-boot System Assessment. You can use this tool to check if the hardware components have any severe issues. To do so:
Step 1. Shut down your computer.
Step 2. After a while, press the Power button to reboot it. As soon as the logo screen appears, press the F2 key repeatedly to enter BIOS.
Step 3. Highlight Diagnostics and hit Enter to run ePSA Pre-boot System Assessment. After the process is done, you can replace the faulty hardware according to the test result.
Fix 3: Perform Automatic Repair
When your Alienware laptop gets stuck on the loading screen and cannot boot normally, you can make use of the inbuilt Windows repair tool – Automatic Repair or Startup Repair to fix this issue. Here’s the detailed tutorial:
Step 1. Press the Power button to switch off your Alienware laptop. After a while, power it on and press & hold the Power button to shut it down when you see the Windows logo. Repeat the process several times until you see the Automatic Repair screen.
Step 2. Click on Advanced options to enter Windows Recovery Environment (WinRE).
Step 3. Go to Troubleshoot > Advanced options > Automatic/Startup Repair to start the repairing process.

Fix 4: Boot into Safe Mode
Safe Mode only allows basic system programs and services to run at startup so that you can easily detect and repair some computer system issues including Alienware laptop stuck on boot screen. Here’s how to boot into Safe Mode:
Step 1. Repeat the first 2 steps in Fix 3 to enter Windows Recovery Environment.
Step 2. Click on Troubleshoot > Advanced options > Startup Settings > Restart.
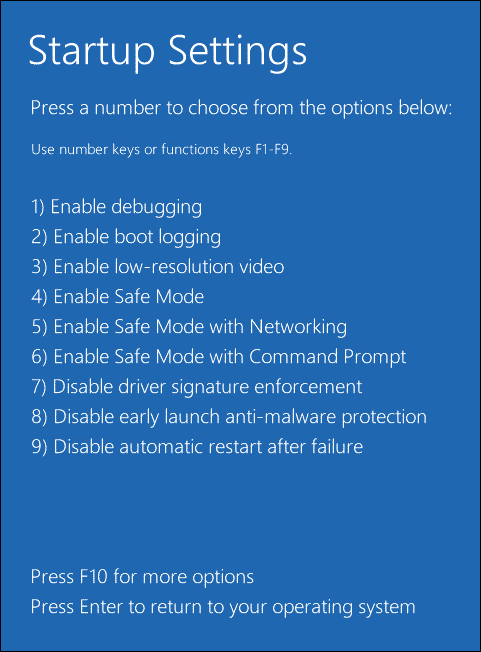
Step 3. Wait for your computer to restart automatically and press F4, F5, or F6 to enable Safe Mode in the Startup Settings screen. There are three Safe Mode options available for you:
- Enable Safe Mode – only starts Windows with the most basic components of your computer and extra programs or drives will not start.
- Enable Safe Mode with Networking – starts other components that are required for network services to run besides the basic system components.
- Enable Safe Mode with Command Prompt – is very useful for computer experts or maintenance personnel.
Once you are in Safe Mode, you can rely on some third-party antivirus software to scan, detect, and remove any virus or malware infection.
Fix 5: Change Boot Priority
If the default boot device is not your system hard drive, computer boot issues like Alienware laptop stuck on boot screen will also crop up. To fix it, you need to change the primary boot order to the system volume from the BIOS menu. Here’s how to do it:
Step 1. Restart your computer.
Step 2. Press the F2 key repeatedly at the Alienware logo screen to enter BIOS.
Step 3. Use the arrow keys to navigate to the Boot menu.
Step 4. In the Boot Option Priority section, select your system drive as the first boot device and hit Enter.
Fix 6: Reset BIOS to Default Settings
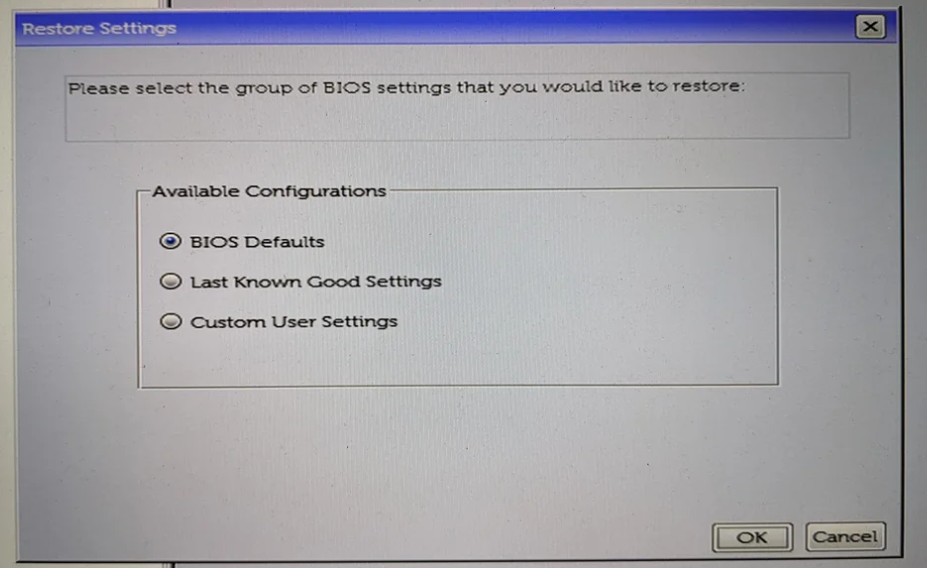
A failed update or malware attack might lead to a damaged BIOS, causing issues like Alienware laptop black screen with logo. In this case, resetting BIOS to default settings might be a good solution. To do so:
Step 1. Enter the BIOS menu of your Alienware laptop.
Step 3. Use the arrow keys to locate Restore Settings, tick BIOS Defaults, and hit OK.
Fix 7: Reset Your Alienware Laptop
When your computer has some severe system problems or runs too slow, factory reset might be a suitable way for you. This operation will wipe all your installed programs & drivers and return them to their defaults.
MiniTool ShadowMaker TrialClick to Download100%Clean & Safe
After making a backup of your data, it’s time to factory reset your Alienware laptop:
Step 1. Enter into WinRE.
Step 2. Navigate to Troubleshoot > Reset this PC > Keep my files > choose Could Download or Local Reinstall.
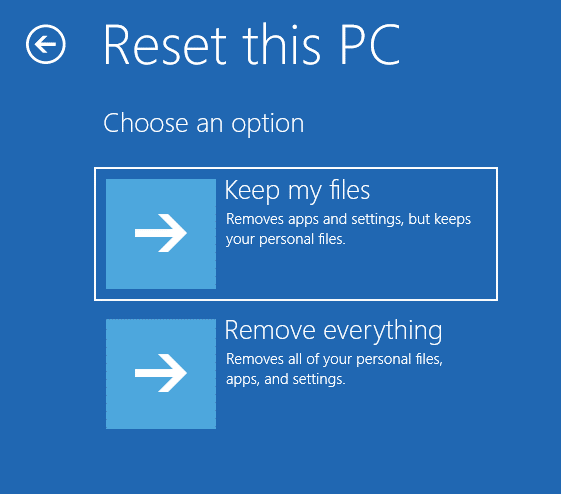
Step 3. Choose an account > enter your password > click on Reset to perform the factory reset operation.
Fix 8: Clean Install Windows
In addition to Reset this PC, you can also choose to perform a clean install of your Windows. Follow these instructions:
Move 1: Create an Installation Media
Step 1. Prepare a computer that can work normally and a USB flash drive with at least 8GB capacity. Go to the Windows Software Download page, select your Windows edition, and click on Download Now to get Media Creation Tool.
Step 2. Run Media Creation Tool and then accept the license terms.
Step 3. Tick Create installation media (USB flash drive, DVD, or ISO file) for another PC and hit Next.
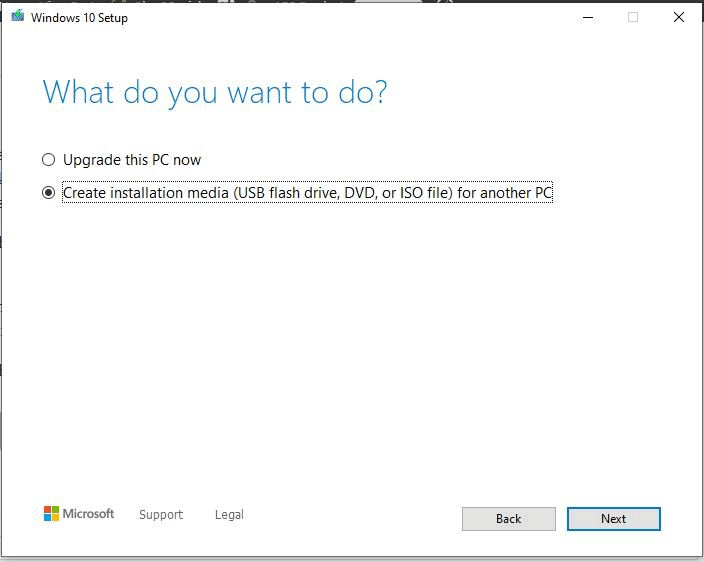
Step 4. Untick the Use the recommended option for this PC option and enter your language, edition, and architecture.
Step 5. Insert a USB drive into this computer, tick USB flash drive and select your USB drive.
Step 6. After the process completes, hit Finish to exit the tool.
Move 2: Reinstall Windows
Step 1. Insert the USB drive into your problematic Alienware laptop.
Step 2. Enter BIOS to change the USB drive as the default boot device.
Step 3. Boot your computer from this USB drive, pick your language preferences, and hit Next.
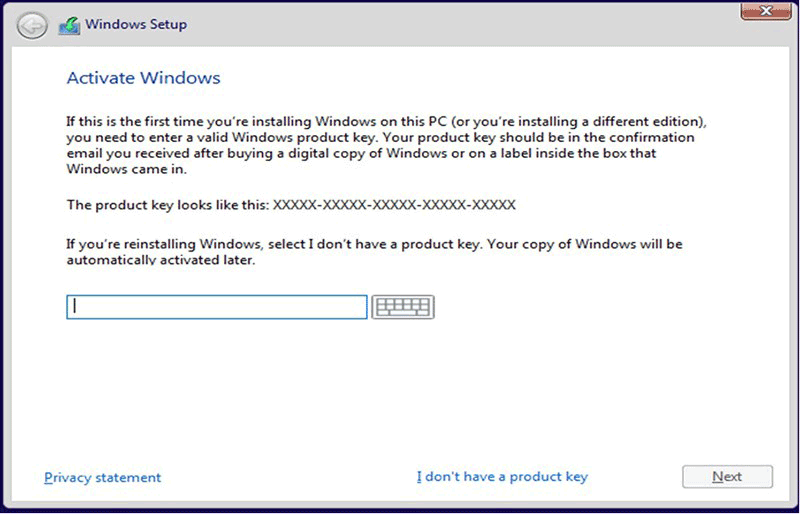
Step 4. Click on Install now> hit I don’t have a product key > select your Windows edition > hit Next.
Step 5. Press Custom: Install Windows only (advanced) > select the partition with the operating system > hit Next > follow the on-screen instructions to complete the installation.
Back up Your Alienware Laptop with MiniTool ShadowMaker
As you can see, multiple factors can lead to Alienware laptop stuck on loading screen and you might spend quite a long time to figure out the exact reason for your situation. Is there a better way to simplify your troubleshooting process? The answer is yes! You can back up your system regularly and restore it when needed.
To back up your system, a Windows backup software – MiniTool ShadowMaker is a top choice for you. This free tool can satisfy all your backup needs including backing up files, folders, systems, disks, and partitions. Also, you can run it to create a scheduled backup to develop a good habit of backup. Here’s how to create a system image with this tool:
Step 1. Launch MiniTool ShadowMaker and hit Keep Trial.
MiniTool ShadowMaker TrialClick to Download100%Clean & Safe
Step 2. In the Backup page, you can see your system is selected as the backup source by default, so you only need to choose a storage path for your system image in DESTINATION. Here, choosing an external hard drive or USB flash drive is more recommended.
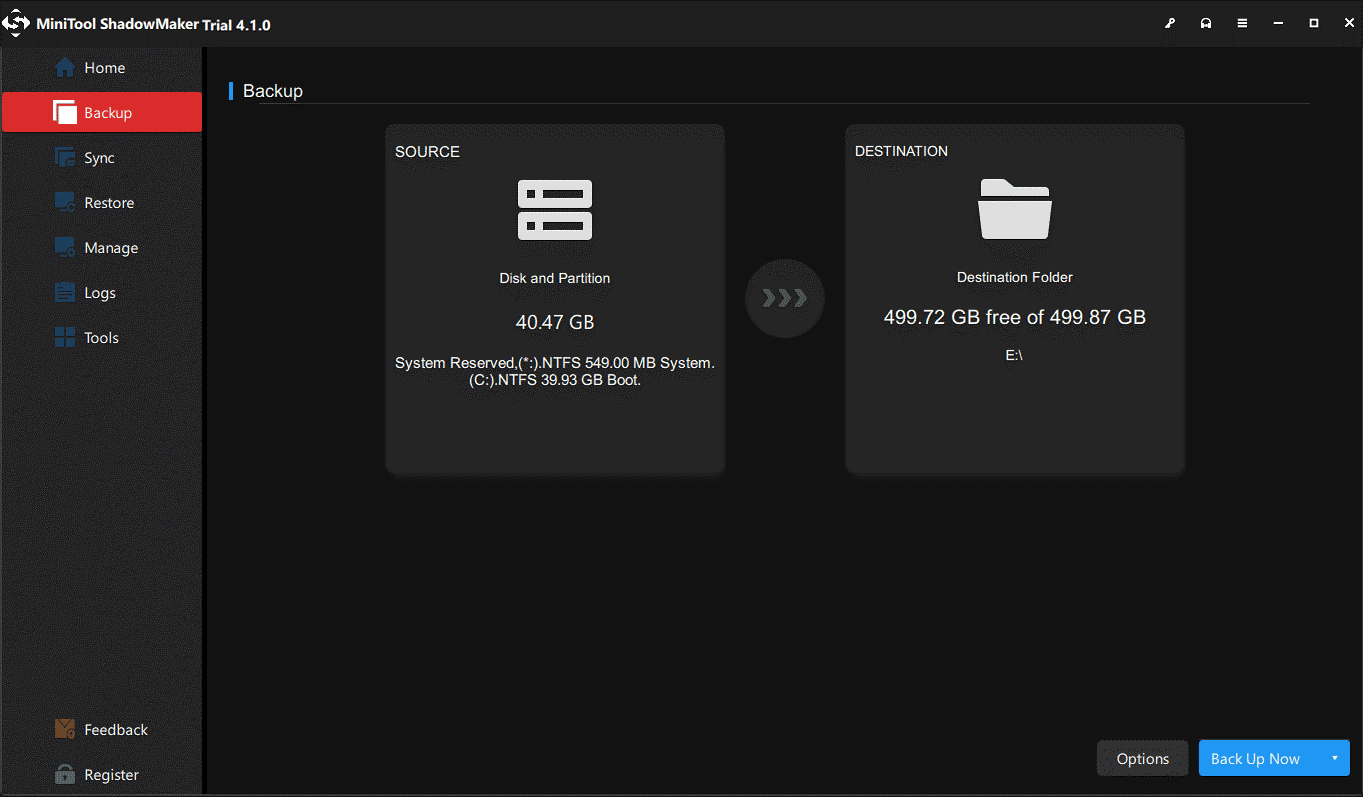
Step 3. Either click on Back Up Now to start the task immediately or delay the task by hitting Back Up Later. You can find the delayed task in the Manage page.
# Create a Bootable USB Flash Drive
After backing up your system, it’s time to create a bootable USB flash drive.
Step 1. Connect your USB drive into your computer.
Step 2. Launch MiniTool ShadowMaker and go to the main interface.
Step 3. In the Tools page, click on Media Builder > select WinPE-based media with MiniTool Plug-in > choose your USB flash drive as a media destination.
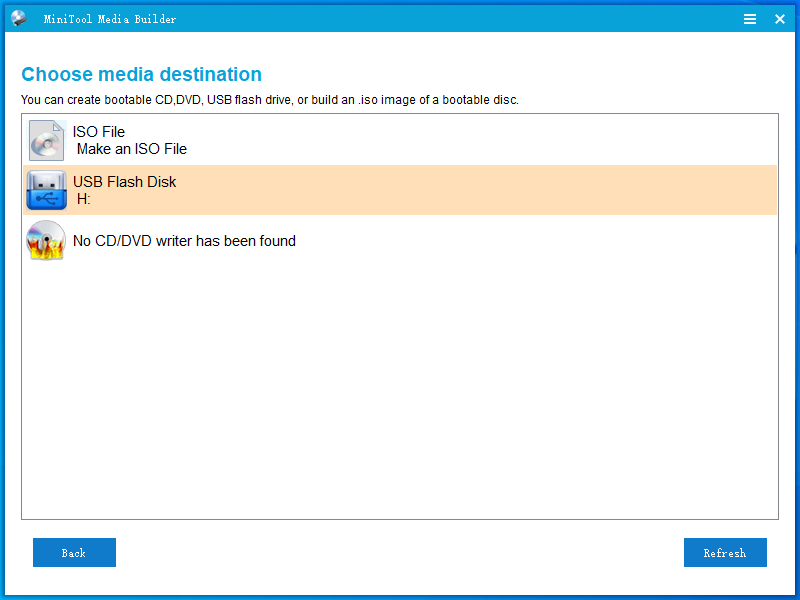
Step 4. Click on Yes in the warning message to confirm this action and wait for the process to complete. If your Alienware won’t boot to Windows in the future, you can boot your computer from this drive and perform system recovery with it.
We Need Your Voice
Why is your Alienware laptop stuck on Alienware logo? After reading this post, you may have the answer now. Besides, you had better back up your files and system with MiniTool ShadowMaker as prevention. For any suggestions and questions about our product, you can directly contact us via [email protected]. We are looking forward to your feedback!
Alienware Laptop Stuck on Boot Screen FAQ
Way 2: Press the Ctrl + Alt + Delete keys > press and hold the Ctrl key > hit the Power icon > hit Restart.
· For a bootable computer: go to Settings > Update & Security > Recovery > Get started under Reset this PC, and then follow the instructions on the screen to complete the rest process.
· For an unbootable computer: create a bootable USB flash disk > change it as the default boot device > boot your computer from this device > enter Windows Recovery Environment > go to Choose an option > Troubleshoot > Reset this PC.
About The Author

Position: Columnist
Aurelie is a passionate soul who always enjoys researching & writing articles and solutions to help others. Her posts mainly cover topics related to games, data backup & recovery, file sync and so on. Apart from writing, her primary interests include reading novels and poems, travelling and listening to country music.