Creating, editing, or deleting files is part of everyday life. There are times that your files get lost by accident or deleted by mistake. To retrieve your lost data, things will be much easier if you have a backup. This guide from MiniTool will offer you multiple ways to back up MSI laptop with ease.
Why Do You Need to Back up MSI Laptop?
MSI laptops are renowned for its robust gaming capabilities. Like any other computers, you might store crucial data or system settings on it. However, no one can guarantee that the data on your computer will be intact forever and data loss might occur at any time and any place. Typical factors that might trigger unexpected data loss include:
- accidental human deletion
- virus infection
- power outage
- hard drive failures
- system crashes
Once data loss occurs, you might realize the importance of MSI laptop backup. With the backup, you can easily retrieve lost files, folders, or even save an unbootable device without much time and cost. How to back up MSI laptop? Is there an effortless and time-saving way to do it? In the following paragraphs, we will show you how to back up your MSI laptop to an external hard drive or a USB flash drive with MSI Center Pro, Windows Backup app, Backup and Restore (Windows 7), and MiniTool ShadowMaker respectively.
Option 1: Back up MSI Laptop via MSI Center Pro
MSI Center Pro is tailored to optimize your system performance and user experience with a wide range of tools like Performance Analysis, System Analysis, One-Click Optimization, System Restoration, MSI Recovery, etc. You can utilize this program to back up MSI laptop to a USB flash drive. Follow these steps:
Step 1. Launch MSI Center Pro and click on System Diagnosis.
Step 2. Move to the MSI Recovery page and tap on Start.
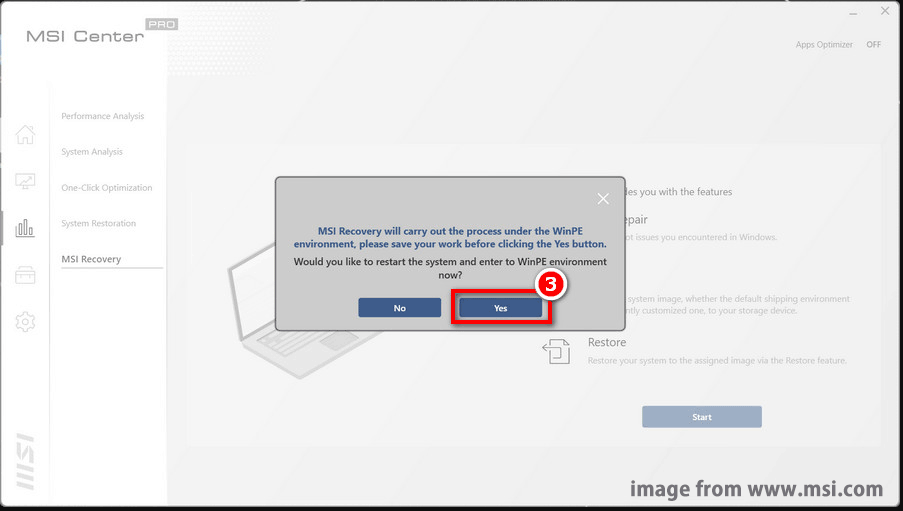
Step 3. Then, a prompt will pop up to inform you that it will restart your computer and enter to WinPE environment. Click on Yes to confirm this operation.
Step 4. Plug the MSI Image Backup disk and an empty USB flash drive. In the WinPE menu, select Backup.
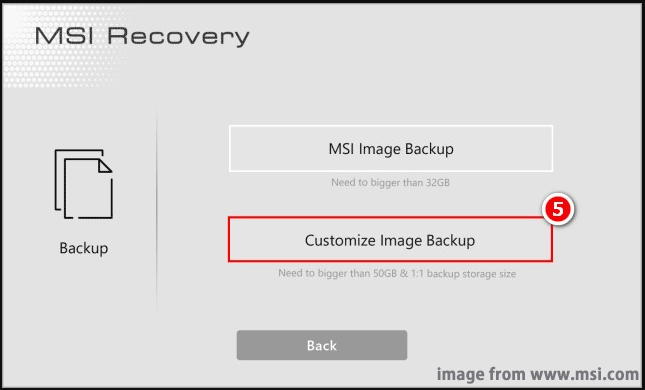
Step 5. Then, there are 2 options for you:
- MSI Image Backup – creates a MSI Image Restore disk that can restore your computer to the factory defaults.
- Customize Image Backup – backs up the current operating system including all your files and settings.
In terms of the restoration process, the former will restore your OS to the factory status and delete all the data, while the latter is similar to a system restore point that restores the system to a previous state in which it was running perfectly. Since here we need to back up MSI laptop, choose Customize Image Backup to continue.
Step 6. Select your USB flash drive to store the customized image backup file and wait for the process to complete.
Option 2: Back up MSI Laptop via Windows Backup App
Microsoft Windows comes with a new inbuilt Windows Backup app that supports back up crucial items including files from Desktop, the Documents folder, the Picture folder, installed apps, pinned app preferences, accounts, Wi-Fi networks and other passwords to the OneDrive server. While it’s worth noting that OneDrive only offers 5 GB of free cloud storage. If you have sufficient budget for the cloud backup service, follow these steps:
Step 1. Type Windows Backup in the search bar and hit Enter to launch this program.
Step 2. Then, the Windows Backup will list all the items that it backs up to the cloud. Tap on Back up to start the process.
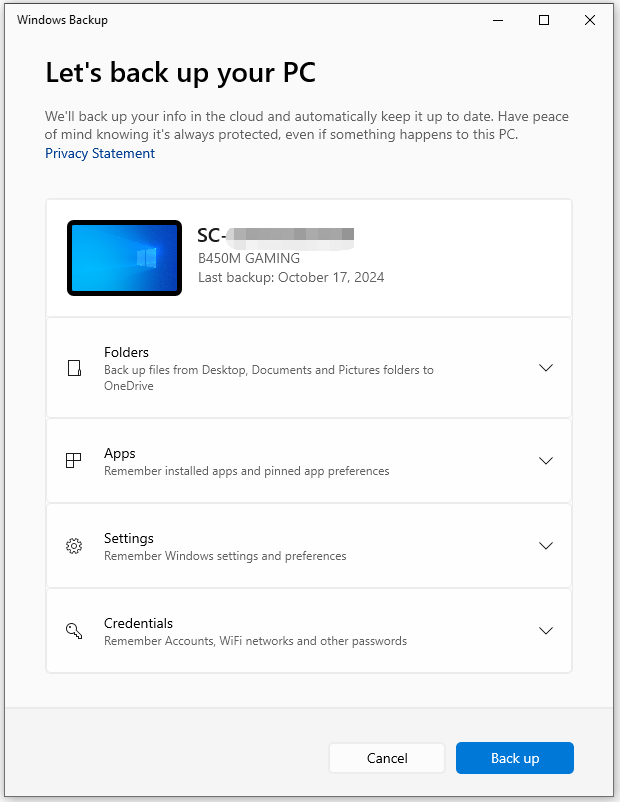
Step 3. To configure more backup options or preferences, go to Windows Settings > Accounts > Windows backup.
Option 3: Back up MSI Laptop via Backup and Restore (Windows 7)
Backup and Restore (Windows 7) is also a commonly used tool for data backup and system backup. You can back up data on local drives, external drives, or even on a network drive. Now, follow these steps to back up your MSI laptop:
Step 1. Open Control Panel.
Step 2. Click on System and Security > Backup and Restore (Windows 7).
Step 3. Click on Set up backup if you never created a data backup with this program before. If you have backed up data with it, hit Manage settings.
Step 4. Select where you want to save your backup and click on Next to continue.
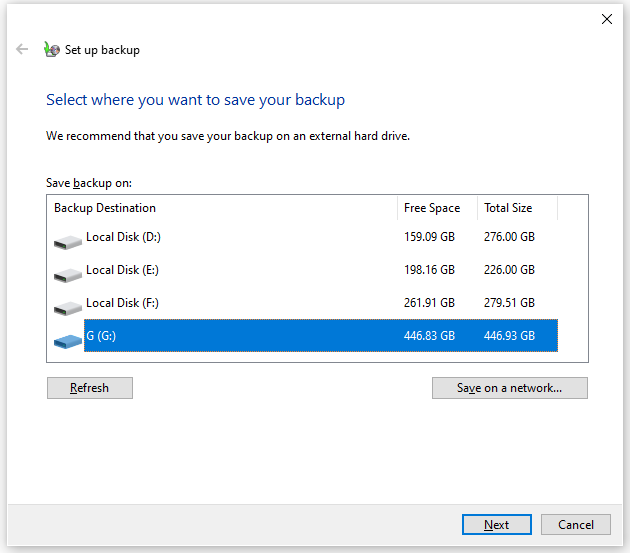
Step 5. In the What do you want to back up window, you can select either of the options below as per your actual needs:
- Let Windows choose (recommended) – backs up all default Windows folders and files in Libraries as well as the system image.
- Let me choose – specifies desired files and folders and whether to include a system image in the backup.
Step 6. After making your choice, click on Save changes and run backup to start the task.
Option 4: Back up MSI Laptop via MiniTool ShadowMaker
To back up your MSI laptop or laptops of other brands, MiniTool ShadowMaker is well worth a go. This is a piece of PC backup software that supports backing up various items on your computer including personal files, the operating system, selected partitions, or even the whole disk.
As with most backup programs, this software offers you with a 30-day free trial and paid version. Moreover, it is lightweight and user-friendly. Even if you are not computer literate, you can master this program and backup data with ease. Here’s how to back up a MSI laptop with it:
Step 1. Download and install MiniTool ShadowMaker Trial Edition. After installation, launch this freeware to enter its main interface.
MiniTool ShadowMaker TrialClick to Download100%Clean & Safe
Step 2. Go to the Backup page. As you can see, the system-related partitions are selected as the default backup source, so you only need to select a storage path for the backup image in DESTINATION.
Also, you can alter the default backup source in the SOURCE section if you want to back up other items like files, folders, partitions, or the whole disk.
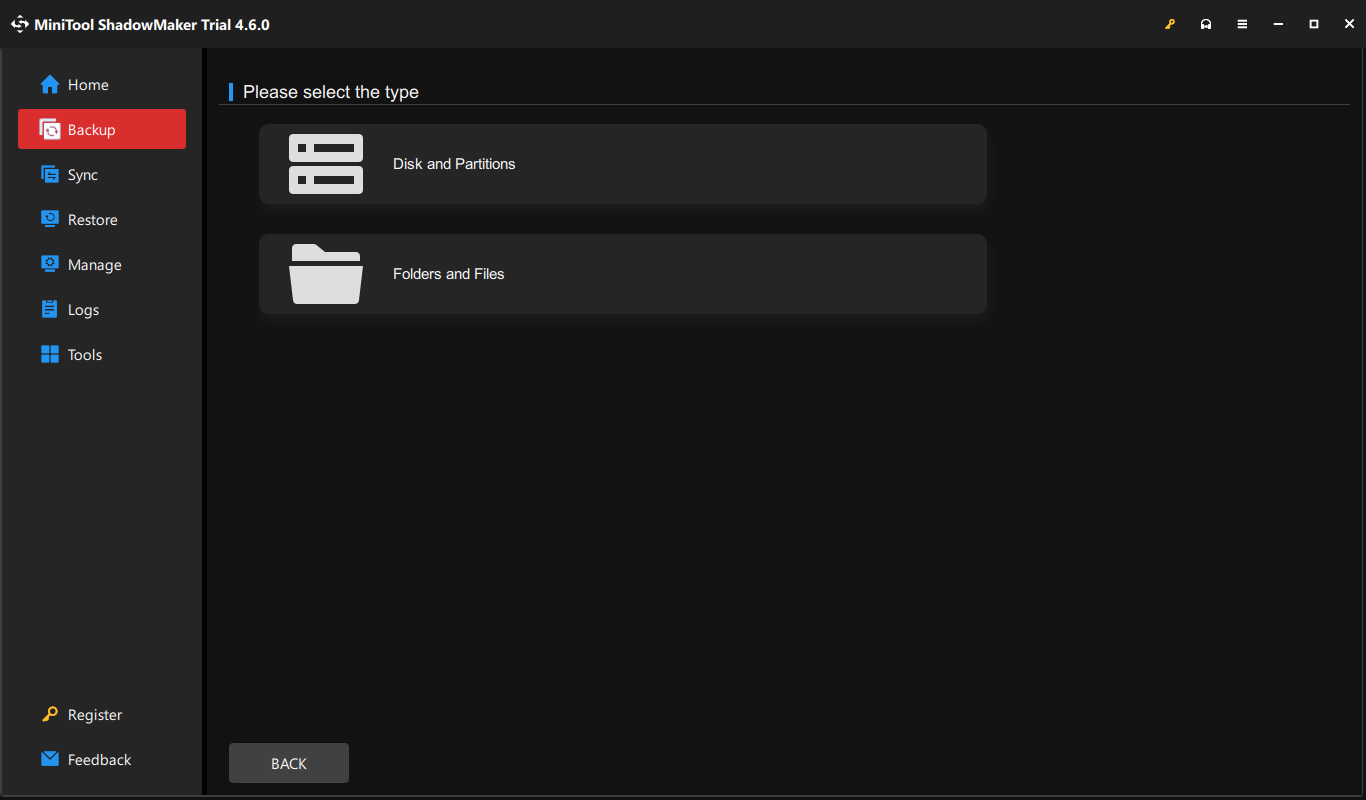
Step 3. Click on Back Up Now to start the process at once.
Create a Bootable Device with MiniTool ShadowMaker
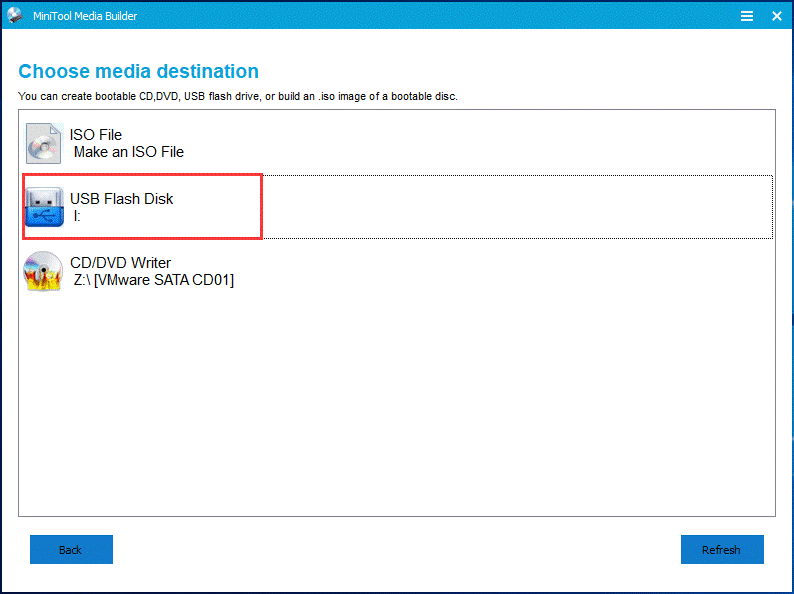
Beyond that, MiniTool ShadowMaker can also create an emergency recovery disk that remedies an unbootable Windows device. To do so:
- Go to the Tools page and select Media Builder.
- Select WinPE-based media with MiniTool plug-in.
- Choose a USB flash drive, USB hard drive, or CD/DVD writer.
- Confirm this operation and wait for its completion.
MSI Center Pro vs Windows Backup App vs Backup and Restore vs MiniTool ShadowMaker
After puzzling out how to backup MSI laptop with the 4 tools above, some of you might still have no idea about which one you should choose. Don’t worry. Here’s a quick comparison of the 4 MSI laptop backup tools:
| MSI Center Pro | MiniTool ShadowMaker | Windows Backup App | Backup and Restore (Windows 7) | |
| Preparation before Backup | a MSI Image Backup disk a USB flash drive (more than 50 GB) | sufficient free disk space to store the backup image file | a Microsoft account enough cloud storage stable internet connection | an external hard drive or DVD/CD |
| Backup source | the current OS | folders and files partitions systems disks | folders apps settings credentials | files operating system |
| Backup destination | USB flash drive | HDD/SSD external hard drive USB flash drive | OneDrive cloud server | external hard drive DVD/CD |
| Supported laptop brands | MSI laptops only | all Windows computers | all Windows computers | all Windows computers |
| Supported OS | Windows 10 version 17134.0 or higher | Windows 11/10/8.1/8/7 Windows Server 2008/2012/2016/2019/2022 | Windows 11/10 | Windows 7/10/11 |
We Need Your Voice
How to back up your MSI laptop effortlessly? This guide introduces 4 powerful PC backup software for you – MSI Center Pro, Windows Backup App, Backup and Restore (Windows 7), and MiniTool ShadowMaker. Which one do you prefer? Personally speaking, the last option is more favored because it offers greater flexibility, a more customizable backup solution, more robust features, and better disaster recovery capability.
MiniTool ShadowMaker TrialClick to Download100%Clean & Safe
Do you have any problem about our MiniTool backup software? If yes, don’t hesitate to share your ideas with us via [email protected]. We are looking forward to receiving your feedback! Appreciate your time and support!
Back up MSI Laptop FAQ
For MSI Image Backup, it takes one or two hours to complete the whole process.
For Customize Image Backup, it depends on the size of your system because this process will back up all your personal files and customized settings.
